Five simple options
There are no identical tears, damage to clothing, or holes, and there are many options for how to beautifully sew them up with embroidery. It is better for beginning craftswomen to use simple ones first.
Fantasy approach
If the location of the hole allows, you can not cover it with a patch or embroidery, but turn it into a decorative element. We give it the correct round shape, we process the edges manually with a buttonhole or overcast stitch (over the edge).
When processing the edges, we place the stitches as close to each other as possible so that the fabric does not unravel under the load when wearing the item. You can reinforce them with adhesive-based interlining or thin braid.
After the hole is processed, we add decor around it - we embroider flowers, stars, geometric shapes.
Bright rectangles
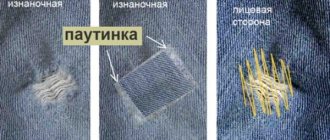
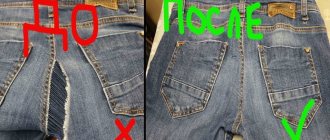
You can beautifully sew up a hole in jeans using a technique that imitates patchwork sewing.
Draw a rectangle or square on the fabric around the damaged area. You can draw with chalk or a dried bar of soap with sharp edges, or a thin felt-tip pen to match the fabric. Within the framework of the resulting figure, we lay a base-mesh, preferably diagonally. Then we lay another layer of thread across the stitches already made, bringing the needle alternately from above and from below, sometimes catching the fabric of the item.
A scattering of sparkling beads
On a T-shirt or knitted sweater or skirt, you can beautifully sew up a hole with beads. Such embroidery does not necessarily have to have a clearly defined shape. Let go of your imagination and create.
First, select a base - beads of different shapes, but of similar shades, so that the picture does not hurt the eye. The color should also match the color of the fabric on which it will be sewn. A sharp contrast will not only not smooth out the defect, but may even emphasize it.
Small colored elements
Do you have experience with cross stitch or satin stitch? Great! For those who are trying their hand at darning or decorating items from their wardrobe, this is an excellent opportunity to beautifully sew up several small holes that are often left by moths.
“Scatter” small cheerful spots all over your dress, leggings, turtleneck or even children’s tights. They can be monochrome or several shades. The main thing is that they echo each other.
Japanese technique "sashiko"
Translated from Japanese into Russian, the word “sashiko” means “small injections.” And we will act precisely on this principle. We will create the pattern and embroidery at the hole site or around it using small hand stitches.
When using this darning technique, a hole or tear must be closed or reinforced with a piece of material. It can be the same color as the fabric, or a contrasting shade, with a pattern or pattern.
We apply the patch from the inside out, fix it with a running stitch, without tightening the thread, or with sewing pins. Around the hole we lay several lines with a small stitch at the same distance from each other. Parallel lines can be replaced with crosses or ornaments.
After finishing the work, remove the running seam that secures the patch.
Some useful tips
It is worth listening to the advice of experienced housewives:
- Be sure to turn the item inside out when you plan to sew it up. The front side of the item must be made perfectly, with invisible seams and knots.
- A seam ripper will be a great help when removing unnecessary stitches.
- Store needles correctly. They should be stuck into a pad or paper.
- Try to work on your own mistakes, because the first attempt may not always be successful.
- The thread should always be matched.
- Be sure to finish the work with the correct stitches, because if you leave the thread and do not fix it in any way at the end, the seam will simply fall apart.
If you are very worried and afraid to sew up the item yourself, then it is better to contact a tailor shop that will readily solve all problems with torn clothing.
Star on socks
Thrifty housewives never throw away socks or children's tights that have a small hole in them. They have many ways to sew it up beautifully and turn a damaged item into a designer item. One option is to decorate this place with embroidery in the form of a star.
The step-by-step instructions are very simple. Take sewing thread and a needle. The threads should be thick enough, in a contrasting color with respect to the thing we are “repairing”. We use wide stitches to designate a six-pointed star. Its boundaries should “depart” from the edges of the hole in the fabric by at least 0.5 cm.
When the first star is ready, we embroider the second, but it will be slightly smaller than the first. The second is followed by a third, a fourth, and each one is slightly smaller than the previous one. We repeat the steps until we “get” to the center.
The last step is to secure the decorative element. We lay several stitches along the diagonals between the rays of the star.
We make a knot on the wrong side of the item. We take the needle and thread inside out, turn the sock or tights inside out, make a knot and cut off the thread.
How to sew up a hole without being noticed
Knitwear is an elastic non-woven textile fabric. Products made from it differ from most woven ones in being more plastic and elastic. This significantly increases comfort during their operation. Household knitwear is divided into the following categories:
- underwear (women's, men's, children's, sports underwear);
- light outerwear (blouses, skirts, dressing gowns, pajamas, women's suits);
- warm, sporty outerwear (sweaters, jackets, ski and tracksuits);
- stockings, socks;
- shawls, scarves;
- faux knitted fur;
- batting.
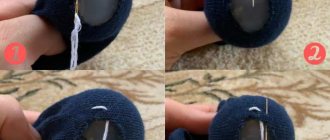
There is one universal and very quick method that will help disguise a flaw on knitwear of any category. To do this you will need a hand needle and thread of a suitable color. Step-by-step instruction:
- Thread the thread into the eye of the needle and tie a small knot. Pass the needle inside out through the hole, leave the knot there, do not turn the knitted item itself inside out.
- Begin stitching the hole closed, picking up one edge and then the other.
- Finish the seam, pull the thread until the thread goes into the seam, becoming invisible from the front side, without pulling the fabric. You can always stretch the seam to the sides to straighten the thread a little.
- Bring the needle inside out and secure the thread.
Leaves using Brazilian technique
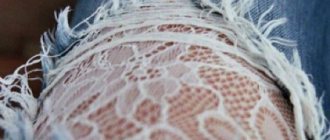
Often the fabric is not torn, but frayed, and such a hole can be decorated using the Brazilian leaf embroidery technique. By the way, it is applicable for restoring any things - this way you can sew up a leather jacket, jeans and even tights. The result is not only beautiful, but also original.
There are two options for creating such a patch decoration. The first one is with a “flying” stitch. We fix the previously damaged area with a patch on the wrong side. Then, in the area of the fabric tear, draw a leaf and mark its middle. You can start decorating:
- make the first stitch at the top of the future leaf;
- in the middle of the stitch we make another short transverse one, slightly pulling the main one downwards;
- “we walk” in this way until the entire figure we have drawn is filled with threads;
- We make the fastening knot from the inside out.
The second option is to use a fishbone suture. As in the first option, we fix the hole with a patch and draw a sketch of a leaf indicating the middle. Then we make stitches from the edge of the figure to the middle, with each of them slightly extending beyond the line.
Heart patch
Embroidery of this shape will decorate any thing. And it’s quite simple to make, and darning will take minimal time. In addition, even beginning craftswomen will get a beautiful heart without “training.”
Before sewing up the hole, you need to mark an even circle and a heart around it. You can do this either with your own hands or using a pre-prepared stencil.
Description of actions step by step:
- We make the first stitch from top to bottom strictly in the middle of the heart;
- we bring the needle and thread from the wrong side to the front side on the left approximately in the middle of the figure;
- “return” down to the center and from the wrong side we make a stitch on the right, again to the middle of the stencil;
- We begin to embroider according to this principle, placing each stitch higher than the previous one so that the threads lie close to each other.
As an option - a patch in the shape of a ladybug. We make it using almost the same principle as the heart. We draw a figure on the fabric and sew it with even, tight stitches. The difference in the technique is that we embroider each part of the “cow” using satin stitch, the stitches do not intersect with each other. We use two colors – red and black. The back will be red. We decorate the spots on it, nose and paws with black.
Curly darning – squares, flowers
Masking defects on fabric using embroidery is a very extensive part of needlework. Dreaming craftswomen have come up with and use many options for such figured darning. The simplest of them are geometric figures and plant motifs, which can be completed in a few minutes.
To create a square at the tear site, we make cross stitches. With each new step, making a puncture next to the previous one, we will “move”, closing the hole and interweaving the threads.
The patch can not just be sewn on, but secured with stitches in the shape of a flower. We fasten a piece of fabric with running stitches and begin sewing. We make a puncture with a needle in the center of the patch, bring the needle outside it and wrap the tip with thread, pulling the needle out. We get a curly loop stitch that imitates a flower petal. We repeat the actions in a circle. We secure the middle with yellow threads. The charming daisy patch is ready.
On leather that doesn't fray like regular fabric, making a flower is even easier. We place petal stitches around the hole, fill the center using the Japanese technique of darning - we make a “frame” of threads, then intertwine them with transverse stitches, bringing the needle either from above or from below.
More details in the video tutorial:
Don't rush to throw away things that have small holes or scuffs. Take advantage of the experience of experienced craftswomen and turn old T-shirts, jackets, jeans into designer items.
What to do if your tights are torn while not at home?
Force majeure situations often arise when the thin material of tights breaks due to accidental contact with an uneven surface, inaccurate pulling up, or snagging on accessories or clothing parts. You can correct the situation and stitch it up if the tear or tightening has formed in a not very noticeable place and is small in size.
Advice! Always carry a spare pair of nylon tights in your purse, which will save you a lot of hassle. Situations are different, but it is easier to change tights than to frantically look for means to sew up an accidental tear.
Salvation from the inevitable huge hole should be sought in fastening agents that will prevent it from spreading and hopelessly ruining the image.
- PVA glue or Moment. Work around the edges of the hole in the tights to “seal” loose loops and prevent arrows.
- Nail polish. It is better to always have a transparent varnish in your purse: the stain from it is invisible and will allow you to quickly fix a tear in nylon tights.
- Hair fixation spray. Apply the spray to the problem area and let dry.
- Toilet soap. Rub bar soap over the gap and let dry. This way you can prevent the hole from spreading.
A small life hack: before putting on nylon tights, varnish them completely, then the nylon will be stronger and less susceptible to tearing.
Unfortunately, such emergency measures will only help in situations with small arrows and holes in inconspicuous places. If the tights are badly torn, it is better to find a new pair.