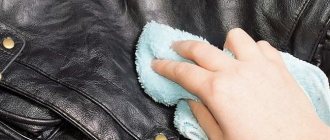
The formation of holes in your favorite clothes is always a disappointment, but do not be sad, every item can be restored. How to glue polyester? - to do this, you need to take a small piece of fabric, carefully insert it inside and straighten it, after which you should insert a special strip for gluing there. Such stripes can also be found under the name “cobweb”. The edges of the hole are connected and ironed on top.
Here it is important not to forget that polyester does not like high temperatures, and turn on the “silk” mode. The entire product is ready to wear (except in cases where the strip cannot be inserted).
Types of damage
Even deliberately damaging a tent can be very difficult, but in the forest almost anything can happen. The most common reasons that lead to a tent being sealed are:
- thermal damage - burning the tent with coals from a fire or a cigarette;
- wear and tear – prolonged use, careless operation;
- mechanical damage - ruptures, cuts, punctures.
Each type of damage has its own repair method, because they are very different from each other. However, minor “injuries” can be eliminated without much effort right in nature.
How to cover a hole with applique?
Patches, applications and stickers ideally mask all visible flaws in a product and help update old items. You can choose any suitable sticker to suit your taste and use a creative approach. The main thing is that it fits into the overall look, for example, for children's clothing you can choose a patch with cartoon characters, and to repair men's clothing, you need a strict patch to match the product. So, once you've found the perfect patch, it's time to attach it to the fabric. You can do this in two ways:
- Sew on.
- Glue it.
If you have a fabric overlay, it should be sewn to the bologna. This is done like this:
- We trim the edges of the ugly hole and cut off all excess.
- On the inside, glue or sew any piece of fabric.
- Apply the patch on top so that it completely covers the slot.
- Carefully sew along the edges.
- Ready!
If you use a thermo-adhesive badge, then everything will be easier and faster with it. Follow these instructions:
- Repeat points 1, 2 and 3 from the previous list.
- Cover the badge with some cloth.
- Heat the iron to maximum power and apply it to the patch through the fabric for literally 5 seconds.
- That's all! A fashionable and reliable patch is glued on.
How not to carry out repairs
Now you know well how to seal a tent at home. However, so that you don’t make common mistakes during the work process, let’s look at the two most “harmful” repair methods, which should not be resorted to even if the leak is temporarily eliminated.
Never sew the edges of the awning to the hem. This method will not save the tent from leaking, but most of the tent will be damaged by needle punctures. This sounds quite simple, but many people neglect this rule and, instead of quality repairs, only make things worse.
It is also highly recommended not to cover any damage with “silver” tape. The effect of such a patch will be temporary, since the tape is unlikely to last more than two days, but the remaining adhesive substance will be extremely difficult to remove from the surface. Sometimes such glue comes into contact with a moisture-resistant coating, after which it is completely absorbed into the fabric. In this case, there is only one thing left - complete replacement of fragments of the damaged fabric with new fabric.
Invisible seam No. 1 – “Ladder”
The first option of a hidden seam will be appreciated by lovers of all kinds of life hacks. It's all about the speed of its execution and versatility.
The ladder stitch is indispensable in the following situations:
- the item is torn at the seam;
- you need to sew together the parts of the product;
- sew the lining onto the jacket;
- sew a stuffed toy, belt or other product that turns inside out through the hole.
Invisible seam pattern:
We make the seam step by step:
- First of all, iron the seam allowances to the wrong side. We will sew by passing the needle and thread exactly into the fold.
- Thread a needle with a thread matching the color of the fabric and tie a knot at the end.
- Place the needle and thread under the seam allowance and pull it out at the edge of the piece to be sewn from the front side. The knot will be hidden in the fold.
- Insert a needle into the edge of the second piece opposite the first puncture. Under the fold, on the wrong side, make a small stitch (0.5 cm).
- Pierce the opposite side. The needle should go exactly into the edge of the fold. The punctures are located opposite each other. Sew a 0.5cm stitch under the seam allowance.
- Repeat until you have completed 4-5 stitches.
- Slowly pull the thread, tightening the edges of the parts.
- Continue sewing in the same manner until the end of the folds.
- Secure the thread with a knot and cut the thread.
A clear example of how an invisible seam is made:
Indistinguishable from machine stitching!
Video instruction:
Invisible seam No. 2 – “Emergency”
The second hidden seam can help out in an unforeseen situation. For example, a hole appeared right before an important event, but there is no time to repair the product. You can sew it up with an invisible seam directly on yourself.
Step-by-step instruction:
- Thread a thread matching the color of the item into the eye of the needle. Tie a knot at the end of the thread.
- Thread the needle through the hole. Bring it out at the edge of the hole, leaving a knot on the wrong side.
- Using a needle, pick up several threads of fabric from one side of the hole and then from the other.
- Pull up the thread.
- Having retreated a few mm, again pick up the fabric at the edges of the hole and pull it off.
- Continue until the hole is completely sewn up.
- Make a knot and cut the thread.
The photo clearly shows how an “emergency” blind seam is performed.
In the master class, the thread is used in a contrasting color so that the viewer can see the details of the process. If you match it to the color of the product, the seam becomes more invisible.
Video:
General tips for repairing clothes
- Non-woven tape is selected according to color: for a light jacket - white, for a dark jacket - black.
- Threads for blind seams must exactly match the color of the clothing material.
- The fabric should be carefully straightened when attaching a patch or applique.
- Fabric patches must first be secured with pins - this technique will prevent the decorative element from being sewn crookedly.
- Small burnt areas can be disguised with satin stitch embroidery. The main thing is to choose tone-on-tone threads.
- When patterning a decorative pocket, it is worth adding a few millimeters to the hem.
- You can mark the place where the decorative element will be patched with a piece of soap.
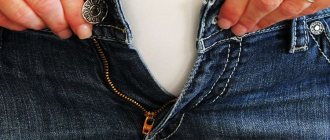
- In case of masking a cut with a zipper, it is better to stitch the product on a sewing machine.
- It is not possible to stitch - it is worth buying special rivets (holniten). They are sets of caps and parts with a thin stem that are inserted into each other. They are used to secure pockets, zippers and other parts. Installation requires a special tool or hammer and a flat surface.
Renewing a down jacket at home
Among other things, you can get creative and show your imagination. To cover awkward holes and update a down jacket, you can use a lot of things, for example, buttons, snaps, rivets, embroidery, pebbles, sequins or other decor. They can be attached to pieces of fabric and then sewn onto the jacket. You can create any pattern - either symmetrical, on both sides of the garment, or single.
As you can see, all of the above methods are quite simple and do not require a lot of effort and money. With these simple methods you can give a “second life” to torn outerwear yourself, without turning to specialists for help.
Accessories for decorating a jacket
For decoration (and camouflage) you can use the following accessories:
- Store emblems and adhesive-based patches (check with sales staff to see if the material is suitable). Consider the location. For example, such decor would look more appropriate on or near pockets, on a sleeve or on the back at the level of the shoulder blades.
- Decorative ribbons (same recommendations).
- Metal or plastic accessories: buttons, rivets, eyelets, buttons, zippers and so on.
- Iron-on adhesives.
- In specialized stores you can also find specialized repair kits for certain types of outerwear.
Raincoat tent repair
To seal a raincoat tent, you need to have the same tools available as in all previous cases, adding only a few cotton swabs to this list. It is worth pre-treating the surface of the tent with water and any degreaser, and then leaving the tent indoors to dry. It is advisable to have a fan heater or radiator nearby.
After a few hours, apply polyurethane glue to the damaged surface. To ensure the layer lays evenly, use cotton swabs. Moreover, the treatment should be carried out on both surfaces to be glued, carefully lubricating the fabric along the edges. During gluing, it is necessary to maintain a technological pause, carefully and accurately pressing the surfaces against each other. It is necessary to make maximum efforts, since the strength of the fabric connection depends on this.
What kind of glue will help?
When choosing glue for repairing a jacket, you must be guided by several principles. The composition should be:
- waterproof;
- elastic;
- colorless;
- resistant to light and temperature changes;
- do not change the structure of the fabric;
- have a thick consistency;
- do not spread;
- Don't freeze instantly so you have time to make changes.
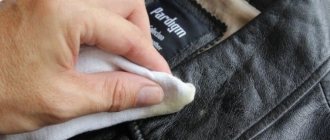
Among the wide variety of adhesive compositions, you can choose an option suitable for a specific fabric and the nature of the tear.
Polyurethane
This type of glue reliably connects surfaces because it is made on a synthetic basis. It is produced in hard and elastic form. The second option is suitable for repairing jackets, down jackets and other fabric products. It has high adhesion and excellent resistance to temperature changes.
Polyurethane glue performs equally well at temperatures from -50 ⁰С to +120 ⁰С.
Rubber
The adhesive composition, which is based on rubber, is highly elastic and can be used to work with leather, fabric, rubber, glass, and wood. Latex rubber adhesive contains casein, which gives it additional elasticity and water resistance. Seams can be glued with styrene rubber-based glue. The composition, which includes natural rubber, is used to glue leather and fabrics together. It has high elasticity.
Polyvinyl acetate
This type of glue is well known to users as PVA. It can be used for fixation “temporarily” and “permanently”. Usually this glue is washed off after washing, since it does not tolerate moisture. But currently they produce polyvinyl acetate glue with high moisture-resistant characteristics. If desired, you can even find two-component adhesive compositions on sale that can withstand direct contact with water. They are best suited for repairing down jackets and down jackets.
- How to sew up a hole so that the seam is not visible or with a hidden seam - step-by-step instructions
Neoprene
Neoprene adhesive makes it easy to make on-site repairs. It dries in less than a minute and forms a strong bond that is flexible and durable. An adhesive composition based on neoprene can easily withstand elevated temperatures and is recommended for gluing elements made of leather, fabric, and rubber. The glue is transparent, waterproof, and can be used to repair jackets and down jackets.
Hot melt adhesive
Safe and non-toxic hot melt adhesive can be used to glue fabrics together. It is applied using a glue gun, which allows the composition to be distributed evenly over the surface. Hot-melt adhesive takes the form of rods that are melted in a gun, or powder for preparing the adhesive composition. The advantage of hot-melt adhesive is its speed of action.
Adhesive aerosol
The difference between aerosol glue and other types is that it can be applied using a spray can. The sprayer allows you to create an even layer of glue and fix materials in places that are difficult to reach for other types of glue. The connection it creates is elastic, the can is sealed, and the consumption is economical. You can apply several layers of adhesive. Complete drying occurs after 20 minutes.
Polyvinyl chloride
This type of glue is produced in the form of an aerosol. It is sprayed in an even layer on one surface, the second is applied on top and pressed with a press for two hours. Complete drying occurs after 6 hours. The adhesion of polyvinyl chloride glue is high and can be used for different fabric textures.
How to fix a jacket?
Of course, you can turn to the craftsmen for help if the item is quite expensive, the hole is too complex, or if you are not confident in your abilities. But if you decide to get down to business on your own and bring your favorite outerwear into perfect shape, then doing this with our tips will not be difficult. Let's first look at the reasons why jackets most often tear:
- It can tear if it gets caught on a nail or sharp object.
- The hole was caused by burning, either from a cigarette or a hot object.
- The seams came apart due to extreme stretching.
Based on the type of damage, you need to choose a special remedy for repair. So, with a jacket you can do the following:
- Sew up.
- Seal with glue.
- Use reflective tape and braid.
- Sew on a patch or stripe.
- Cover with zipper and other decor.
Next, we will look at each method in more detail.
Workshop repairs: what you need to know
Any careless repair, especially thermal sizing, can ruin the awning fabric. Therefore, it is better to contact a workshop. Where to go to get professional repairs?
- Companies producing tents, tents and other products for tourism. Sometimes camping equipment manufacturers repair not only their own products, but also tents from other brands.
- Ateliers providing repair services for tents and tourist furniture.
- Private workshops for sewing and repairing tents with professional equipment.
The repairman will inspect the entire surface of the awning and give recommendations on the feasibility and methods of repair. It is possible that during the inspection other damage and weakened areas of the tissue will be discovered.
Together with a specialist, the tent owner can choose a convenient way to troubleshoot the problem. The workshop can offer the following services:
- Choose a patch that matches the structure and color of the main product;
- Boil tears, patches, seams using professional equipment at temperatures up to 800˚C;
- Replace the damaged part with new fabric;
- Insert a window with blind curtains or a mosquito net at the site of the damage;
- Replace loose fasteners, hooks, and reinforcements for guy cords.
Specialists will carry out repairs better and more accurately than can be done at home. Depending on the region, the cost of repairing 1 meter of awning is from 700 – 800 rubles. The final price of such a service is determined by the size and complexity of the damage, and the degree of wear of the fabric.
- November 12, 2018
- Equipment
- Natali Michaelis
The task of any tent is to effectively protect the interior space from cold, wind, sun and precipitation. Even slight damage to the fabric can lead to a decrease in the protective properties of travel equipment. However, any defect can be repaired at home without much difficulty. Read our article about how to properly seal a tent, what materials need to be used for this, and what the operating principle is.
How to sew up a hole in a jacket?
This method is suitable for sealing small holes and slits, as well as if the product is torn along the seam. For these purposes, you will need a thin long needle, thread to match your outerwear and basic sewing skills. Here is the necessary sequence of actions:
- We measure a double thread up to the elbow and thread it into a needle. We tie a knot at one end of the thread.
- If you need to sew up a small hole, then you need to pierce the jacket from the wrong side, and then carefully sew the product.
If you need to sew a thing along the seam, then there are 2 methods, choose the most suitable one for yourself:
- For the first method, you need to rip the product open from the inside in order to quietly sew it up with bologna. Then you will need to sew the hole made from the inside out.
- If you are not ready to tear the lining, you will have to sew the fabric from the outside. To do this, bring the needle through the wrong side and sew the seam in parallel lines. Most often, the places where tears occur are in the armpits, and there the seam is usually not visible, so you can act boldly.
- When sewing along a seam, you need to start doing this 1-2 centimeters before the start of the tear. You should darn directly along the seam itself, that is, along the thread holes, in order to darn the item as unnoticeably as possible. At the end of the action, we hide the knot from the inside.
Repairing worn surfaces
After several years of active use of the tent, the material may begin to allow water to pass through without any visible damage. There is only one reason for this - the polymer water-repellent layer has worn out, and now it is not possible to use camping equipment in the rain. In this case, how can you seal the tent awning or should you throw it away and buy a new one?
To eliminate this problem, it will be enough to buy any impregnation for an awning, for example British-made Granger's. Water-repellent material can be restored easily and quickly at home using the following algorithm.
- We remove the awning fabric from the frame and clean it of dirt with water.
- We lay the fabric on the floor so that it is convenient to work with it.
- We impregnate the tent using a sponge or spray.
- Dry the unfolded material thoroughly.
It is worth noting that such treatment should be carried out every 1-2 years, without waiting for the tent to wear out. You should also apply impregnation strictly according to the instructions, using special protective equipment.
Double patch method
Another way of gluing a bologna jacket is the double patch method. It is considered the most durable and reliable. In this case, polyethylene or non-woven fabric is used instead of glue. To do this, a piece of polyethylene is also cut out along with the patch; it should be slightly smaller in size than the patch. Next, the jacket is turned inside out, the edges of the cut are connected to each other, polyethylene is placed on top, and then a patch. Next, they are ironed through natural fabric at an iron temperature of 100-110 degrees.
How not to carry out repairs
There are two of the most “harmful” repair methods, which technicians do not recommend resorting to even to temporarily eliminate leaks:
- Sew the edges of the awning with a hem. This method will not save a leaking tent. But a large area of the awning will be damaged by needle punctures.
- Seal the damage with smooth “silver” tape. The effect of such a patch will be temporary, only for a few days. But then it is difficult to remove the remnants of the adhesive layer from the surface of the fabric in order to glue the fabric patch. Sometimes the adhesive from the tape reacts with the moisture-resistant coating, literally being absorbed into the fabric. In this case, the only way to repair is to completely replace the damaged fragment with remnants of adhesive tape with new fabric.
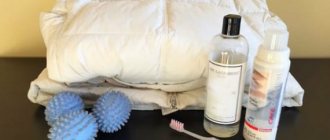
How to care for a repaired product (glued or sewn)?
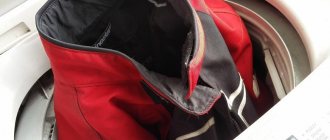
Caring for a high-quality repaired product will not be difficult. The main thing is not to wash the sealed down jacket just a couple of hours after the repair - the glue will set securely only after 8–10 hours. It’s better to wait another day or two before washing.
The sewn product can be washed immediately. After washing and drying, it is recommended to iron the repaired down jacket very carefully. This rule is especially true for things sealed with hot-melt adhesive: the area repaired in this way should not come into contact with the iron.
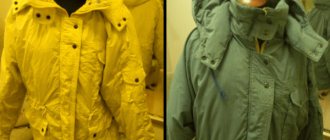
How to properly seal polyester clothing?
To begin repairing the product, you should purchase dry glue tape, also called “non-woven fabric”. The cost of the auxiliary material is low and it is not difficult to find. Any sewing store should have it. In addition, you need to have a piece of fabric, slightly larger for the hole and matching the color of the product, as well as gauze and an iron.
After you have stocked up on everything you need, you need to cut a piece of tape and baste it to the prepared piece of fabric. If this is a jacket, then you will need to get close to the hole from the wrong side, ripping out the lining (very carefully). The better you connect the edges of the hole and straighten the fabric, the less noticeable the restored area will be. After this, the product should be ironed through gauze, but do not forget that the device should not be too hot.
As you can see, in order to get rid of a hole on a product, you do not need special knowledge or large expenses. To secure the result, you can attach thermal application, braid or rivets to the treated area. That's it, your favorite item is ready to use again.
Preparing to sew
The work of making a blind seam puts a lot of strain on the eyes, requires concentration and takes a lot of time. In addition, you need to constantly hold the product in a certain position for accurate stitching.
Therefore, it is necessary to prepare a comfortable, well-lit workplace. The most practical thing is a table with a lamp. Working at a desk will help preserve your vision and posture. But sitting on a chair for a long time is uncomfortable. Therefore, you can set up a workplace on an armchair or sofa, placing a floor lamp nearby.
The place for hand sewing should be organized so that the necessary tools are at hand: threads, pins, needles, scissors.
The light is installed in such a way that the rays are directed from above on the left side and completely illuminate the work space. Sunlight quickly tires the eyes. However, it should not be completely ruled out. The best option is a comfortable combination of artificial and natural lighting.
In addition to thread and needle for sewing, you may need:
- Iron (for smoothing seams).
- Ruler and chalk (to mark the seam line).
- Tailor's pins.
- Magnifier.
- Scissors.