Today, various improved models of capping systems are used to seal alcoholic beverages. Unique types of stoppers protect alcohol products from falsification and counterfeiting and are an effective way to combat counterfeiting. Redesigned closures protect products from re-filling, helping to protect the company's brand name.
The most popular are plastic closure systems. They have good tightness, sufficient mechanical strength, and do not allow air to pass through. At the same time, such closures are quite functional, especially models with a dispenser, which ensure uniform pouring to the last drop. However, ordinary users often experience difficulties, for example, when the bottle cap does not open. This can cause some inconvenience and in most cases happens at the most inopportune moment.
Where to begin
A dispenser on a bottle of vodka or whiskey allows you to conveniently pour drinks into glasses. It is usually made of plastic. The item works like a valve: it’s easy to pour the drink out of the bottle without anything getting inside. This element protects customers from counterfeits and facilitates the process of filling glasses.
Original bottles from Jack Daniels and other designer containers can be easily adapted for homemade liqueurs, as well as used for decorative purposes. Simply remove the plastic element from the neck.
It is important to act carefully so as not to break the glass container.
What not to do
There are a few things you shouldn't do with hats.
Knitted hat
Wool hats are prohibited:
- wash at high temperatures - they may shrink;
- twist and pull during spinning - the product will lose its shape;
- wash using bleach.
It is also not recommended to machine wash.
Fur product
It is better to dry-clean a fur hat. If you still decide to clean it yourself, remember that you cannot wear a fur hat:
- soak in a basin, rinse and squeeze. Fur requires special cleaning - dry or wet. It is lightly treated with a special compound using a spray bottle or a cotton swab;
- dry in the sun and near heating appliances. Direct sunlight will ruin the color, and dry air will cause lint to come out.
How to remove a dispenser from a plastic or glass bottle: instructions
If you have finally decided to sort your garbage and take it to collection points in your city or to environmental events, here are our instructions for you on how to prepare sorted recyclables for delivery.
“Separate Collection” environmental movement helped Recycle figure out whether it is necessary to separate metal springs from notepads, how to reduce the size of a bag with plastic, and what to do with broken glass
Required materials and tools
Before you deal with the question of how to seal a soccer ball, you need to understand what you will need for this. If you have experience gluing car/bicycle inner tubes, then you will understand the principle of ball repair.
The principle of ball repair is similar to the same process for damaged bicycle tubes.
You need to purchase the following materials and tools:
- Glue. There are a lot of options on the market, but rubber works best in practice.
- Adhesive moment (quick-drying). They are universal, act almost instantly and effectively.
- A piece of elastic can serve as a patch. Patches can also be purchased.
- Scissors or knife (at your discretion).
- Degreaser (acetone works fine). Needed to prepare the rubber surface for gluing.
Before starting work, make sure you have all the necessary tools.
The surface of the ball is pre-cleaned.
Plastic
It is recommended to rinse the plastic to remove any remaining food or grease. If promotions accept different types of plastic, it is better to separate it by type (read how to do this here).
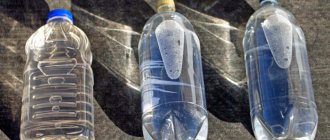
Plastic should also be reduced to a minimum volume: for example, bottles should be crushed. You can also remove the covers from them. If the labels on the bottles are easy to remove, then it is advisable to remove them as well. Do not fill plastic bottles with other plastic (bags, etc.).
Divide the bags and film into two types: only colorless, without drawings or paint, and everything else.
Waste paper
Waste paper can be divided into corrugated cardboard and everything else. Paper must be dry to be recycled.
It is better to fold the sorted piles as tightly as possible and, if possible, tie them with rope.
It is necessary to separate metal springs (from old calendars, notebooks), and also remove files, tape, and paper clips. A clear plastic window should be cut out of the envelopes.
Glass
It is recommended to rinse the glass and, if possible, remove the caps, dispensers and rings on the neck. It is advisable to put the broken glass in some container (for example, in the same glass jar).
Tetra Pak packaging
The packaging must be rinsed so that there is no odor or contents left behind, and then crumpled. For ease of washing and storage, the packaging can be cut.
Metal
Metal debris should be washed or rinsed to remove food and drink residues, then dried to remove moisture and, if possible, flattened. It is also advisable to remove labels from cans.
Batteries
Batteries must be carefully packaged to avoid damage during storage and transportation - at least put in a waterproof bag. Do not store batteries in metal containers. Use tightly sealed plastic boxes or special containers to store batteries.
Detailed instructions with illustrations on how to properly prepare recyclables for the campaign and how to sort waste in general can be found in a special brochure
Subscribe to our channel in Telegram!t.me/recyclemagru
How to disassemble a stroller, transformer, etc. before washing?
A universal, practical, convenient transport for a baby is a transformer . It is used all year round, so you have to wash it more often than other strollers.
The complete set and mounting features of the transformer depend on the brand and the specifics of the model, but its main characteristics are the same for all types. The transformer consists of a large number of parts. It needs to be disassembled before washing.
To do this optimally, it is recommended to follow the suggested procedure:
Remove shopping cart.- Pull out the cradle and envelope.
- Unfasten the fabric parts fastened with straps, Velcro, or buttons. Such elements include a muff, a mattress, a bag.
- If the hood is attached to the base with bolts or screws, then use the appropriate tool to detach it.
To quickly determine the connection locations, you can use the diagram from the instructions supplied with the product. - Remove all covers if possible.
- Remove the bow that supports its shape from the hood.
- Remove the wheels by pulling the special brackets.
What to do with non-separable ones?
Washing strollers with non-removable covers and elements is carried out without a complete disassembly stage. Such designs, if possible, preliminarily facilitate:
- remove the wheels
- bumper,
- additional accessories.
The manual method is used for cleaning. For example, a stroller, otherwise called a cane, is washed with a large sponge or brush dipped in soapy water.
Washing begins from its upper part - the hood, not forgetting the metal parts. After this, rinse and wipe thoroughly.
If a family lives in a private house with its own plot, then it is better to wash a non-separable stroller outside using a water hose. In urban environments, a bath is used for washing.
How to remove the dispenser from the bottle? – How to drink correctly
Empty liquor bottles can come in handy around the house. They can be refilled with liquid and can be used as a decorative item or as a material for crafts. But instead of a regular cap, a special dispenser is often installed on the neck of the bottle so that the drink can be conveniently poured into glasses or glasses. You cannot pour new liquid into a bottle with a dispenser. You cannot remove it by hand; it is installed tightly. How to remove the dispenser?
- First way
- Second way
- Third way
First way
This method is common among people who make their own alcohol. Vodka bottles are ideal for storing your prepared drinks because they look more impressive in a glass bottle.
The first method is suitable for removing the dispenser, which is located in the plug outside the neck.
What is required for extraction?
- Two pans.
- Hot water.
- Towel or other cloth.
- Fill the pan with hot water to a level of 5 centimeters.
- Place the bottle upside down in the water.
- Wait 5 minutes.
- Periodically add hot water from the second pan to the neck.
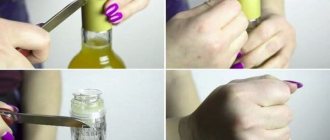
- Take out the bottle, grab the bottom of the bottle. Grab the neck with your other hand; it is better to use a towel or other cloth.
- Pull out the dispenser. You may have to put in a lot of effort or repeat the entire process.
A bottle without a dispenser can be reused. You can install the dispenser back on the bottle. It can be removed many times, but over time it can deteriorate due to sudden changes in temperature.
Such dispensers are usually installed on bottles of whiskey, cognac, syrups, and balms.
Step-by-step cleaning instructions
To ensure that your child’s vehicle does not become deformed from washing or become covered with cracks, stains, or creases, you should follow the following rules:
- To choose a washing method, the composition of the material from which the stroller is made is taken into account. For example, if all the removable parts are made of raincoat fabric, then they can be washed in a machine. If these parts are combined with artificial leather, the stroller can be washed by hand.
- Individual parts may require different cleaning methods. For example, a hood is machine washable, while a bedspread decorated with an embroidered monogram can be hand washed. Hard-to-reach corners are easily cleaned with a steam generator.
- The bottom of the structure, seat belts, and other non-removable parts are carefully cleaned with a brush.
- Chrome parts are polished with a damp cloth.
- The wheels are washed under running water.
- Hypoallergenic washing and cleaning liquids are used.
Before washing for the first time, you should check the material for resistance to the selected cleaning agent.
In the washing machine
The fabrics from which stroller sets are made contain structured synthetic fibers. They add strength, water resistance, and increase wear resistance to the product.
Machine washability makes caring for these strollers easy. In this case, all that remains for manual work is cleaning the wheels and the main base.
Washing recommendations:
- all removable elements are placed in a special bag that protects them and the machine from mechanical damage;
- a delicate mode is established;
- the temperature is set to 40C°;
- super rinse function is used;
- push-ups are performed at low speeds.
Automatic spinning and drying cannot be used for parts with insulation. The water drain mode is suitable for them.
as laundry . Regular washing powders can leave streaks on the surface of items. Additional treatment with rinses and conditioners does not make sense.
Manually
If the product contains a leather substitute, artificial PVC fabric, or a lot of accessories, then it requires wet cleaning or hand washing. Considering the lightness and waterproofness of such materials, this most often applies to strollers.
If there is a removable hood and leg cape, their processing consists of the following steps:
- Soak in warm soapy water for 20 minutes.
- Carefully hand wash at 50C° with baby powder.
- Rinse until completely free of soapy water.
- Light squeezing.
- Straightening things out.
Products made of PVC, eco-leather, and combined elements require delicate care. They are cleaned with a damp soft sponge. For heavy soiling, add detergent. Remove any remaining water from the surface with a viscose napkin.
Laundry or baby soap and dishwashing detergent are also suitable for hand washing . The criterion for choosing a product is complete rinsing and anti-allergy.
Do not use chlorine-containing cleaning products or subject the stroller to aggressive mechanical cleaning.
How to apply the cleaner?
An alternative to washing is cleaning with foam cleaners for cars and carpets.
Advantages of this method:
- quick and easy application;
- thorough destruction of dirt and rust;
- removing stubborn stains;
- there is no need to disassemble the product.
To use, the contents of the can are sprayed onto surfaces. Dried foam with dirt particles is removed with a napkin, vacuum cleaner or shaken off.
To quickly clean an eco-leather stroller, you can use car interior leather cleaner . In this case, the bonus will be enhancing the color of the stroller, polishing, and eliminating odors and microorganisms.
The video will show you how to clean a stroller with a foam cleaner:
Is it possible to remove the dispenser from a vodka bottle?
Closure manufacturers offer improved modifications to glass bottle dispensers.
Unique models are manufactured at modern automated stations in accordance with the provisions of GOST. They are distinguished by good tightness, sufficient mechanical strength and reliability.
With their help, you can create beautiful decorated caps that will attract consumers.
Why do we need alcohol bottle dispensers?
- Provide reliable protection against refilling of glass containers, such as liquor bottles.
- Promote reliable sealing due to the tightest connection with the neck.
- Allows you to achieve increased comfort during pouring due to pouring from the outlet in any radial direction.
- Helps achieve a consistent stream without air bubbles.
The introduction of bottles with dispenser caps into production allows us to reach a new level of production and helps demonstrate the high quality of closure systems.
The unique closure system attracts the attention of buyers with its beautiful design using embossing or silk-screen printing.
What is the difference between a plastic cap with a dispenser and an aluminum screw cap?
Polymer closures, unlike metal screw closures, have increased strength. The latter are made of thin sheet of aluminum.
If the conditions of acceptance, unloading and transportation are improper, the screw cap may be damaged and the contents of the bottle will simply leak out.
Such cases have already been recorded at enterprises, and as a result, many companies suffered losses, albeit minor ones.
The most important difference is that screw closures are not equipped with a re-opening protection system, unlike modern polymer closures with a dispenser. At the same time, the cost of metal closures is higher than polymer ones.
When purchasing large volumes of closures, the difference becomes obvious. In addition, polymer closures do not oxidize and do not react with an alcoholic product, which cannot be said about aluminum stoppers.
The undeniable advantage of plastic and screw closures is the ease of opening and closing. Compared to cork, no special device is required, which is very convenient and practical. Almost everyone knows how to open a screw plastic lid. It only takes a little effort.
Advantages and disadvantages of polymer closures with dispenser
- 100% protection against counterfeiting. Your branded alcoholic products will be protected from any sale of counterfeit and counterfeit goods. Underground companies will not be able to produce their own products under your name.
- Effective presentation.
Original vodka bottle dispensers with beautiful decorations, glitter varnishes, embossing and shaving will make the product stand out on the store shelf. A great option to make your product more recognizable and presentable to customers. Excellent sealing.
The capping system is made using a unique technology, which allows you to reliably preserve the contents of the bottle and the properties of the alcohol-containing product. Increased level of comfort.
The original closure with a dosing system protects against splashing, helping to preserve every drop.
Useful tips and tricks
Like any product that is actively used, the ball requires some kind of care. And this concerns not only the repair procedure, but also operation, storage, and cleaning.
Sports equipment needs to be maintained regularly.Some useful tips to help you keep your ball for as long as possible:
- After each game, the surface is inspected for pickles, small branches and thorns. If they do not reach the camera, then there is nothing to be afraid of, just remove them.
- Avoid overloading. The habit of placing his foot on the ball or sitting on it does not benefit him. Excessive pressure can cause gradual deformation.
- It is not advisable to wash using chemicals.
For a ball to last a long time, it must be handled correctly.
An easy way to remove the dispenser from a bottle
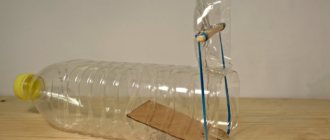
A beautiful empty bottle of vodka (whisky or other alcohol) can be used as a container for “homemade” alcoholic beverages, as well as vinegar or vegetable oil.
But to pour something into an empty bottle, you must first remove the plastic dispenser. How to do this quickly and accurately? There is one proven method.
To do this you will need a pan of water. We put it on an electric stove or gas burner and bring the water almost to a boil (temperature about 80-90 degrees).
We remove the dispenser without problems
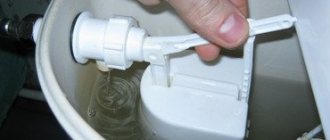
Next, unscrew the cap and remove the trim on the neck of the bottle (usually it is made of thin sheet aluminum). Then we immerse the bottle, neck down, in a pan of hot water.
It is advisable to pour hot water over the neck from another container (for example, from an electric kettle). Or you can simply turn the bottle over from time to time. You need to keep it in hot water for several minutes.
Then we take out the bottle and try to carefully pull out the plastic dispenser. Just don't use your bare hands - use a towel to avoid getting burned. In some cases, it is necessary to apply a certain amount of force.
For details on how to remove the dispenser from a bottle at home quickly and accurately, watch the video on our website.
Preparing the tools
For your work to be successful, you need to stock up on:
- with strong threads, thick, nylon, twisted, but the fishing line will not work - it will stretch itself and tear the material being fastened;
- an awl selected according to the size of the holes on the elements of the ball;
- with a special loop tool.
Let's take a closer look at the latter. To create it, take a piece of elastic steel string with a cross-section of no more than half a millimeter and a length of 20 cm. In the middle it is heated on a candle, burner or lighter and bent in half. The ends are clamped with an M5 screw into the rod - it will become a handle that greatly facilitates the work. The end of the loop expands to fit the thread and bends slightly to push it through. You can start working.
How to remove a dispenser from a bottle
You don’t have to throw away an empty vodka bottle right away, because it can come in handy again. Especially if it looks original, and you want to pour another drink or alcohol into it, prepared yourself. But you won’t be able to unscrew the lid and pour a new drink, because the container is equipped with a special dispenser.
Remove the dispenser from the bottle
Many fans of making homemade alcohol come to try to figure out how to remove the dispenser from a bottle of vodka. Vodka - including. After all, it is much more pleasant to pour a drink into glasses from a beautiful glass container than from an unattractive container.
There are several ways to remove this dispenser. One of the simplest ones requires just a couple of pans (or a saucepan and a kettle) of hot water. This option is suitable for removing those dispensers that are built into the plug covering the outside of the neck. The procedure is as follows:
- Pour hot water into the pan.
- Place the bottle there, neck down.
- Leave for a few minutes.
- During the process, pour additional boiling water over the neck from another pan or kettle.
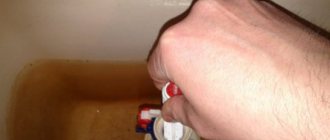
- Remove from the pan, firmly grasp the bottom with one hand, and grab the bottleneck with the other.
- Pull the plastic plug towards you: it will pull out with force, but it will come out.
The container can be used again. The dispenser can be easily installed back after you pour your drink inside. It will also stay firmly in place until you need to remove it again.
Using this method, you can remove the dispenser not only from a bottle of vodka, but also from any other bottle of strong alcohol: whiskey, tequila, cognac, absinthe.
How to seal a torn inner tube of a soccer ball
Before you patch up a hole in the ball, it’s worth understanding the variety of modern tools for restoring cameras. If you've repaired car or bicycle tire tubes before, some of the tools may look familiar.
Camera Repair Kit “Piece of Mind”
The manufacturer included everything you need in the kit:
- Glue,
- Patches of different sizes,
- Metal tool for surface cleaning,
- Instructions
- Spool valves.
Having everything listed at hand, you can seal the chamber of the damaged projectile in about a couple of hours, even without special skills.
Buyers respond positively to the use of this set.
YP3204P-C Camera Repair Kit
The composition resembles the first sample:
- Activating glue,
- Five large patches
- stripping tool,
- Spool valves.
The set of patches differs in size. Large sizes will help eliminate even significant camera defects.
Bicycle first aid kit Park Tool PTLGP-2
Accessories for restoring bicycle inner tubes will do our job perfectly. This set contains six self-adhesive patches.
The simplest and most convenient tool to help beginners, you just need to apply a patch to the damaged area and wait the specified time.
Gummi glue for repairing rubber products
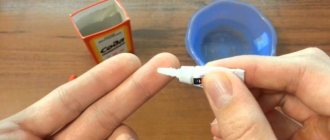
If your favorite ball is made of rubber, a rubber-based adhesive is suitable for repairs. Gummi is an excellent option with a low cost and a lot of positive feedback from customers. It's not difficult to use: apply a thin layer of glue to the hole, let it dry, waiting 5 to 10 minutes. Repeat the manipulation. When the second layer dries, you can safely inflate the shell.
Glue "Droplet" from Henkel
Need to glue a patch to a leather or rubber surface? Use “Droplet” for these purposes. The manufacturer recommends degreasing the surface before use. The composition must be applied to both surfaces; for better adhesion, place the structure under a press.
Story
The Romans used oak bark to make corks. After the collapse of the empire, the lands on which this type of tree grew were captured by the Ottomans. As a result, this material was forgotten for a long time. The creator of champagne, the French monk Pierre Perignon, invented a universal cone-shaped cork.
Wine was not produced in Ancient Rus'. It was bought in other countries. In those days, any alcoholic beverage was called wine. The situation changed only after the Crimean Peninsula became part of the Russian Empire. In the 17th century, the production of glass vessels began. They could already be hermetically sealed using plugs. After the invention of the corkscrew, the shape of the plugs changed significantly. Wooden cylinders began to be pushed into the neck of the bottle.
Are there differences for different models?
Types of children's vehicles are divided according to their main characteristics into classic, recreational, and transformers. They differ in purpose of use and functionality.
It is impossible to separate them into separate groups based on the type of cleaning - all strollers, even of the same brand, differ in the material of manufacture, assembly method, and completeness.
In addition to the manufacturer’s instructions, when washing a specific stroller, a combination of factors is taken into account:
- The degree of disassembly of the structure.
- Number of removable parts.
- Composition of the material.
- Availability of additional accessories.
- The presence of combined elements.
Corkscrews
The first corkscrews were drills, which were used to pull stuck bullets out of weapons when they misfired. The corkscrew was invented in England by an unknown gunsmith. It was originally used to open apothecary bottles and perfume bottles. The first models had a special brush for brushing away crumbs of cork and wax.
In 1802, Edward Thomason received a patent for the manufacture of double-action corkscrews. Napoleon Bonaparte introduced a corkscrew as a mandatory item of equipment for French soldiers. In 1894, dentist William Robert Maud developed a device with a central part in the shape of a molar. This tool did not destroy the cork when opening the bottle. The new instrument began to be sold in pharmacies along with bottles of medicine.
In 1979, Herbert Allen created a Teflon-coated corkscrew that allowed the cork to be pulled out effortlessly. He also invented the lever-type corkscrew. The world's largest corkscrew weighs 350 kilograms. It was put together by Rob Higgs. The design allows you to uncork the bottle and pour wine into a glass. It took 3 years to make it.
There are currently 350 types of wine bottle openers. The corkscrew has become a collector's item. Rare specimens are sold at auctions for several thousand dollars. The largest corkscrew museum is located in the French city of Rouen. His collection numbers 15 thousand copies. Professional sommeliers use a special knife to open bottles. It was invented by Karl Weinke in 1883.
Comments
twist and pull up))) this is how it opens
beloved daughter
6 years 6 months
there is a button there. you need to make a few turns and it will pop out
beloved daughter
6 years 6 months
I did a million revolutions and that’s it...
maybe something is broken there... try either pressing and twisting, or vice versa, pulling and twisting... or have you already opened it?))
beloved daughter
6 years 6 months
no it doesn’t work out anyway!!!
Then marriage
And I couldn’t :-):-):-):-):-):-)
I couldn’t open it either, my husband opened it, and I still don’t know how he did it))))))