+7 multichannel
With constant workload of printing devices, problems with print heads often occur. This occurs when documents are printed with streaks or gaps on the paper. Basically, inkjet printers produced by well-known companies Epson, HP and Canon suffer from this problem.
Contaminants and ways to eliminate them
Even under normal operating conditions of printing equipment, you cannot be sure that all elements will work perfectly. If the use of consumables cannot be properly controlled, unexpected equipment failures often occur. We can name several variants of events in which the most sensitive working parts of the printer, namely the head, are affected. Nozzle clogging occurs when:
To solve problems with a clogged head, the creators of printing equipment included a special utility in the system for monitoring its operation. In most cases, it helps get rid of printing defect problems.
Stages of cleaning an Epson printer
There are two ways to clean the print head: hardware and manual. In the first case, you need to do the following:
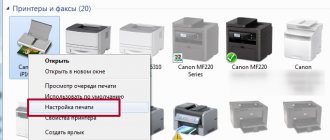
Through the “Start” menu, open the “Devices and Printers” window;
select the connected printer with this problem and open the “Printing Settings” context menu by right-clicking on it; In the “Service” tab, find the “Print head cleaning” function and perform it.
It may be necessary to carry out this procedure several times so that the ink under operating pressure penetrates the nozzles of the head. To check print quality, print a test page, which the device will automatically prompt you to do after each cleaning.
Restoring Canon and HP devices
Exactly the same steps need to be carried out to clean the heads in Canon printing devices.
HP inkjet printer drivers have a software monitoring system that links to the HP Problem Resolution Center. You can access it through the printer’s “Settings” menu, where you will find “Printer Toolbar”. The Cleaning tab will help you program print head cleaning, similar to the above procedure.
Source
Cleaning the HP printer head
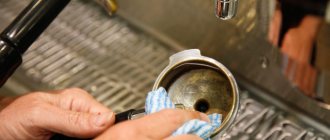
The print head is the most important component of any inkjet device. It consists of many nozzles, chambers and various circuit boards that spray ink onto the paper. Of course, such a complex mechanism can sometimes malfunction, and this is most often due to clogging of areas. Fortunately, cleaning the head is not difficult. Any user can produce it independently.
Method 1: Windows Cleanup Tool
When creating the software component of any printer, special maintenance tools are almost always developed for it. They allow the owner of the equipment to easily carry out certain procedures, for example, checking the nozzles or cartridge. The service also includes a head cleaning function. Below we will tell you how to launch it, but first you will need to connect the device to your PC, turn it on and make sure it works correctly.
Next you need to do the following:
If for some reason the device does not appear in the list, we recommend that you refer to the article at the following link. In it you will find detailed instructions on how to fix the problem.
Depending on the model of printers and MFPs, the menu type may look different. The most common option is when the tab is called “Service”, and in it there is a “Print Head Cleaning” tool. If you find one, feel free to launch it.
Differences also apply to instructions and warnings. Before starting cleaning, be sure to read the text that should appear in the window that opens.
This completes the cleaning process. You can now run a test print to ensure the desired result is achieved. This is done like this:
Above we talked about the built-in maintenance tools. If you are interested in this topic and would like to further adjust the parameters of your device, read the article at the link below. There is a detailed guide on how to properly calibrate the printer.
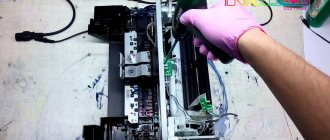
Disassembling and cleaning the HP Deskjet Ink Advantage 3525 MFP
Inkjet printers and MFPs from HP are inexpensive, but have a number of disadvantages.
Among them are high ink consumption, repair and expensive replacement of cartridges, clogging and contamination of the head and “diaper”, since water-based ink and black pigment ink are used for printing. This exacerbates the rate of contamination when using combination printing. Over time, dried ink leads to the fact that the main printing components can no longer perform their functions and the device needs cleaning, and sometimes more significant repairs, it all depends on the condition and age of use.
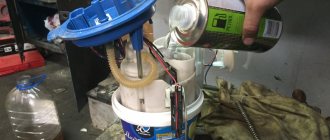
I recently took apart my work HP 3525 to clean it and put it in order. After a couple of years of leisurely typing, problems began: I did not print part of the text, sometimes waited for submission or did not react at all and wrote “remove the obstacle.” I didn’t have time to make a video, I found a similar review with photos from the good guys showing the problematic contamination and the solution.
For most inkjet models from common manufacturers, the procedure is suitable and differs only slightly in that the fastenings and cables will be different. The main difficulty is to act carefully when disassembling and not to damage the fastening elements of the parts and cables.
So, let's look at the main stages of cleaning the head and diaper on the HP 3525. Let's start with disassembly. To get to the head and other elements, unscrew 7 bolts around the perimeter.
Now, slightly lifting the far part of the cover, we find the mounting deck at the front side and press.
Next, we separate the control panel; you have to be careful here, the fastening there is quite flimsy.
After this, lift the block cover towards you, it should go up easily, nothing else interferes with it.
Next, we take out the cartridges and disconnect the springs, this should also be done carefully.
After this, it remains to disconnect 3 cables and access to the head is obtained, you can clean it!
Now a few more pictures of what a dirty device looks like before and after. Here is one example. Everything is covered in dried pigment paint.
And here the head cleaning unit is also all dirty, since it takes on the main flow of paint. A layer of contamination of 3-4 mm can be critical.
Here you can see that the absorber (the so-called “diaper”) has also changed significantly and has absorbed a lot of paint. In order for it to fulfill its function of collecting excess ink, it must be periodically cleaned from a mixture of inks and falling dust.
In my case, everything was cleaned of paint with ordinary household surfactants, the diaper was washed and dried, then a little lubrication of the moving elements and everything was ready for reassembly.
HP 3525 is a fairly common and unpretentious MFP. If you clean and lubricate the moving elements in a timely manner, there are no problems with it, unless you consider the very principle of inkjet printing and its low productivity to be a problem. It is optimal to use for infrequent b/w or color printing. For documents, p1102 or its analogues are better.
Cleaning the print head of a Canon printer
If you find streaks or gaps on the pages you have printed, this means that the printer's print head is clogged and needs to be cleaned immediately. If you don't do this right away when a problem is discovered, the part will break - and replacing it will cost you a fortune.
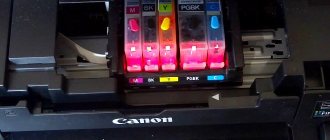
Before manually cleaning the print head, check the loaded print cartridges. These cartridges must be free of packaging residue and must be carefully inserted into the print head. After a general check of the cartridges, you can determine which cartridges are causing streaking on the pages - color or black.
Next, perform automatic cleaning, which can be launched through the printer settings.
Steaming
Suppose the ink in your printer is dry, what should you do? The high-temperature steaming method will help you with this. The cartridge must not be empty. Otherwise, it must be at least partially replenished.
Turn on the kettle, wait for the water to boil, open the lid and hold the cartridge for 30 seconds with the nozzles down. Then remove and clean the attachments with a soft cloth.
We will repeat the procedure as many times as necessary.
If this does not help, there is a more radical method - immersion in boiling water. To do this, pour freshly boiled distilled water into the bowl so that you get a layer of about 1 cm, and place the cartridge there with the nozzles facing down. Leave for 20-30 seconds. Repeat if necessary.
In this way, it was possible to revive even cartridges that had dried up a hundred years ago.
How to clean your printer's print head manually
If automatic print head cleaning does not have the desired effect, you must clean it manually. To do this, follow these steps:
Turn on the printer and open the cover. The carriage containing the cartridges will move to a position so that you can remove them. Place the cartridges on a piece of paper to prevent air from entering the chambers.
Once removed, place the printhead in a container of special printhead cleaner or injector cleaner for a few hours, keeping the contacts sideways and dry. Alternatively, you can also use distilled water.
After the “bath procedures”, install the print head and cartridges in place. Perform automatic cleaning again through the printer settings - after this the print head should be clean. If the seal still doesn't work properly, you can try the water bath again with alcohol.
Printing with cleaning fluid
The method helps to reset the non-removable head built into the cartridge. Detergent is poured in place of the dye and cleaning begins. If, when printing on a color printer, defects in only one color appear in the image, the cleaner should be poured only into the problem compartment. After cleaning, the device cannot be used for two hours. During this time, the cleaning liquid will have time to dissolve the dye that has dried in the nozzles.
After 2 hours, open any graphics editor and fill the page with the color that you had problems with before cleaning. It's best to use Photoshop because it allows you to use the CMYK color scheme when filling the sheet. The resulting fill is printed on a standard sheet, and first you need to set the maximum print density. Residues of the cleaner mixed with the paint will leave marks on the paper. If horizontal white streaks appear during printing, the print head has not been cleaned sufficiently. When the filling becomes homogeneous, remove the block in the head.
After washing, the cartridge is refilled with ink, the nozzles are programmed to be cleaned, and the color sheet is printed again.
If manual cleaning doesn't help
It may happen that manual cleaning also does not correct the problem, and the prints still turn out “dirty”. In this case, try changing the print head. In some models you can replace it yourself, in others - only with the help of a specialist.
If our advice did not help, check whether your printer is covered by a warranty. It usually makes no sense to repair a device outside of warranty - it’s easier to buy a new one.
Source
Sooner or later, the printer may print poorly, for example, stain the paper, leave black or white stripes, and color distortions will be noticeable. This often happens due to the lack of preventive measures during intensive, frequent printing. Elements of the device can become clogged, and if we talk about an inkjet printer, the cartridges of which are refilled with liquid ink, then the latter are susceptible to drying out, both in the cartridge itself and on the part through which the ink enters the sheet of paper - the print head.
This element, depending on the brand and model of the printer, may be built into the cartridge (non-removable) and vice versa. In both cases, you can restore the operation of the part by cleaning it thoroughly using one of the suggested methods below.
It doesn’t matter what kind of printer you have, Epson, Canon, HP, or even talking about a multifunctional device (MFP), because the only difference will be in the design. And in the material we described various methods that will help you clean the printer head at home in a variety of situations. With the help of the posted images and videos, you will probably be able to understand which method is right for you.
How do you know when it's time to clean your equipment?
You may be interested in: Silicone grease for coolers: review, characteristics, which one is better
The issue of cleaning is relevant for printers that use water-based, pigment, and sublimation inks, and when there are certain indicators that indicate that it is time to service the device. How to understand that equipment requires maintenance? You should pay attention to the signs. These include decreased print quality, stripes and omissions in the printed file, less bright or incorrectly rendered colors. But just in case, you also need to make sure that the paint supply hose is not pinched or kinked. If everything is in order, then you need to figure out how to clean your HP inkjet printer.
Software cleaning
Every printing equipment manufacturer offers washing software. The program is installed on the computer when connecting and setting up the printer automatically or from the installation disk.
Cleaning with software involves running ink through the head nozzles. Ink pressure removes light ink plugs and air pockets.
Before more complex physical cleaning, do a software one according to the scheme below.
The required settings and the item responsible for cleaning depend on the brand and model of the equipment. Install the software that comes with the device upon purchase and study its interface in detail. We are confident that you will find the function you need and clean the part.
For the Epson brand, you can install the PrintHelp utility, which also has this functionality.
Manually cleaning the print head
First prepare your work area. A simple desk is optimal. To avoid contaminating it, cover the surface with old newspapers or paper in several layers.
What you need for cleaning
All about flushing fluids
For cleaning, it is best to use flushing fluid produced by the same company that manufactured the consumable. If you can't find it, any certified cleaner will do. It will not damage the device, but you need to choose a product based on the type of ink in the cartridge.
To clean water-soluble ink, use:
To wash nozzles contaminated with pigment dyes, use either a specially designed solvent or isopropyl alcohol.
Popular cleaners from WWM:
Regular window cleaner is cheap. At home, “Mr. Muscle” is often used.
When choosing a detergent, it is important to pay attention to its color.
Before washing, the cleaner must be heated to t=+40..+60 °C to enhance the effect of the solution.
Before cleaning, you can test the effectiveness of the cleaner. A little ink is taken and dissolved in various media. After a few hours, you can analyze the result. If sediment is released or the liquid becomes jelly-like, the cleaner was chosen incorrectly. With the right cleaner, the dye liquefies and the ink clumps loosen.
Flushing the fitting
To check the quality of cleaning, place the head on gauze soaked in cleaner for one hour. If after an hour the gauze remains clean or there are only faint stains on it, the cleaning has been done efficiently. Additionally, you can run 2-3 cleaning programs.
Soaking (dropping)
You can take plastic tubes from the dropper, cut pieces of 5-10 cm from them, put them on the fittings and pour the cleaning agent inside, leaving them to soak for a while. Liquid can be periodically added to the tubes.
To speed up the process, the agent is drawn into the syringe, a tube is put on it, and the entire structure is inserted into the cartridge connector. To clean the nozzles, several cubes of cleaner are fed through the tube with a syringe. This way all head connectors are cleaned, and then two cleanings are done by software.
Broach
Ultrasonic bath
This is a rather risky cleaning method; they resort to it if it was not possible to wash the head with other methods.
The procedure requires additional equipment, for example, a medical device or a device for gentle cleaning of small parts. With an ultrasonic bath, there is a risk that the part will fail and cannot be repaired. Those who have used this method claim that within a day or immediately after the first print, the head breaks.
How to clean a mouthguard and knife
The knife (squeegee), which in an inkjet printer removes excess dye from the surface of the nozzles and nozzles, can be carefully wiped with a lint-free rag soaked in cleaner.
The cap, which absorbs moisture and prevents the ink from quickly drying in the nozzles, requires thorough washing according to the following algorithm:
Falling jet method
Now I will tell you how to repair a dried out inkjet printer cartridge using brute force. Or rather, the power of water. Pressurized water can push through dirt and the cartridge will be as good as new.
Use the method only when all others no longer help (that is, it was not possible to wet the cartridge with anything at home).
Since there is nowhere to go, you will have to use regular tap water. To do this, go to the bathroom, open the tap with hot water so that it flows in a continuous stream, without splashing. The more water falls from a greater height, the better.
We replace our ill-fated cartridge under the jet and keep it there for some time. We periodically take it out in daylight and check whether the desired result has been achieved.
Cleaning the head on the cartridge
If the printer has a cartridge with a built-in head, remove the container from the device, turn the nozzles up and apply a few drops of the product to them. After 10 minutes, remove excess cleaner with a napkin and check whether the dye passes onto the napkin. If it was not possible to wash the nozzles in this way, they need to be soaked in a container with detergent. You need to soak for at least 2-3 hours.
To help the liquid penetrate the nozzles better, you can place a piece of toothpick under the inkwell, so the nozzles will not come into contact with the bottom of the container and will remain immersed in the solution.
After soaking, wipe the entire surface dry with a napkin, especially the contacts. The cartridge is inserted into the printer and the nozzle check test is started. If the cleaning quality is poor, try blowing the nozzles through the air intake:
Cleaning for Epson printers
The cleaning technology itself is no different from the instructions above. The only difference is that the head does not need to be removed from the carriage. Then the algorithm will be like this:
Then you need to put a clean, folded 2-3 times napkin on the tray (a tray with several compartments for collecting waste ink, located in the parking area), and slide the carriage onto it so that the napkin does not wrinkle. We will evaluate the cleaning result based on the condition of the napkin after washing.
The image shows the carriage with the lid closed. It must be removed to gain access to the head.
Next, take a syringe, fill it 2/3 with cleaner, put it on the fitting and slowly press the syringe plunger.
The liquid should flow easily through the channel. If there is no passage at all, then a plug has formed in the head that needs to be removed. To do this, small forward movements of the piston back and forth are made at intervals of one minute.
So you need to clean every channel. The amount of cleaner pumped should be approximately 1-2 ml. If the fluid flows in one channel more difficult than in others, then the flushing must be repeated until the same force is needed everywhere.
After washing each tubule, you need to check the condition of the napkin. Move the carriage aside and look. If the napkin is stained, replace it with a new one. And so on until the napkin stops staining and only transparent cleaner comes out.
When cleaning the printer cartridge is completely done, remove the napkin, insert the cartridges into the carriage, and place it in the parking lot. Turn on the printer, do cleaning through the software (software) or through the device menu.
If the head is bolted or screwed to the carriage, it can be detached and cleaned outside the printer. Then you first need to remove the board with all the cables, and then get the PG. The part is washed in the same way, only in a container.
Complete head disassembly
You can only disassemble the head yourself if you have experience. It is better to entrust the work to specialists from a certified service center. The video below will help you disassemble it.
Soaking in washing liquid
If the cartridge begins to wear out or stops printing altogether, it can be cleaned with a special cartridge wash prepared according to one of three recipes:
- acid (HP color cartridges): essence of acetic acid 10%, alcohol 10%, distilled water 80;
- neutral (suitable for any printer): pharmaceutical glycerin 10%, ethyl alcohol 10%, distilled water 80;
- alkaline (Epson, Canon): 10% ammonia/ammonia, 10% ethyl alcohol, 10% glycerin, 70% distilled water.
Before resuscitating a dried cartridge with this composition, it must be carefully filtered in every possible way.
Under no circumstances should cartridges be washed with ordinary (non-distilled) water! This will cause scale to accumulate in the nozzle area and damage the cartridge. Don’t be too lazy to go to the nearest auto store and spend 80 rubles on a 5-liter bottle of distilled water!
If one type of acidification doesn't work, try another.
Excellent results are obtained by using green “Mister Muscle” as a washing liquid for washing glass (with ammonia).
Mister Muscle is diluted with distilled water in a 1:1 ratio and used as a wash.
How else can you wash the printer head at home? Instead of Mr. Mask, you can get cheaper "everyday" glasses and mirror cleaners."
Recovery technique
Printer cartridges from different manufacturers need to be washed differently. We will talk about how to wash the Epson inkjet printer head later. For now, let's start with the most common ones: Hewlets, Lexmark, Canon and the like.
How to clean a Canon, HP, Lexmark (and similar) printer cartridge?
Sprinkle the tissue generously on the tissue and place the cartridge with attachments directly on it.
Make sure that the napkin is always thoroughly moistened! Add liquid as it dries.
If the cartridge is empty and very dry, you can immediately put the whole thing into the solution (but not for cartridges with foam!), pour it inside and leave for 1-3 days.
How to clean the Epson printer head?
Epsons are restored in another way: they take the head to the side, wipe it with a napkin or a thin piece of cloth of a suitable size and place it in the place where the head is parked. Saturate generously with acidifier and park the head. Leave for 10 or more hours.
As a last resort, you can completely disassemble the head and immerse the attachments in the composition by 1 cm, and then select head cleaning from the menu (a couple of times). After this, if the cartridge is working properly, it should start printing.
Well, the easiest way to flush any cartridge is with clean distilled water. The next two methods will simply use it.
Prevention
It is recommended that you perform regular maintenance checks on the entire printer and at the same time clean the head as a preventative measure. Make sure that the devices are free of dust or dirt, jammed paper, paper residue, or any other foreign objects. If found, they must be removed immediately.
If your printer has a continuous ink supply system, regularly check the condition of the hoses that pump the ink from the reservoir to the head. There should be no blockages, air plugs, kinks or mechanical damage. The amount of ink should be kept above the average level. This precaution will prevent air from being sucked into the CISS. It is not recommended to leave the printer idle for a long time without printing. Ink can dry out quickly, especially if it is of poor quality. Once every 1-2 weeks, do preventive printing of several sheets. Otherwise it will dry out and there will be problems:
With regular program cleaning, physical cleaning will not be necessary for a long time. To prevent the paint from drying out, you need to print a color page at least once a week.
Source