Pistol foam Makroflex 750 ml. Photo by Leroy Merlin
Polyurethane foam is used to solve a wide range of problems . Polyurethane sealants are especially widely used when installing door and window frames . often arise . Insufficient experience of the performer, the use of foams in household cylinders, or the use of low-quality products can elements surrounding the work surface .
Cleaning up fresh tracks
If the polyurethane foam has not yet dried, remove it with a sponge and a solvent, for example, White Spirit, Cosmofen 5 or ATOLL. The stains will disappear in a few minutes. Varnished and painted objects cannot be cleaned this way, otherwise the caustic composition will ruin the coating. Take two spatulas: pry up the sealant and move it to another spatula. Then wipe the sticky residue with a cloth soaked in warm vegetable oil or vinegar and leave for a few minutes.
When cleaning, do not use water, otherwise the foam will immediately harden and be more difficult to remove. You can try to remove stains from clothes with water, after first removing the excess with a rag.
If it gets on an acrylic bathtub, what and how to remove it?
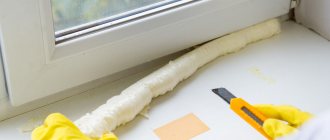
Acrylic coating requires delicate cleaning . Therefore, it is not recommended to use solvents, abrasive powders, metal spatulas, knives and blades, gasoline, ammonia, or chlorine-containing products. These tools and substances may damage the coating or destroy the structure of the product . If polyurethane foam gets on the surface of the bathtub, it is recommended to wait 20-60 minutes until the composition hardens, this makes it easier to clean off. The bulk is carefully cut off with a knife. To remove residues, it is possible to use vinegar essence (for a better effect, a rag can be left on the dirt), a solution with salt, and cleaners.
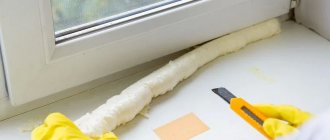
Removing dried foam mechanically
This method is suitable for wooden surfaces and other capricious materials for which aggressive solutions cannot be used. Can also be used for painted and varnished surfaces, if other methods are not suitable - if necessary, the coating can be restored.
Sequencing:
- cut off the dried layer of foam with a sharp knife;
- wipe off any remaining material with fine-grained sandpaper;
- rub the surface until smooth;
- varnish the treated area if necessary.
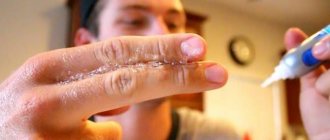
You can also clean your hands mechanically. To do this, wet the skin well, spread the contaminated areas with a rich cream and remove traces of foam with a pumice stone.
The washing machine produces too much foam
The user's interaction with the washing machine usually ends with loading things and setting the mode. But at the end of the work, you can find that foam is coming out of different parts of the body. This state of affairs threatens short circuits and serious damage; action must be taken immediately.
Causes
A lot of foam is generated in the washing machine for the following reasons:
- Too much washing powder is poured in - foam formations fill the space of the drum, or even look for a way out.
- The powder used is “hand washable”. An automatic machine from Candy, Zanussi or another manufacturer must be loaded with an appropriately labeled product. Otherwise, an abundance of foam settles on the heating element, shortening its service life.
- The drain hole is clogged - water does not drain.
- The fastening of the fluid supply hose has come loose, water does not flow normally. Space is created for the formation of foam, which subsequently has nowhere to go.
- Filter clogged. The water is drained into the sewer and pre-filtered. Gradually, the filter becomes clogged with debris, water passes through, but small soap bubbles remain.
If you notice that there is a lot of foam in the washing machine, this should not be ignored. Why is this situation dangerous? The detergents that make up soap bubbles are not washed off - they remain on the surfaces inside the equipment. As a result, they lead to rapid wear of parts and premature failures.
Sometimes the foam builds up so much that it comes out. Upon reaching the power supply, a short circuit may occur. At best, this threatens to damage the board; at worst, a person standing nearby will receive an electric shock. The consequences can be dire, so it is recommended to act upon detection.
Actions when there is too much foam
What to do if the situation takes you by surprise? Perform the manipulations:
- Unplug the cord from the outlet.
- Locate the door on the bottom panel. On most models Ardo, Indesit, Ariston and others, the hatch is located in the lower right corner. Place the bowl, unscrew the lid and wait until the liquid drains. Individual machines are designed with a special pallet for this case. Then you won’t need a handy container.
- Clean the filter and allow time to dry.
- Place the filter in its original place and screw on the lid tightly. Close the panel door.
- Remove the laundry from the tub.
- Try to collect as much foam as possible by hand.
- Close the lid and start rinsing. It will flush any remaining foam and detergent down the drain. When the foam is abundant, the mode is started several times until absolutely clean water begins to flow into the sewer.
Certain types of items cannot be washed in the standard mode. These include down jackets, tulle, lace curtains and bedspreads. Washing them promotes additional foam formation. You need to pour less powder, strictly adhere to the recommendations of the manufacturer of Whirlpool, Bosch and others, and read the information on the product packaging.
Removing dried foam using chemical means
If foam gets on fabric, glass or furniture, do not rub the surface too hard to avoid damaging or scratching it. In this case, use special cleaners - household chemicals or improvised methods.
Traditional methods
Dimexide.
This is an anti-inflammatory drug that is sold in pharmacies. Moisten a cloth generously with the mixture, apply to stains and leave for 15 minutes. When the foam becomes soft, remove it with the hard side of the sponge.
Vegetable oil.
Heat the oil to a temperature of 45°C, soak a sponge in it, wipe off the dirt and leave for half an hour. When the dirt becomes wet, remove it with a damp cloth soaked in soapy water.
Vinegar.
Mix table vinegar and water in equal proportions. Apply to hardened foam and leave for 25 minutes. Then clean with the hard side of the sponge.
Salt.
It is used to cleanse hands and clothes. Dissolve two tablespoons in a liter of warm water and soak your hands in the solution for several minutes. If you need to remove foam from the fabric, put it in the solution for 30 minutes.
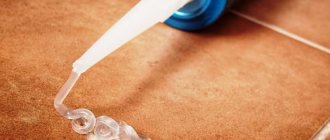
Alcohol.
This method is suitable for removing small stains that have not yet dried. Pour medical alcohol into drops of polyurethane foam and leave for half an hour. Then wipe the area with a hard sponge.
Soap.
Will not remove sealant from hard surfaces, but will remove fresh stains from hands. Wash your hands with soap and wipe them with a washcloth, rinse with hot water.
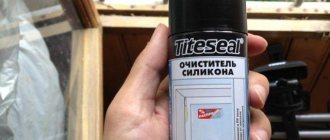
Industrial solvents
Special chemicals have an aggressive composition, so use them according to the instructions on the package. Almost all industrial solvents are explosive, so do not use them near open flames and do not leave them near heating devices or in the sun.
Cosmofen 5.
The product is suitable for removing stains from PVC window profiles. Take a lint-free cloth and soak it in the solution, wipe away traces of foam, then rinse with soapy water. Cosmofen 5 not only removes sealant, but also removes abrasions and scratches, and forms a layer protecting against ultraviolet radiation. The average price for a liter jar is 500 rubles.
ATOLL.
Suitable for door and window frames, clothing and work tools. Spray the product onto the hardened foam, leave for ten minutes, then wipe with a damp cloth or sponge. A 500 ml bottle costs an average of 150 rubles.
Mastertex Premium.
Designed to clean any surfaces, disinfects and degreases them. Shake the can and spray onto the sealant. After 10 minutes, remove traces of foam and cleaner with a damp cloth. 500 ml of product costs from 300 rubles.
PENO-OFF.
It is used for any frames, glass, plastic, and working tools. The product copes equally well with fresh and dried foam. The method of application is the same as for Mastertex Premium. Price - from 200 rub.
TYTAN PROFESSIONAL.
This cleaner removes dried foam and glue stains from any surface in a couple of minutes. Attach the tip to the valve, apply to fresh drops of foam or glue. Remove any residue with a dry cloth. The average price for a 500 ml bottle is 350 rubles.
REGISTER
Group: Club Member (100) Messages: 427 Registration: 10/18/2008 From: Kemerovo User No.: 6 586 Car number
: 838
Car make:
LR4/DISCOVERY 4
Did you like the topic? Useful? Share with your friends on social networks:
Group: Club Member (1000) Messages: 8,854 Registration: 3.4.2009 From: Anapa User No.: 9,381
Car make:
Car of a different brand
Group: Club Member (500) Messages: 722 Registration: 2/28/2011 From: Moscow User No.: 25 478 Car number
: 703
Car make:
LR4/DISCOVERY 4
Group: Club Member (1000) Messages: 1,111 Registration: 10/4/2011 From: Cheboksary User No.: 33,865
Car make:
RANGE ROVER Series 2002
Group: Club Member (1000) Messages: 8,854 Registration: 3.4.2009 From: Anapa User No.: 9,381
Car make:
Car of a different brand
Group: Club Member (1000) Messages: 7,554 Registration: 5.6.2008 From: MO, Podolsk User No.: 3,597 Car number
: 595
Car make:
LR4/DISCOVERY 4
Group: Club Member (500) Messages: 784 Registration: 12.3.2011 From: Shchelkovo User No.: 26 101
Car make:
DEFENDER Series 2007
Group: Club Member (1000) Messages: 2,208 Registration: 6/19/2013 From: Moscow South-Western Administrative District User No.: 57,099 Car number
: 723
Car make:
LR3/DISCOVERY 3
Group: Club Member (100) Messages: 427 Registration: 10/18/2008 From: Kemerovo User No.: 6 586 Car number
: 838
Car make:
LR4/DISCOVERY 4
Group: Club Member (1000) Messages: 1,111 Registration: 10/4/2011 From: Cheboksary User No.: 33,865
Car make:
RANGE ROVER Series 2002
I would like to see how you would clean it with a plastic scraper. The key word is "CAREFUL". And in case of minor defects, everything is polished and I give my word that everything will be fine!
Source: lr-club.com
Features of removing foam from different surfaces
Not all remedies are universal. Some may not be able to handle foam stains or cause damage to capricious materials. Let's consider which methods are safer and more effective for various surfaces.
Leather.
Polyurethane foam is non-toxic and therefore does not harm the skin. A salt solution will help remove dried marks. Another way: lubricate the area with rich cream or warm oil, and then wipe it off with a pumice stone or washcloth.
Clothing, carpets and furniture.
If polyurethane foam gets on clothes, furniture or carpet, acetone or an acetone-containing compound, such as nail polish remover, will remove the marks. If you don’t have the right product at home, Dimexide will do. Be careful to apply the solution to a small area of the material first to test the reaction. If the color remains the same, you can treat the entire stain. After this, the surface should be washed with soap and water.
A harmless cleaning method for fresh stains is cold water. Place the stained material under running water: under the influence of low temperature, the sealant will harden, then it is easier to remove it with a spatula or a stiff brush. To clean your carpet, you can apply ice cubes to the stains.
Tree.
To remove the foam, it is better to wait until it dries - polyurethane foam is not absorbed into the wood. Then cut off the frozen drops with a knife or spatula, and moisten the remains with a special cleaner or Dimexide until completely dissolved and wash with soapy water. Dimexide should not be used on dark wooden surfaces, otherwise the composition may spoil the color. It is better to remove marks with fine-grained sandpaper, purified household gasoline or special solvents for wood.
Plastic.
Treat traces of foam on plastic surfaces with warm vegetable oil, leave for 15 minutes and then remove with the hard side of the sponge. Instead of oil, you can use a solution of vinegar and water in equal proportions.
Metal and glass.
Apply heated vegetable oil to the metal surface for half an hour, and then remove traces of foam with a sponge. To remove stains from glass, use White Spirit, vinegar or special solvents. But if the drop is small, it is enough to remove the frozen foam with the tip of a knife or a spatula, and then rinse the surface with window cleaner.
Wallpaper and tiles.
Wallpaper is a delicate coating, and solvents can damage it. Try removing the frozen foam with a spatula. Traces of sealant are removed from the tiles with a scraper and treated with any type of solvent or Dimexide, then wiped with a damp sponge soaked in a soap solution.
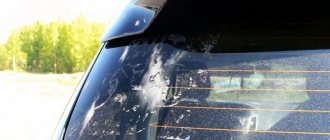
Automobile.
If foam gets on the car's paintwork, it can be cleaned with Cosmofen 5 or White Spirit, but there is a risk of damaging the paint. A safe way is to wait until the sealant turns yellow and breaks down under the influence of sunlight, and then wash it off with strong water pressure.
How to ensure surface protection during work
Even a professional builder cannot boast of the complete absence of unwanted lumps of foam. Therefore, if it is impossible to avoid polyurethane foam stains, it is necessary to protect all surfaces from them. Repair experts recommend following three rules.
- Work clothes. Be sure to pick up things that you will throw away with a light heart after renovation. It is very difficult to wash construction foam from clothes. Remember that most often your hands and hair suffer from working with foam. Therefore, be sure to wear rubber gloves and do not take them off under any circumstances. Pull a hat over your head or tie a scarf, completely hiding your curls under the headdress. Neglecting the rule can lead to an unplanned haircut.
- Rescue oilcloth. Don't rely on your super accuracy. Light foam can quickly contaminate adjacent surfaces. Therefore, before starting work, prepare the area by covering with film all objects located in the area of work with sealant.
- Vegetable oil. This is another home trick that will help protect varnished or painted surfaces from foam. Before work, generously lubricate them with vegetable oil. In this case, lumps of sealant, even if they get to the surface, will not stick. Polyurethane foam does not have the ability to adhere to oily coatings.
Main
- Before installation work, cover everything in the room with film or oilcloth and remove valuables. Wear old clothes and cover your skin.
- If traces of foam remain on the surface, remove them immediately with a solvent or folk remedy. Fresh stains are easier to remove than dried ones.
- Use a knife to scrape off foam only from wooden surfaces. Clean any other materials with a hard sponge.
- Before purchasing a professional solvent, read the instructions on the package: it will indicate for which surfaces it is suitable.
Helpful information
Tips for removing polyurethane foam from various materials:
- if the sealant lies on the surface in a lump, it needs to be cut off and only after that can you begin the main cleaning;
- before using aggressive compounds, they need to be tested on an inconspicuous area;
- To remove foam, it is better to use fluffy brushes rather than rags - this will allow you to clean off the building material rather than roll it up.
Mounting gun
After pouring foam into all the necessary places, particles of it may remain in the gun, which will soon dry out. The sooner a person notices its traces, the easier it will be to clean the construction equipment.
How to clean the gun:
- Check to see if the foam has dried. If it is still soft, then the gun needs to be washed with Isofoam R cleaner.
- When it has time to harden, you need to either clean off the residue with a screwdriver or use a solvent (OPPA or PENOSIL).
After cleaning, the gun will work again. The main thing is to clean carefully, especially if you use a screwdriver and other items for mechanical cleaning.
Don't get the coils wet
Also, do not use a pressure jet to wash the engine compartment or engine compartment. If you direct the jet into the engine compartment, it can cut off electronic sensors hanging on flimsy contacts, and there is also a risk of flooding electrical equipment. The most unpleasant thing is to get the ignition coils or the engine control unit, located on top of the engine near the windshield, wet. Then the car will become immobilized and require expensive repairs.
Washing an engine is a serious operation for which you need to specially prepare your car, taking all precautions.
Close contacts are dangerous
Under no circumstances should you wash away dirt at a 90-degree angle, holding the spray nozzle directly in front of the body. In addition, the nozzle should not be held closer than 15 cm from the surface. The energy of the escaping jet of water is then almost completely absorbed by the metal. The surface layer vibrates, and the paint becomes covered with microcracks, which become cloudy after a few years. The device must be held at an angle so that the stream is reflected from the body and flies along with the dirt into the ground. If you hold the nozzle far away, the water has time to spray and loses energy. It settles on the surface of the body and wets the dirt without causing harm to the car.
Source
Other publications in the “Little Tricks” section
You are right, “liquid” glass has been used for a variety of purposes for quite a long time and enjoys well-deserved popularity. However, time does not stand still and construction technologies and materials are developing along with it. For example, building materials are currently on sale on the market.
Hiding a TV cable can be quite simple. For this purpose, replace ordinary wooden skirting boards with plastic skirting boards with a cable channel. In addition to the fact that such skirting boards are inexpensive, they are also very simple to install. At the same time, they even look very good, and most importantly, the cable is not visible.
To create the illusion of the presence of household members in the apartment, you can install a digital timer that will switch the lighting equipment according to a set program, which can be set for a day or a week. For this purpose, you can use, for example, a single-channel digital timer “DATA M.
Cleaning clothes
The question of how to clean polyurethane foam from clothes is relevant for many people, because clothes most often end up contaminated.
It is almost impossible to completely remove foam from fabric, since it binds very tightly to the fibers. However, it is quite possible to try to significantly reduce its effect on the fabric. It’s worth saying right away that it’s better not to use substances containing acetone, since acetone can change the color of clothes and even ruin them.
How to wipe off polyurethane foam that gets on clothes? The following options are suitable for this:
- White Spirit;
- stain remover;
- gasoline solvent. This is pure gasoline that does not contain any impurities. This is the one you should use;
- foam solvent.
Now let’s look at not how to wash foam from clothes, but how:
- The foam cap (fresh or already hardened) is removed from the surface of the fabric.
- One of the above compounds is applied to the stained area.
- There is a pause of 15 minutes.
- Remaining substances are removed with a cloth, sponge or soft brush.
- If traces of foam remain on the fabric, the procedure can be repeated.
- Clothes are washed using powder and stain remover.
We use the freezer
This method can help if there are isolated splashes of foam on clothing, as well as if foam gets on delicate fabrics.
Don’t know how to remove polyurethane foam from clothes without using solvents? We tell you:
- The contaminated item should be placed in a plastic bag, and the bag should be placed in the freezer.
- After 1 hour, the clothes should be removed from the freezer, and pieces of frozen foam should be removed from the fabric by hand.
- If stains remain, they can be treated with a stain remover.
- Clothes need to be washed.
It is easier to prevent troubles with foam from occurring than to later eliminate the consequences of such mistakes. However, using one of the above methods, you can completely or partially eliminate pollution.
Tweet
During the process of sealing door frames, sometimes polyurethane foam gets onto the surface of the door leaf. This happens due to the inexperience of the craftsman performing the work, or less often due to negligence. This insignificant, at first glance, in a certain situation can develop into the most unpleasant development - up to irreversible damage to the decorative layer of the door covering.
In this situation, such advantages of foam as high adhesion to any surface and resistance to chemicals after polymerization become an obstacle when removing contaminants. Polyurethane seals cracks just as well as it adheres to the face of the door.
Foam gets on the door surface in two cases:
- An inexperienced craftsman incorrectly calculated the amount of mixture injected into the gap, sufficient to seal the voids. As a result, the volume of expanded foam does not fit in the cavity being sealed, and the excess, falling out of the gap, slides down along the door leaf, leaving marks.
- An unprofessional cylinder equipped with a plastic tube is used. In this design, the rate of release of the mixture is poorly controlled, so when the valve is released, the mixture continues to be released uncontrollably from the tube for some time. When you swing the balloon, it comes off and splashes fall on the door. Also, when the contents of the cylinder run out, the remaining gas comes out of it jerkily, carrying splashes of the mixture flying out of the tube at high speed. These splashes can also get on the door leaf.
Break off a piece
The so-called chrome elements of the bumper, namely decorative plastic linings with silver paint that imitates a galvanic layer of metal, are very sensitive to a powerful jet. Due to temperature changes in winter, they often develop cracks, around which the paint begins to peel off. If a jet hits there, there is a risk of breaking off a piece of the coating.
In the same way, you can damage the paint at the joints of body panels or on wheel arches. The paint layer in these places is often damaged by flying stones and becomes covered with microcracks. Excessive force of the water jet can aggravate the matter and peel off particles of old paint from the body.
Don't boil! Do I need to wash my car radiator?