Hi all! In this article we will look at a simple way to convert a regular ironing board into a folding one. Probably everyone has such a thing as an ironing board, so I have one! But, unfortunately, there is absolutely no space in the apartment for it. When unfolded, it takes up precious space and interferes with movement around the apartment; when folded, there is also nowhere to put it, so after thinking a little, I decided that it was time to attach it somewhere. The only free space in the apartment was the loggia; the size of the board was perfect, and besides, there were sockets in this place, which undoubtedly simplified everything. All that remained was to figure out a way to adapt the board so that it would be convenient to use. You can find out what I got out of this by reading the article to the end.
I have attached detailed instructions and a photo report.Materials and tools
To work you will need:
- jigsaw;
- construction stapler;
- drill with wood drills;
- metal ruler;
- compass;
- circular saw and fine-toothed disk;
- sandpaper of different grain sizes or a grinder;
- self-tapping screws;
- pencil for marking;
- piano or hinge hinges;
- scissors;
- hammer.
Materials that will be required to make a built-in board in a cabinet:
- furniture board, sheet of ordinary or moisture-resistant plywood or chipboard with a minimum thickness of 12 mm;
- 2 bars 40*70 mm or a sheet of plywood 10 mm thick;
- wood glue;
- thick fabric for backing;
- natural sustainable fabric for decoration.
Fabric covering
Before starting this procedure, you should attach the rotary loops to the straight edge of the board at both ends.
First, the workpiece is covered with thick fabric. You can use a towel, wool blanket, or other heat-resistant material.
Lay the fabric face down on a flat surface and place a board on it so that the loops are on top. Wrap the edges of the material onto the workpiece. Fix them so that the fabric is slightly stretched. A construction stapler is used for fastening. Excess fabric around the entire perimeter is cut off with scissors, leaving 5-10 mm for allowances. If in some places the staples do not fully penetrate the wood, hammer them in with a hammer.
In the same way, cover the workpiece with decorative fabric (cotton, linen or other natural and heat-resistant material are suitable).
Some popular models from top-rated manufacturers
Among the available options for built-in boards, there are those that you can follow when making devices for ironing clothes/clothes yourself, or buy and use for their intended purpose - they will last a long time and faithfully. I am glad that they were produced mainly in Russia and the CIS - TriYA, IRON SLIM, Shelf-On, “Lubimy Dom”:
- wall-mounted ironing board “Mermaid” with a chrome-plated pipe frame and an automatic lock - installed quickly and easily, taking up only 8 cm from the wall;
- built-in “Rocket” board with variable installation methods (inside and outside the cabinet), mounting on the right or left rack, with a varied set of ironing surfaces and, what is especially valuable, its maximum permissible load is 70 kg;
- wide built-in ironing board attached to the wall with reinforced brackets with a mirror cabinet from IRON SLIM;
- compact ironing board Astra-mini Eco, built into a cabinet with hinged doors, with a plastic lock included - child protection.
Support elements
On another large board, from the wide end, screw the strip that is 90 cm long to its entire length. Attach two corners to the strip along the edges of the plywood so that when they are placed on the main board, their outer sides are in close contact with the installed strips on the edge of the main plywood. Fasten the corners with a furniture canopy from the inside - they should fold freely inward.
Five unusual ironing boards
1. Bright board I_ROni_Ca from Orit Mazurik Designs, unfortunately, just a project. But we would like to see it come true!
From this video course you will learn how to make such an unusual furniture device. It's called: ironing board behind the facade.
If you are wondering what to practice on for the first time in order to test yourself as a furniture maker, this is just the best option for a beginner.
You will have the opportunity to work with:
Laminated chipboard, - chrome pipes, - guides, - mirrors or glass, - facades.
These are almost all the main materials that are used in the modern furniture industry.
Manufacturing cost of the transformation system: 1500 rubles. The cost of decorating the facade: approximately 2000-3000 rubles. For training, you can divide the manufacturing process into two stages. If you manage to make a transformation system for 1,500 rubles, then as a second step you can think about making the facade part.
Ease
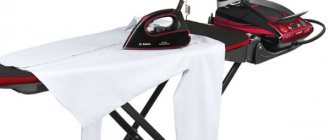
Ironing devices should not be bulky and weighty, since they are mainly used by the fair half of humanity.
But it is not advisable to purchase products that are too light, for example, on plastic legs; they are often shaky and short-lived.
Reinforced legs are also not a very good option - it makes the structure heavier; the best option is aluminum supports.
Preparing a niche
First of all, before installing the ironing board, you need to make a niche where the device will be folded. That is, first you need to make storage for the ironing structure. It is easier to make a niche in a frame-type house. You just need to pull out the inner lining and then give the niche a special shape using wooden boards.
To correctly calculate the size of a niche, you should take into account the dimensions of the ironing board. The lower limiter, located at the very bottom, should be located at a height of 80 cm, not higher. This height will allow you to unfold the ironing structure for convenient use.
A solution for everyone
To ensure that the ironing board does not take up space and is always within reach, you can use the following idea.
hanging ironing board on the door
By hanging a special model on the door, you forever solve the issue of placing the ironing board.
This model can be found in online stores and its cost is comparable to the price of an average ironing board.
It is very convenient to place the ironing board on the bathroom door, but it is important to take care in advance of additional reinforced hinges for the door leaf.
There are also models that attach to the wall and fold vertically.
Ironing board on the wall
You can hang the ironing board on the wall
Often the space behind the door or on the walls is not used. The board does not require much space, so you can safely hang it on the walls. This will not interfere with your movement around the room and will save space. If you decide on this option, choose the upholstery of the ironing board to match the color of the curtains, furniture or accessories so that it decorates the interior and becomes part of it.
Ironing board as part of the interior
To secure the ironing iron to the wall, use regular coat hooks, which are usually used in hallways. It is enough to fix two such hooks on the wall and you can already hang your ironing board on them. Just make sure that the fastenings are reliable and can withstand the load. For these purposes, choose metal hooks.
Ironing board with clothes hooks
In a wall cabinet
If you like to make furniture with your own hands, you can make a special wall cabinet for the ironing machine. This will make your interior more harmonious and attractive, as well as functional.
Ironing board in wall cabinet
The ironing board can be hidden in a single cabinet or the design can be supplemented with shelves for storing household chemicals and various small items. And don’t forget that such a piece of furniture should fit harmoniously into your interior, so think carefully about its color scheme and the material from which it will be made.
Compact cabinet for ironing board
It’s so convenient not only to hide the board, but also to use it for its intended purpose.
And a few more important details that should not be forgotten:
• Locate the ironing iron storage area near an electrical outlet.
• Keep the iron and socket out of the reach of small children. If the outlet is located at a low level, cover it with special protective plugs, which are sold at any hardware store.
Wooden ironing board cabinet
A great way to hide not only the ironing board, but also the socket
Not long ago we wrote a review of original storage systems
. In it you can find a lot of interesting and useful information for yourself, as well as see photos of real examples.
Did you like the article? Then support us, click
:
How to choose the right built-in whiteboard
Buying an ironing board is a complex task that requires taking into account a large number of nuances. It is best to seek help from specialists who will tell you the features of each model and warn about their shortcomings. If you choose a product yourself, you need to pay attention to the following characteristics:
- Size. You need to buy a board that, after installation, will not interfere with the free movement of people around the apartment. To eliminate the possibility of error, you should make all the necessary measurements in advance.
- Weight. This indicator is important when choosing products that will be attached to a thin cabinet wall. If the weight is too heavy, the device may fall and break something in the apartment.
- Sustainability. When ironing, you can never rule out the possibility of getting burned. To prevent this from happening, the foundation must be stable. In addition, a shaky structure will cause inconvenience to the owner.
- Quality of support. To prevent the product from falling out of the cabinet or niche, it must be equipped with a reliable lock. This structural part is made from a variety of durable materials.
- Reliability of the mechanism. The device that allows you to raise and lower the board should work without any problems. When purchasing a product, you should ask the seller about the material from which the mechanism is made. It must be strong and durable.
Device
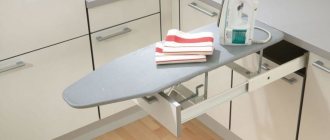
Ironing boards that are attached to the wall are most often hidden in a closet in order to hide a necessary household item nearby and rationally distribute the space of the room. A wall-mounted ironing board will be convenient for those who do not have a storage room or a special room for household needs in their apartment. Thus, it is possible to place all the necessary things in one place: an iron, a water spray bottle, accessories for cleaning the iron, an additional armrest for the board and much more. A wall-mounted model usually lacks such advantages and can be placed in any corner of the apartment, even if it is not entirely convenient for the owners.
If the ironing board is hidden in a closet, it is often made foldable, which means the device becomes much more complicated. The following main elements can be identified:
- support;
- folding mechanism;
- ironing surface.
The support is the part that is attached directly to the surface of the wall or cabinet. It is important to secure the base well so that it can easily support both things when ironing and the weight of the board itself when folded. The next important detail is the fastenings, which must be made only from high-quality and durable materials so that the product lasts as long as possible.
The last part, namely the ironing surface, can be wooden or metal, depending on the need and wishes.
The dimensions of the board can be very diverse, from miniature, where small wardrobe items will be placed, to a full one and a half meter surface, on which you can easily iron an evening dress or raincoat. The fasteners will be different for each case: a more powerful design requires strong and reliable systems, a smaller one makes it possible to use dowels and screws of suitable length, which are screwed into the back wall of the cabinet, if it is strong enough, or into the wall.
Making a folding design
Now you need to figure out how to mount this option yourself, make drawings and a diagram. A special mechanism allows you to lower and raise the tabletop if necessary, which is very convenient. In addition to the tabletop, this ironing structure also has a frame built into a wall niche and a footrest.
By the way, you can choose different sizes for this type of device. You just need to take into account the availability of free space in the room where the built-in ironing board will be located. To make the ironing device more attractive, you can use various decorative elements.
In the dressing room
An ironing board in a dressing room is very convenient because things can be immediately placed on shelves.
ironing board in the dressing room
Today, manufacturers of storage systems for wardrobes offer different options that will make the ironing process convenient and comfortable.
built-in ironing board
Rules for choosing functional ironing boards
When preparing to purchase or accept the ordered and installed drawers and built-in ironing boards on the wall, check:
- folding mechanism - smooth lowering, no noise, there should be no doubt about the quality and durability of the material;
- reliability of fastening of the support to a box, shelf or wall and stability of the structure - swaying, dangling in a horizontal position will unbalance the fastener, leading to injury during ironing and breakage;
- weight of the structure - the wall thickness should not hold, but calmly hold the total mass of the ironing board, linen and iron;
- warranty promises and obligations of the manufacturer and installer: no guarantees - refusal to use.
How to make it yourself
The easiest way is to make a folding type. Firstly, due to the availability of mechanisms for it, and secondly, due to the absence of the need for additional work on organizing electrical power. We chose any free wall next to the socket - all that remains is to make a rectangular box and attach the folding mechanism to the wall.
The easiest way to make a folding board with your own hands.
Each mechanism has its own maximum load limits, this must also be taken into account. Sometimes you can do without a decorative element, but this option is not very aesthetically pleasing.
Without a decorative element, the board fastening mechanism does not look very aesthetically pleasing.
As a mechanism for fastening the canvas, you can use a simple U-shaped pipe to which the base of the board will be attached. On the one hand, such a canvas can even be fixed with magnets or hooks sold in every hardware store.
You can fix the ironing board cloth in different ways.
The folding board must rest against the wall, and to reliably implement this possibility, a stop connecting the base of the board and the wall is sufficient. It is better that during ironing this stop is fixed to both contacting surfaces.
Important! The retractable option can be assembled only if the dimensions of the device can be fit into the available furniture space.
The same rule applies to the ironing cloth built into the cabinet. It can be installed only if the dimensions of the furniture correspond to the ironing cloth itself in a vertical position and the presence of a mechanism.
When creating a retractable board, you should take into account the dimensions of the furniture.
Reviews
Our daughter is a needlewoman. She sews toys and clothes for them. Parts and workpieces need to be ironed. There is a stationary board of a folding type, but it is inconvenient to lay it out all the time, and the children don’t want to clutter it up. We installed a “Mermaid” wall board in her room – it’s compact and easy to handle in children’s hands. When unfolded, it leaves a good gap - it’s convenient to iron both small pattern pieces and our (adult) things. Everyone is happy.
Egorov Dmitry When ordering the wardrobe, we immediately provided an ironing board with a rotating function. They installed everything quickly, neatly, without unnecessary play - everything is clear and thought out: the tabletop is at the right level - your hands don’t get tired and your lower back doesn’t ache from unnecessary bending, doesn’t sag or wobble during ironing. We've been using it for four months now - absolutely no complaints. Both my wife and I are happy: she’s comfortable, and I’m comfortable.
My husband gave me a gift - he ordered an ironing board with a mirror cabinet from IRON SLIM. This is just lovely! The house is always in order. And it gave in to me instantly - no difficulties either during opening or assembling. I managed it right away. Now I want to give my daughter-in-law the same birthday present.
Source
Master class on making a cabinet with an ironing board
Set up a niche for a cabinet with an ironing board. A recess is formed in the wall according to the dimensions of the box so that the width and length exceed the dimensions of the board by several centimeters. Standard - 125 x 40 cm.
Operating procedure:
A box is made from wood (boards), its lower part is fixed from the floor at a height of 80 cm.
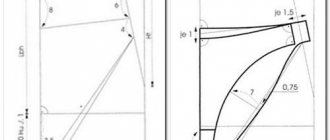
The board part is cut out of furniture board, chipboard, plywood. Contours are marked on the material using a ruler and compass so that the front part is rounded; instead of a compass, you can use a pattern.
Manufacturing process
{banner_x}
Let's get started!
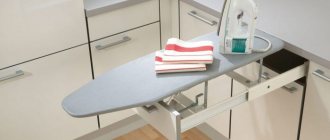
I took this regular ironing board.
Next, we take it, turn it over and put it on the floor.
Now we unscrew all the existing fasteners.
Next, we take the unscrewed rack and move it forward to the narrow part; previously the fastening was in the opposite direction. We place it so that the stand fits evenly along the length
boards
, then, when everything is ready, we fix it with self-tapping screws. The front part will serve as a support.
Now all that remains is to secure the supporting part, which sets the height
boards
.
{banner_z}
Before starting the remodeling, I measured the pitch of the support legs, choosing the optimal height, since in the future there will only be one, the other two will not be used, but, by the way, they are not really needed.
Then we attach the stop in the right place.
The following happened.
Now it's time to move the converted structure to the loggia.
To iron
board
I was able to recline, I took the two loops I had, using their reverse part
boards
will receive support and the ability to recline.
I placed them at the required level and made markings for the holes.
Drilled holes. I secured it with dowels and screws.
Next, I unscrewed everything, put a new cover on the board, since the old one was rendered unusable, and fixed everything back.
The next step was to install the locking element, it will hold the board in the folded position.
{banner_w}
The latch seemed to me to be the most suitable element for this.
Fixed it at the desired height.
Next, the second element from the latch was installed directly on the board itself.
When folded it looks like this.
That's all
board
ready to use.
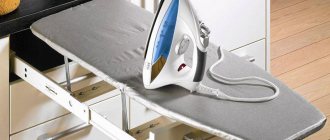
Shelf in the kitchen
There are ironing boards that can be built into a kitchen drawer.
pull-out ironing board
This solution is suitable for a small apartment and does not take up much space.
Modern interiors are subordinated to the idea of convenience, so do not be afraid to experiment and use non-standard solutions - they were invented to make our lives easier and more comfortable.
Related articles:
Which sockets are almost always forgotten during repairs?
TOP 5 unforgivable repair mistakes
Small apartment: how to make it visually more spacious
author: Ruslan Kirnichansky
I really want my advice to be useful to you, and in order to receive new articles faster than anyone else, you can subscribe to my channel “An Architect’s Diary”
VKontakteFacebookYoutubeInstagram Telegram
Required materials and tools
To make a folding ironing board from a wall, cabinet or other element (mirror-shaped designs are often used), not many elements are needed.
Materials:
- Plywood or other material for the entire frame, more than 12 mm thick.
- Tightening material, staples.
- Flange.
- Sawn chrome tubes.
- Washers for joker pipe or bolts for upholstered furniture. The second option is better, because without manipulation it completely disappears in the frame.
- Guides.
- A bolt with a hat turned on a grinder or a long block for fastening to the guides.
- Handles for guides.
- Cut bolt.
- The plate to which the fixation lock will cling.
The tools you will need are a screwdriver, a mallet, a grinder, a hexagon, a pencil, a meter or ruler, a square, a stapler, and scissors. Depending on the approach and elements used, additional tools may be required.
Preparation of materials and tools
To make a niche you will need: a leg for support, a frame for wall mounting, plywood for cutting out the base of the board. For the surface prepare: plywood sheet 16 - 20 cm thick, metal guide rails, confirmants, self-tapping screws, piano hinges, upholstery fabric, soft padding, interlining.
List of tools:
- electric jigsaw, manual or electric router, drill with a set of drills;
- stapler and staples No. 8;
- hammer, chisel, knife, level, square, scissors;
- compass, pliers, Phillips and flat-head screwdriver, wrench to fit the bolts.
Use sandpaper of grit No. 60, 80, 120; to use it you need a wooden block. Self-tapping screws are prepared for woodworking (with large carvings). Typically M10 bolts with corresponding nuts are used. Glue the base fabric onto the PVA compound.
Features of folding ironing boards
From a mechanical point of view, for normal functioning such a board requires a mechanism capable of performing two functions:
- fix the surface in a vertical position;
- support the structure and the items and household appliances placed on it during ironing.
And if both conditions are met, then the board will be able to perform its functions for a long time.
If you choose the right built-in ironing board, you will enjoy it for a long time.
As you can see, the main thing when choosing a built-in ironing board is to understand your needs and compare them with the existing ergonomics of the room in which you plan to place it. Decent board options can be easily found in many furniture stores in your neighborhood.