There are things that make a housewife's life easier. This is exactly what an ironing board is. It’s good if the apartment has a place for this item - a storage room or a convenient niche. An alternative to a massive portable stand can be an ironing board built into the cabinet. This ironing surface is very convenient. It saves space, is easy to hide, and when folded is completely invisible.
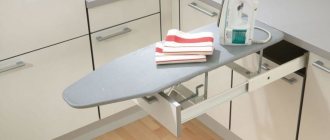
Retractable option
Types of built-in ironing tables
Folding models are mounted in cabinet doors. Boards with a simple mechanism turn into a ready-made workplace in a matter of seconds. To do this, they are lowered down from the wardrobe door.
The size of the folding ironer corresponds to the parameters of the cabinet door. You can choose a board model that will fit into the interior of the room and remain invisible.
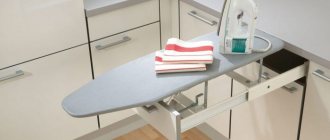
The retractable design is hidden inside furniture drawers; it is considered the most compact. This table is ideal for small spaces, but the retractable mechanism is more delicate than a folding one and can be damaged if handled carelessly.
Hidden ironing surfaces are hidden behind mirrors, wall panels, paintings, and other interior decorations. The operating principle of the sliding mechanism is simple - the “camouflage” moves to the side, and behind it there is a compartment with a board. To prepare for work, simply pull it down from the opening.
Ironing board in the closet
Expert opinion
Svetlana Kolesnikova
Designer
A closed automatic ironing cabinet is a small unit that completely replaces an iron and steamer. You can place several items of clothing inside at once. Some time after starting the machine, the laundry is ironed.
Ironing device in the closet
Built-in ironing boards in stores are not cheap. Their price ranges from 20–30 thousand rubles. In order not to regret the money spent, before purchasing you should pay attention to the dimensions and design features of the product.
The sliding board mechanism is quite complex. Self-tapping screws or self-tapping screws are used for fastening. They are screwed into the thick wall of cabinets and drawers. The presence of spring blocks ensures smooth sliding of the working surface. Furniture fittings stores sell mechanisms with the ability to rotate the ironing table up to 180 degrees. You can fix the board in a rotated state every 15 degrees.
Depending on the model, the mechanism consists of retractable guides on rollers or a structure made of metal tubes. To ensure that the sliding ironing surface does not sag and is stable, a folding stand-leg or stop is used. It is fixed below the attachment point of the main horizontal plane. Additionally, the boards are equipped with a metal stand for the iron.
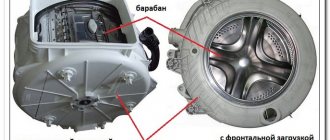
Built-in wardrobe mechanism
What are they made from?
To make a built-in ironer, waterproof plywood with a thickness of 10–20 mm is most often used. The surface is insulated with heat-resistant foil and covered with decorative material.
For the manufacture of cheaper models, particle boards are used. The working surface of an ironing board made of this material quickly warps under the influence of high temperature, begins to peel, and creaks during ironing.
Boards made from perforated metal plates are particularly strong and durable. But such products are quite heavy. It takes a lot of effort to get them ready for work. Lighter and easier to use mesh metal plates treated with an anti-corrosion compound.
Mesh metal ironing board
Dimensions
If you are going to buy a ready-made transformer, you only need to select its model. But when it is necessary to integrate an ironing board into a ready-made cabinet, it is important to take into account the dimensions of the existing furniture.
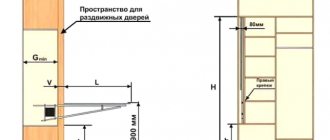
The compact retractable design can be installed in a cabinet with a depth of 50 cm or more. For a more massive ironer, you will need a wardrobe up to 1 m deep.
The size of the box for a board fixed vertically in height should only be a few cm higher than the size of the ironing table. And it is 10–20 cm deep.
We do it ourselves
Of course, today there are no problems finding ironing boards. In any specialized store you can find many different models. And yet, there is another fairly simple way that will allow you to acquire this necessary item in your everyday life - you can make an ironing board with your own hands. You can even give such a thing as a gift to a loved one. Such a gift will be appreciated when they find out that you did everything yourself.
We washed and then ironed all the clothes and linen, now the question arises: “Where to put and hide the board?” Typically, ironing boards are left unfolded in the room, and some people fold it every time after ironing and put it behind some furniture to free up space in the room. But this kind of folding and unfolding takes a lot of time and effort. There is a great solution - a retractable ironing board.
This built-in type of ironing design combines many advantages.
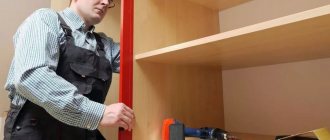
- Easy installation. For maximum ease of use, the board is attached to the wall. Several special fasteners are screwed to the wall, and the board itself is then installed on them. By the way, it is recommended to carefully choose a place so that there is an outlet next to the built-in structure.
- Significant savings in free space. Household members do not have to be limited in their movement, because the ironing unit can now be hidden in a closet, and this, in turn, will give the room more free space.
- Practicality. You need to iron the clothes - the board is taken out of the closet, ironed - then hidden back.
- Appearance. The folding ironing structure is designed to match the style of the interior, thereby complementing the overall picture of the entire space.
- Reliability of the strongest design. All these qualities provide the ironing board with a long service life. For example, there are models that are equipped with a strong metal frame with thoughtful details.
Nuances of choice
Selecting a product to match existing furniture is not easy. For a built-in ironing board, it is better to go to a specialized store or order it from a specialist.
It is difficult to accurately choose a model for a cabinet with a corner location. Therefore, before purchasing, you should make accurate measurements of the niche parameters.
In homes where space allows, you can install a combination cabinet for storing a vacuum cleaner and ironing board.
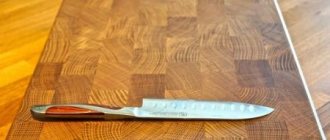
It is important to pay attention to the quality of the materials from which the ironing board is made. The metal frame must be durable, and the working surface must be made of a material that will not deteriorate from exposure to high temperature or steam. The retractable mechanism should slide smoothly and silently. It should not swing during operation.
Before purchasing a built-in ironing table, you need to check the strength of the folding mechanism. Made of thin metal, it will quickly fail. The board will be unusable. The strength of the support is no less important. In order to withstand the load during ironing, and also not fall out of the cabinet, it must be equipped with high-quality fasteners.
Designer white board
You should ask the seller about the weight of the structure. The cabinet wall may not be able to withstand the load created by an overly heavy table. And the heavy weight of the ironer will cause trouble for the owners.
Location on the balcony
Design
It is necessary to take into account many sizes and correlate them in one product. You can consider the project in the form of a strict drawing or make preliminary sketches. They display:
- shape of parts (guides, ironing board, frame elements, legs);
- dimensions of all structural elements;
- joints connecting parts to each other and to cabinet elements.
The diagram will help you calculate the amount of material, hardware, and bolts. If changes are needed in the process, they are easier to track on the drawing and adjust.
Popular models for built-in cabinets
There are many models of built-in ironing boards on the market from big-name manufacturers and practically unknown factories. There are three most popular companies that manufacture ironing board cabinets:
| Manufacturer name | Model | Characteristics |
| Shelf.On (Russia) | Aster | Small size model. The work surface is hidden behind a chipboard facade. The depth of the cabinet is 8 cm. It is made in the version with a hinged door or a sliding door. The ironing surface is made of waterproof plywood, protected by a Teflon cover, lined with a layer of foam rubber. The system is equipped with a lock. It protects against accidental loss. The weight of the structure is 13 kg. |
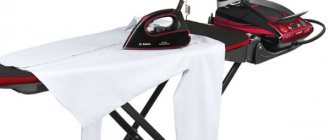
| Asko (Sweden) | ASKO HI 1152 W | Pull-out model for installation between washing machine and dryer. Product with a metal base. The retractable mechanism securely fixes the structure in weight. The surface dimensions are 59.5 by 93 cm; an additional section for processing sleeves is mounted. |
| Belsi (Italy) | Belsi Verona | The “compartment” design is attached to the wall or the inner surface of the cabinet with six screws. Equipped with decorative moldings. The ironing surface can be covered with a mirror or decorative panel if desired. The board is covered with a cotton cover. There is a built-in socket and iron stand. Table size - 38 by 128 cm. |
If you have a question about making a built-in board, you should purchase high-quality fittings. Among the best manufacturers of frames are Starax (Turkey), Hafele (Germany). Holders for folding and folding structures can be purchased in online stores and specialized retail outlets.
ASKO HI 1153T - ready-made design for installation in a cabinet
How to make your own built-in whiteboard
To become the owner of a convenient ironing device, you don’t have to shell out a significant amount of money at an Ikea or other furniture store. If you have the tools, you can make a built-in board yourself.
Making a wall cabinet with ironing board
You will need the following design components:
- support leg;
- frame for wall mounting;
- tabletop.
Separate outer cabinet for ironing board
The size of the device may vary depending on the dimensions of the room where you plan to install the ironer. You should prepare a drawing of the future design in advance and stock up on decorative elements for cladding the product.
Constructing a storage niche for an ironing iron with your own hands:
- It is necessary to make a recess in the wall. Its size should correspond to the dimensions of the box and be several centimeters larger than the ironer itself.
- The box is made from boards. Its lower part is fixed at a height of 80 cm from the floor. This is necessary for the stability of the ironing surface during operation.
- The standard dimensions of a built-in folding ironing board are considered to be length 125 cm, width 40 cm. The product is cut out of plywood or furniture board.
- Using a pencil and ruler, make marks on the prepared material. The front of the table should be narrowed and rounded. A compass is used to create a contour.
- After delineating the contours, the material is cut. This is done using an electric jigsaw. Then the side surfaces are sanded with a machine or a block with sandpaper.
- Hinges are installed where the smoother is attached to the wall. A metal or wood leg is attached to the bottom with a piano loop. At the base of the board, two wooden blocks 40 mm thick and 70 mm wide are mounted. They will provide reliable support for the table while working.
- After installing the fasteners, the board is beaten. For covering, use a soft base (thin foam rubber, an old blanket), thick cotton fabric. The surface of the material should be taut. This will prevent wrinkles from forming when ironing.
- Hinges are used to secure the board to the cabinet wall. For safety, it is worth fixing the rotary type stop. This device will prevent arbitrary opening of the structure. Then install the decorative door. It will turn the board invisible.
How to make an internal niche with an ironing board is clearly shown in the photo:
For an alternative option for making an outer cabinet, watch the video:
Download the parts list with explanations for this video
Preparation of materials and tools
To make a niche you will need: a leg for support, a frame for wall mounting, plywood for cutting out the base of the board. For the surface prepare: plywood sheet 16 - 20 cm thick, metal guide rails, confirmants, self-tapping screws, piano hinges, upholstery fabric, soft padding, interlining.
List of tools:
- electric jigsaw, manual or electric router, drill with a set of drills;
- stapler and staples No. 8;
- hammer, chisel, knife, level, square, scissors;
- compass, pliers, Phillips and flat-head screwdriver, wrench to fit the bolts.
Use sandpaper of grit No. 60, 80, 120; to use it you need a wooden block. Self-tapping screws are prepared for woodworking (with large carvings). Typically M10 bolts with corresponding nuts are used. Glue the base fabric onto the PVA compound.