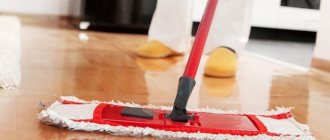
It is impossible to walk around in wrinkled clothes - everyone needs an ironing board. On the one hand, a standard floor device is functional, because it is convenient to iron, but on the other hand, it is irrational: every time you need to lift it, move it apart, walk around it, fold it, and hide it. It takes up a lot of space and is a lot of hassle. Where to iron, how to unload the living space? There is a solution - purchase or make a built-in ironing board.
Types of built-in ironing devices
There are plenty of options for ergonomic, practical ironing devices that relieve space and fit seamlessly into the interior.
Folding
There are several types of folding ironing boards, including the following:
- Classic wall-mounted version of the ironing board. The tabletop-lid (solid wood, laminated chipboard or moisture-repellent plywood) is attached to a frame-frame with a simple folding mechanism, and it is attached to the wall (at two or four points). When folded, the board is positioned vertically; when working, it is positioned horizontally on the floor. There are two possible methods of fixation: without a supporting leg or for (reinforcement) on a stand resting on the floor.
Important!
When installing the classic wall-mounted version of a built-in ironing board, the frame to which the lid is attached remains open. Metallized frame pipes will fit perfectly into a loft or industrial style, emphasizing its deliberate simplicity; disharmony with others is possible.
If the ironing device is hidden in a box with a sliding decorated panel or a hinged door, imbalance can be avoided.
- Ironing board with wall mirror. A two-in-one variation: on the outside there is an elegant reflective surface of any shape or size, on the inside there is an interior device for ironing clothes. The mirror sheet can be hinged - sliding to the side, or hinged - a traditional single-leaf structure using canopies, a box and a movable sheet. An additional advantage of combining two functionalities is unloading the scarce space of a small apartment and its visual expansion. A built-in ironing board with a mirror can be integrated into any interior style by framing the reflective surface with a suitable finishing or decorative material (baguette, molding) - natural wood, wild or ornamental stone, stucco, plastic.
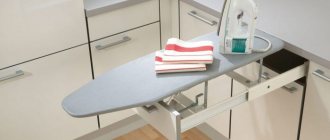
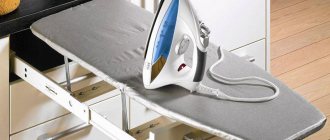
Retractable
A folding version of the ironing board, placed inside a furniture box (in a cabinet, chest of drawers). It is fixed on the guides by the widened part of the base, the tabletop “breaks” in the middle, folding in half - the narrowed part is laid on the wide one - face to face. The dimensions of the retractable ironing board are proportional to the size of the drawer, stability depends on the quality of the guides.
Built-in
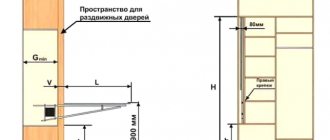
Maximum space saving. The optimal variation for small apartments. It is usually made to order when purchasing a wardrobe or installed with your own hands in both a wardrobe and a kitchen cabinet (a labor-intensive but functionally rewarding process of filing partitions, installing a fastening system and fixing structures).
Important!
In a large ironing wardrobe, it is more advisable to install not a static board, but a rotating or folding board with a built-in socket. In the classic variation of the cabinet with swinging doors - with a folding device and a light weight structure.
Preparatory stage
Ironing board requirements
- A quality product should be light but durable. But if such a result cannot be achieved, it is better to sacrifice lightness than strength. If the board wobbles on thin legs, bends and cracks under the weight of the iron, then it is better to continue ironing on the kitchen table.
- The plane of the board itself should be of sufficient area. Otherwise, tucking and pulling up the laundry will take more time than ironing itself.
- If the board is not upholstered correctly, you have to additionally lay a blanket or thick material on it. To avoid unnecessary worries, the plane is covered with thick fabric with a soft backing.
Tools for work
- Electric jigsaw.
- Manual milling machine.
- Drill, plug drill ∅ 25 mm, drill ∅ 8 mm.
- Drill stand.
- Stapler.
Selecting material for work
A thrifty craftsman does not run to the construction supplies store for every piece of wood. Near the wall in his garage there will always be remnants of timber and furniture panels. And we don’t need anything else. We opted for an 18 mm thick board and planed timber for the legs. Plywood is not suitable - under the influence of steam and water, this multi-layer board will very soon be bent by the propeller.
- Ironing board dimensions 18x1220x300 mm.
- Bars 35x40x1100 mm – 3 pcs.
- Bars 35x40x300 mm – 2 pcs.
For fasteners you will need screws and M10 bolts. To upholster the board you need to prepare a piece of fabric and a strip of foam rubber. Foam rubber can be replaced with Armotex covering geotextile fabric, folded in four. It is better to use a special fabric - non-stick, waterproof. But thick cotton will also work.
DIY built-in ironing board
Several built-in variations are possible in the cabinet:
- retractable - a complex design for homemade craftsmen with specialized telescopic mechanisms;
- hidden - in a niche behind shelves or a mirror - requires stable carpentry skills;
- folding - with a simple and reliable fastening and fixing mechanism.
The folding option is easy to implement. The structure consists of:
- ironing surface (you can use a modernized base of a folding floor board);
- folding device;
- frames;
- support attached to the rear wall of the cabinet.
For a DIY installation, it is better to use the practical installation of a static board to the middle shelf (at lumbar level) using door awnings, piano hinges or butterfly hinges (ideally hidden hinges). The upper shelves above the ironing tabletop are filed down so that it can be placed freely when folded behind a closed cabinet door.
The support must be attached to the wall with the same hinges that were used for the table top, and hooks must be installed under it on the bottom (back) side of the board. During operation, the lower support is folded back and secured with hooks to the board lowered onto it.
This version of a hand-made ironing device is stable and maneuverable.
Materials and tools
To convert a regular ironing board into a folding one, we need the following:
Material
- 2 door hinges;
- medium sized latch.
Tool
- screwdriver;
- roulette;
- pencil.
Rules for choosing functional ironing boards
When preparing to purchase or accept the ordered and installed drawers and built-in ironing boards on the wall, check:
- folding mechanism - smooth lowering, no noise, there should be no doubt about the quality and durability of the material;
- reliability of fastening of the support to a box, shelf or wall and stability of the structure - swaying, dangling in a horizontal position will unbalance the fastener, leading to injury during ironing and breakage;
- weight of the structure - the wall thickness should not hold, but calmly hold the total mass of the ironing board, linen and iron;
- warranty promises and obligations of the manufacturer and installer: no guarantees - refusal to use.
Work order
Having prepared the necessary materials and tools, they proceed to making the board.
The process of its creation consists of three points:
- marking and cutting the main part;
- covering the board;
- installation in a storage location.
Marking and cutting
On a sheet of plywood, furniture board or chipboard, outline the contours of the future board. The standard product is about 40 cm wide, 120-130 cm long, with a gradually tapering rounded edge. If desired, these dimensions can be easily increased or decreased. You can first make a pattern on cardboard or thick paper, and then transfer it to wood. To form a rounded edge, it is recommended to use a compass, and if you don’t have one, use improvised means (saucer, roll of tape, any cylindrical object of suitable diameter).
Then they move on to cutting. Straight cuts are made with a circular saw, curved cuts are made with a jigsaw.
The cut workpiece is processed with sandpaper or a grinding machine. It is necessary to sand not only the cut points, but also both sides of the board. Since the process generates a large amount of dust, this should be done outdoors or near a hood (it is recommended to protect the respiratory tract with a mask or respirator).
Some popular models from top-rated manufacturers
Among the available options for built-in boards, there are those that you can follow when making devices for ironing clothes/clothes yourself, or buy and use for their intended purpose - they will last a long time and faithfully. I am glad that they were produced mainly in Russia and the CIS - TriYA, IRON SLIM, Shelf-On, “Lubimy Dom”:
- wall-mounted ironing board “Mermaid” with a chrome-plated pipe frame and an automatic lock - installed quickly and easily, taking up only 8 cm from the wall;
- built-in “Rocket” board with variable installation methods (inside and outside the cabinet), mounting on the right or left rack, with a varied set of ironing surfaces and, what is especially valuable, its maximum permissible load is 70 kg;
- wide built-in ironing board attached to the wall with reinforced brackets with a mirror cabinet from IRON SLIM;
- compact ironing board Astra-mini Eco, built into a cabinet with hinged doors, with a plastic lock included - child protection.
Subsequence
Now that all the materials have been prepared, you can proceed to the most important stage - the work itself.
- The first step is to decide for yourself what the scale of the object will be. Typically, the figures vary from 125 * 35 centimeters (length * width, respectively).
- You should measure and transfer the measurements to the furniture panel itself.
- Prepare the bars, the dimensions of which are indicated in the paragraph of the article described above.
- Next, cut out the parts.
- Take a block and measure 52 cm from one end, and 58 cm from the other side.
- Drill a hole at the marked points.
- With other lumber it is enough to do similar frauds.
- The longest of them are worth sampling. To do this you will need a test drill. Thanks to this, nothing will interfere with ironing.
- The remaining product must be combined, and the middle ones must be rotated 180 degrees.
- Create a small gap, the diameter of which will be 8 mm, having first retreated three cm from the border.
- On the other edges, leave a distance equal to two cm and make a sample from one.
- Use bolts to attach the long logs to the short ones.
- From now on, your tabletop support is ready. All that remains is to fix them. To do this, leave a space from the border of the segment of approximately 18 centimeters.
- If you cut a small recess at the other end of the element, then it will be possible to attach a leg there. This is convenient when unfolding the ironing board.
- During production, it makes sense to pay attention to the upholstery of the fittings. This is also easy to do. It is just advisable to take into account the parameters of the tabletop. Next, mark the sketch with a marker and cut along the intended marks.
- Wrap the finished installation in canvas and strengthen the structure with a stapler.
There are times when there is no time to tinker with such inventions, and the presence of a floorboard is mandatory. This problem can be solved with a temporary solution. Doing it is as easy as shelling pears. And if you also own a wide stool, then you are lucky. You only need to assemble a special cover, which will consist of three layers: a blanket, aluminum foil, and cotton fabric.
IMPORTANT! The second of these materials should be attached with the shiny side up. When you have collected all the essential things, you need to connect them with each other. This is done with a needle and thread.
In addition, you can use a stapler for fixation. Whatever the outcome, you will end up with a compact and easy-to-use device. And thanks to the three-layer product, the surface of the chair itself will not be exposed to high temperatures, so safety is guaranteed.
Fabric covering
Before starting this procedure, you should attach the rotary loops to the straight edge of the board at both ends.
First, the workpiece is covered with thick fabric. You can use a towel, wool blanket, or other heat-resistant material.
Lay the fabric face down on a flat surface and place a board on it so that the loops are on top. Wrap the edges of the material onto the workpiece. Fix them so that the fabric is slightly stretched. A construction stapler is used for fastening. Excess fabric around the entire perimeter is cut off with scissors, leaving 5-10 mm for allowances. If in some places the staples do not fully penetrate the wood, hammer them in with a hammer.
In the same way, cover the workpiece with decorative fabric (cotton, linen or other natural and heat-resistant material are suitable).
How to determine how high-quality raw materials a manufacturer uses?
The surface of high-quality WPC decking boards has a smooth appearance, the geometry of the product is uniform and symmetrical.
Severe deformation of the profile indicates a violation of the technological process during the manufacture of the product and reduces strength, therefore:
- on the end sections, you need to check the absence of voids and “swelling” of the inner surface;
- there should be no wavy bends on the profile;
- in places of breaks and cuts there should be no foreign inclusions (they are usually gray, greenish or dirty blue), stains - this indicates impurities of low-quality secondary raw materials.
When directly inspecting the product, convince yourself of how high-quality the board is being offered to you.
pros
We washed and then ironed all the clothes and linen, now the question arises: “Where to put and hide the board?” Typically, ironing boards are left unfolded in the room, and some people fold it every time after ironing and put it behind some furniture to free up space in the room. But this kind of folding and unfolding takes a lot of time and effort. There is a great solution - a retractable ironing board.
Article on the topic: Do-it-yourself vacuum table
This built-in type of ironing design combines many advantages.
- Easy installation. For maximum ease of use, the board is attached to the wall. Several special fasteners are screwed to the wall, and the board itself is then installed on them. By the way, it is recommended to carefully choose a place so that there is an outlet next to the built-in structure.
- Significant savings in free space. Household members do not have to be limited in their movement, because the ironing unit can now be hidden in a closet, and this, in turn, will give the room more free space.
- Practicality. You need to iron the clothes - the board is taken out of the closet, ironed - then hidden back.
- Appearance. The folding ironing structure is designed to match the style of the interior, thereby complementing the overall picture of the entire space.
- Reliability of the strongest design. All these qualities provide the ironing board with a long service life. For example, there are models that are equipped with a strong metal frame with thoughtful details.
What will you need?
The plane on which you will iron things is best made of wood, namely chipboard. Your product will last much longer if you use a material that has increased moisture resistance. If you make a board from ordinary chipboard, you will have to protect it from getting wet and damp. If desired, you can use solid wood of any thickness. Don't make the board too thick, otherwise it will turn out very heavy. The cover for the board is best made from quilted fabric.
If you want to protect the wood from heat or need a soft surface for ironing, you can use batting as a filler.
Many home craftsmen place this material in two layers. In addition to consumables, you cannot do without some tools. For example, you will need glue for attaching the batting to the wood, wax, scissors, a stapler with staples and a jigsaw, which is convenient for cutting out the outline from the wood.
Ease
Ironing devices should not be bulky and weighty, since they are mainly used by the fair half of humanity.
But it is not advisable to purchase products that are too light, for example, on plastic legs; they are often shaky and short-lived.
Reinforced legs are also not a very good option - it makes the structure heavier; the best option is aluminum supports.
In a wall cabinet
If you like to make furniture with your own hands, you can make a special wall cabinet for the ironing machine. This will make your interior more harmonious and attractive, as well as functional.
The ironing board can be hidden in a single cabinet or the design can be supplemented with shelves for storing household chemicals and various small items. And don’t forget that such a piece of furniture should fit harmoniously into your interior, so think carefully about its color scheme and the material from which it will be made.
Case
For comfortable use of the ironing board, it is necessary to keep its working surface clean. You will need a cover for your DIY ironing board. This will provide the following benefits:
- will protect the structure from contamination;
- will save a person from the need to clean it;
- will increase the service life.
As you can see, the case is a necessary element for proper storage of the above product.
By doing the work on your own, a person receives not only a high-quality finished product. He has the opportunity to enjoy the fruits of his labor and can brag about the work he has done.
Assembly
Now you need to connect the two structures to each other.
To do this, you need to attach one side of the legs (one pipe along the length) to the wooden sheet using self-tapping screws (they should be much shorter than its thickness).
To ensure that the second part is secured, clamps are installed on the opposite side, several can be used to adjust the desired height.
Thus, by performing a minimum of actions, using basic materials, you can get an ironing board that will be no worse than a store-bought one, and even much cheaper.