Getting the perfect invisible stitch is very important when sewing. The main feature of this work is the stitches that are invisible from the “face” of the product. However, such a hidden seam can be done manually using thread and needle, or on a machine.
In this article we will tell you:
- What is a blind seam
- Kinds
- Purl
- Facial
- Where is it used (table)
- How to choose a thread and needle for a blind stitch
- Preparing to sew
- How to secure thread at the end of a seam
- Step-by-step instructions for making invisible seams by hand
- Hem your trousers
- Fold the edges of jeans
- Connect product parts
- Hem the bottom of the skirt
- Attach a patch
- Sew up the hole on the front side
- For repairing soft toys
- Attaching the sleeves of shirts and blouses
- Sewing products using patchwork or quilting technology
- For knitwear and knitwear
- For shoe repair
- Blind stitch on a sewing machine
- Tips for making a blind hem
Show in full ▼
Features of a hidden seam
The peculiarity of the seam is that it actually exists, but it is not visible. The stealth effect is achieved with practice. To begin with, use fabrics with pronounced textures, where the weaving threads are visible. It can be cotton, linen, woolen fabric.
There are 2 ways to use the blind stitch:
- For hemming the product (purl blind stitch). In this case, you need to sew so that no stitches are visible on the front side. The stitches vary in length, and on the face fabric the needle only catches 1-2 threads.
- For connecting two parts (front blind seam). The cut edges of the parts are folded inside out, and the thread is passed into the folds of the parts. If the color of the thread is chosen exactly to match the product, the seam becomes almost invisible. The stitches on both sides are equal in length.
Hemming trousers
At first glance, it is very simple to hem trousers. But, in fact, this work has several nuances. In order to hem them correctly and the result is neat folds, you need to familiarize yourself with the work procedure.
Hemming trousers:
- The first step is to carefully determine the desired length of the trousers. Tuck the edges of the trousers directly onto the wearer. Leave a small margin, about a few centimeters, in case they need to be lengthened in the future;
- then fold the trousers along the entire length and pin them with pins - this will allow you to cut the trouser legs evenly. Stitch the hem tape and finish the edge with an overlocker;
- hide the ends of the threads with a hook;
- Next, a blind seam is made. To do this, you need to turn the trousers inside out and pin the fold, stepping back 1 centimeter from the cut;
- insert a needle with thread and a knot into the overlock stitch, grabbing a couple of threads of the fabric of the product and bring the needle back to the hem;
- It’s worth sticking to the smallest step possible.
Where is it used?
A blind seam by hand (photos are presented step by step later in the article) is easy to do. It has several purposes. The main function is to connect two parts.
The main uses of a blind seam are described in the table:
| Where is it used? | Blind seam type |
| Clothes repair (suturing rips, cuts, loose seams) | Facial connecting |
| Making toys (sewing parts of arms, legs, heads, ears, stitching seams) | Facial connecting |
| Hemming bottoms (jeans, trousers, skirts, blouses) | Purl hem |
| Making clothes (sewing sleeves, lining) | Facial connecting |
| Manufacturing of products using patchwork and quilling techniques (folding the edges of the product, processing decorative elements) | Purl hem |
What to do?
Don't let the lack of an overlocker bother you. You can sew the overlock stitch by hand. It's not as difficult as it might seem at first glance. Of course, you will have to spend much more time, but the result may look very decent in appearance.
What is an overcast stitch? We use it for finishing fabrics during the sewing process. At the same time, they can be used to fasten individual panels. Thanks to this, you can get a very neat tissue cut. There are several ways to make an overcast seam by hand. And in our article we will try to touch on some of the subtleties of this work.
The photo below demonstrates quite clearly what a hand-made overcast seam looks like in a product.
How to make the perfect invisible seam by hand?
To learn how to make a blind seam, you need to have suitable threads, needles and follow the basic rules for its implementation.
Secrets of the perfect blind seam:
- Work must be done in comfortable conditions with good lighting.
- The working thread is matched close in color to the fabric of the product. If it is not possible to choose a color, then use black thread for dark fabrics, and white thread for light ones.
- The needle is thin, sharp, short with a small eye.
- The sections of the parts to be sewn are folded inside out. They should have clear edges on the folds. If necessary, the folds can be ironed with an iron.
- The folds of the parts must be held firmly with your fingers so that they do not move relative to each other. You can pin the seam.
- When stitching, the stitches should go exactly to the edge and have the same pitch (2-5 mm). The needle must be pulled out exactly from the edge of the fold.
- The thread connecting the parts must run strictly perpendicular to the folds.
- When sewing, pick up the threads of each part separately, and do not try to pass the needle into 2 fabrics at once. It will take more time, but the seam will be perfect.
- At the beginning of the seam, the needle must be inserted from the inside out to hide the knot.
- The seam is completed by securing the thread by threading it into the loop made and tightening.
Preparing to sew
When working with the technique of creating a hidden stitch, people put extra strain on their eyes. The technique requires concentration and a lot of free time. It is also necessary to hold the clothing, toy or other item without changing position, otherwise the vertical seam will turn out crooked and visible.
Therefore, you need to start preparing by choosing a comfortable place with good bright lighting. A practical choice is a table with a lamp. This can help preserve vision and posture. However, sitting on a hard chair for a long time is uncomfortable. Then try to set up a work area on a sofa, armchair or sofa next to the lamps.
Organize your “sewing area” so that you can always reach the tools: pins, threads, scissors, chalk.
Install lighting to your left. It is important that the rays hit the entire workspace. It is advisable not to rely on sunlight - it tires the eyes. The ideal option is a convenient combination of artificial and natural lighting.
Secret connection
A blind stitch, or as it is called, a blind stitch, is a sewing technique in which hidden stitches of a permanent nature are formed. Each connection element is formed by using a thin thread. More experienced needlewomen do not pay attention to this nuance and use any type of material.
What threads can be used
The color of the thread must match the color of the fabric of the product or lining. The connection itself is localized in those places where it is necessary to secure layers or parts of the product invisibly. Thanks to the feather stitches, the parts are connected carefully, which prevents displacement, distortion and deformation of the shape and silhouette of the item during use.
It is necessary to sew without a seam:
- if the jacket has come apart at the seams. The only option to carefully repair the damaged part is to use a fur stitch;
- when sewing a knitted or hand-sewn hat, this particular stitching technique will also come in handy;
- if a sleeve, trousers, trousers or skirt has come apart at the seam, then you can remove the defect using this unique option;
- when you need to hem the hem of a dress or skirt, or shorten the length of the legs, then this type of processing is simply irreplaceable;
- when creating things using the patchwork technique, skills in forming exactly this type of stitches are also required;
- This type of stitch can be used to repair a torn toy. At the same time, you should make sure that the filler does not get ruffled.
Note! To make the inner seam neat and as even as possible, you need not only to select threads of the right color, but also a needle with a small diameter.
Scope of use of a hidden connection
Not many people know how to sew with a blind seam by hand, but mastering this technique is advisable for everyone who wants to look neat and wear intact clothes. In the sewing business, this is simply an indispensable type of processing and joining of parts of different types.
Finishing fabric edges: what is it for?
Processing the edge of the fabric is a mandatory process before the main work. It allows you to preserve the cut of the material, the transverse threads not to crumble, and not to deform the appearance of the future product.
Some novice needlewomen do not want to spend time processing the edge, believing that this is not at all necessary. But practice shows that in the end they often end up with a low-quality product with frayed edges and damaged embroidery.
The tension of the fabric during work stretches the canvas, the stitches may differ in size and look sloppy. Therefore, experienced craftswomen must process the cuts before starting work.
Sew with an invisible seam on a machine
Even a novice seamstress can create an invisible seam using a sewing machine. You just need to know a few nuances. To figure out how to sew without a seam using a sewing machine, you need to prepare the right tools and make the appropriate settings for the device itself. This particularly applies to the paw.
Correct foot
Careful preparation of the instrument is also necessary. In addition to choosing a presser foot, it is worth performing a standard check of the device for functionality. Next, you can begin to consider the settings that are made for example on a Janome sewing machine:
You might be interested in this: How to sew a denim skirt on your own
Device setup
The instructions on how to sew two parts of fabric with an invisible seam on a sewing machine consist of performing the following steps:
- Fold the fabric as desired and iron it well. Then the lapel of this part is carried out. A clear line remains on the canvas along which the stitching will be formed.
- Next, the material is laid. Here it is worth using a certain pattern so that the seam is accurate and hidden. The diagram is presented below.
- When making the seam itself, you need to ensure that the needle catches only a few threads along the ironed fold. Otherwise, the thread will appear in the front part of the product.
Scheme for laying fabric
To make this option for connecting parts on a sewing machine, you can use other options for feet. There are even universal designs of this type.
Naturally, the time spent on forming hidden stitches on a machine is significantly reduced compared to doing the work manually. At the same time, the result looks more aesthetically pleasing - the stitching is uniform and the stitches are of the same length. But not every needlewoman has such a device in her arsenal, so mastering the manual type is also necessary.
Hidden seam
To repair clothes, connect parts or hem parts, you need to use a unique stitch option. This is a hidden stitch that can be formed by hand or on a sewing machine. A hidden stitch is made manually and using a machine in accordance with a certain algorithm-scheme.
Other stitches
There are several basic options for hand stitches. The ability to make such seams will certainly be useful to any needlewoman more than once.
Basting stitch
Used for tightening fabric, placing pintucks, darning and seams that do not experience stress. To make a seam like this, you need to make several stitches forward, evenly inserting the needle into the fabric and bringing it to the surface before pulling the thread.
The number of stitches directly depends on the thickness of the fabric. The length of the stitches and the distance between them are influenced by the location of the seam.
Zigzag stitch
In this case, the stitches are made from side to side. This stitch is used when working with elastic fabric or to strengthen button loops.
To lay it, you first need to fold the fabric in half and secure it with a pin. Then you need to open the edge slightly and insert the needle so that it comes out from the front side. Then you need to make a vertical stitch up and return the needle to the starting point.
Then you should make a diagonal stitch to the left and return the needle to the right side under the end point of the diagonal stitch. These steps must be repeated until the very end of the seam, which must be completed with a vertical stitch.
Blind stitch
It is used for maximum inconspicuous fixation of folded edges of fabric, attachment of lining and pockets.
In the process of making a blind seam, the needle must be inserted from right to left, grabbing no more than one thread of the upper fabric, and then grabbing the fabric of the upper fold of the hem. There is no need to pull the thread tightly.
Hole on genuine leather
Although leather clothing is practical and durable, even it is not protected from accidental snags on sharp objects. Light damage - holes and narrow cuts - is best fixed with glue to an internal patch made of plaster or any thin, elastic material.
To sew up a large hole, prepare two patches to match the color of the product:
- fabric, slightly wider than the gust, will be located on the inside as a lining;
- leather, identical in size.
Next, the edges of the tear are aligned, and the patches are carefully attached to the hole, joining together.
How to fix a jacket?
Of course, you can turn to the craftsmen for help if the item is quite expensive, the hole is too complex, or if you are not confident in your abilities. But if you decide to get down to business on your own and bring your favorite outerwear into perfect shape, then doing this with our tips will not be difficult. Let's first look at the reasons why jackets most often tear:
- It can tear if it gets caught on a nail or sharp object.
- The hole was caused by burning, either from a cigarette or a hot object.
- The seams came apart due to extreme stretching.
Based on the type of damage, you need to choose a special remedy for repair. So, with a jacket you can do the following:
- Sew up.
- Seal with glue.
- Use reflective tape and braid.
- Sew on a patch or stripe.
- Cover with zipper and other decor.
Hole in nylon tights
Nylon is a light and fragile material that breaks at almost any snag. If you don’t have the time and money to buy a new pair, you can get used to it and carefully sew up the tights both on your fingers and in a visible place:
- Prepare a thin needle and thread that is as close in color to the product as possible. Silk threads or thread pulled from unnecessary tights are also suitable.
- Gently pinch the opposite edges at the base of the hole.
- Sew tights, sequentially picking up loops from different sides. Try not to miss a single one to prevent the material from spreading further.
- If possible, go over the seam with a clear varnish.
Advice: Don’t rush to throw away tights with a long crease. Use them to pull out thin threads and make the most invisible seams.
What to do in more complex cases?
Unfortunately, the jacket does not always tear strictly along the seams. In this case, returning it to its proper appearance is much more difficult. If you sew up a hole in the usual way, even very carefully, the seam will still be noticeable.
You will need non-woven fabric with an adhesive thermal backing. It is sold in haberdashery stores in the form of ribbons and scraps. The size of the tape (or shred) should be slightly larger than the hole. If threads come out at the cut site, carefully cut them off so that there is no fringe. Then, under the wrong side, place the interlining with the adhesive side to the fabric and press it well so that there are no wrinkles or blisters. Carefully connect the torn edges without overlap. Cover the hole with gauze on top and iron thoroughly.
Hole on lace and guipure
Restoring torn guipure or lace is a painstaking task that requires special patience, and in most cases also experience in lace weaving. Repairing a lace product will make it easier to pre-align the edges of the hole to avoid mesh breaks.
If the hole is not noticeable, you should try to find a matching guipure pattern in stores and hem it with a thin single thread from the bottom.
You can try to restore the lace mesh pattern so that the seam from the patch is not visible. A rougher finish will be obtained by crocheting the mesh. To do this, a strong thread will need to be tied into small bundles. The most accurate restoration of the pattern is achieved when weaving lace using bobbins - special spools onto which yarn is thrown.
Hemming the bottom of the products
Typically, the bottoms of most garments are machine stitched, but there are some items where machine stitching is inappropriate or unattractive. These items include men's classic trousers, as well as clothes made from thin, delicate knitted materials. By the way, in professional ateliers, thin transparent monofilament is most often used for blind stitching. You can also try hemming things with it, but working with such a thread is a little more difficult, so for beginners it is better to use regular thread.
Read this: DIY French curtain: doing the process correctly
Hole in a knitted T-shirt
It is not difficult to put a hole in thin cotton knitwear. It’s all the more unpleasant when it shows off in a prominent place of your favorite thing. In such cases, repairs are usually made with simple threads using a hidden seam. But even then, “terry” threads often remain on the front side, and the thickness unpleasantly increases.
To sew up a hole on a T-shirt as discreetly as possible, use a thin (beaded) needle and thread made from chiffon, organza or waste nylon tights:
- Pull the thread out of the fabric and thread it into the needle. For convenience, we use a thread threader. We do not tie a knot.
- We quilt on the right side of the fabric, inserting the needle into the knitted loops. To prevent eye pain, turn on a bright light and arm yourself with a magnifying lens.
- Connect the opposite edges of the hole.
- At the end, we bring the needle to the wrong side and collect the missing loops.
- We fasten with stitches, not with a knot.
- Upon completion of the work, we go over the seam with an iron from the inside out to fix it and not accidentally tighten it in the future.
Types of seams used for sewing
Not all stitches can be done on a machine. Some are made only by hand. Such as overlock or blind seams. The lines look neat and invisible to others.
How to make a blanket stitch without a machine
At first glance, this look is not difficult to perform. But to ensure that the lines do not “jump” and are even, you will have to practice a lot.
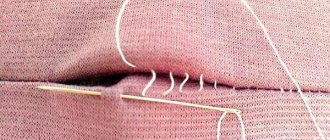
Photo 1. Scheme of working on a classic overcast seam using a needle and thread.
- Using a needle with a long thread, pierce the material from the wrong side and pull it out from the front.
- Throw the needle over the edge of the cut and make a new stitch.
- Tighten the thread a little (it should not pull the fabric).
- Stepping back 2-5 mm from the stitch you made, make another one.
How to sew with a needle so that it looks like machine stitching
When sewing clothes on a professional device, the stitches are even, small and neat. The same result can be achieved manually using a stitch seam, without which not a single product can do. Technique:
- Connect the two parts that need to be fastened.
- Use a needle and thread to pierce the elements through.
- Pull the needle out from the back.
- On the back side, retreat 1-7 mm and make a new stitch on the outside.
- From the outside, insert the needle into the place of the previous puncture (there is no distance between the stitches).
- Back off and stitch again.
Important! With the help of a stitch seam, all mistakes that a sewing machine can make are corrected.
Sew blind stitches
Necessary for repairing outerwear, making soft toys, hemming the bottom of trousers and much more. Before starting work, the material is folded and ironed.
Photo 2. The process of processing the hem of the edge of the fabric on the product using a regular blind seam.
- From the wrong side, insert the needle into the open hole (the knot on the thread should remain invisible).
- Move the needle to the front side of the fold and, retreating 3-6 mm, make a new stitch.
- Pull it out from the wrong side and tighten the thread slightly.
- Back off and stitch again.
Other string forms
Most hand stitches can be used for either temporary or permanent joining of elements.
For example:
- Overlock seams. They are used to process the material and prevent it from crumbling. Scheme: a sharp needle is used to pierce the fabric just below the cut, throw it over the edge of the material, move aside 3-5 mm and make a new stitch.
- Basting or running stitches. Used for temporary fastening of several parts. The second type has a smaller stitch span and is more convenient to use when trying on clothes. Execution scheme: the needle is inserted into the fabric and brought to the surface, forming an even row of lines. Stitches can be from 0.3 to 3 cm in size.
- Copy stitches. Used to create identical parts or transfer the seam line from the front to the wrong side (or vice versa). Execution: the fabrics are joined and fastened using a needle and thread according to the basting type, without tightening the thread.
- Hemming lines. The pre-folded edges of the product are processed with a seam. Pattern: a small stitch is made at the bottom of the hem, after which the needle is brought up diagonally across the edge of the hem and another stitch is made.
How to beautifully sew up a hole in thick fabric
It is not necessary to mask scuffs and rips on furniture, leather clothing, and denim. If they are located in a visible place, they can be decorated. Here are a few techniques:
- “leaf”: the upper and lower edges of the hole are fixed with 1 stitch, then from edge to edge of the drawn leaf, stitches are placed crosswise and tightly to each other (each goes in a house and from bottom to top), so that a braid is formed, reminiscent of the texture of a hazel leaf;
- “chain”: “sleepers” of stitches are laid from bottom to top, and then braided (the needle alternately passes under the “sleepers” from bottom to top and vice versa);
- “snowflake”: the hole is fixed from the inside with interlining or “cobweb”, the vertices of the 6-gon are marked along the face, the thread is pulled to any vertex (1), and then each time it passes from the 3rd vertex to the 2nd. And so - in a circle, decreasing the radius on each new row.
With a little skill, getting rid of small defects on clothes will not be difficult. You can remove a hole not only with a neat seam, but, for example, hide it under an applique or patterned darning, thereby beautifully decorating the item.
How to sew by hand: tips for beginners. What seam should I use?
The most durable is the saddle. When connecting parts of the product with a saddle stitch, the threads do not intertwine inside the leather and do not return each to its own side.
The top thread is on the bottom and the bottom thread is on the top. The threads meet again inside the material at the next stitch and return to their sides. If one of the threads breaks, the seam will not fall apart because each stitch is supported by two threads.
What is the advantage of hand sewing over machine stitching?
When machine stitching, the top and bottom threads are intertwined within the material and each thread returns to its own side. Machine stitching, compared to hand stitching, is not as durable and strong. If the thread on one side breaks, the thread on the other side will remain unsupported and “fall out”, forming a hole in the seam.
Flowers
The most popular leather flower is the rose. Thin raw materials 0.5 - 1.2 mm thick are suitable for its production. Petals are cut out of the material, onto each of which (several layers) PVA glue diluted with water is applied with a brush.
Photo 1. From leather you can make such original decorations in the form of flowers; multi-layered petals give volume to the figure.
As soon as the petals are saturated with the skin, it is necessary to form folds and bulges on them: the material is folded like an accordion and kept in a compressed state for 5 - 7 minutes, then the petals are straightened. They are dried and collected into a bud using glue. You can use a toothpick, stick, or wire as a base around which the petals will wrap.
Decorations
Among the leather jewelry, the most popular are chokers (on the neck), earrings, and bracelets. They are made of thin material, predominantly black or brown. Black leather looks great with silver metal details.
All kinds of belts
To make a belt, it is recommended to use a special hole punch to make holes. You will also need a buckle and additional fittings if the craftsman wants to decorate the item (for example, rivets).
The finished product is treated with walnut oil and beeswax to improve the appearance of the leather and make the belt waterproof.
Important! The edges of the object must be smoothed and polished. This can be done with your own hands or on a polishing machine.
Small handbags
You will need soft leather, a pattern, a set of tools, accessories (buttons, snakes, rivets, magnets, carabiners for bags and backpacks).
After all stitching work, it is recommended to rub the surface of the product with wax and punch the seams with a hammer.
The reverse side of the leather is treated with CMC wallpaper glue or starch to prevent lint.
Hand stitches: basic rules
How to sew hand stitches with your own hands? There are several basic rules that you should adhere to when sewing by hand.
- Be sure to work on a level and flat surface.
- The hand sewing needle must match both the fabric and the threads.
- For more comfortable and faster work, use a thimble. It is placed on the middle finger of the hand with which you are holding the needle.
- As you work, control the tension of the thread: it should not be pulled too tight.
Getting Started: Node
We'll show you how to tie a knot at the end of a thread quickly and easily.
Hold the thread with your left hand. Loop the thread around the tip of the index finger of your right hand, and place it on the end of the thread. Place your thumb on the crossed threads and, pulling the long thread, move your thumb to the end of your index finger so that the threads twist around each other. Then drop the loop. Pinch the ring between your thumb and index (or middle) fingers. Pull the long end with your left hand and gently tighten the knot.
How to secure the thread at the end of the seam?
You can secure the thread in two ways: with a knot or tack. To create a knot, make a small stitch on the wrong side, on top of the last stitch. Slowly tighten the thread until a small loop remains.
Pass the needle through the loop and continue tightening until a second loop appears. Pass the corner into the second loop and pull the thread tightly, forming a knot. To make the tack, simply make a few small stitches using a backstitch. These stitches are placed one on top of the other and hold the layers of fabric together well.
Back stitch
This stitch is one of the strongest hand stitches available. It is used for seams in hard-to-reach places and for securing stitches at the end and beginning. Bring the needle to the top side. Make a small stitch back (2-3 mm) and bring the needle up again, retreating the same 2-3 mm along the seam line.
Continue bringing the needle into the end of the last stitch and out one stitch ahead.
On the wrong side the stitches will be twice as long as on the front side.
Back stitch with skips
This option is also used to secure the transition edge of the facing and hem.
Perform a regular backstitch, but pull the needle back half the stitch length. The needle still comes out the length of a whole stitch.
Loop stitch
Used for the manufacture of hand-processed parts: hanging thread loops and holes, thread loops, hook fasteners, belt loops. Also suitable for decorating felt or fleece parts. Sew the seam from left to right, positioning the fabric so that its cut is at the bottom.
Secure the stitch to the edge of the fabric with a loop or any other method convenient for you.
For each stitch, point the needle toward you. Stick the needle into the right side of the fabric and bring it over the thread at a distance of about 5-6mm from the edge and the same distance to the right. Do not pull the thread too tight.
Stitch “Goat” (“Herringbone”)
Use this stitch to join two layers of fabric with a slight degree of movement, for example to join a lining to a garment or to hem knitwear.
Sew the seam from left to right. Make a small horizontal stitch in the top layer, slightly away from the edge. Then, just beyond the edge of the top layer, sew another stitch on the bottom layer, diagonally to the right of the first stitch. Sew stitches without tightening the thread.
French setting
Use this bartack to attach the hem of the loose lining to the hem of the garment.
Sew 2-3 stitches, about 2.5-3cm long, between the garment and the lining.
On top of the long stitches, sew stitches in a buttonhole stitch, placing them as close to each other as possible. Completely cover the long stitches with loops.
Dotted seam
This version of the “back needle” seam is used to finish sewing in zippers on fabrics such as velvet, corduroy or satin, in case the machine stitching looks unsightly.
Bring the needle up through all layers of fabric. Perform a back stitch, picking up 1-2 threads of fabric. Bring the needle to the surface, retreating 5-6 mm forward.
Basting stitch
This stitch is a basic hand stitch used for cinching fabric, tucks, darning and non-stress seams.
Sew forward a few stitches, bringing the needle evenly in and out of the fabric before pulling the thread through.
The number of stitches depends on the thickness of the material. The length of the stitch and the distance between them depends on the location of the seam and can range from 3 mm to 3 cm.
How to secure thread at the end of a seam
You can secure the thread at the end of the seam using 2 methods: a knot or a tack. To get the first method:
- Sew a small stitch on the wrong side above the last stitch.
- Slowly tighten the thread.
- After a small ring appears, stand up.
- Pass the needle through the loop.
- Tighten until a new ring appears.
- Insert the needle through the second loop.
- Pull the thread tightly until a knot is formed.
To sew the tack, sew 2-3 small stitches using the backstitch technique. This seam is located on top of another and perfectly connects the layers of material.
How to sew up a hole in a sock with an invisible seam: master class
A hole in the toe or heel is one of the most common sock “damages.” It happens that you don’t have threads of a suitable color at hand - for example, at the dacha or while traveling. This life hack is about how to sew knitwear with a seam in which the thread on the front side is not visible, so you can use any color. In addition, there is no need for special devices, as with darning. Please note: this method is not suitable for very visible places. It's more of a life hack for quickly fixing something that's torn.
You will need:
- hand needle;
- threads.
Sequence of work:
1. Thread the needle and make a small knot. Do not turn the product inside out. Pass the needle through the hole to the inside of the knitwear and leave the knot there.
2. Start sewing up the hole, grabbing one or the other edge in turn. Proceed as shown in the diagram.
3. When you finish the seam, pull the thread. Pull until the thread goes into the seam, becoming invisible from the front side, but does not pull the seam. You can always pull the seam sideways to straighten the thread a little. Bring the needle inside out and secure the thread.
Let's get started
So, you and I don’t have an overlocker. Before making an overcast seam by hand, let's estimate our resources. Let's take the highest quality needles, preferably from a well-known manufacturer. It is best if it is a needle with a special coating in the area of the hole, in this case called the “golden eye”. Thanks to it, the thread will be easy to thread and slide smoothly through the fabric.
The numbering of needles used for hand sewing ranges from 1st to 12th number. What do these numbers mean? This is a tenfold increase in its largest diameter in millimeters.
Never use a needle for work if it is dull, bent or rusty. And do not forget about matching the thickness of it and the thread. After all, the larger the diameter of the needle, the greater the force required to push it through the fabric. Accordingly, the thread must be thick enough.
How to sew a broken stitch with a hidden seam: master class
In this case, the hidden seam from the previous life hack is also used. Read a detailed master class on how to make this seam here.
The method is suitable for repairing burst or torn machine stitching where it is not entirely convenient to sew up a hole from the inside out. For example, you can sew up a hole in the lining, on the inside pocket, and so on. By the way, the same seam can be used to repair a torn hem on trousers or a skirt.
You will need:
- hand needle;
- threads.
Sequence of work:
Carry out the seam as shown in the photo or in the diagram from the life hack above. At the end, carefully secure the thread.
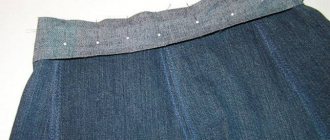
How to sew trouser tape on a sewing machine
Before I talk in detail about the hidden seam, I want to briefly explain how to sew on a trouser tape. The ribbon is adjusted using a sewing machine using two lines. It is not necessary to baste it, the main thing is to tension it correctly when sewing. Otherwise, the tape can either tighten the bottom of the trouser leg, or, on the contrary, stretch it and this defect cannot be corrected with an iron.
It is difficult to explain in words the degree of tension on the tape; this requires practice. But the general idea is this. If the tape is loose, the hem of the pant leg will be wavy. And vice versa, if it is overtightened, it is narrowed. It is best to pull the tape and fabric lightly at the same time with a little force. Just so that the tape is evenly applied to the fabric without deforming it.
Never do this as your last operation. Better put it off for the next day. A careless hem at the bottom of the product will ruin its entire appearance. Moreover, an inexperienced seamstress sometimes has to redo this work more than once.
How to sew clothes from the front side
An invisible external seam, made with a thread and a needle on the front side, will save you in an unexpected situation.
If you have a seam torn and it is impossible to quickly sew it up from the inside out, because... there is no access, for example, the lining is in the way.
Photo 1
It is very easy to sew up a torn area. In addition, no lines need to be drawn. The seam line on the fabric will be visible by itself, it has already been created by machine stitching, iron and time (photo 1)
Photo 2 Photo 3
Using a needle, carefully “open” the seam further (photo 2, photo 3). This will release the threads of the remaining seam. Tie them together with 2 knots, thereby securing the remaining seam. Remove the threads from the fabric inside out. Do the same with the opposite side of the opened seam.
Take a thread that matches the color. Thread it through a needle. Make a knot at one end of the thread and leave the other end of the thread hanging freely. For the photo, I deliberately took a thread of a contrasting color to show that the seam would be invisible.
Photo 4
Make a puncture with a thread and a needle on the left half of the seam from the wrong side strictly along the seam line, slightly above the ripped place, pull the thread with the needle to the front side of the fabric to be sewn (photo 4).
Photo 5 Photo 6
On the right side of the product, strictly opposite the thread exit from the left half of the seam, make a puncture with a needle and thread on the wrong side and immediately on the front side, also strictly along the seam line. Stitch length is about 1 mm. Pull the thread to the front side (photo 5, photo 6). Tighten the thread so that the halves of the rupture of the product are connected.
Then, on the left side of the product, strictly opposite the thread exit from the right half, make the same puncture 1 mm long (photo 7). Pull the thread and needle to the front side.
Photo 7
On the right side of the product (photo, make a puncture with a stitch length of 1 mm strictly opposite the thread exit from the left half of the product. As in photos 5 and 6.
Photo 8
On the left side of the product (photo 9), make a puncture with a stitch length of 1 mm strictly opposite the thread exit from the right half of the product, just like in photo 7.
Photo 9
So we continue to sew until the end of the gap. At the end of the break, make a securing puncture, or tie the working thread with the opened threads of the product into 2 knots. Cut off the ends of the threads.
Photo 11
Finished seam (photo 11). The needle indicates the starting point of the seam.
Photo 12
This is what the puncture sites look like (photo 12). Demonstration photo.
Crocheting the edge of the product.
This method of edge processing is most often used for knitted items. But whoever owns a crochet hook can use it for both knitted materials and fabrics. This single crochet stitch is clean, stretchy, and looks beautiful.
It is also important that when tying, the edge involuntarily bends slightly to the wrong side and therefore the stitching becomes even cleaner
In this article we looked at ways to finish edges by hand.
In conclusion, I will say about threads. For sewing sections, the threads are selected in color. Thick threads can not only look rough, but when ironing they can be pressed onto the front side by the iron. However, thin threads also cover the edge poorly, making it more difficult to make an even and beautiful stitch. Ideally, it is better to use darning thread to sew the edges of the product by hand. They are soft, loose, and cover the edge well. They do not experience tensile loads, so they can be safely used.
Write which of the manual methods of processing sections did you like best?
I look forward to your comments and questions. If the article was useful, share it with friends, like, subscribe and receive the book “Sewing Machine for Home Use” as a gift.
With love, Olga Zlobina
Blind ladder seam
Look, this is the kind of seam we were taught (me for sure) in labor lessons at school. American craftswomen call it “overlapping”
We were taught to sew up the opening for turning inside out with such a seam, as well as to hem the hem of products. The needle grabs several threads of fabric and goes diagonally.
And here is the “Ladder” seam. the needle goes straight straight down.
Now in detail.
Here is a drawing - a diagram of the seam
A seam consists of three main actions.
The first step is to insert the needle into the fabric from below (or to the left) of the hole and bring it out after 2-3 mm, make a small stitch “Forward needle”,
The second step is to insert the needle on the other side of the hole strictly above the exit of the needle, that is, perpendicular to the first seam. Make the same small stitch “forward needle” and bring the needle and thread out,
The third step is to tighten the thread. One seam is pressed against the other (well, I don’t know how else to describe it) and the threads are absolutely invisible. And so does the seam, if, for example, you sew two fragments of a single-color fabric with thread that matches the color of the fabric.
Now the photo.
1. Insert the needle into the edge of the fabric, make a small “forward needle” stitch and pull the needle out
2. Insert the needle into the opposite edge of the fabric directly above the first seam, make another small “forward needle” stitch and pull the needle out.
It is better to tighten the thread so that the seam is hidden through several such steps.
Since the thread will be stretched all the time, it is very important that it is strong and does not break suddenly, as sometimes happens (for me, for sure) with a thread that is pulled too tightly.
This is what the seam looks like after the hole is completely sewn up.
In order not to leave a “tail” from the cut thread - another small know-how, this is from the craftswomen who sew big-legged dolls.
When the hole is sewn up, make a small knot on the thread next to the last seam so that the thread does not come apart; Then you pass the needle and thread through the entire thickness of the product, or you step back three to four centimeters from the edge of the seam and pull the thread out by the needle. Pull the thread again and cut it off. Then you straighten the product - the tail hides inside. It's so simple.
Kinds
There are two main methods of blind stitching, but they are similar to each other.
Both types of blind stitch are essential to completing any sewing project, from clothing to accessories, toys to home decor.
Purl
The first is used when hemming the edges of skirts, trousers, thin jackets and other products. The cut edges are folded to the wrong side, and the thread is passed into the folds of the parts. The stitches on both sides are the same width. Using this method it is possible to sew a drawstring and insert an elastic band. For example, to reduce the width of a dress.
Creating a hemming method is as follows:
- Fold the excess fabric to the wrong side 1 or 2 times.
- Inserting a needle and thread in the color of the material, tying a knot.
- Inserting the needle under the folded fabric.
- The stitch is 60-80 millimeters and the output is through the edge of the fold.
- Picking up 1-3 threads on the fabric to which the hem is sewn.
- Inserting the needle into the fold and into the place where the threads came out.
- Stitch the same length.
- Repeat step 5.
- Stitch the same length.
It is important not to pull the thread too hard, otherwise the material will wrinkle and look pulled together.
Facial
The second method, often known as ladder or herringbone stitch, is good for embroidering on stuffed animals or other items that need to be joined on the right side of the fabric. American needlewomen call the front seam “overlapping”, that is, “whip stitch”.
Here the seams are even, but completely hidden. Stitches vary in width.
Creating a ladder joint consists of three main steps:
- Inserting the needle into the material from below the hole and withdrawing it after a couple of millimeters. Next you need to take a step forward.
- Inserting the needle from the second side of the slot directly above the exit of the needle, namely perpendicular to the first stitch. Again it is necessary to perform the “forward needle” movement and move the tool to the outer part.
- Pulling up the thread. One seam must be pressed against the second so that the stitching is not visible.
Invisible seam No. 4 – for knitwear and knitted items
No one is safe from a hole in their sweater. Many people know that such holes tend to spread quickly. To prevent this from happening, you should repair the product correctly. Knitwear and knitted items have their own invisible seam.
Let's pay attention to the diagram:
Progress:
- First you need to find the threads that have broken and bring them to the wrong side.
- Next, we arm ourselves with thread to match the color of the product. We insert it into the needle.
- We tie the end of the thread to the end of the broken thread.
- We bring the needle to the front side. We pass through the 2 upper loops, then through the 2 lower ones (see diagram).
- Continue darning until all the loops are secured.
- Let's go to the wrong side. We tie the thread to the second torn end.
- Ready!
If the knitting is small, you can use a magnifying glass.
A clear example of how to properly sew up a hole on knitted items and knitwear:
Where jeans can often rip
Even the thickest denim pants can tear in the wrong place. Fabric is also damaged due to its disrepair: for example, abrasions occur when clothing is worn for a long time, and the fibers become thinner over time.
The advantage of this wardrobe item is that your favorite item can be repaired discreetly.
The most common types of abrasions and holes are formed:
- on your knees;
- between the legs;
- on the front pockets at the edge;
- on the trouser legs along the bottom edge.
Holes in the knees of trousers have long looked familiar. And clothes that are worn between the legs are thrown away or patched/restored in some other way.
The second way out of the situation is interesting: how to sew jeans between your legs unnoticed.
Invisible seam No. 1 – “Ladder”
The first option of a hidden seam will be appreciated by lovers of all kinds of life hacks. It's all about the speed of its execution and versatility.
The ladder stitch is indispensable in the following situations:
- the item is torn at the seam;
- you need to sew together the parts of the product;
- sew the lining onto the jacket;
- sew a stuffed toy, belt or other product that turns inside out through the hole.
Invisible seam pattern:
We make the seam step by step:
- First of all, iron the seam allowances to the wrong side. We will sew by passing the needle and thread exactly into the fold.
- Thread a needle with a thread matching the color of the fabric and tie a knot at the end.
- Place the needle and thread under the seam allowance and pull it out at the edge of the piece to be sewn from the front side. The knot will be hidden in the fold.
- Insert a needle into the edge of the second piece opposite the first puncture. Under the fold, on the wrong side, make a small stitch (0.5 cm).
- Pierce the opposite side. The needle should go exactly into the edge of the fold. The punctures are located opposite each other. Sew a 0.5cm stitch under the seam allowance.
- Repeat until you have completed 4-5 stitches.
- Slowly pull the thread, tightening the edges of the parts.
- Continue sewing in the same manner until the end of the folds.
- Secure the thread with a knot and cut the thread.
A clear example of how an invisible seam is made:
Indistinguishable from machine stitching!
Video instruction:
Questions and answers
Why can an invisible seam turn out sloppy and crooked?
This happens when you rush too much.
Please note that seam allowances must be ironed. Folds meet machine seam
After this, small stitches are made. They should be on the same line
It is also important to choose the right needle and thread
How to choose the right thread and needle for a blind stitch?
The thread and needle should be thinner than the fabric
It is important that the needle is sharp and can catch individual threads. The thread should be strong and untwisted.
Color – transparent or similar to the product. The invisible seam is made with only one thread!
How to make an invisible seam without a needle and thread?
This repair method is used as an emergency method for small cuts and holes in the fabric. Buy a special thermal tape to match the color of the product. A patch is cut out of it and installed on the wrong side. The repair area is covered with a cloth from above and slightly moistened with water. The last stage is ironing the patch with a hot iron.
An invisible seam can be done either by hand or with a sewing machine. In everyday life, the first option is more in demand. It will be much faster to sew up a hole by hand. Having mastered a simple technique, you can hem trousers, repair a seam that has come apart, quietly patch a hole, sew a Tilda doll or a pillow. If you make small and neat stitches, the stitching will be truly invisible.
Source
Repair without seams
You can repair an item using an iron and a glue web - this is a special tape for gluing clothing parts, which is sold in a sewing store. Follow the recommendations:
- Cut two pieces of tape that fit the size of the hole and cut off the corners.
- Place the two cut pieces together, shiny sides facing out, and place the pieces under the hole.
- Gently connect the edges of the hole with your fingertips so that the fabric does not become deformed.
- Iron the item from the front side.
This method is only suitable for minor damage.
Option 7
An even simpler way, after which damaged jeans will be transformed beyond recognition.
To work, you will need a needle and thread that matches the color of the jeans, as well as a second, unnecessary pair of jeans (they may differ in color).
From old trousers, cut out any pocket that is larger than the hole or stain. Cut without tearing, along with the fabric. All that remains for you is to simply sew an old pocket onto men's jeans by hand so that it completely covers the defect. Designer jeans are ready!
As you can see, even without any sewing skills or a sewing machine, you can easily bring seemingly damaged jeans back to life.