What to do if the cartridge is dry?
Our restoration technique will be useful to all owners of inkjet printers without exception. But first, let's find out how to understand that the cartridge has dried out and not run out?
Firstly, if he was typing before your eyes and suddenly suddenly - bam! - and stopped, which means it simply ran out of ink.
Secondly, if you try to refill a dried out cartridge, it will not work. He never published, and never will.
Thirdly, if you apply the “Shake Off” method to a cartridge that has run out, you can squeeze out a little more ink from it and even make it print a couple more pages.
You can try one of the methods below or a combination of them in any combination and sequence.
- Software cleaning
- Maceration.
- Steaming.
- Falling jet method.
- Leveling up.
- Shaking off.
So, let's go in order.
Burying
The first thing you can do is turn the cartridge over with the nozzles facing up and apply a few drops of cleaning liquid to them. Not everyone has the latter and is much more expensive than window cleaner, which can also be used. Experts recommend blue Mister Muscle .
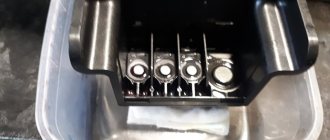
Leave for 5-10 minutes. We wipe everything. Press the nozzles onto toilet paper or a napkin and check the print (see the first photo in this article). If the print is unclear or is not there at all, move on to the next step.
Is it possible to wash the cartridge with alcohol?
The regular alcohol we use to disinfect and treat wounds, better known as isopropyl alcohol, is very effective for drying. When you don't have a cartridge holder for a specific cartridge model, you can use alcohol to clean the cartridges.
Interesting materials:
How to preserve ripe tomatoes longer? How to preserve ripe tomatoes? How to preserve fresh cucumbers and tomatoes? How to preserve fresh tomatoes at home? How to store fresh tomatoes in the refrigerator? How to preserve fresh tomatoes? How to preserve green tomatoes until they turn red at home? How to preserve green tomatoes until they ripen? How to preserve green tomatoes for as long as possible? How to preserve green tomatoes?
Soaking
Take a lid from a jar and pour a cleaning liquid into it (suitable for windows) a few millimeters high.
Place the cartridge with nozzles in the liquid and leave for 1 or 2 hours (see photo on the right). We take it out, wipe it and check the ink print. If the print is not clear, change the cleaning liquid in the lid and leave it for 1 day. To prevent the liquid from evaporating, you can cover it with some kind of plastic container or change the liquid every 6 hours.
Checking the nozzle print. If the latter does not suit us, then we refill the cartridge with a cleaning agent. For internal use, I would buy a special one. Place the nozzles in the lid with cleaning liquid and leave for 1 day.
We take out the cartridge, wipe it and use a syringe to pump out the liquid inside. Refill with ink and check the print. If the latter leaves much to be desired, then move on to the next method.
Printing with cleaning fluid
The method helps restore the non-removable head, which is built into the cartridge. Instead of dye, cleaning agent is poured in and cleaning starts. If, when printing with a color printer, defects of only one color appear in the image, then you only need to fill the cleaner into the problem compartment. After cleaning, the device cannot be used for two hours. During this time, the cleaning liquid will have time to dissolve the dye that has dried in the nozzles.
After 2 hours, open any graphics editor and fill the page with the color that you had problems with before cleaning. It is optimal to use Photoshop, since it allows you to use the CMYK color scheme when filling the sheet. The resulting fill is printed on a standard sheet, and you must first set the highest print density. The remains of the cleaner, mixing with the paint, will leave marks on the paper. If white horizontal stripes appear when printing, the head has not been cleaned sufficiently. When the filling is homogeneous, the blockage in the head is eliminated.
After washing, the cartridge is refilled with ink, the nozzles are programmed to be cleaned, and the color sheet is printed again.
Pressure
You can pressurize the cartridge chamber to force ink through the nozzles and clear them. To do this, use pliers to break off part of the syringe needle so that a piece 1-2 cm long remains. Find a piece of elastic. You can cut off a piece of the eraser. We put a rubber band on the shortened syringe needle. This will be our seal. We fill the syringe with air.
Place the cartridge on a napkin or toilet paper. The nozzles must be free. Insert the needle into the filling hole and press down. A piece of eraser will seal the hole. We press in the piston.
Ink should come out through the nozzles. If all else fails, you can try removing the cartridge cover (see video below), pull out the foam and fill in the flushing liquid. Lower the nozzles into the lid with the flushing liquid. We close the whole thing and leave it for 1 day. If it doesn’t help, then you need to think about buying a new one.
To prevent the ink from drying out, it is recommended to either print regularly and refill it on time, or, if you are leaving for a long time, remove the cartridges from the printer and seal it tightly in a small container.
The ink cartridge may dry out due to the printer being idle for a long time or as a result of untimely refilling. Manufacturers of inkjet printers are categorically against any manipulation of cartridges (except for their complete replacement), but in most cases this expensive procedure can be avoided.
Recovery methods
If this procedure does not help the first time, you can repeat it or try another recovery method.
The recovery process for black and color cartridges with built-in print heads is the same, but it is easier to restore a black cartridge than a color one, because If it contains one color, then the chances of getting a positive result are greater.
Cleaning with detergent
To implement the cold method, you will need to stock up on the following available tools and materials:
- rubber gloves (medical);
- syringe;
- napkins (cloth) made of paper or cotton;
- clean water;
- pipette;
- a special glass cleaner containing isopropyl alcohol or ethylene glycol.
Examples of suitable detergents are “Mr. Muscle”, “Mr. Glitter”.
The whole process takes place in the following sequence:
- remove the cartridge from the printer;
- place it with the nozzles up (on a specially laid fabric);
- a few drops of cleaning liquid are applied to them using a pipette;
- wait approximately 10 minutes;
- then blot the nozzles with a napkin and wipe them dry with a cotton cloth.
A screwdriver may be required to remove it, depending on the model of device you are using.
The manipulations discussed above are not always sufficient. If the nozzles remain clogged, then continue the operation:
- take a small container;
- fill it with cleaning liquid, pouring approximately a layer of 3 mm;
- immersed in the nozzle composition;
- keep them in liquid for 3 hours;
- take it out and wipe it dry.
After wiping the cartridge nozzles, located in the working position, with a cloth, there should be an ink mark on it, which is a characteristic result of complete cleaning. An ordinary plastic jar lid is suitable as a container for the cleaning composition.
There are special liquids available for sale to remove dried ink. They are even divided by type of cartridge, but the way they work is the same.
Method 1. Soaking
If the cartridge with a sponge inside dries out, you should try to soak the sponge. To do this, place the cartridge in a vessel filled with distilled water or washing liquid with the nozzles down (in the same position as it is installed in the printer). Soaking can take quite a long time (from several hours to several days.) It is important to pour little water so that only the nozzles are immersed in it (to a height of about 1 cm). Then the cartridge is filled with ink. It doesn't hurt to pump the ink through the suction cup with a syringe, but don't use too much force. Pull the syringe slowly, without sudden jerks, and when the ink begins to come out evenly and in large quantities (no more than 10 ml), it is better to stop the procedure. Before inserting the cartridge into the printer, wipe it clean of any remaining ink, and pay special attention to the electronics contacts. Do 2-3 head cleanings and print a test page.
Shaking off
For light stains, the shaking method works well.
To do this, take the cartridge, move to the bathroom, and, holding the cartridge over the bathtub, with a sharp movement, “shake off” it with the nozzles down. The movements should be exactly the same as if you were shaking off a mercury thermometer.
I highly recommend not doing this in the room, because parents may not appreciate the multi-colored ink blots on the wallpaper.
The point is that the ink, due to centrifugal force, pushes the blockage in the nozzles and makes its way out.
You will see the result immediately - the flying ink drops are hard to miss.
Method 2. Boiling or 'the principle of boiling pasta'
- small iron bowl or ladle
- pliers and pliers
- napkin or toilet paper
Instructions
- With the printer turned on, open the lid and wait. and the cartridges themselves move to the replacement position. It is enough to lightly press its box down and it will come out easily. We take out the cartridge
- Now you need to heat a small amount of water on the stove in an iron bowl or ladle so that the water boils and steam comes out. We take the cartridge and hold the print heads over the fumes, you can rinse for 2-3 minutes by lowering the print cartridge into boiling water. Be careful because... The cartridge will heat up, so it is better to hold it with pliers. Just do not squeeze it under any circumstances to avoid damage.
- The dried paint in the head should become wet and begin to drip; wipe off all excess with napkins until all the colors come through. This can take quite a long period of time, depending on the degree of neglect of the printing nozzles.
- If the inkjet cartridge has not been used for a long time, you will have to wash it from the inside. Be careful when opening the lid. Older models have a special metal device for this. Don't be afraid of a little crunch, you can't do without it. On new printers, the cover is sealed with adhesive tape; first you need to get rid of it, and then carefully open it with a screwdriver. The main thing is to prevent cracking of the walls, this can render the container unusable. We take out the absorbent inserts and rinse them with warm water, be sure to remember where each of them was located.
Falling jet method
Now I will tell you how to repair a dried out inkjet printer cartridge using brute force. Or rather, the power of water. Water under pressure can push through any dirt and the cartridge will be like new again.
Use this method only when all the others no longer help (i.e. you couldn’t soak the cartridge with anything at home).
Since there is nowhere to go, you will have to use regular tap water. To do this, go to the bathroom, open the tap with hot water so that it flows in a continuous stream, without splashing. The higher the water falls from, the better.
We place our unfortunate cartridge under the stream and keep it there for some time. Periodically we bring it out into the light of day and check to see if the desired result has been achieved.
Method 3. Steaming
You take a dead, dead cartridge from an inkjet printer, which has been lying around no matter how long and has dried up tightly and all sorts of soaking, blowing, and ultrasonic baths do not help and everyone says throw it away and buy a new one - try this method and everything will work. This method applies to HP, Canon, Lexmark cartridges with a built-in print element. Take a kettle, boil water, when it boils and pour it into some bowl, the water depth is about 1 cm in and immediately lower the dried cartridge into this boiling water with the nozzles downwards, just before that remove the top sticker covering the holes as the paint will expand greatly and can flow out through top filling holes, hold in boiling water for 30 seconds and do this three times (carry out all operations with a refilled cartridge). Then you wipe the cartridge nozzles with a napkin and put some photo into the printer to print at the best quality, it will immediately turn out to be anything, then you make 4 main color sheets completely of the same color and print to run each color, the quality will still not be very good for In order to eliminate this, print any photo and in the printer settings set the quality to normal (not fast, not draft, but REGULAR). I would be most grateful if you leave a review here; I would also be grateful if you recommend this site to your friends.
Installation and configuration process
After the print head has been washed, the parts are installed in the printer and configured. Setup and calibration work is carried out based on the results of printing a test page.
The complete process consists of the following steps:
- The print head, wiped with a dry cloth, is installed in the device.
- Lower the latch and insert the cartridges.
- Close the printer cover and start a test print.
- If extraneous lines or symbols appear on the sheet, then calibrate. The same operation is performed if the print quality is poor (blurry, pale colors, stripes).
- Place at least 10 blank sheets in the tray.
- The printer is connected to the computer.
- Both devices are connected to the network.
- On the PC, find the “Start” button.
- In the menu that appears, select “Control Panel”.
- Then click on “Devices and Printers”.
- In the window that opens, select “Properties”.
- In this section, go to the “Advanced” tab.
- Place a check mark next to the words “Align manually”.
- Save the changes made.
- At the next stage, find the “Maintenance” section.
- In it, select “Head Alignment”.
- Make the necessary changes and save the settings.
Method 4. Under running hot water
Sometimes it happens that the cartridge head becomes clogged or dries out. In an attempt to clean the head, you have tried many methods for cleaning cartridges, but none of them helped you. I found another way to clean (restore) the ill-fated cartridge. To do this, you do not need to buy anything additional, such as “Liquid for cleaning cartridges”, “Special devices”, etc. To do this, take the cartridge and place it upside down in the bath, head up. Next, turn on the hot water, with a small stream of water. This stream should accurately fall on the head with nozzles. Thus, the cartridge should stand for a couple of minutes. The cartridge needs to be moved a little so that the falling stream of water hits all the nozzles. The meaning of this method of cleaning printing elements is as follows. Water falling from a height of about a meter picks up speed and passes with force through the nozzles (holes through which ink splashes onto the paper during printing) and cleans them. The jet also breaks through dried channels that you had previously resisted. After this procedure, close the tap, take the cartridge and place it head down on a cloth and let it dry. Wipe it down and put it in the printer. Print a test page. If you are not lucky the first time, repeat the procedure several times.
If these methods do not help you, see more material on cartridge recovery below
When cleaning is needed
- When running a nozzle test, part of the image is skipped on the sheet, white stripes are visible when printing, colors are not reproduced correctly, or one of them is completely missing. Such signs of clogging occur when the printer is used very intensively.
- The printer did not print documents for a long time. Water-based liquid inks may dry out. For different models, the drying time of the paint varies from several days to a month. If the device has been idle for a long time, has inkjet printing technology, and after turning it on, printing has deteriorated significantly or even blank sheets are coming out, it is likely that the print head has dried out completely.
- Different types of dyes were filled in or the cartridge was filled with paint from another manufacturer. When mixing solutions of different chemical compositions, a reaction occurs inside the ink tank, which can result in rapid thickening of the ink and failure of some elements of the head. If there is a need to use another brand of ink, first thoroughly wash the cartridge, the channels through which the ink is delivered, and the head itself.
- Refilling ink. After each cartridge refill, you need to clean the print head for preventive maintenance.
You should resort to cleaning the PG as a last resort, since the reason for a decrease in print quality can be not only its clogging, but also:
- airlock;
- incorrect head position;
- excessive pressure caused by installing the CISS above the level of the head;
- failure of piezoelectric crystals due to printer overload (Epson);
- overheating of the heating element (HP).
If system errors are displayed on the display, cartridge indicators are blinking, or information is given that ink is low, there is no need to flush the head. Even with frequent and intensive printing, cleaning is done no more than once a quarter.
Method 5. Cleaning the cartridge in an ultrasonic bath
'Fari' and water are used. Color water-based ink cartridges recover after 10 years in the cabinet.
We also recommend reading:
Published: September 17, 2007 Last modified: August 18, 2013
Inkjet printers are characterized by low cost and excellent color printing quality. However, these devices have one common drawback - the rapid drying of any ink in the cartridge. This leads to a change in the quality of the printer and even a complete lack of printing. If the cartridge is dry, what should I do?
Signs that cleaning is needed
It is not difficult to understand that the cartridge needs cleaning or soaking. Certain signs will always indicate this.
The first sign that the ink in the cartridge has dried is a sharp decrease in the quality of the resulting printed images - text from a laser printer and color images or photographs from an inkjet printer. There may be unprinted white areas, fuzzy lines, wide horizontal or vertical stripes, and the image may be faded or unclear.
In a color printer, ink may run out or even dry unevenly, causing the printed image to have one or more colors missing while all other colors remain vibrant. Uneven drying may be due to the quality of the coloring powder itself, so it is better to buy cartridges in trusted stores with well-known brands on the market.
If the inkjet printer has not been used for a long time, but there is ink, most likely it has dried out, since a feature of inkjet printers is the need for their regular use. Without frequent printing, the ink dries out very quickly.
If the Canon cartridge is dry, the printer continues to work. It passes a blank sheet of paper through itself, makes a sound like printing, but the output sheet remains white or with barely noticeable traces of ink.
The cartridge has dried out: what should the user do?
The fastest and most reliable way to solve the problem is to purchase a new cartridge. If your device is dry, you can contact a service center where you will receive professional help. You can try to restore the printer using the forced cleaning mode.
You can try to solve the problem of resuscitating a cartridge yourself using several effective methods. But it will take time and, of course, you will have to put in some effort. In addition, you need to take into account that this is quite dirty work - then you will have to wash your hands and work area.
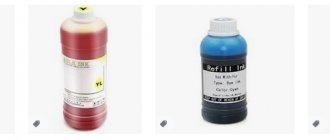
To implement one of the methods of cleaning the cartridge, you need to purchase washing liquid and a syringe with a needle, prepare paper towels and a small container with a lid.
It is necessary to determine the degree of drying of the ink: turn the unusable cartridges with the print heads up and drop washing liquid from the syringe onto them. If the composition is absorbed through the nozzles, this means that the restoration process will be short-lived.
Removing severe head clog
If flushing the print head is unsuccessful, then you should use a more effective cleaning method. It will take a lot of time and effort to complete all the steps provided.
Step-by-step algorithm:
- The medical tube for droppers is cut into several parts. The length of each of them should be about 6 cm.
- Tubes are inserted into all holes.
- Pour in cleaning agent.
- If the blockage does not allow liquid to penetrate inside, then repeat similar steps several more times.
- As soon as the plug is partially broken, the head is left for 2 days.
- Check the cleaning agent level every 2 hours. If necessary, top it up.
- After 2 days, the liquid mixed with ink is drawn out with a syringe.
There is another way to get rid of severe blockage. To carry out the work, you will additionally need a plastic container and several napkins. Having prepared these items, perform the following steps:
- Place 2 napkins at the bottom of the plastic container.
- A small amount of the selected detergent is poured onto them.
- The part to be cleaned is placed on top.
- It is pressed to the bottom of the container.
- Use a syringe to draw out the liquid.
- Repeat the operation 5 times, constantly adding a little cleaning agent.
Recovery
What to do if a Canon or HP cartridge is dry? In this case, it is necessary to dissolve the remaining ink and clean the nozzles. In order to pour the purchased washing liquid into the cartridge, you need to carefully peel off the label with the number. Under it you can see special holes. Then fill the foam adsorber with washing liquid from a syringe.
For a color cartridge you will need 5 milliliters of the composition, for a black cartridge - 10 ml. The remaining special cleaning fluid must be poured into an empty container. The cartridge should be installed in it with the nozzles facing down. Close the container with a lid and leave the cartridge to soak for 24 hours.
After a day, pump out the solution with remaining ink using a syringe. Then you can begin refilling the cartridge and then installing it into the printer. Enable forced cleaning mode and print a test page. If the user is not satisfied with the print quality, he can repeat soaking the cartridge in any container with washing liquid.
How do you know when it's time to clean your equipment?
You might be interested in: Silicone grease for coolers: review, characteristics, which one is better
The issue of cleaning is relevant for printers that use water-based, pigment, and sublimation inks, and when there are certain indicators that indicate that it is time to service the device. How to understand that equipment requires maintenance? You should pay attention to the signs. These include decreased print quality, stripes and omissions in the printed file, less bright or incorrectly rendered colors. But just in case, you also need to make sure that the paint supply hose is not pinched or kinked. If everything is in order, then you need to figure out how to clean your HP inkjet printer.
Pressure
There are situations when a user is in a hurry to print a document, turns on the printer and discovers that the HP cartridge is dry. What to do if you don’t have cleaning products on hand? You can wash the nozzles with ink. To do this, it is necessary to create pressure inside the cartridge. The user needs to use pliers to break off part of the needle so that 2 centimeters of metal remains on the syringe.
Next, you should cut a small piece from the elastic band or eraser. Place the homemade seal on a shortened needle and draw air into the syringe. Place the cartridge on a napkin with the nozzles facing up, insert the needle into the refill hole and squeeze the air out of the syringe. In this case, the piece of eraser should completely cover the filling hole. Ink will come out through the nozzles.
Cleaning a Canon printer manually
Manual cleaning of the internal elements of the printer is used if the hardware turns out to be ineffective. There are also printer models that do not provide a hardware method.
External surfaces
Clean the inkjet printer body using a dry and soft cloth. Before cleaning, disconnect the printer from the power supply. Do not use rough paper napkins. This may damage the surfaces. Also, do not use chemicals, even with severe contamination.
Attention! Gasoline or acetone can lead to permanent damage to the device.
Use a soft cloth to remove dust and dirt from all external parts of the printer. It is lightly moistened with water, and then the clean printer is gently wiped dry.
Scanner cover and feed rollers
The built-in scanner consists of a cover and an inner side. If these elements are dirty, print quality will deteriorate. Clean the scanner with a dry cloth. It is important that there is no lint on it, because it can remain on glass surfaces.
Rollers feed the paper into the printer. If they are dirty, it may get stuck during the feeding process. Cleaning the rollers is done as follows:
- connect the device to the network;
- remove all sheets of paper from the tray;
- gently press the “Stop” button;
- the emergency system will start flashing;
- you need to wait for it to blink seven times;
- After this, the “Stop” button is released and wait for the end of the rotation of the rollers.
Once the rollers stop rotating, the first cleaning stage is complete. Now the procedure must be repeated using paper sheets:
- a small pack is placed in a tray;
- hold down the “Stop” button;
- wait until the emergency system flashes seven times;
- release the “Stop” button;
- wait until the paper is completely ejected.
Sometimes the rollers are wiped with a cotton swab slightly moistened with water. Both rollers are accessible from the rear of the printer. You cannot touch them with your fingers.
Dry cleaning
There are three types of compounds:
- Acid. Consists of 10% acetic acid essence, 10% alcohol, 80% distilled water. Suitable for HP color printers.
- Neutral. Consists of 10% glycerin, 10% alcohol, 80% distilled water. Can be used for cleaning any cartridges.
- Alkaline. Ingredients: 10% ammonia, 10% alcohol, 10% glycerin, 70% distilled water. Suitable for Canon and Epson printers.
The user can prepare the appropriate composition himself if he discovers that the cartridge has dried out. What to do with homemade cleaner?
The liquid must be poured onto a paper towel. Place the cartridge with the nozzles down on a napkin with a special composition. Wait 2 days. The empty cartridge can be placed entirely into the solution. It is worth noting that foam filler cannot be immersed in the composition.
Causes and signs of pollution
Signs of contamination of the internal elements of a Canon printer are as follows:
- lines on control printouts blur, lose clarity, and become uneven;
- when the printer is working, this is accompanied by the appearance of ink blots;
- colors are lost;
- When printing a photo on paper, streaks are visible.
First, you can reboot your device. If the problem persists after rebooting, you need to open the case and clean the cartridges. Cartridges are cleaned regularly because the ink inside them dries out, especially if the printer is rarely used. Dust gets inside the device, which gradually settles on the elements, clogging them. Most often you have to clean the cartridges and the print head.
Alternative methods
Many users get upset when they find that their ink cartridge is dry. What should I do if I cannot restore normal print quality using the above methods? A completely unusable cartridge can be placed in the bath with the nozzles facing up. Then you should open hot water. A small stream should fall directly onto the print head.
The cartridge should be moved so that the water passes through all the nozzles. The jet will wash dry holes that were not amenable to regular cleaning. After 2 minutes you need to close the tap. After this, you need to place the cartridge on a piece of cloth with the nozzles down, let it dry, wipe it thoroughly with a napkin and install it in the printer. Print a test page.
Software cleaning
Every printing equipment manufacturer offers washing software. The program is installed on the computer when connecting and setting up the printer automatically or from the installation disk.
Cleaning with software involves running ink through the head nozzles. Ink pressure removes light ink plugs and air pockets.
Before more complex physical cleaning, do a software one according to the scheme below.
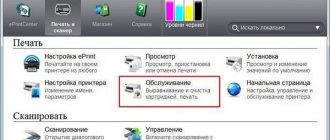
- Go to “Start” - “Control Panel” - “Hardware and Sound” - “Devices and Printers”. Or you immediately get to the desired window: launch the “Run” window and enter the command “control printers”, press “Enter” or “Ok”.
- From the list of connected equipment, select your printer and right-click on it.
- From the context menu, select “Printer Properties”.
- Select the Maintenance or Service tab.
- Depending on the cleaning depth required, select Printhead Cleaning or Deep Cleaning.
- If the dirt is heavily soiled, the cleaning program runs several times.
- Print a sheet (test page) to check the nozzles or any multi-colored image.
The required settings and the item responsible for cleaning depend on the brand and model of the equipment. Install the software that comes with the device upon purchase and study its interface in detail. We are confident that you will find the function you need and clean the part.
For the Epson brand, you can install the PrintHelp utility, which also has this functionality.
Keep in mind that the software method consumes ink, which could be enough to print 3-5 A4 sheets. After cleaning, the printer should be left undisturbed for 2-5 hours.
If after 3-4 cleanings the print quality does not improve, the head must be washed manually.
Preventing cartridge drying out
If none of the recovery methods help, then the user will have to purchase a new replacement ink unit.
What measures should be taken to prevent the cartridge from drying out? What should I do for this?
- Print the drawing weekly to control the availability of all colors.
- Do not keep the printer near a heater, in a draft, or in the sun.
Do not cover the nozzles with tape or adhesive tape. If the printer will not be used for a long time, it is recommended to close all covers of the device. Replacement cartridges should be stored in a cool, dark place.
How to clean an HP printer: useful tips
The development of technology, in addition to progress, also brings with it certain problems for consumers. Everyone buys one or another device in order to make their life easier, but this does not always work out, since they require certain care. For example, not all buyers of an HP Deskjet printer know how to clean it. But nevertheless, you need to know this in order to prevent malfunctions and not face repairs. In today's article we will look at how to properly clean dust from various printer elements.
How to remove the print head
To remove the print head, you need to lift the top cover and turn on the printer. Next, observe the movement of the cartridges. When they are in the middle, they are carefully removed one after another. It is important to remember their original location in the device.
The print head is located under the locking lever. Sometimes they don’t lift him, but pull him towards himself. The head is removed and cleaning begins.