Features of paper hats
How to make a cap from newspaper? In fact, everything is much simpler than it seems. Making crafts does not take much time. The technique allows you to make hats for a large number of people. Features of the craft:
- ease of implementation;
- covering your head from construction debris;
- sun protection in hot weather;
- cheap material for manufacturing;
- one-time use.
Paper crafts are suitable for children's games. You can create several hats for your child and his favorite toys. This way, your little one can imagine going camping with his best friends.
Necessary materials
Hats using the origami technique are made from any available paper. They can be folded from newspaper or use unnecessary scraps of wallpaper - the origami hat is so unpretentious in its material. Take yesterday's Izvestia or simple office paper - it doesn't matter. Much more significant is the decor, thanks to which the paper hat will acquire a thematic affiliation (pirate, gentleman, cowboy). To decorate the headdress, use feathers, any appliqués, drawings and inscriptions, buttons and any other available details. So a simple paper cap can easily become a pioneer cap, an army cap, and even a navy cap.
What you need to make a paper hat
To make a paper hat, first of all, you need to prepare a place to work, materials and tools.
It will be most convenient to sit at a table with good lighting. There should be enough space so that you can lay out a sheet of paper and a little more.
For some models of hats, all you need to work with is the material itself - paper. For others, you will need to additionally prepare the following:
- scissors;
- glue;
- paints and decorations;
- ruler, pencil;
- a compass or anything round that can be traced, the right size.
You should immediately clarify what you will need for the work so as not to interrupt the creative process.
Paper cap
A cap made from cardboard is much better than one made from newspaper. It is created on the basis of a sketch, which consists of 6-8 sections. First, they design the drawing in pencil on paper, then cut out the pattern along the marked lines, connect the parts in the center, aligning the holes made with a hole punch. The visor is glued to the main part. If the product is decorated with various decorative elements, you will get a bright and beautiful baseball cap.
Homemade cap
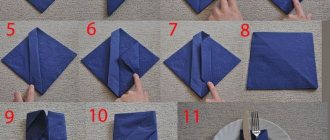
An origami cap is a universal thing. Its role assignment depends solely on how it is decorated (painted, painted) by you. Let's figure out how to make a cap out of paper. Look at the figure below - a detailed analysis of the circuit will tell you about the process in detail. In Fig. 2 specifically shows how to make a cap from a newspaper, since its standard spread sets a sufficient size of headdress for an average head. So:
- An origami cap is folded from a rectangular sheet. Fold it in half, and then bend the upper “closed” corners of the fold inward, bringing them together corner to corner, face to face (see figure);
- Fold the top “side” up twice, then turn the workpiece over. Bend the planes on both sides towards you, setting the desired size (we are making a cap for ourselves, a teenager, a small child);
- Fold the bottom edge of the workpiece towards you without overlapping the protruding folds, unfold the edge and bend its corners along the intended line of the new fold;
- Bend the bottom plane upward twice, covering all previously made folds. Essentially, the paper cap is ready;
- Turning the workpiece over, bend the top of the roll downwards, aligning it with the base of the workpiece. Then tuck this fold over the side of the package, straighten the product - you have a pioneer cap in your hands. I managed to make a paper cap with my own hands in just a couple of minutes.
Original paper sombrero
To make an original long-brimmed hat you need to prepare:
- Whatman.
- Old plastic flower pot.
- Glue.
- Paints, brushes.
Using a compass and ruler, mark a circle for the hat on whatman paper.
In the center of the circle you need to prepare a small hole that corresponds to the diameter of the flower pot. Corresponding to the contours of the pot, an additional cone is cut out of paper.
Color the brim of the hat in any pattern (you can use photos of real Mexican hats as an example). Place the pot in a paper cone, attaching it with tape or strong glue. Attach the finished hat cone to the wide brim.
What paper can you use to make a hat?
The paper is selected depending on the type of hat. Most often, a headdress, such as a painter's hat or a children's panama hat, is made from a magazine or newspaper. For doctor's caps, thicker paper is suitable - whatman paper in A1-A4 format, for a cap - a single-color (green or blue) sheet. It is recommended to make a pirate or cowboy hat for children's scenes from cardboard, and a cap from thick wrapping paper.
When choosing a material, keep in mind that sheets that are too soft or thin cannot be used. They will not hold their shape and will tear quickly.
Carnival hat cylinder made of cardboard
Is carnival coming soon? Will your child be dressed as a magician or a gentleman from London? Or maybe she will be a real lady who cannot go out without an elegant miniature hat? Then you definitely need to learn how to make a cylinder hat out of paper. Of course, plain paper will not work for this job. The material should be denser, it is better to use cardboard.
What else is needed for this job:
- the main material (cardboard) is selected according to the theme of the future costume;
- pencil for making marks;
- PVA glue;
- adhesive tape;
- fleece;
- To create a beautiful shimmer, use varnish and a wide brush.
Before you make a paper hat with your own hands according to the instructions, you need to prepare for the upcoming work. It is impossible to make a top hat without measurements, of course, unless it is a miniature hat to decorate your hairstyle.
You are required to:
- measure the circumference of the child’s head with a sewing meter;
- think about what height of the finished product you need; making a very high cylinder is not recommended, it can cause discomfort when worn.
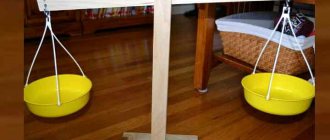
Now we’ll explain step by step how to make a paper hat with your own hands:
- We transfer the obtained measurements onto paper. The first thing to do is to cut out a cylinder (the top part of the hat) according to the circumference of the head.
- Based on the resulting cylinder, we cut out the bottom and crown. Glue the parts together (Step 2)
- Let's start making the cylinder fields. We attach the blank to the cardboard and trace it. We cut out several identical parts. The second part will be attached to the crown of the finished cylinder. Don't rush to cut the first one. Draw another circle inside this circle with a diameter smaller than that at the base of the workpiece. We cut out the parts and cut the inner circle with a large fringe. Glue the elements together.
- Almost done. You need to attach the previously obtained “teeth” to the base with glue. To ensure that the finished hat fits tightly to your head, glue a layer of fleece inside.
For a spectacular result, coat the cylinder with varnish and leave until completely dry. Now you know how to make a cylinder hat out of paper with your own hands. But this option is suitable for little gentlemen, but what about ladies?
Cylinder
Some children's matinees or theatrical performances require a top hat. It’s quite easy to make if you have whatman paper or at least a sheet of paper, A3 size, scissors, pencil, wrapping or colored paper, glue or double-sided tape.
- First, a double circle is drawn on a large sheet of paper. Its middle can be decorated with paints of a suitable color. Then this circle needs to be cut out. These will be the fields of the cylinder;
- A pipe is rolled up from wrapping and colored paper, with a diameter suitable for the previously cut circle. Excess paper is cut off and the edges are glued together;
- Moving away from the edge of the pipe, small cuts are made, like a large fringe, and folded outward. Glue is applied to their middle or pieces of double-sided tape are fixed;
- All parts are connected. The cylinder can be decorated to your liking with any decorative elements.
Small elegant top hat for girls
The following instructions from megamaster.info will tell you how to make a paper hat that will decorate any holiday outfit. It is attached to the hairstyle using hairpins or a hoop. This accessory can be used not only by children, but also by adult girls. Such mini cylinders can be a good solution for photo shoots.
Prepare before work:
- thick cardboard;
- PVA;
- glue stick and gun;
- ruler;
- corrugated paper;
- paper for working using the quilling method;
- braid;
- scissors.
Before manufacturing, as in the previous version of the cylinder, we need to decide on the dimensions. There is no need to measure the circumference of the child’s head; the work can be done “by eye”. For those who are engaged in such creativity for the first time, we recommend using standard sizes; we will indicate them during the work.
And now the instructions on how to make a miniature paper hat:
Small elegant cylinder (Step 1)
- Take a ruler and pencil. Draw a strip on the cardboard with a width of nine centimeters and a length of forty-two centimeters.
- On the resulting strip we draw small stripes on the bottom and top. From the edge, each line drawn should be from one to two centimeters. Using the resulting strips, we cut out the cloves. They will help us glue all the resulting components together.
- We fold the strip and secure it. Use glue. We recommend using a stapler, this way the work will be stronger. We cut off the resulting excess part during the folding process. (Step 2)
- Make two circles. It is very important that they are level and match the required size. The first diameter should be twenty centimeters. It will be used as the brim of the hat. The size of the second circle should be twelve centimeters - this is the top of the product.
- We take a cylinder that has already had its teeth and the largest circle cut out. We glue the blanks. Start from either side. After this you can glue the bottom of the hat.
Externally, the cylinder may seem ready. It needs to be decorated. We use corrugated paper and quilling techniques. After practice, you can indulge in fantasy.
So:
(Step 3)
- We cut out a circle from paper, it should be smaller than the base, and apply it to the cap. We wrap the excess part inside and secure it with core glue. We decorate the top of the mini cylinder with braid;
- We make flowers. Use paper that matches the color of the hat. Use a special stick to twist the strips. Form flowers. Use the same principle to make the leaves. Glue the resulting products to the cylinder.
- To prevent the finished accessory from falling off your head, attach it to a hoop, you can use an elastic band or braid.
This is just an example of work, you can make the product any way you want, with larger or smaller margins and decorated as you wish
Cap
Suitable for the costume of an astrologer, Pinocchio, fairy.
Note!
DIY necklace: how to make it quickly and easily from scrap materials (160 photos)
How to make beads with your own hands step by step - an easy master class with photos and descriptions
DIY pencil case: a detailed description of how to make a unique pencil case for school
The simplest of all options, this is the basic version for creating multiple models.
- Using a measuring tape over the ears and above the eyebrows, measure the circumference of the head.
- It is necessary to make a cone, this can be done either using mathematical calculations or the fastest method - folding a sheet of whatman paper into a cone, where the outer part of the cone is bent, glue is applied and the seam is pressed tightly for better adhesion. A measuring tape with the circumference of the head marked is placed on top of the rolled cone. Markings are applied and excess is removed with scissors.
- The cone is decorated and decorative elements are added.
If desired, the cap can be turned into a Dunno hat or a wizard’s hat - for this:
- A circle is marked and cut out - future fields.
- You need to make cuts at the bottom of the cone, then bend the cut parts inward, place the cone in the center of the circle and draw around it with a simple pencil. Cut out the resulting smaller circle.
- Bend the parts that were previously bent inward outward and apply glue.
- Place the prepared disk with the hole on top of the cone and press tightly to the cut parts with glue applied.
- Decorated as desired.
Dunno Hat
The photo of a hat made of paper, repeating the headdress of the fairy tale Dunno, beloved by many children, attracts with its amazing similarity to the drawn original.
If desired, you can make this accessory yourself:
Measure the child's circumference and draw a circle according to the dimensions.
- Step back 2 cm from the circle and cut out.
- On a two-centimeter strip, make cuts every 3-4 cm.
- Step back at least 25 cm from the inner edge and cut out the brim of the future hat.
- Visually divide the previously cut circle into three triangles and cut out one of them.
- We make notches on one of the sides.
- We roll the cone and attach it to the hat using fastening cuts.
- We paint the entire surface with blue paint or cover it with fabric.
- We cut out a tassel from corrugated paper and “hair” characteristic of Dunno from yellow paper.
It is advisable to complement the fairy-tale image with a blue tie, which is also easy to cut out of paper according to the template provided.
As you can see, most hats are made according to an identical pattern, so often you just need to stock up on an appropriate photo example, patience, try to break the hat down into its component parts and make a beautiful accessory for any occasion.
Corrugated paper sports cap
Necessary materials:
- Corrugated paper with vertical folds for the base
- 2 corrugated paper strips in contrasting color
- 1 ribbon of thick paper or thin cardboard
- Lace or braid
- Decorations (eg paper applique)
Operating procedure:
1. Fold a sheet of corrugated paper in half, iron the fold and unfold it.
2. Apply a thin bead of glue directly below the fold line. It is better to use thick, non-spreading glue.
3. Place cardboard tape over the adhesive. Its top edge should coincide with the fold line of the base, and a little corrugated paper should protrude on both sides. Fold these edges over the sides of the tape and glue to it.
4. Apply a thin bead of glue along one edge of the contrasting colored paper tape.
5. Glue the tape along the top edge of the base so that its clean edge (without glue) matches the edge of the base.
6. Fold the bottom edge of the base up and glue the second corrugated paper tape over it.
7. Make a fringe along the entire top edge, capturing both the base and the ribbons.
8. To make a flap along the bottom edge of the hat, simply fold it up 1 or 2 times the width of the cardboard tape inside.
9. Now wrap the piece around your head from the lapel side, measure and cut off the excess warp on one side. Don't forget to leave a small seam allowance for gluing.
10. Glue the hat in the lapel area or fasten it with a stapler. Cardboard tape placed between the layers of paper will prevent it from tearing.
11. Place the hat on your head and carefully gather the top part into a bun. Tighten it with braid or lace and fluff out the fringe.
12. Decorate the lapel with paper applique or other decorative elements as desired.
Paper helmet like a samurai
Some boys, having watched enough cartoons or read comics, begin to bring them to life in games. If their hero is a samurai, then a scheme for making a samurai cap will definitely not hurt you. Just before starting work, prepare square-shaped paper, where all sides are the same length.
- Connect the diagonal corners of the prepared square to form a triangle. Make a square out of it by turning the sharp corners towards the top of the figure;
- Bend the corners located at the bottom of the front side towards the opposite corner. After this, perform the action again with the upper corners folded upward. With this you will form “ears” that protrude beyond the edges of the cap;
- To complete the Japanese cap, fold the corner of the top layer, which is located at the bottom, so that it slightly overlaps the wrapped elements of the workpiece. Fold the bottom over a second time to create the desired shape;
- Turn the craft over. Bend up the extra corner there on the other side. Now you can unwrap the hat and put it on your little samurai hero.
Master classes on creating a hat
Today, the following types of hats are most relevant for children's parties:
- Dunno paper hat.
- Pirate headdress.
- Hat for a hussar.
- Women's hat for a beauty contest.
- Original sombrero.
All submitted works are accompanied by detailed instructions with step-by-step descriptions of actions.
What paper can you use to make a hat?
Paper hats are good to make because you can use almost any large enough piece of paper you have on hand as the base material, for example:
- full spread of the newspaper;
- A4 sheet of cardboard;
- a piece of paper wallpaper;
- office or landscape paper;
- colored paper or cardboard.
Important! Do not use paper that is too thin or soft - it will not hold its shape.
Repair hat made from newspaper
During repairs, construction dust and plaster tend to settle on the hairstyle. To prevent this, you can make a simple boat hat from newspaper.
And it is simple precisely because it is really very simple to put it together:
- Fold a sheet of newspaper in half. Mark the middle longitudinal line of the sheet by bending it in half lengthwise.
- Considering the fold of the sheet as the top, bend the upper corners to the middle line.
- Bend the bottom strip outward butt to the bottom line.
- Fold the bottom corners of the lapels.
- Fold the flaps up from the outside.
- Pull the center points of the bottom. You will get a square.
- Fold the bottom corners outward, bending along a line slightly below the center of the square.
- Pull the center points of the bottom again.
- Fold the flaps outward again.
- Grasping the corners, pull them apart.
- Add volume to the hat.
Having learned how to make such a headdress, you will not have to worry about your hairstyle during any dirty work.
How to make a hat with a visor from a newspaper with your own hands
Another interesting version of a newspaper headdress is a cap.
It is also done by folding paper without using scissors and glue as follows:
- Fold a sheet of newspaper in half. Fold the top corners, closing them in the middle.
- Fold one of the bottom strips in half.
- Bend it from the outside, forming a side.
- Turn the workpiece over and bend the protruding corners of the side. Fold the sides, forming the size of the future cap.
- Fold the bottom strip up to the hem line.
- Fold in the bottom corners.
- Tuck the free corners of the curved triangles inside the side.
- Turn the workpiece over and bend the top corner.
- Tuck it under the side.
- Straighten the cap and give it volume.
This cap can be worn on a sunny day somewhere in the country.
Paper cylinder
The young gentleman will definitely love the paper cylinder.
To make it you will need a sheet of colored paper. You can take the packaging. And also a thick paper or cardboard sheet of A4 format, scissors, glue, paints, a pencil, two circles of different diameters.
After preparing everything you need, you can start working:
- Cut a strip from a colored sheet. The width of the strip is the height of the future hat, the length is equal to the circumference of the cylinder.
- Roll the strip into a pipe and glue it together.
- On a sheet of cardboard, draw two circles of different diameters with a common center. The inner circle should be equal in diameter to the glued pipe. The difference between them is the width of the cylinder fields.
- Color the resulting fields and cut them out.
- Cut the bottom edge of the pipe into a fringe 1 cm deep and wide.
At this stage, all the parts are ready, all that remains is to connect them. To do this, you need to bend the fringe of the pipe outward, put the cut ring on the pipe and glue the fringe along its lower side.
On a note! For a neater look, you can cut out a second ring and glue it underneath, covering the fringe.
You can diversify the hat with additional fun decor.
Newspaper hat
The advantages of newspaper over other paper products are that it is large in size and folds easily. It is used mainly to cover the head when painting, fishing or on a picnic.
So, let's make a hat from a newspaper. To do this, we need to lay out the newspaper on the table. Then fold along the fold in the center. And fold again to a rectangle.
Next, we follow the diagram and bend the lower end by five centimeters. Moreover, at this stage we bend only one edge. The other end is bent in a mirror direction symmetrically to the previous edge.
Next, we wrap the ends from the edges again by five centimeters and secure them with adhesive tape so that the structure does not fall apart.
Square cap
An unusual version of the cap, which fits tightly to the head and has a visor.
- Fold the newspaper in half and then into a quarter to locate the center line.
- Open it up and make a triangular roof.
- First fold the rectangular strips into 2 halves, then bend them.
- Turn the model over and bend the edges from the sides towards the center of the model.
- Let's fold regular triangles in both corners.
- We bend the triangular roof and tuck it in.
- Open the model and align it to form a square.
- Rotating, bend the corners, open.
- We turn 4 corners. The result is a hat in the shape of a box.
Paper skullcap
You can create a skullcap with your own hands from hard paper or printing sheet, which is folded in 2 layers for greater density. It is made according to a pattern similar to folding a cocked hat, only in the case of a hat the outer corners are folded completely, and in a skullcap the upper corners are turned away at a short distance from the middle. The workpiece is trapezoidal in shape.
If you need a headdress made of cardboard in an oriental style, the headbands are decorated with a beautiful pattern. You can paint it yourself with artistic paints or paste it over or trim it with ribbons with colored embroidery.
When the side triangular protrusions are pulled out, the product turns into a jester's cap. If you pull out another protrusion and straighten all 3 corners, the skullcap becomes an academic cap.
Paper samurai helmet
Without glue and scissors, you can make a samurai helmet from just one piece of paper for a children's party.
Instructions for assembling a paper helmet:
- Take a square sheet of paper.
- Fold it first along one diagonal, then along the second.
- Close the sharp corners in the resulting triangular figure.
- The bottom edges of the top layer are folded upward.
- Bend the resulting folds symmetrically on both sides.
- The lower part of the top strip is folded slightly below the line of the future bottom.
- The bottom layer is folded onto the bent corner.
- Turn the product over and make a fold along the bottom line.
For little cowboys
To make such an accessory, you must first take measurements. The hat consists of two parts. The length of the crown and the diameter of the oval for the brim should correspond to the circumference of the head.
The height of the crown is equal to the length from the crown to the forehead. The crown is the part of the hat that covers the head.
Step-by-step instruction:
- On a sheet of thick cardboard we draw a rectangle-shaped crown. You can use ready-made ideas; templates are given below.
- Add 2 cm on three sides.
- Cut out the workpiece.
- For the margins, cut out an oval.
- Glue the parts together.
- Glue the lace on the inside.
If desired, cover the cowboy headdress with colored paper and fringe.
You can make a cylinder in the same way. In this case, the crown of the hat will be in the form of a cylinder and larger in height.
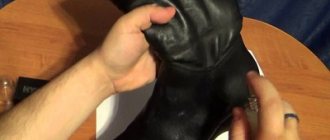
Paper cowboy hat
A cowboy hat will be much stronger if it is made of dense material covered with paste or glue. To add realism and volume, the product is decorated with artistic paints. It can be worn to holidays and children's events. For a hat with a large brim, you will need pre-prepared patterns.
How to make a paper hat without glue: diagrams and description
For a children's party or masquerade party, you can make original paper hats. Moreover, some models can be folded without the use of glue and scissors. You need to take thick colored paper or paint it at the end with paints and applications.
Paper skullcap
To create an oriental look, you can make a skullcap. To do this, you will need a square sheet of paper with a side equal to 40 cm. Next, you need to fold it according to the diagram:
- Fold the sheet in half.
- Fold the top corners at some distance from the middle.
- Fold the bottom of the top layer in half to the level of the folded corners. Then wrap it again.
- Turn the workpiece over.
- Fold the sides.
- Fold the bottom in the same way as in step 3.
- Straighten the skullcap, give it volume.
The final touch will be decorating the hat in an oriental style, for example, with bright stripes.
Paper hat with brim
Kids will definitely love this cowboy hat with a paper brim.
It is also made using the origami method as follows:
- A rectangular sheet of paper is folded in half.
- The resulting rectangle of dreams is bent in half and unbent back. This marks the middle.
- The upper corners are bent towards the middle line.
- The lower part is folded in half to the line of folded corners. The action is repeated on the second side.
- A second fold of the lower part is made on both sides. Next, the workpiece is stretched beyond the central points of the lower edge.
- Fold the bottom corners of the resulting square from different sides of the workpiece diagonally.
- Unfold the resulting triangle again by pulling the center points of the bottom.
- Pull the top corners of the new square and unfold the hat.
- Add volume to a cowboy hat.
Important! When drawing corners at the final stage of creating origami, you should not do this until the very end. Otherwise, a cowboy hat with a brim will turn into a boat with high sides.
The finished headdress can be decorated with a sheriff's badge, and you can also attach a cord to attach the hat to your head, inserting it into small holes.
Paper samurai helmet
For a children's party, you can make a samurai helmet for a young warrior.
To make a helmet you will need a square sheet of paper. To make the product more original, you can take paper with sides of different colors. You need to make a headdress according to the instructions:
- Fold a square sheet of paper diagonally. Unfold and fold again along the second diagonal.
- Bend the sharp corners of the triangle, butting them end to end.
- The result is a rhombus. Bend the bottom corners of the top layer of the workpiece upward.
- Bend the raised corners symmetrically on both sides.
- Fold the lower part of the top layer along a line just below the line of the future bottom.
- Fold the bottom strip over the folded corner.
- Turn the workpiece over and bend along the bottom line.
- Give the helmet volume.
Thus, making a samurai helmet without glue and scissors is also not difficult.
Hat with brim
It won't be that difficult to make a hat with a brim. Moreover, the detailed diagram will become clear to school-age children.
Let's describe the entire algorithm for creating a hat.
- Take any newspaper and make a square piece out of it. Bend this sheet in half, and then in half again so that the bends are outlined;
- Then unfold the paper so that you are left with a double rectangle. Tuck the hidden corners inward, but do not connect the folds along the edges;
- Open the last folds from the inside and press a little along the entire workpiece. Turn the workpiece with the wrong side up, following the fold lines, bend the edges towards you, and then fold the “sides” here on all sides;
- Straighten the hat, press it down a little and you can wear it for an evening walk.
Paper Samurai Helmet
Let's first decide on the purpose of our future paper hat, and then immediately start making it. For example, a samurai helmet is perfect for children to play in the game. It folds up surprisingly simply. Our step-by-step instructions will help make your child happy with a new gaming attribute in 2 minutes. Let's get started?
- Prepare a sheet of paper in the shape of a regular square (see Fig. 1). Fold the piece of paper diagonally, and turn the resulting triangle into a square, bending the sharp corners towards the top;
- Bend the lower corners of the “front” side to the opposite corner, and then bend the upper corners outward again, forming “ears” protruding beyond the boundaries of the blank;
- The Japanese paper hat is almost ready. Bend the lower corner of the upper plane upward, slightly overlapping it over the bends of the workpiece, fold the bottom again, fixing the shape;
- Turn the hat over to fold up the “extra” corner on the back side, unfold the product - you have learned how to make a paper hat with your own hands for your fidgety shogun.
By the way, you can also make a paper shuriken star for a complete set.
Tips for working with paper
To make your creative work satisfying, you should heed a few tips:
- you need to start creative work only in a good mood;
- You should be responsible when choosing a place for creativity: nothing should interfere, there should be enough space and light;
- When working with paper, you need to keep your hands clean so as not to leave marks on the product. If you have to deal with glue or paints, it is better to immediately prepare wet and dry wipes;
- you need to remember that scissors are a sharp tool, you should not leave children with them unattended;
- Before folding life-size origami, you should practice on a “draft” - an unnecessary sheet of paper;
- For a homemade hat to look good, all lines and folds must be neat and symmetrical.
Following these guidelines will help you have fun and enjoy paper crafting.
Sources
- https://tkaner.com/golovnye-ubory/shapka/kak-sdelat-shapku-iz-bumagi/
- https://my-pic.ru/uyut/kak-sdelat-shapku-iz-gazety.html
- https://samodelki.org/kak-sdelat-shapku-iz-bumagi/
- https://kuhniug.ru/stirka/kak-sdelat-shapku-iz-bumagi.html
- https://floridei.ru/tvorchestvo-s-detmi/kak-sdelat-shlyapu-svoimi-rukami-iz-bumagi.html
- https://vsepodelki.guru/shlyapa-iz-bumagi/
- https://megamaster.info/kak-sdelat-shljapu-iz-bumagi/
- https://tytpodelki.ru/shlyapa-iz-bumagi/
- https://rukodelieinfo.ru/shlyapa-iz-bumagi/
- https://www.promyhouse.ru/rukodelie/izdeliya-iz-bumagi/delaem-bumazhnuyu-shlyapu.html
- https://www.tkaner.info/golovnie-ubori/shapki/kak-sdelat-shapku-iz-bumagi/
- https://PosudaIzKamnya.ru/iz-bumagi/shapka-iz-a4.html
[collapse]