How popular different patches and decorations for clothing are now, but they don’t cost that little for simple pieces of fabric embroidered with colored threads. This, of course, is their disadvantage, but how wonderful things are transformed with them!
We have found a solution to this problem, because today we will tell you how to make patches on clothes with your own hands. It will be very exciting, and most importantly, the result will be pleasing to the eye.
Interesting views
DIY patches on clothes come in a variety of varieties. From pin brooches to fabric and design ideas. After all, the most important thing is not the material used, but the idea!
So you have a huge range of choices to choose from to get the perfect patch for you. Firstly, you can change the base, since in its place there can be felt, denim, leather and even thick cardboard.
Secondly, this is the material for doing all the work. The patch can be made not only with floss threads, but also with sequins, beads, seed beads or pieces of fabric.
In addition, there are just as many variations in attaching the patch to clothing. It uses pins, adhesive tape, and the option of instant manual stitching.
After we have discussed all the possible options, it’s time to tell you how to make patches on clothes with your own hands.
Option for professionals
Important! With such technical support, you can realize any fantasy, and quite professionally and efficiently.
Before you make stripes on clothes with your own hands, you need to stock up on blanks in the form of:
- adhesive interlining;
- soft non-woven base;
- threads of the required shades.
Important! Before you start the main operation of the sewing machine, you need to set the outline. It will be easier to cut out the patch using it; no additional securing of the edges will be required.
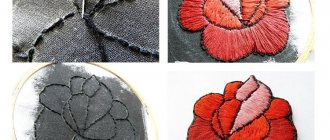
Drawings with the form completely filled out are an excellent option for home execution. This applique holds up well, does not delaminate and looks good under any circumstances.
The secret to proper embroidery planning:
- We fix both layers of fabric - both the interlining and the non-woven base - in a hoop.
- Let's make the main drawing.
- When everything is ready, cut the thick fabric along the contour.
- Using a glue stick, we pass the lower part of the workpiece and tightly apply the adhesive base of the non-woven fabric.
- We put it back into the hoop and run the overlock stitch along the contour.
- Now the product has acquired a finished look, all that remains is to trim off the excess and attach it to the clothes.
Do-it-yourself patch on clothes: manufacturing features
- Take the main fabric and iron it thoroughly to remove excess creases and folds. After this, it is advisable to use the hoop throughout the entire work to ensure even embroidery.
- If your fabric is very different from the color palette of the threads you plan to embroider with, then draw and paint a sketch of the embroidery with slightly diluted gouache or acrylic paint.
- Let the paint dry and adhere thoroughly to the fabric base.
- If desired, the paint can be sprayed with varnish for stability.
- Start your satin stitch with one spot of color and then move on to the next. The stitches need to be done as close as possible so that the applied paint does not even show through them. This is the only way you will receive a high-quality product that you will not be ashamed to use in life.
- So, step by step, fill the entire patch with threads, and then complete the entire look with a contrasting color edging stitch.
- Cut out the embroidery with a small allowance of 5-8 millimeters.
- Then saturate the fabric edge with glue and fold it over to the wrong side so that it is not visible. The same thing must be done with protruding threads.
- How to make patches on clothes with your own hands so that they look really cool? Add slight wear or highlights in some areas using layering stitches or simple paint.
Now you can decorate all your clothes, since making stripes on clothes with your own hands will be very simple and quick!
One of the products widely available in handicraft stores are patches on clothes. This versatile item can perform several functions. In everyday clothing, patches are used as a decorative element, and on specialized clothing they perform an informational function, and in this sense, patches are widely used on uniforms and work clothes. The fashion of decorating clothes with stripes has returned to us from the past, taking with it more modern ideas.
Why do you need curtain tape?
On sale you can find a large number of accessories that will help you quickly and easily hang curtains on the window, as well as give them amazing and beautiful designs. One of these elements will be curtain braid. It looks like fabric flaps of various widths, along the entire length of which a cord or thin ropes are stretched. In the center of the braid there is a thicker layer with loops necessary for hanging curtains to the baguette, and laces are used to create folds of the required type and size.
What is curtain tape used for:
- processing the upper edges of curtains or curtains;
- hanging them from the cornice without using rings or clothespins;
- creation of assemblies of varying complexity.
Main types of ribbons
Also, the ribbon can be sewn in other places on the tulle. After tightening the ropes, folds are formed on the surface of the tulle; they can be made in any form. In order to remove the curtains, you just need to untie the ropes and straighten the braid. This tape greatly simplifies the work of window styling, and anyone can sew it on. It is also called curtain elastic, mesh or belt.
Attention! Using drapery, you can create beautiful patterns and lines on the surface of curtains or tulle. But, unfortunately, some types of draping will be difficult for a beginner
To do this, it is recommended to watch several video tutorials to understand the essence of the work.
But, unfortunately, some types of draping will be difficult for a beginner. To do this, it is recommended to watch several video tutorials to understand the essence of the work.
Varieties of patches
Depending on the method of attaching the stripes, there are:
- adhesive;
- sewn;
- with Velcro.
It is necessary to choose a patch that meets this criterion taking into account the quality of the fabric, the location of attachment and the level of skill of the person who will attach it. Velcro patches are most often found on sportswear. Adhesive patches are much easier to attach than sew-on patches. But the word “patch” itself determines the most acceptable method of attachment.
Lemon
How to make a patch? The easiest way to make it is to embroider a beautiful design on thick material. For example, you can make an applique in the shape of a lemon. An outline should be cut out of felt. It can be a whole lemon or a slice. Cut out the felt and stitch it. The most convenient way to do this is with a sewing machine or overlocker.
A beautiful edge of the patch can be made by hand, for example, by crocheting the product or stitching it over the edge. If you are making an applique in the shape of a lemon, then you should embroider a highlight on the product. If the patch looks like a slice, then it is necessary to make white veins. They can also be embroidered in two ways: either by machine or by hand. Don't forget to use a few stitches to create the bones.
How to make a patch on clothes?
Making a patch is a rather complex and time-consuming process. It is necessary to carry out the work very carefully, strictly following the intended sketch.
First you need to prepare the materials that you will need for your work: a sample patch, suitable pieces of fabric, adhesive fabric, scissors, a needle and thread, cardboard. The work will become easier and more understandable if you perform it in several stages, following this example.
- Cut out individual pieces from the fabric for the patch. Cut out the general shape of the patch from adhesive fabric, and its outline from cardboard.
- Sew the cut out parts according to the sketch and glue the adhesive fabric to the wrong side of the patch. After this, use “moment” glue to glue the cardboard outline to the backside.
- Armed with a needle and thread, manually embroider the desired design on the patch and finish the edges with frequent stitches. The finished patch should be smooth and neat.
If you have an embroidery machine, you can use it to embroider a design on a patch.
Sewing on buttons: useful tips
To begin with, it is worth mentioning the sizes and shapes of buttons. In addition, it is worth knowing that there are buttons with and without a “leg”.
Button size
Each button manufacturer sets its own size range. All button sizes can be specified in millimeters (mm) or lines (L).
If you decide to order buttons, you need to agree on the calculation system with the manufacturer. For example, if you decide to order size 30, then their size is 34 mm, and if 34L is indicated, then the size is 21 mm.
Here is a table to help you better understand these two number systems:
All these data apply to round buttons. Square buttons are sized on the diagonal, while custom sized buttons are usually sized on their longest side.
Button on the leg
If the "foot" is present, then this is a plus, since it reduces the tension that typically occurs between the button and the material when you unbutton and fasten the garment. This means that the “leg” will protect the clothes from tearing.
It is also worth noting that the leg hides the threads with which you sew the button, which means that the button can be sewn on with thread of any color, even if this color does not match the clothing.
But even if the button does not have a “shank,” you can make one from the thread you use to sew on the button.
Has a button come off? Some useful tips.
Tip 1:
If you have lost a button and there is no spare one, then you will have to buy the required number of suitable buttons of the same type, and alter all the old buttons on the clothes.
Tip 2:
Choose the size correctly, as a button that is too small will constantly come undone, and a button that is too large will not allow you to fasten it properly. Simply insert an unsewn button into a buttonhole on your garment to see if it will fit.
Tip 3:
if the fabric is dense, then the needle and thread should be suitable - the threads are thick and the needle is thicker and with a larger eye.
Types of needles for hand sewing:
Tip 4:
Use sharp scissors, as dull scissors will fray the tip of the thread, making it difficult to insert the thread into the eye of the needle.
Tip 5:
Be sure to wear a thimble to protect your fingers while sewing on the button.
Advantages and disadvantages of handmade patches
Today, everything made by hand has special value. Patches are no exception to this rule. The advantages of such stripes include:
- unique design, because it is likely that a do-it-yourself patch will be the only one in the world;
- low cost due to the fact that remnants of previously used materials are often used to make the patch.
Among the disadvantages of such work, one can note the mandatory presence of experience in sewing, without which the work will not be accurate, and a significant investment of time.
Ice cream
Today it is fashionable to decorate clothes with images of food. How to make a patch of this theme with your own hands? You need to cut out the outline of the ice cream from felt. The material should be beige, as it will form the basis of the cup. Now you need to divide the workpiece into two parts. One of them will be a cup, the other will be ice cream. We start making the applique by sewing beads along its contour.
Now you need to draw a diamond-shaped pattern on the cup. Once it is ready, you can move on to decorating the ice cream. Beads and beads should be sewn on in a chaotic manner. If desired, you can even glue rhinestones. The main task is to fill all the space so that there are no gaps left. The finished patch can be used to decorate not only clothes, but even a bag.
Some Caveats
Mostly young, fairly brave girls who love to be the center of attention decorate their clothes with stripes. And although they are most often used to decorate everyday clothes, you can also find stripes on business suits and even evening dresses.
Still, you shouldn’t overdo it when using stripes as a decorative element, especially for women who are not of a young age.
By showing imagination, accuracy and perseverance, you can turn a completely ordinary item from your wardrobe into a fashionable and stylish outfit that will invariably be the center of attention of others.
Snowman
Children often tear their clothes, and buying new things all the time can be expensive. It’s easier to decorate holes with appliqués. How to make a patch on clothes? One of the easiest ways is to make an applique from felt. To do this, cut out a circle from the material, which will be the base, and the outline of the upper part of the snowman. We sew the parts to each other with the seam first, needle first.
To make the patch look organic, a decorative seam needs to be laid along the contour of the entire product. Now we cut out a scarf from pink felt, and a nose from orange felt. Sew the details to the applique. All that remains is to detail the product. You should embroider the eyes and mouth with black threads, and snowflakes on the scarf with white threads. If desired, the snowman's chest can be decorated with a button.
Tell your girlfriends
Support the Womee project, because we put our whole soul into it - share the article with your friends by clicking on one of the buttons below
The peculiarities of making chevrons mean that they are attached to stretchy fabric and then sewn onto the product. And the quality of the finished product depends on the level of hooping. They have a huge number of varieties.
The uniforms of many organizations and departments are decorated with a sewn chevron - the insignia of various professional corporations, denoting various corporate characteristics.
Dog
How to make a beaded patch? First you need to draw the outline of the animal's muzzle and cut it out of felt. Now we should outline the main features. We draw the outline of the eyes, nose and ears onto the fabric with a pencil. Now we take beads of several shades (black and white) and get to work.
First we embroider the edging in white. Then we outline the circle of the muzzle with black beads. You need to embroider strictly according to the form. That is, the forehead should form a semicircle, the nose should form a drop, and the eyes should form ovals. Refer to the sample attached above and follow the shape.
Application of insignia
The chevron is part of the uniform equipment of various structural units:
- police
- police
- military
- security guards
- some enterprises
Often, insignia are used for uniforms of staff of huge network marketing, hypermarkets, or are used to designate brands. The chevron is used to distinguish enterprises or law enforcement agencies, or for the purpose of advertising a certain brand. Consumers quickly recognize by signs which company or power structure the employees represent. Clothing decorated with insignia looks representative and respectable. Sportswear is also decorated with certain signs that distinguish different sports enterprises.
Making an embroidered chevron
Let's take a look at the chevron, which is made from a fairly dense fabric base, cut in the shape of a circle, oval or square and decorated with embroidered logo of a particular company or organization:
1. The edges of the formed distinctive part are well processed with thread.
2. The logo of the required structural unit or sports enterprise is embroidered in the center of the created element.
3. Having completed the manufacturing and embroidering of the details, the chevron is sewn onto the uniform or other item representing the brand of the advertised enterprise.
Patch
This application looks very original. How to make a patch patch? We will make it from two materials: the first is felt, and the second is thin faux fur. We make patterns of two rectangles with rounded edges. One of them should be larger, the other smaller. We cut out the part from felt according to a larger pattern, from fur - according to a smaller one. Now you should place the blanks on top of each other and stitch them on a machine or sew them by hand.
Let's move on to the most interesting part - the decor. In our case it will be a broken heart. Embroidering on fur is inconvenient, so the first step is to make a backing. Using a machine, we sew a rectangle in the center of the patch and make an edging for it. On it we draw a broken heart with a pencil. Now, using a typewriter or manually, fill the outline with red thread. To make the patch more realistic, small circles should be embroidered in a chaotic manner on both sides of the center.
Methods for making chevrons
The manufacturing features of chevrons have different methods of fixation to the product. Quite often, chevrons are used to replace regular embroidery on difficult-to-embroider fabric, such as lacoste or knitwear. This happens due to the poorly visible embroidery on the material described, as it is lost in the soft fabric - embroidered chevrons will look great and quite attractive. To strengthen and strengthen the product, you need to fix the embroidered chevron from the inside of a uniform jacket or other clothing with an adhesive solution. The adhesive base is used when gluing the chevron to the product using a hot iron. If you have a heat press, you can use it. Embroidered patches are of great importance for hats. Due to the miniature embroidered area, the embroidery process is too difficult. The process of sewing or gluing ready-made distinctive signs embroidered with bright threads saves the day. By using special glue, the prepared embroidered detail is placed on the cap, making it luxurious and magnificent. These manipulations can be performed on any small product; the embroidered patch is fixed easily, without complications of the work being done.
Video material
In fact, with the right level of skill, such an accessory can be embroidered and created manually, for example, from felt. True, this is much more difficult and time-consuming. But if you really want it and the goal is set, it is quite possible. After all, you can sew a patch on your favorite sweater, and it will sparkle with new colors! Now, having an idea of how to make a patch on clothes with your own hands, you can take care of the sketch and get to work. Such a hobby will be appreciated by friends, because hardly anyone can refuse such a stylish gift.
So! 1) Original. As you can see, everything will be shown using the example of Hellsing cosplay patches.
2) We cut out the details of the patch from the main fabric and adhesive + border from cardboard. In my case, gabardine was used as the main fabric. IMPORTANT! The final result of the work will largely depend on how smoothly you cut everything out at this stage, so take your time! First, I cut out the parts from glue and a 5mm wide cardboard border, then I cut the paper pattern and cut out the parts from fabric.
3) Sew the patch parts together. If you choose synthetic fabric, like I did, you can burn the edges for ease of use. The seams are carefully ironed and pressed.
4) We glue the sewn patch - this is necessary in order to make your patch even tighter so that it does not unravel, warp or wrinkle over time. I used Neftekamsk glue. For those who do not know what it is: adhesive is a special fabric that serves to impart additional density and rigidity to the parts of the product. Apply the glue-coated side to the back of the patch and iron it. IMPORTANT! It is necessary to glue the adhesive through wet gauze, otherwise it simply will not adhere to your fabric and will peel off very quickly!
5) Glue the previously prepared cardboard border on the wrong side. The border will help us with embroidery.
6) We embroider the border by hand and add other details. Unfortunately, I did not have the opportunity to photograph these steps in detail. IMPORTANT! The fewer threads you use at a time, the smoother and more even the embroidery will end up! I didn’t waste time on trifles, so I started with 2 threads at once, walked along the contour twice and, as a final touch, corrected some unevenness with a single thread. When embroidering a border, you are wrapping thread around the cardboard. When bringing the thread to the face, try to pierce as close as possible to the border of the cardboard border, otherwise the embroidery will end up uneven. Life hack: when embroidering corners, you can help yourself and carefully glue the threads so that they do not move to the sides. The end result should be a nice tight border. The inscriptions are made with acrylic paints on fabric. Outline everything with a pencil, use the thinnest brushes and do not add a lot of water. => Your stripes are ready!
Good luck and patience to you~! I hope someone finds this “tutorial” useful.
1) Original.
2) We cut out the details of the patch from the main fabric, adhesive + border from cardboard.
Sew the patch pieces together.
We glue the sewn patch.
We glue the previously prepared cardboard border on the wrong side.
We embroider the border by hand and add other details. Your stripes are ready!
Torn pants or jacket? Don't throw away your favorite clothes. You can make an applique. Read below about how to do it.
Manufacturing process
Having theoretically familiarized yourself with the work process and having an idea of chevrons, you can move on to creating interesting, colorful embroidery.
Let us consider in detail the features of chevron manufacturing. For creative work, we definitely need an embroidery machine, even a household one.
To complete the creative procedure we will need:
- selected embroidery pattern
- fabric base
- needles
- required spool threads of different colors
- tailor's scissors
- lighter or candle
- wooden hoop
- glue stick