Buffs (Bouffer) - a word taken from the French language, translated as “to swell,” which describes this type of fabric draping quite well.
The original way of creating folds can be found on curtains, various items of clothing, and accessories. Most often, puffs can be found in interiors created by fashion designers - for example, on pillows. However, to follow fashion, it is not necessary to contact designers or order a finished product from an expensive boutique. You can create such a beautiful drapery with your own hands by studying the basic diagrams and calculations.
Areas of application for buffs
Puffs are a unique textile decor that can be used in any area. Some designers use the technique to decorate clothes, others decorate furniture upholstery in this style.
Buffs for finishing fabric
Where can you use this decorative technique:
- On collars, belts of clothes.
- Linen pillowcases on sofa cushions.
- On curtains, curtains and lambrequins.
- You can decorate the bedspread with a pattern.
- On hats, headbands, scarves.
- Bags, wallets, cosmetic bags.
- Ottomans, furniture covers.
Puffs on clothes
You can use puffs for finishing any types of textiles that have decorative functionality.
Magnetic holders
Magnetic clamps are considered the most durable and versatile.
What does a magnetic tuck look like? It is a cord or wire with small magnets attached to the ends. For decoration, you can simultaneously use several tucks that are similar to each other.
The variety of magnetic pickups is simply amazing. In stores you can find tucks in the form of flowers, butterflies, shells or pebbles. The color of the accessories can be combined with the curtains or, conversely, be contrasting. Classic magnetic clips are universal, as they suit any room decor.
Magnetic holders can be open or closed. The closed type differs from the open one in that the magnet is sewn into the fabric. Such models are considered less practical, since the effect of the magnet is weaker.
Magnetic clamps have many advantages. They are versatile, functional, reliable and affordable. But despite all the advantages, such holders also have their disadvantages. They are not suitable for attaching heavy or bulky curtains, as they are not able to hold them in the desired position. If dropped, the magnetic clips may break. Therefore, when choosing magnetic holders, make sure that they will cope with their task.
Types of buffs
There are several types of puffs that have a certain pattern. The most popular patterns are:
- Concentric circles that move from the center to the edges or vice versa. Reminiscent of a flower pattern with opening petals.
- Linear, when the pattern moves from one edge to the other.
- Multi-row. Seams are formed on the canvas without direction. The most common option is the “wafer”, used to decorate pillowcases.
- Ornamental. The folds form a complex compositional pattern. The simplest example would be “heart”.
Types of buffs
Please note! There can be a lot of examples of specific patterns; if you understand the principle of pattern formation, then you can create interesting compositions yourself - without a diagram.
Different options for making folds are considered relevant. For example, “polka dots” look harmonious on almost all types of products.
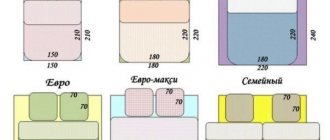
Calculation of the required number of buffers
The number of elements depends on the width of the future curtains. To do this, you need to multiply the length of the cornice by 2.5. The number you get will be the length of fabric you will need.
Important!
Always consider the amount of fabric that will go into the side cuts. Therefore, 10-20 centimeters should be added to the total amount of material.
Once you have calculated the amount of fabric, you can find out the number of future folds. To do this, you need to divide the width of the canvas by the width of the future element.
Then the width of the future lambrequin is calculated. It is calculated by summing the following indicators:
- You need to multiply the height of the element by the future number of rows.
- Calculate the future width of the curtain tape, adding about 2-3 centimeters for allowances.
- You should also calculate the allowance for the bottom edge (about 2-6 centimeters) and the fold width for the bottom cut (5-7 centimeters).
Choosing fabric for puffs
To get a neat and embossed pattern, you need to choose a fabric suitable for the job. This is the most important stage in working on textile finishing. Which options are most preferable:
- Knitwear is ideal for creating the most precise pleat shapes.
- Puffs on satin and similar fabrics look rich and elegant.
- On linen and other natural fabrics the pattern looks unclear, but this type of textile is most often decorated using this particular technique.
- Synthetic fabrics are most amenable to bouffant processing.
You might be interested in this: Patterns and features of sewing boots for dolls
Important! In the selection process, you should pay attention to the quality of the fabric - textiles should not split into fibers when the needle runs through the warp.
Fabric option for pattern formation
Additional conditions arise regarding colors - the material must be monochromatic. There should be no print on the canvas.
Using buffers in a modern interior
Most often, such decorative folds are used in rooms where the interior is made in a classic style with massive furniture, gilding and monograms.
However, they look very original and extraordinary in the Art Nouveau style. In this case, the difference will only be in the design of the fold itself. They can be made more lush and airy.
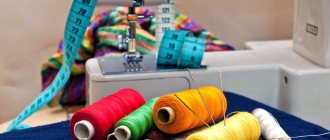
Required materials and tools
Even the simplest version of the pattern using the puff technique requires the availability of appropriate tools and materials. The complexity of the pattern can be completely diverse. The set in each situation is the same:
- A piece of fabric on which “fold embroidery” will be done.
- Ruler and marking tool (pencil or chalk). Tools are needed to recreate the pattern on the canvas.
- A needle and sewing thread, although it is better to use floss.
- Scissors for cutting threads.
Tool set
Additional information ! It is advisable to use a sewing machine to fix the pattern, but this can be done by an experienced craftswoman. Therefore, it is not always necessary to include the device in the main list.
Sewing machine for creating puffs
Sometimes needlewomen use hoops as textile holders. Such a tool can bend the folds and make the pattern asymmetrical or uneven. It is better to prepare a flat surface that will be well lit.
How to calculate the amount of fabric
Before you start work, you should think through all the stages and first evaluate the result. Difficulties may arise with calculating the fabric, since during the stitching process the fabric tightens, forming folds.
Do-it-yourself puffs for beginners, schemes and fabric calculations are as follows:
- You need to decide on the size of the desired product. The parameters must be accurate.
- It is advisable to decide on each step of fold formation.
- In order to end up with a product of the required size, you must initially take 2 times more textiles than you need.
- It is necessary to add an additional 2-3 cm, which can be spent on the seam, processing the cut, and forming the border.
Fabric consumption for the product
To accurately calculate the required amount of fabric, you need to take a small scrap and sew several rows of puffs. Thanks to this, it will be possible to determine the degree of deformation and fabric consumption.
Folding technology
This technology will make folds original and unique. The fabric is secured with stitches, resulting in folds. The technology is implemented according to the diagrams. At first it may seem that these schemes are quite complex, but in practice, even beginners in needlework can figure them out. For beginners, simple schemes are needed; for beginners, the main thing is to understand them.
What is a buff pattern? A buff pattern is a grid that has rows of points and line directions that need to be tightened.
To make ties and folds on the inside of the fabric, you need to put points. The points should form parallel rows and also be equidistant from each other. The rows should be parallel to the warp and weft threads of the drapery. Thanks to this, the folds will look beautiful and even.
Marking and assembly is carried out manually. It is recommended to make markings using a specially designed marker. It is easy for them to apply markings, and most importantly, it can be cleaned without any problems. As a replacement, it is possible to use ordinary chalk. It is necessary to calculate the material costs. The main factor that affects material costs is the selected pattern. It is best to take fabric that will be 2 times larger than the area of the site (location of finished folds).
Markings can be applied to both the outer and inner sides of the fabric, depending on the pattern.
The material can be different, but the most popular are silk and gabardine. If work is carried out on the outside, then you need to be extremely careful. The seams must be perfect. In areas where the fabric is joined, it is recommended to additionally sew on some additional elements, for example, beads, if it all looks harmonious. The diagram should include not only rows of points, but also the directions of the lines. The directions of the lines are needed so as not to get confused while working. The distance between the lines may vary. If you use thick fabric as a material, then it should be approximately two centimeters. If the material is thin - one and a half centimeters.
Rules for designing buffs
You can decide how to make the puffs on the fabric neat and correct in a matter of seconds. You need to know a few secrets of creating folds and the rules of working with a needle. The basic rules are a few nuances:
- The distance between the elements of the pattern should be determined by the size of the base fabric. Usually only 1.5-2.5 cm between the needle penetration points is sufficient.
- When transferring the diagram to the fabric, you need to set not only points for the needle, but also indicate the direction of work.
- It is advisable to tighten the thread so that a “stable” but soft fold is obtained.
- When the thread passes through the point, you need to fix it by making several knots at the base.
- The pattern is located in the center of the product; it can become a frame or a side strip for decoration.
- You can hide uneven stitches and divert attention from the supporting work by using decorative elements: beads, seed beads, sequins.
You might be interested in “Bat” sleeve patterns for dresses, blouses and sweaters
Execution technique
To make puffs, it is enough to know just a few nuances regarding the design of folds. It is advisable to have a fine feel for the needle and choose the appropriate thread for sewing. To hide not very good work, you should use little tricks.
detailed instructions
How to make gathers on fabric? To carry out assembly, you must use a strong thread. The color of the thread should also be combined with the tone of the selected product.
The needle should be inserted and removed so that the point is in the middle.
Next, you need to tighten the thread so that the folds can “stand”, but at the same time they can be moved to the central part without any problems. The ends of the threads must be tied into a strong knot. Then another puncture is made under the starting point. The rows are made in the form of a zigzag. The thread needs to be pulled again to make a knot.
Subsequently, all technology is similar. Nodes are created downwards, moving along the row. All threads should lie in a zigzag pattern.
There are various options for buffing schemes:
- In the form of a wave (inner side);
- flowers (inner side);
- diagram-spike (inner side);
- floral (outer side);
- basket (inner side);
- bamboo (wrong side);
- pigtail (wrong side);
- braided (wrong side);
There are other options for making puffs, it depends on the person’s preferences. Master class on making puffs - let's look at step-by-step instructions for some schemes.
"Network"
Let's look at the step-by-step instructions:
- First you need to make markings on the inside. The seams are made from the wrong side.
- All lines must be directed from left to right. The stitches are secured at the end using knots. Depending on the fabric, you need to accurately determine the correct distance between the points. If the fabric is thin, then it should be one and a half centimeters, if dense - two centimeters.
- Completing the first row. You need to connect the first and second points using a small tack. The third and fourth points are connected using the same principle. There is no need to tighten the second and third points.
- Execution of the second row. Above is a diagram that shows how to do this. The dots must be connected in such a way as to create a chess move. This move must be relative to connecting the points located in the top row.
You will admire the puffs made according to this option.
"Flowers"
Let's consider the algorithm for executing the "Flowers" scheme:
- It is also necessary to mark on the inside. One bead is needed for each flower.
- On the outside it is necessary to make a “square” shape using stitches.
- Next, you need to tighten the thread and sew through the screed section. After this you need to insert the bead.
- Next, you should bring the thread to the inside of the fabric and tie a knot. This will secure the assembly. Then you need to insert the needle into the closest point to create another flower. You definitely need to tie a knot.
- Afterwards, you need to bring the needle to the outer part of the fabric to stitch the “square” shape again. After this, you need to tighten and repeat the fixation on the inside.
- The process must continue. Assemblies must be repeated and recorded.
"Pigtail"
Algorithm for creating an assembly:
- Markings are made on the inside of the fabric.
- Following the diagram, the assembly should take place on the inside. This is done in order to fix each assembly with a knot before starting to tighten and after that.
You can familiarize yourself with the diagram of this option of buffs above.
"Bamboo"
Procedure:
- Markings are also made on the inside of the fabric.
- Each fold is secured with a knot. This is done before the start of contraction and after it. This work must be performed according to the diagram.
Sewing curtains
To decorate a curtain with puffs, you must first decide on the pattern and its size. If the fabric is dense and rough, then the elements should be small. The lighter the base is taken, the larger each zigzag becomes.
Description of the formation of puffs on curtains:
- Unfold the curtain, turning the fabric inside out. Iron the fabric to smooth out all wrinkles.
- Using a ruler and pencil, make detailed markings for the pattern. The result is a grid that resembles a notebook sheet.
- The size of each marking cell should be 5x5cm. You can make the shapes smaller, then the pattern will look more elegant.
- It is enough to draw 5-6 rows on top or bottom - it all depends on the decor.
Puffs on curtains
A more detailed creation algorithm depends on the chosen type of “embroidery”. Additionally, it may be necessary to sew on a ribbon to attach the curtains, so you should step back about 10 cm from the edge.
Holder functions
Curtain clips primarily perform the function of fixing the curtains. They allow light to freely enter the room. To completely darken it, simply remove the clip. The advantages of holders include:
- ease of operation;
- decorative value;
- regulation of the flow of sunlight.
Tucks are most often attached at the level of the window sill, but every housewife can fix them at the level where she wishes. Curtains look more elegant with tiebacks. Curtain clips are used in two cases: when the curtain is located on the doors or when the tulle with drapery is on the window.
When choosing a tuck, it is not necessary to choose it to match the tone of the main color of the curtain. Today, there is a huge selection of different clamps on the market, so you can easily choose an accessory, taking into account the overall style of the room’s interior.
If you know a few tricks, then with the help of tucks you can add special elegance to the style of the room or hide flaws in the interior. You can visually expand the window. To do this, the grabbers need to be installed at 1/3 of the height from the floor. In this case, the window will appear slightly wider. If the clip is attached at 1/3 of the height from the ceiling, it will visually make the ceilings a little higher and visually enlarge the room.
Pillow Buffs
A pillow is an essential piece of furniture in many homes. Typically, decorative specimens are displayed and placed on a sofa or bed. Standard pillowcases can get boring, so craftswomen are trying to create something unique and original.
Buffs on a pillow
To make a pillowcase non-standard, you can use the “buffa” technique. Working with just such a product will not be difficult if you decide on the pattern and prepare the basis for work. In order to evenly cover the pillow with a pillowcase, and the pattern itself does not puff up, it is advisable to choose simple patterns. The choice should be made in accordance with the shape of the base and the functional feature of the bedding item.
Types of buffers
There are only two types of such decorative folds:
- Those made in production;
- Those that are made independently.
The only difference between them is that manual work requires a lot of time and perseverance. As for factory production, you will receive finished work in the shortest possible time.
Today the most popular buffer configurations are:
- Rhombus,
- Braid,
- Zigzag,
- Basket,
- Hungarian embroidery,
- English folds,
- "Waffle cake",
- Various types of flowers.
They get their names from the shape of the fold they end up with.
Important!
In addition to curtain designs, puffs can be sewn onto pillows and blankets.
Step-by-step description of working on a pillow
The most common option for finishing with puffs is making a pillowcase. The procedure is quite painstaking and requires a lot of time. Stitches must be precise and neat.
How to make puffs on fabric with your own hands, if it is a pillowcase for a decorative pillow. Markings are prepared from the front part. Embroidery is done on the outside of the textile. If we take specifically the “spike” pattern, we get the following scheme for performing the work:
- It is advisable to take satin or synthetic textiles - these types of fabrics are easier to wash off dirt.
- Make a mark on the front side of the fabric.
- First mark a square with a side of 3cm.
- Then, using the herringbone principle, draw diagonals with a gap in one figure.
You might be interested in Sewing a sheet with an elastic band for a mattress yourself
“Spikelet” pattern for a pillowcase
Puff ear patterns assume the minimum fabric consumption. The screed occurs in small folds that visually resemble a spikelet.
Original methods of finishing fabrics may involve the formation of three-dimensional types of patterns. To decorate textiles with puffs, you need to use a step-by-step master class and a working diagram. In each situation, it is worth taking into account the principle of material consumption and the peculiarities of making the pattern. To use this technique, you need to be at an intermediate level with the needle.
Variety of options
There are a huge variety of patterns for making puffs on fabric. And knowledgeable needlewomen often invent something new and original, so keeping up with all possible schemes is unrealistic. Let's look at the main ones.
The most popular puff pattern is “braided”. The seams in it are made from the wrong side, so it’s okay if the first time it turns out a little imperfect.
First, mark the thread connection points according to your chosen pattern on the wrong side of the fabric. Then, after threading the needle, begin stitching from left to right, tying knots at the end.
On thin fabric, the distance between the points should not be large, but on thick fabric, you can increase it slightly.
In the first row, connect 1 and 2 points, then 3 and 4. Do not connect 2 and 3. In the second row, do it as shown in the diagram - in a checkerboard pattern in relation to the first row. And so on.
The next pattern is “floral”, in which the seams will be from the face, therefore, when choosing such a pattern, you should immediately get ready for serious work and try not to be distracted from the process.
We also mark the mesh on the fabric. Then we sew the first square, as shown in the photo below.
Tighten and secure with a few stitches.
You can add a bead to make the bouffant flower look prettier.
There is also this type of puff - “wave”, sewn from the inside out.
The pattern is very similar to the “braided” one, only this time the rows are not staggered, but are located equally under each other.
The next scheme, which will certainly not leave young girls indifferent, is the “heart”.
What are buffs? Puffs are a fabric presented in lush gathers. These assemblies are laid using special technology. Thanks to this technology, the fabric can be given a unique beautiful appearance. Puffs can be located not only on the curtain. They can also often be seen on dresses, skirts and textiles (pillows, upholstered furniture, etc.).