Atelier or fur restoration at home: what to choose
Services for restoration and alteration of fur products are often offered to be performed directly at the master’s home.
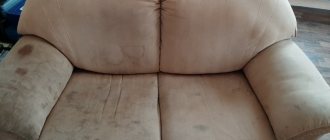
Can they be trusted? Of course, if there are recommendations from friends or acquaintances. But you should always remember that you are giving an expensive item into the hands of a stranger. Of course, not all furriers working at home are scammers, but some of them are self-taught, who can easily ruin a fur coat with their inept actions. Below is an example of an unsuccessful restoration of a fur coat (pictured), which was entrusted to such would-be masters.
The studio may also not be very successful in refreshing your fur coat. But the customer will have a receipt, an advance payment check, and sometimes the receipt indicates exactly what will be done with the item. All this evidence can be taken to court if the product was damaged.
Learning to furrier
The next problem that indicates the need to restore a mink coat is loose seams. Most often this occurs in the chest area, on the back or in the armholes of the sleeves. First we deal with the lining: if it is stitched, it must be carefully torn off so that we have access to the area that requires repair. Do not use a sewing machine for restoration; it is advisable to sew up the tear using a furrier’s stitch (photo) by hand; to do this, practice on an inconspicuous area. The main thing is that when sewing, make sure that the fur does not get into the seam, and also adjust the thread tension so that the seam does not turn out to be too tight. At the end of this complex operation, sew up the lining, and you can be proud of yourself - after all, you did everything with your own hands!
Worn fur emphasizes the old age of your fur coat. You will have to put a patch in place of the abrasion. For these purposes, you can use a piece cut from a collar, pocket, belt or hood. You can also choose a new skin of a suitable color and pile. Using a sharp blade, carefully cut off, trying not to affect the pile, the patch of the desired size. At the end of this jewelry operation, it is necessary to tap the junction of the main product and the patch with a wooden hammer through paper, which will align the old and new fur and level the restoration site (photo).
A very unpleasant and difficult problem to overcome at home is the splitting of a fur coat, when fur fibers on the collar, sleeves, and hood spread out to the very core. This is, one might say, a natural defect that can occur even with a new mink model. You can deal with this problem at home if you have a household steam generator, but it’s better to take the fur coat to a repair shop.
Let's become fashion designers
When purchasing an expensive mink model, you expect that you will wear it for a long time, but capricious and changeable fashion interferes with your regular life, or you are simply tired of your old, but still quite like new, model, and you decide to make drastic changes, for example, shorten it. First you need to decide on the length, to do this, put on a fur coat, button it up and tie the belt, carefully straighten it and pin the hem with tailor's pins.
Measure the required length along the entire hem of the fur coat, do not forget to leave 4 cm for the seam allowance, then, using a sharp blade, carefully cutting with forward movements, cut off the excess. Tuck the fur and sew it over the edge with a seam, aligning the right and left edges
All that remains is to sew on the lining and straighten the fur that got into the seam (pictured before and after).
And in the end, some tips on how to care for a mink coat so that you don’t have to restore it for as long as possible.
- To ensure longevity, try not to wear fur in wet weather. If it does get wet, dry it away from heating devices, preferably in a natural draft. In summer, regularly ventilate the product in the shade.
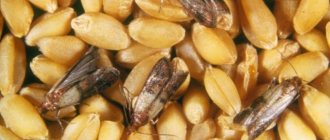
- Protect fur from moths, as natural fur infected with moth larvae cannot be restored. Currently, there are many ways to protect yourself from harmful insects: from banal orange peel and geranium to industrial sprays and solutions. Well, it’s better to leave grandma’s proven old method - mothballs - in the past, since you will get rid of moths, but you will no longer be able to remove the fetid odor from your favorite fur coat.
- Store your fur coat in a special case in a spacious closet so that the fur does not come into contact with the walls of the closet or other clothes and does not get wrinkled.
https://youtube.com/watch?v=xT5NaN1GqQQ
Using these simple tips will preserve the appearance for a long time and will save you from having to restore your fur coat yourself or turn to professionals for help.
Tips and tricks
The places where mink coats most often tear are the back seam and sleeves. This is the most difficult finishing option. If the back seam is torn, you need to carefully rip off the insulation and lining to get to the tear. Next, when repairing a fur coat, you need to prepare and apply a patch at the tear site. For these purposes, you should not use scissors, which will only damage the fleecy part of the patch. The patch is placed in place of the tear and sewn with a regular stitch; there is no need to stretch the leather and fur. You can use a wooden hammer if you need to achieve even edges after stitching.
To eliminate a defect in the dorsal seam, you should use a thick needle, since the thickness of the fur in this place is slightly greater than in other places. The stitching is carried out in the direction of the fleecy part of the product.
When repairing a mink fur coat, you may encounter another problem - repairing the sleeve. To sew it up, you have to do a difficult task - tear off the side stitching and lining material. The armhole is cut off so that you can see the actual size of the tear and its edges. If the fur is torn evenly, it will not be difficult to sew it up yourself by making a patch of suitable size.
Defects on fur products
When is fur coat restoration necessary? The following signs indicate this:
- the edges of the sleeves are frayed;
- the fur has rubbed off on the pockets and at the bottom of the product;
- the fur coat is torn (along the seam or along the skin);
- the lining is worn out;
- bald patches appeared in any area;
- The fittings are damaged: buttons, hooks, loops are torn off, along with small areas of fur.
In addition, restoration of a fur coat may include changing the color, style, length, adjusting to the figure or a complete alteration.
Often such work involves the use of additional materials: similar fur for inserts, or completely different fur for a new collar, sleeves, or trim. All this affects the cost of rework. The final price for repairing a fur product can only be found out when the technician examines the item and determines the degree of wear, and also listens to the client’s wishes.
How to repair your fur coat at home
If you accidentally tear or damage your fur coat, it can be repaired free of charge, but only if the warranty period specified in the coupon has not yet expired. If it is already out, then you will have to pay for its restoration out of your own pocket.
You shouldn’t take on repairing a fur coat if you don’t have the skills to work with fur and don’t understand anything about tailoring, otherwise you may damage the product and it will be problematic to restore it.
In addition, to work with fur, you may need a special tool that the studio has, but which you do not have. This is a sewing machine, a special knife and scissors.
Sew a button to a fur coat
To sew a button to a fur coat, take thin paper and place it under the button. This is necessary so that the pile is not sewn together with the threads. After the button is sewn, the paper can be torn off.
Do not sew the button close to the skin. Leave at least 2-3 mm. To sew a button to a fur coat you will need thread No. 60-80.
Sewing the fur coat at the seams
As a rule, people bring a fur coat for repair if it is torn at the seams. This kind of trouble can happen if the fur coat is small. You can fix this problem yourself.
If the seam has opened slightly, it can be joined with a buttonhole stitch on the wrong side of the product under the lining. You need to sew up the seam by straightening the fur outward. For this you will need cotton threads size No. 60-80.
If it is not possible to sew the seam from the inside out, then you will have to sew it from the front side.
If the skin on a fur coat is torn, there is no need to sew it up. In this case, the skins are glued together. To prevent the joints from being noticeable, place a piece of gauze on the reverse side and coat it with glue so that not only the gauze is saturated, but also the flesh. This method of gluing torn fur coat skin will allow you to connect the torn parts so that no one will notice them.
How to repair it yourself
If you have the necessary skills, it is quite possible to repair a fur coat yourself. However, to do this, it is necessary to determine the nature of the damage.
See also
How to choose the right tulle, varieties and examples of ready-made solutions
How to sew an armpit seam
The armpits are considered a weak point. In this area, fur coats often deteriorate. To cope with the defect, you should take the following:
- glue Moment;
- bandage;
- needles;
- threads that match the fur in shade.
The simplest damage that can be easily repaired is the tearing of clothing at the seam. In this situation, it is recommended to stitch the fastening area 2 times. It is also necessary to secure the threads of the previous seam well so that it does not unravel again.
If the product is torn and the skin is damaged, you will have to use a bandage and glue. It is worth restoring the model as accurately as possible. Thanks to this, the defect will not be noticeable.
What to do if the membrane is torn
The causes of damage to the flesh include poor-quality dressing of the skin and old age of the fur. Damage to the underside of the model is a consequence of improper care. To cope with the problem, simply sew up the fur. For this purpose, it is recommended to choose a furrier's stitch. To do this you should do the following:
- Fold the flesh. In this case, the pile should be directed inward.
- Sew from right to left. This stitch resembles a regular overlock stitch. The key difference is that the needle is stuck into the same area twice. As a result, the connection area from the inside becomes almost flat.
- After the darning is completed, the fur coat should be unrolled and the seam smoothed with a moistened thimble.
By following these simple steps, you will be able to make the fixation area as invisible as possible. If suturing the mesh fails and it continues to tear, the material will need to be strengthened. To do this, it is recommended to stick a thin strip of leather or textile onto the damaged surface. It is not recommended to use superglue for this purpose as it will crack in the area of the tear.
A good option would be to use a casein solution. This substance is sold in almost all hardware stores and has an affordable price.
To glue a fur coat made of rabbit, nutria or mink, you can use Moment glue. A piece of soft and thin tissue must be applied to the affected area. Thanks to this, it will be possible to make the seam much more reliable.
See also
How to use fabric softener correctly and why you need it
How to seal a hole in a seam
If a certain element breaks in the seam area, you can repair the product yourself. To do this, it is recommended to do the following:
- Add the affected items.
- Place gauze or similar cloth on top.
- Secure all elements with pins.
- Fasten all the parts together using Moment glue. Another solution that is designed for gluing leather or suede is also suitable for this purpose.
If the procedure is performed correctly, it will be possible to restore the seam. Thanks to this, it will serve for a long period of time.
Installing a patch on a large hole
Fur clothing often tears on the sleeve or back. To deal with a large hole, it is worth installing a patch. To begin with, it is recommended to tear off the lining and remove the insulation. Then you should cut out the patch and place it on the affected area.
After which it is sewn to the area of the tear. To do this, it is recommended to use threads that match the color of the fur. The patch may be sewn with a marking stitch. After completing the repair, it is recommended to tap the damaged area with a wooden hammer. This will help make the fur noticeably smoother.
If the sleeve is damaged, it is recommended to open the side seam. It is then recommended to rip the lining apart. If the damage has smooth edges, it is permissible to make repairs yourself. In other cases, it is recommended to contact a specialist.
If a tear appears under the armpit, you should insert a piece of fur into the damaged area and sew it well. Such a fragment can be bought in a workshop or cut from another product. If the hole is small, you can use soft glue. In this case, rubber solution is perfect. The easiest way to repair products is from astrakhan fur. This fur has a fibrous texture. Thanks to this, it is possible to obtain an invisible seam.
What you need to repair or restore a fur coat
If the item is subject to restoration, you need to think about the material for repair. A long fur coat will make a sheepskin coat, and there will be enough fur for restoration. Shortening a long fur coat is the best option, since its floors often get dirty and worn out. The “trapezoid” model is best suited for recutting – it has a lot of fur, which allows you to get creative with patterns.
For minor repairs, you can take the fur from the underside of the turn-down collar or cuffs, replacing it with natural or artificial leather, suede, or drape of a suitable color. To replace the collar, cuffs and hems, you can choose fluffier fur. You can use a child's fur coat, or buy tanned skins at a fur store. The combination of fur and leather looks good. A fur coat can be transformed by trimming the edges of the sleeves, pockets, and top shelf with strips of leather.
If your fur coat comes apart at the seam: what and how to do
Get to the unraveled seam from the wrong side of the product. If the lining is sewn on, back it up. If it is not stitched, bend it back. Carefully bring the edges together with the fur inward, and sew along the entire opening with a furrier's stitch. This is done like this:
- pass the needle through both edges
- pull the thread
- then throw the needle through the cut
- insert the needle again into the first puncture site
- tighten the thread.
The next puncture should be at a distance of 2-3 mm on the side opposite to the first (on the side where the needle came out). Repeat the stitch formation process. As a result, a line with intervals will appear on both sides. After this, sew up the lining (if it was sewn) and comb the fur.
Attention!
- During the sewing process, carefully ensure that the fur flaps do not move relative to each other.
- Avoid the formation of bubbles or depressions.
- Work on a hard surface.
- Control the direction of pile growth when repairing your fur coat yourself. If you can maintain the natural pattern of the fur, no one will guess that the fur coat was sewn up.
If the fur coat comes apart at the seams a short time after its purchase, then most likely you were sold a low-quality product. In this case, try to first contact the store with a demand to either return the money or exchange the product. It’s better to still demand the money back, since most likely the entire batch of fur coats turned out to be of poor quality.
Minor fur coat repair along the seam
Valuable fur must be properly stored and inspected before purchase. Frequent cases of tearing along the seam should be stitched with dense thick threads; try to turn the fur pile outward so that the applied seam is not visible. Go through all the unraveling stitches with a needle by hand, and also, to avoid unraveling of the seams in the future, tread over the edges.
When using a sewing machine, repairs are carried out using a goat stitch; the overlock stitching method is also well suited. Repairing a mink coat can be done using contact tape to seal the seam and finally stitch with a goat stitch. This method is the most effective and accurate. Please keep in mind that the durability of a fur coat is affected by both the quality of the product being repaired and the stitching seam.
The product is torn near the sleeves or chest - what should I do?
The fur coat may tear on the chest due to the fact that the model is too narrow for you. In this case, you will also need to expand it with additional fur. If sleeves and armholes are torn, then several options are possible. First, peel back the lining and assess the damage. If the seam comes apart evenly, it can be easily corrected with a thick tailoring needle. In case of uneven tears, you will have to install a patch. If the fur “floated”, i.e. If the edges of the tear are torn and uneven, and the reason for this is that the narrow model is not suitable for you, then such a product will have to be altered. An alternative is to cut off the top of the fur coat and alter the product using the bottom. But keep in mind that in this case it will become much shorter. By the way, it is not recommended to perform such work on a typewriter - it is better to do it manually.
How to clean or wash the lining of a mink coat to remove dirt?
If there is little dirt, then the product is dried, and then the dry dirt is cleaned with a brush.
There are two options for cleaning the lining:
- Rip off the lining. After this, the lining is machine washed on a delicate cycle. After drying, the fabric is ironed and sewn back onto the fur coat.
- No steaming. In this case, there is no need to steam the lining. Prepare a soap solution and apply it to the lining. Try not to let the inner layer of the fur coat become wet. After this, rinse everything off with a damp cloth and pat dry with a clean, white towel. Hang on hangers and let dry.
How to clean or wash the lining of a mink coat?
Signs that repairs are needed
Clothing made from natural fur has many advantages. It has an attractive appearance, provides amazing comfort and reliably protects from the cold.
A high-quality mink coat can be worn for at least 10 seasons. However, sometimes an expensive product deteriorates in just a few months. Following certain clothing care recommendations will help you avoid this.
The reasons why there is a need for product repair include the following:
- Loss of lint. As a result, creases and bald spots appear on the surface of the clothing. The causes of such problems are washing the product, constant exposure to ultraviolet radiation, and the use of an iron. Also, bald spots are caused by the use of aggressive chemicals for cleaning, the use of a hair dryer to dry the product, and damage to the fur by moths.
- The appearance of holes and tears. Such problems are caused by various jewelry - hairpins, pins or brooches. Also, a fur coat may tear due to a mismatch in the size of the product.
- The appearance of deformations and abrasions. This is due to carrying bags on the shoulders. Also, deformed areas appear as a result of traveling in a car or full public transport.
Cleaning a mink coat with ammonia from milk
There are two ways to clean products with ammonia:
- Alcohol and ammonia. Substances are mixed in equal quantities. The resulting liquid is moistened with a sponge and applied to the fur. Next, the product is dried and combed.
- Ammonia, salt and water. It is necessary to add 40 ml of ammonia and 20 g of salt to 500 ml of water. After this, the mixture is shaken and applied to the fur. After this, the product is dried and combed.
Cleaning a mink coat with ammonia
Our quality guarantees
We guarantee our work. If during the season the loop or hook we installed comes off again, we will replace it free of charge. If the seam comes apart, our craftsmen will repair the gap out of turn. We would like to note that such requests have not yet been made.
We guarantee high quality clothing repair and our other services. Quality guarantees at Mobile Tailor are:
- more than 10 years of experience
- modern sewing equipment made in Germany, Switzerland and Japan
- highly qualified craftsmen who already have a regular clientele
- our clients, including well-known brands, for example, the Denim Symphony chain of stores, Lee-Wrangler, Modis, Familia
- our responsibility to landlords.
You can find guarantees for the safety of products and guarantees for work performed in this section.
How to remove bald spots on a fur coat
An unpleasant defect that spoils the beauty of the product is the appearance of bald patches. This may be a crease or a deep split in the pile, reaching to the core. Most often it appears in such places of the fur coat as:
Collar;
Hood.
The cause of the defect is grease, untimely cleaning, and improper storage.
You can remove creases after cleaning the fur by combing it with a special brush. Steam treatment will also correct the defect.
Bald patches can form when hair falls out due to mechanical stress. For example, using shoulder bags or backpacks. How to remove bald spots?
In this case, a patch will be required.
Fur coat restoration: we offer an economical option
There are two options.
The first one is expensive. In this case, if, for example, the fur on a sleeve has become frayed, exactly the same fur is selected and the frayed area is replaced with it. In other words, the product is restored using new skins, which must be purchased.
We would like to note that our company does not have a stock of skins; the skins needed to replace them are purchased by you from specialized organizations.
The second option is economical. This is when the fur coat itself becomes the “donor” of fur. If, for example, the collar has lost its original appearance, then it can be restored by taking the fur from below. The product will become a little shorter (and its style will not be affected at all), but this repair option will cost much less. It is the economical restoration that is offered by the Mobile Tailor studio.
How to update fur?
First you need to find out why the fur looks bad. If the fur gets wet and as a result sticks together and loses its appearance locally, i.e. one specific place, then it can be moistened with a solution of warm water and a couple of drops of glycerin. This procedure is performed on the inside and outside of the skin - this will soften the interior. If the mink fur has generally lost its attractive appearance and has ceased to shine, then it can be renewed with the help of special solutions, most of which are also glycerin-based.
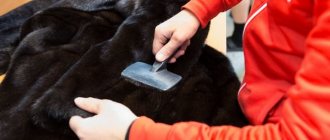
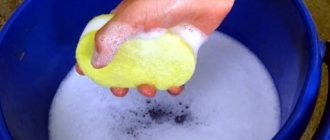
Cleaning the fur before starting work
Before you start working, it is better to clean the fur
Dense fur with short pile can be carefully vacuumed. Long matted fur can be carefully combed with a wide-tooth comb.
Here are some safe ways to clean fur:
Take potato starch and sprinkle it over the product. Use the same hand movements as if you were washing regular clothes. The time of such dry washing should not exceed 10 minutes. Shake off the starch with vigorous movements and remove any remaining residue using a natural bristle brush. This cleaning method is suitable for fur products of any color. Prepare a solution of ammonia, hydrogen peroxide, and clean water: add a teaspoon of peroxide and 2-3 drops of alcohol to a glass of water. Fill a container with a spray bottle with cleaning product and spray the fur at a distance of 10cm. After treatment, dry the fur at room temperature. Take equal parts alcohol (or vodka), vinegar (table or apple), and water
Apply the composition to the pile with a brush, blot carefully with a well-absorbing cloth. Dry and comb the fur.
Putting on a patch
In order to eliminate a hole or restore a tear, you need to select a piece of fur with the same pile as on the damaged area.
Important! For the patch, you can take a piece cut from the waistband, side seam or hem.
To sew a mink coat with your own hands, you must follow the following algorithm:
- Using a blade or a tailor's (stationery) knife, carefully trim the edges of the damaged area, giving it the desired shape.
Important! When working with fur, you cannot use scissors - they cut off the pile.
- Carefully baste the patch, being careful not to pull the fur.
- Finally sew the patch on with an overcast stitch.
- In the final stage, the repair site should be lightly tapped with a wooden hammer through a thin cloth or paper - this is necessary in order to even out the fur.
What are the most common types of damage to fur products?
As a rule, mink coats faithfully and reliably serve their happy owners for fifteen to twenty seasons. However, due to insufficient storage of these products or some other unfavorable factors, there is a high risk of premature occurrence of unwanted damage and defects. The most common and common types of problems include:
- divergence of seams on a fur product;
- the appearance of characteristic abrasions in the area of sleeves, collars, pockets;
- skin tears in various areas of the mink coat.
All these types of damage are very serious and therefore require thorough restoration - for example, a complete recut and change in style. By carefully looking at the photos and videos, you can easily learn how to restore a fur coat. The main thing is to have the necessary high-quality tools at hand and not be afraid to modify your usual product. After all, time does not stand still, and completely new fashionable models and styles of mink coats are constantly appearing.
Of course, in order to properly and efficiently update a fur product, you will need to spend a lot of time, as well as be careful with every movement. Thus, not only will it not lose its charm, but it can also become even more attractive.
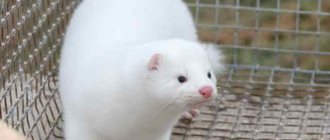
How and with what to clean a white mink coat?
One of the best ways to clean white fur coats is hydrogen peroxide or sawdust with gasoline.
Instructions:
- Pour purified gasoline over the sawdust and squeeze it out
- Lay the fur coat on the table and sprinkle it with wet sawdust
- Leave until the sawdust is completely dry, shake off the product
- Carefully remove any remaining cleaning product with a brush.
How and with what to clean a white mink coat?
Methods for eliminating surface damage
Unfortunately, it often happens that a beautiful mink coat after just a couple of months of intensive wear can lose its original charm. Fur pile has the following properties:
- Roll down;
- to press down;
- acquire a yellowish or dark tint.
In such situations, you should not despair, since all of the listed shortcomings are not at all difficult to eliminate with your own hands at home and qualitatively restore the fur coat. What should be done to ensure that the result pleases you with its effectiveness?
- It is recommended to comb dusty and slightly wrinkled areas of a fur product intensively, but carefully, using a special brush.
- For heavily matted fur, use a wide-tooth comb. It must be made of natural wood.
- If some fur areas are too dirty, to clean them you need to use a brush pre-moistened in a mixture of 1 liter of warm water and 1 tablespoon of washing powder.
- Another option for an effective cleaning agent is a mixture of natural starch and high-quality purified gasoline. It will help you quickly and easily update the appearance of the product.
- To clean fur of dark shades, it is recommended to use warm and clean sand - and it must be perfectly dried.
Traces of perfume can only be removed with ammonia.
How to update a mink coat by completely changing its cut
If all of the above methods for restoring a mink coat are powerless, and the damage is truly serious, the best solution would be to change the cut of this product. It is very difficult to restore a product, so it is unlikely that you can cope with this yourself at home - professional experience and special equipment are needed here. The only thing you can do with your own hands is to turn a well-worn long mink coat into a short, fashionable vest.
https://youtube.com/watch?v=-BMEnbtGqSE
Depending on the degree of wear of the fur product and the nature of its damage, you can always choose the most optimal restoration method. After all, updating your favorite fur coat is, in any case, the most accessible opportunity to become the owner of a completely “new” piece of clothing.
Cleaning a mink coat with talcum powder to prevent vomiting
Talc is an excellent fur cleaner. Its action is based on adsorption abilities. This substance is ideal for removing grease and adding shine.
Instructions:
- Remove vomit with a damp cloth
- Lay the product on the floor and sprinkle dirty and greasy areas with talcum powder
- Rub the powder clockwise, shake off the talc little by little
- After this, add a new portion and rub again
- Rinse out the talc and shake the product well.
Cleaning a mink coat with talcum powder
Fur coat repair in the studio: list of services
The atelier for fur and leather products specializes in providing repair services for items made of leather and fur. In the atelier you can sew, dye, comb, re-face, shorten, alter, fit, make inserts from other fur, clean, adjust sleeves.
What type of activity does the fur studio carry out:
- sewing fur clothing from natural and artificial materials;
- repair and restoration of fur clothing and sheepskin coats;
- cut fur coats and other fur products
Also in the fur studio you can:
- make loops; - adjust the sleeve length; - adjust fur clothing to your figure; — replace the lining; - alter a fur coat; - shorten the lower part of the sleeves. - shorten the hem of the product; — replace the edge, cuffs, collar;
Restoration of fur products involves the following approach:
- You can change the style of clothing, remove scuffs and flaws that have formed as a result of wearing the product.
- Winter outerwear can be completely redesigned, tailoring it strictly to your figure.
- Fur studio masters can repair or completely replace parts of a fur coat: collar, edge, bottom hem and sleeves, pocket sides.
Often clients contact the studio with a request to restore the bottom hem of a fur coat. This is one of the most problematic areas of a fur coat that is below the knee length. In winter, in big cities, street paths are sprinkled with special chemicals and salt, which causes natural fur to quickly deteriorate.
Some studios offer dry cleaning services for fur and leather products. If you want your fur coat to look like new, this procedure is simply necessary.
The product can be redrawn completely or partially. As a rule, to hide visible defects, a fur coat needs to be altered and its style changed.
You can make a new one out of an old fur coat by completely reshaping and altering it. The new fur coat will no longer have the same flaws that the old one had. The most important thing is that in the studio you will only have to pay for the work, because the material is yours, and your old product is used as its quality.
recutting a fur coat in the autumn-winter period will cost more than in the spring or summer.
When recutting a fur coat, its collar, sleeves, hood, cuffs, pockets and other details are completely redone. Therefore, a new fur coat may be radically different from the old one.
So that you can imagine what the new product will look like, the studio’s masters draw a sketch and also make a model of the fur coat that you can try on. If you want to change or add something, you can express your wishes to the fur coat studio, which will definitely be taken into account.
The advantage of this approach is that the new clothes will be completely tailored to your figure. In addition, if you have another fur item from a different fur, you can use it to combine it. The following combination of furs looks very beautiful: mink-lynx, astrakhan fur with fox or arctic fox, raccoon.
Therefore, we do not recommend that you get rid of your boring fur coat, which can be used not only as material for sewing a new product, but also for decorating your home, for sewing fur jewelry and accessories. You can also take a fur coat that you don’t wear to a studio, where they will pay you money for it.
How to sew up a mink coat: reconstructing a cracked seam
Sequence of work:
- The damaged parts should be put together;
- A small piece of gauze or some other fabric is placed on top of the gap;
- We fasten the parts together with pins;
- Using Moment glue or other glue for leather and suede, glue both parts together.
If all manipulations were carried out correctly, the defect will be almost invisible, and the seam will last for many years.
How to restore fur coats from different furs
When buying a brand new fur coat in a store, women often do not understand that they are choosing not only fur, but also all the subsequent problems. Different fur deteriorates over time in different ways: some things by their nature are prone to certain changes.
For example, fur coats made from seals, beavers and otters are prone to becoming greasy: the fur becomes dull due to a greasy, sticky coating that must be removed in a timely manner.
Light-colored items made from astrakhan fur, arctic fox and snow-white mink turn yellow over time. This defect can be eliminated by degreasing and cleaning the pile, and then applying talc mixed with hydrogen peroxide to it. But it is better to contact fur cleaning specialists.
Karakul and goat are prone to wiping. This is especially noticeable on the sides, pockets and cuffs. Astrakhan fur coats can be repaired using fur inserts (the seams will be invisible) or leather patches. The easiest way to update a goat item is with contrasting leather patches.
Nutria and rabbit fur coats are rarely restored. The service life of such things is short (3-5 years, no more), since even with an excellent appearance, the base quickly wears out and breaks. And when you try to re-stitch it, it literally crawls apart under the needle.
Restoring a mink coat is a labor-intensive process. The fur is long, very beautiful and quite durable. In order not to visually reduce the cost of the product, for repairs you need to select a similar material in color. However, it is also possible to have leather inserts on problem areas (looks good on sheared mink), or trim with more expensive fur, which will look like a decoration, and not like a patch.
Masters work with any material. They can repair fur coats made from fox, nutria, sheepskin, and chinchilla. In cases where there is a possibility of damage to the product due to severe wear of the skin (most often it is nutria, rabbit or marmot), the furrier warns the customer about the risk, and she makes a decision.
Mink fur coat repair
Simple repairs that are quite accessible to every woman include the most common types of restoration, such as replacing buttons or hooks, hemming or replacing lining, and patching. This is the repair that does not change the main cut of the fur coat. This also includes updating fur that has lost its appearance.
Mink vest
More complex restoration includes any change in style - shortening the sleeves or the overall length of the product, narrowing the model.
But those types of repairs that it is better not to undertake with your own hands include global alteration of the model - sewing on the hood, narrowing or widening the armhole, widening the model to the bottom.
How to shorten a mink coat?
Put on the fur coat, button it up and mark the new desired length with bobby pins, measure the resulting piece. Next, you should tear off the lining and measure the seam allowance line. Under no circumstances should you cut fur with scissors or a regular knife - it will crumble and the edges of the cut will be uneven. It is best to use a construction knife for pruning. Then, using a special needle for fur and leather and strong nylon threads, begin sewing the edge taking into account the allowance, moving from the right side to the left. When about 15 centimeters remain until the end of the work, put on and button up the fur coat again - this way you can even out the edges (video).
The basic rule that you should follow when repairing fur products at home is maintaining the appearance. If the model is heavily modified with a large amount of fur cut off, the overall balance of the product may be disrupted. An incorrectly shortened or narrowed model may “float” on the shoulders, the sides may move apart, and the back line may shift. Therefore, before you start work, objectively assess whether you can avoid ruining the fur. And if you see that repairing on your own can damage the product, then it is best to turn to professionals.
What can be made from an old mink coat?
It is quite possible to give your product a second life. So from long models it may well turn out to be more than one thing. For example, if your item is knee-length, you can shorten it to a short fur coat or jacket, and sew a vest from the remaining pieces. The most interesting option may be new products made from knitted mink, which you will get from scraps. To do this, the mink is cut into strips and knitted in the usual way. This is how practical fashionistas manage to get an excellent matching knitted mink hat, gloves and even bags.
Many people use cut products to create new ones. So, if you have scraps left, you can order a leather jacket decorated with fur, or sew a fur vest with leather sleeves.
As you can see, there are a lot of options for remodeling. Therefore, do not rush to part with a boring or outdated model, which, most likely, will not be possible to sell profitably anyway. Consider the options and become the owner of new, interesting and relevant products!
How to clean a mink coat after winter with alcohol or champagne vodka?
This product is more suitable for cleaning dark fur items. The procedure is quite simple. It is necessary to mix vinegar, vodka and water in equal quantities. After this, a towel or soft brush is soaked in liquid and applied to the product in the direction of hair growth. Next, the product is dried and combed again. This allows you to remove excess fat and add shine to the product.
How to clean a mink coat after winter with alcohol and vodka?