A makeup sponge or just a beauty blender is a real find for every girl who dreams of perfect makeup without a mask effect and visible boundaries between textures on the face. With the advent of the beautyblender, we definitely sighed: this pretty pink egg made of soft porous material allows you to apply and blend any foundation, camouflage and corrective products. The Miracle Egg can be found in the cosmetic bags of celebrity makeup artists, as well as their clients: from Kim Kardashian to Rosie Huntington-Whiteley and Katy Perry.
This year, the beauty blender celebrates its 15th anniversary and in honor of this, a limited collection of marble sponges has been released, reminiscent of the color of whipped strawberries and cream. It's called the Swirl Beautyblender and is already available in online stores for $20 each.
Of course, using this beauty blender is a real pleasure. And it’s even a pity! After all, just imagine how much foundation will contaminate it and how difficult it will be to wash it later, you don’t even want to take this beautiful sponge out of its plastic box. But don’t worry: you can clean the Beautyblender. And it’s easy and simple at home. And we know the best ways to do it!
Steps
Method 1 of 3:
Quick Cleanse
1
Clean the sponge using this method only as needed. It is recommended to resort to deep cleansing if the sponge remains dirty after the usual cleansing described above. You'll most likely need to clean your sponge this way if you wear makeup multiple times a day or haven't washed your sponge for more than a week. You will know if you need deep cleaning by the appearance of the sponge. If the water remains cloudy during rinsing, or if the sponge has noticeable stains after it dries, try deep cleaning.
2
Wet the sponge. Alternatively, you can leave the sponge in a bowl of warm water for 5-10 minutes. There is no need to add soap to the water or monitor the color of the water. Hold the sponge under warm running water for 30-60 seconds or until the sponge absorbs water throughout and increases in size.
3
Treat the dirtiest areas with soap. At this stage, you should also use only gentle detergents. A special Beauty Blender soap is ideal, but you can also use Marseille soap, liquid baby shampoo, or organic shampoos for sensitive skin. Rub liquid or solid soap into the brightest spots on the sponge.
4
Rub the sponge onto your palm. Rub the sponge onto your hand over the areas where you applied the soap, using gentle circular motions. Continue doing this for about 30 seconds. X Source of information
The sponge should be rubbed harder than normal cleaning. Remember that this sponge is quite delicate and can be torn or deformed if you rub too hard. During this cleaning, cosmetics that remain deep inside the sponge will come out. There will be traces of foundation on your palm.
5
Rinse the sponge by continuing to rub it against your hand. It may take 2-3 minutes to remove any remaining soap.
It is important to rinse off all the soap, so take your time. Rinse the sponge under warm running water while continuously moving it over your hand in a circular motion.
Rinse until the water runs clear.
6
Check how well the sponge has cleaned. Apply a little more soap to the sponge and rub it on your hand. If the soap suds are white and not gray or beige, this will mean that the sponge is completely clean. Rinse the sponge under water until you get rid of soap bubbles. The water should be clean and transparent.
7
Dry the sponge. The sponge will likely still be damp after this, so place it in a dry place and let it dry naturally. Use the sponge only after it is completely dry. Gently squeeze the water out of the sponge with your hand and then wrap it in a clean, dry paper towel.
- With regular cleaning, you will be able to remove traces of makeup from the surface of the sponge, as well as partially from the inside. This will also get rid of bacteria on the surface of the sponge. The longer the sponge remains dirty, the more bacteria will form there.
- Clean the sponge every week or every two weeks. If you use the sponge daily, it will be enough to simply clean it once a week. Even if you only use the sponge a couple of times a week, you should still clean it at least once every two weeks.
Cleansing immediately after makeup
A beauty blender is a cosmetic device that comes into contact with the skin. Therefore, it is extremely important to clean it on time, without delaying it for later.
The algorithm is simple:
- Immediately after makeup, the sponge can be cleaned with a special cleaning product.
- You can use any eco-liquid to remove grease stains.
- Leave to dry on a flat surface.
- The longer the sponge is not washed, the faster it loses its properties.
Step-by-step instruction
We all know that any household appliance requires cleaning and washing. And also, in order for the device to serve you as long as possible, it must be properly cared for and stored. But before you put it back in place, you need to wash it thoroughly and dry all the parts. Equipment should be washed immediately after use. Do not delay cleaning the device if there is a saline solution inside it.
- Before washing the blender, it should be disconnected from the power supply, thus de-energizing it, and completely disassembled into individual parts. First of all, you need to unscrew the “mill” from the block part of the electric motor (motor), which is easily removed when turned counterclockwise. Next comes the analysis of the remaining individual parts. That is, the cup, knife, rubber gasket and sealing wheel are removed separately.
Be careful when disassembling equipment! After all, the knives are very sharp, and if you make an awkward movement, you can easily get cut and thereby injure yourself.
- The next step is to clean the motor block. You cannot wash it, but only wipe it with a clean, damp special cloth. Some housewives use soap and sponge. Using a napkin, rag or the same Beauty sponge, rinse all parts under running warm water
- If your house has a dishwasher, you can use it. But only removable parts can be washed in the car and at a temperature not exceeding 60 degrees
Do not use descaling concentrates, otherwise it will cause parts to malfunction. You should only use soap or regular detergent from the Beauty series.
- In nature, there are many foods, vegetables and fruits that tend to color objects and things. A blender such as Brown is very susceptible to coloration from rich and brightly colored foods. The ingrained color is quite difficult to wash off, but either regular laundry soap or vegetable oil will help.
Rub the oil into the cup and lid and leave for 20 minutes, then wash off under running warm water and soap. Soap is an excellent assistant when washing any household appliances and more.
It is important to know that all parts are assembled together, and the blender is removed only after complete drying, otherwise wet parts may corrode. Consequently, the blender will stop functioning
Before you start washing the blender yourself at home, you should read the instructions that came with the device. It also tells you how to properly wash the blender lid and bowl.
It is very important to first read the instructions, because each device has its own, depending on the specific model and type of operation
How to wash the blender lid and cup in 15 seconds?
There is a very effective way that will help you wash a blender in 15 seconds at home. To do this, pour 50 ml of liquid soap into a dirty cup and pour warm water up to the top line indicated on the cup. Next, close everything with the lid and turn on the “Start” button. Run the blender for 15 seconds. This time is enough to perfectly clean the device.
Afterwards, pour out the dirty water and rinse the lid and cup under running warm, clean water. After running water, the parts should be wiped with a clean, dry cloth and left to dry completely on the table for 30 minutes, then it can be removed. The method is very effective and, most importantly, fast.
Beauty blender sponge
After the emergence of the “beautyblender” brand, the egg-shaped makeup sponge began to enjoy enormous popularity, and analogues of beauty sponges for spoilers or highlighters, with which fashionistas apply makeup, appeared on sale. In order to make the right choice and buy beauty that meets specific needs and tastes, you need to navigate the main types of products offered by the cosmetics market.
Beauty Blender Original Sponge Royal
An original product from the manufacturer and brand owner. The blender has the following characteristics:
- Manufacturer: Beauty Blender.
- Price: 1300-1400 rubles.
- Characteristics: purple “egg” in original packaging of classic sizes.
- Pros: the blender is not a fake, the material meets hypoallergenic requirements.
- Cons: high cost.
Holika Holika Gudetama Egg Bun Puff
The product is made in China, repeats the motifs of the cartoon “Hello, Kitty” - the character drawn on the packaging is copied from Gudetama’s yolk:
- Manufacturer: Lazy & Joy.
- Price: 250-300 rub.
- Characteristics: the pouf does not have a characteristic almond shape and is painted bright yellow.
- Pros: low price.
- Cons: the beauty is not original, there may be problems when applying makeup.
Beauty Blender Micro Mini
One of the options for original sponges produced by the manufacturer:
- Manufacturer: Beauty Blender.
- Price: 1500 rub.
- Characteristics: two almond-shaped small beauties in a light green package.
- Pros: reliable product from the manufacturer.
- Cons: high cost, small size.
General information
Regular wiping with a sponge, even with a disinfectant, is not enough to properly care for the blender. Nozzles are attached to its bowl, under which the remains of the crushed mixture are clogged, and pieces of minced meat are wound onto the rotor. If all this is not removed in a timely manner, the engine will fail quite quickly due to excessive load. In addition, any crushed mixture in a blender will acquire an unpleasant aroma of musty or rotten food. It’s unlikely that anyone will want to cook anything with it.
How to clean a blender and what difficulties may arise? For example, the manufacturer strictly prohibits immersing such equipment in water, and the base itself, where the filter and the adapter shaft to the bowl are located, may not be removable. If water gets inside, the engine will begin to corrode (although more often it is the printed circuit boards on which the toggle switches for controlling the operating modes of the electric motor are located that suffer from this).
At the same time, if you do not wash and clean the blender in a timely manner or perform this procedure poorly, then pretty soon:
- knives become dull;
- the bowl will become covered with plaque and scratches due to dry food residues;
- the engine will not produce the stated number of revolutions.
Accordingly, this technique will no longer be able to properly grind food. And such breakdowns caused by improper care are not covered under warranty repair.
How to clean dried mixture?
If you do not clean the blender in a timely manner, the remains of the crushed mixture will certainly dry onto both the bowl itself and the attachment. If the design is collapsible, then the bowl along with the knives should be soaked in soapy water for several hours, and then washed with a sponge and detergent.
What to do if it is impossible to disassemble the blender? In this case, 2/3 of the volume of warm water is poured into the bowl, 2 teaspoons of baking soda, 50 milliliters of vinegar and 5-10 drops of detergent are added there. Then you need to turn on the grinding cycle at minimum power (10-15 seconds). After this, do not remove the lid, but let the blender stand with the mixture inside for at least 6-8 hours. Next is a repeat grinding cycle.
The dirty water needs to be drained, and then the blender should be washed again as usual (with lemon). If this does not help to cope with contamination, then the only option left is to contact an official service center - cleaning must be carried out mechanically with disassembly. For this reason, equipment should be cleaned in a timely manner.
What models are there?
Having figured out how to care for a beauty blender, let's talk a little about the models. Classic – teardrop-shaped, pink. But now you can find other varieties on sale, which differ somewhat in properties and appearance:
- Original. Designed for applying foundation and creamy blush. It has a classic shape and traditional pink color. Most often it is used at home.
- Royalty, Red Carpet. The Royalty and Red Carpet models are similar in purpose to the Original, they have the same functions, but they look different - their color is red.
- Pro. Do you like black? Then the Pro model is especially for you. It is denser than Original in texture, so the layer will be denser. Professional makeup artists use this device more often than modest amateurs.
- Mini. A beauty blender labeled Mini is four times smaller than its counterparts. It has a delicate structure, more porous than other models. It is most convenient for treating the corners of the eyes and brow ridges.
- Pure. The white Pure beauty blender is the softest of all. It is suitable for very smooth skin, but if you need to disguise very noticeable unevenness, this model is not suitable.
History of appearance
More recently, there was no trace of this wonderful sponge, but now it can be found on the counter of any cosmetic store and in the toilet drawer of almost every girl. How did this happen? Previously, make-up artists and make-up artists used a tight brush or used their fingertips. These methods did not give the desired effect, and in some cases were unhygienic. Makeup gurus Rea Ann Silva Veronica Lorenz took the issue of developing a new tool seriously. After analyzing the experience of many years of work, they were able to make a real revolution in the industry.
Many tests and experiments were not in vain, and soon the first beautyblender sponge drop was released. He amazed everyone with his versatility and efficiency. The novelty quickly became part of the cosmetic bags of many fashionistas. Special credit for the spread of the “sponge” belongs to the Kardashian family. First they introduced the fashion for contouring. Then, demonstrating in one of the videos the technique of applying cosmetics, they “lit up” the beauty blender for the first time. And since everything that the star family considers good instantly becomes a trend, it has become a must-have. By the way, at that time, the beauty blender for a long time held first place in sales on the Amazon website, and one famous fashion magazine awarded it the title of the best makeup tool for three years in a row. Now it is produced in a variety of variations: the color, shape, and material change. Almost every cosmetic brand has a legendary sponge in its line.
How to clean a beauty blender in the microwave. General recommendations
A beauty blender is a unique invention in the beauty industry, which is actively used for applying foundation, powder and blush. For its production, good dense foam rubber with antibacterial impregnation is used.
Modern sponges are available in drop, egg and other forms. Appearance does not affect the performance properties of the accessory, but only plays a marketing role.
Regardless of the type of sponge, they distribute the product well over the skin without leaving streaks or streaks. Due to their dense structure, they do not absorb cosmetics. This allows you to use cosmetics more sparingly, while creating excellent natural makeup.
Sponges require careful care, which can be provided at home. It is recommended to clean cosmetic accessories after each use or at least once a week if used infrequently.
When a contaminated sponge is stored for a long time, pathogenic bacteria actively multiply. As a result of using such a sponge, rashes, pimples and irritation appear on the face. This negatively affects the condition of the skin and the quality of makeup.
You can clean a cosmetic sponge yourself at home, using available and available products. To properly clean the instrument and avoid dermatological diseases, strictly follow the recommendations presented.
You can also clean the sponge using hydrophilic oil: apply it to the instrument and spread it over the entire surface with gentle movements. Wash the accessory in warm water with some detergent added, then rinse well and dry.
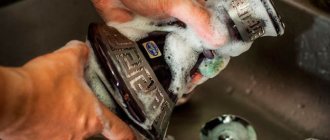
Cleaning the sponge with liquid soap
Liquid soap will help to wash the sponge:
- Soak the beauty blender in clean water and squeeze it out – it should become slightly damp.
- Squeeze a small amount of liquid soap, baby shampoo or dishwashing gel onto the sponge.
- Apply the detergent evenly with your fingers over the entire surface and rub lightly to create a lather.
- Rinse the sponge under warm water and squeeze well.
- Repeat the procedure until the liquid flowing from the accessory becomes completely clean.
- After complete cleaning, wring out the sponge well and wrap it in a clean, dry towel to remove any remaining moisture. Leave the accessory to dry in a ventilated place overnight.
How to clean a beauty blender with a soap bar
Regular bar soap will help clean the sponge. Cleaning algorithm:
- Wet the beauty blender and squeeze it well to remove any remaining water.
- Wet the soap (choose an unscented one) and rub it between your palms.
- Saturate the sponge with soap suds and rub it with light movements.
- Rinse the accessory under clean water, and then repeat the procedure until it is completely clean.
- Dry the sponge with a dry towel and leave it to dry overnight in the fresh air.
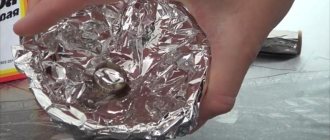
A unique way to clean in the microwave
You can return the accessory to its former purity and freshness using an innovative technique. Despite the originality, this method is quite simple and effective, as well as safe for the instrument. It can be used to remove traces of foundation, concealer and other cosmetics.
Cleaning procedure:
- Fill a cup or bowl with hot water.
- Add a few drops of baby shampoo or dish soap to the liquid.
- Place a beauty blender into the resulting solution.
- Microwave the container for 1 minute.
- Rinse the accessory with warm water and dry well in the fresh air.
Flaws
- Price. In modern realities, you will have to pay more than a thousand rubles for a sponge. By the way, for the same price you can buy a luxury cosmetic product.
- A large number of fakes. Fake beauty blenders are everywhere. Unfortunately, they cannot replace the original and in fact turn out to be either too hard or poorly absorbent.
- Additional purchases required. You will also have to buy a special detergent for the sponge.
- Need for frequent care.
- Shelf life is about six months.
Rules for storing foundation sponges
In order to preserve the sponge and its properties for a long time, provide it with the correct storage conditions:
- keep the accessory separately from cosmetics and other tools;
- store the sponge in a well-ventilated, cool and bright place;
- When traveling, keep the accessory in a special mesh bag.
Store cosmetic sponges separately from other cosmetics.
This will prevent their re-contamination and protect them from rapid deterioration. The sponge is an indispensable tool for creating high-quality makeup. In order for the accessory to last a long time and effectively cope with its task, take care of its cleaning and ensure optimal storage conditions.
How to remove foundation from clothes - Home Tips
- The sponge should be moistened in a bath or under a tap and gently squeezed.
- Then moisten the soap and rub it between your palms so that as much soap foam is formed as possible.
- Take a sponge and apply foam on it.
- Rub in your palms to soak the sponge.
- Rinse the sponge under the tap.
Dissolve any detergent in warm, but not hot water and under no circumstances in boiling water, otherwise the foam rubber will quickly become loose and the sponge will become unusable.
Product Description
Natural product manufactured in the USA
A “cosmetic egg” or sponge is made in the form of a drop. The country of origin of the original is the USA. The material used is hypoallergenic and does not cause allergies when used.
It is important that the sponge does not contain latex. Using the product you can:
- Apply base.
- Use it as a corrector.
- Apply as blush.
- Create creamy shadows.
This is not a complete list of features of the product in question.
It is important not to confuse original products, which are expensive, with other sponges made in the form of a drop or an “egg”. Unfortunately, they do not have the effect of the original.
Economical cleaning methods
Considering the high cost of professional sponge cleansers, care is not budget-friendly.
There are no less effective, but more economical alternative methods of cleansing:
- Use an inexpensive cleanser for oily skin.
- Use regular soap for cleansing. It is recommended to make a soap solution from products that do not dry the skin.
- Use cream soap for cleaning, for example, Dove (Beauty Bar).
- Clean with dishwashing detergent. It is advisable to use products containing a softening balm or conditioner.
- Wash with regular shampoo, carefully massaging the sponge.
Care and storage rules
Leather products after being exposed to rain or snow should be wiped with a dry hygroscopic cloth. For everyday wear, as well as in the off-season period, it is recommended to use a trempel.
Storage conditions for a leather jacket:
- Leather items are sensitive to high temperature and humidity. To avoid the appearance of mold on the jacket and loss of shine, it is stored in a closet, preventing other things from being tightly adjacent.
- The trempel according to the size of the product will not allow its individual parts to deform.
- A dense, breathable cover will prevent the formation of a layer of dust.
Regular use of leather care products will extend their wearing life.
Share link:
General rules and recommendations for cleaning
A beauty blender is considered a unique invention, which is often used to apply blush, powder, and foundation to the face. The product is made from dense foam rubber, which is impregnated with an antibacterial composition.
Modern products can be made in the form of a drop or an egg. In this case, the shape of the device does not affect its operation. This sponge perfectly distributes the composition over the surface of the face. After which there are no streaks or streaks left on the skin.
The sponge has a dense texture. Thanks to this, it absorbs cosmetic composition. This helps to achieve significant savings and get an excellent natural make-up.
Every 3 months it is recommended to change the sponge to a new one. Thanks to this, it will be possible to avoid the development of dermatological pathologies or the appearance of a rash. It is worth considering that a beauty blender requires careful care. It should be cleaned systematically. This is done after each use. If used rarely, it is recommended to wash the product at least once a week.
When a dirty device is stored for a long time, harmful microorganisms often appear on it. This leads to the formation of acne, rashes and irritation on the face and negatively affects the condition of the dermis and the performance of make-up.
Even with adequate care, sponges lose their characteristics after some time. They do not allow the foundation to be distributed normally over the skin.
Varieties
To understand how to use a beauty blender, it is important to first decide on the type that you will use, since the final result depends on it. The company that produces the originals of this instrument has the following variations in its line:
- Original. The very first product in the entire series. It was this plump bright pink drop that became the symbol and ancestor of all subsequent modifications. A universal option that is suitable for both blending blush and distributing foundation. It creates a natural, medium-transparent texture on the face.
- Pro. It is most often chosen by professionals. It differs from its predecessor in black color and increased density. Ideal for applying a thick, long-lasting layer of foundation or powder.
- Pure. It is made in white. It is distinguished from the original by lower weight and increased “lightness”. It is suitable for applying skincare products such as moisturizing emulsions or anti-aging creams. It is also used when distributing BB cream. A more pliable and weightless material helps create a very natural makeup look.
- Mini. A small green “egg” with increased porosity and a very pleasant texture. It is indispensable for applying cosmetics to hard-to-reach places and small areas. For example, in the nasolabial fold or under the eyebrow.
- Red Carpet. Variation of the original, made in red.
- Royalty. Purple droplet, ideal for using cosmetic oils.
How to keep your beauty blender clean?
Soak the beauty blender in coconut oil
You can clean your makeup sponge with coconut oil or olive oil. The oil helps loosen the built-in product and pigment with ease. Just combine coconut oil with some liquid dish soap and squish out all the dirt. However, rinsing the sponge until it is free of any traces of oil takes some time and patience.
Wash the sponge immediately after use
This is a trick that even makeup artists use. You just need to wash your beauty blender once you are done with your makeup. The less time you allow any product to remain on your sponge, the better. This will also prevent staining and make deep cleaning much easier.
Store your beauty blender correctly
How you store your sponge is an incredibly important factor in the health of your skin and the lifespan of your sponge. After washing, always let it dry completely in a clean and open area before using it again.
What is it for?
Initially, beauty blender was created to distribute tone and corrector, but makeup artists quickly found a dozen more ways to use it. So,
Why do you need a cosmetic beauty blender:
- facial toning using foundation or bb cream;
- eliminating bags and dark circles under the eyes with concealer;
- contouring;
- powdering;
- creating the effect of “kissed lips”.
These are the most popular ways to use the “magic” sponge. In fact, by understanding the mechanics of action, you can find many new areas of application for it.