Mechanical cleaning of parts and components of a washing machine is one of the main preventive measures that extend its service life.
If you do not do this regularly, then after some time the drain will still clog. Water will not drain through the hose, and during operation you will hear an unpleasant noise that is unusual for this. Before you start cleaning the drain pump, you need to get to it first.
The main task of users is to disassemble the machine, clear the blockage and correctly assemble the parts. Anyone can do this if they study this article first. After reading it, you will learn how to clean the drain pump of an automatic washing machine.
Why do you need a pump?
The water pump is an important element of an automatic washing machine (WMA). It is an asynchronous type motor that creates vortex flows of water. If we compare the structure of a washing machine with the human body, then the pump is a “heart” that drives “blood” - water, through the inside of the machine. The element is located in the bowels of the machine. It is secured with plastic brackets. There is a filter that traps debris and foreign bodies.
If you clean the unit in question in a timely manner, you can significantly extend its service life. If it breaks, no one will repair it - usually this part is simply replaced. Many housewives do not even suspect that the “insides” of the machine need to be cleaned periodically. To avoid breakdowns, it is recommended to clean the unit in question at least once a year.
Removing the rear panel
When deciding how to clean the pump in the Electrolux and Zanussi washing machines, you will have to remove the back cover. For this:
- Disconnect the inlet hose from the housing.
- Remove the screws holding the cover in place.
Now disconnect and remove the drain pump. If you are disassembling for the first time, it is better to record the repair on camera. This will make it easier for you to assemble everything correctly.
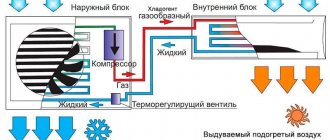
Principle of operation
When the machine is running, water enters it under pressure. Once you select the desired program and click “Start”, water will begin to flow into it. Further work goes like this:
- the solenoid valve opens;
- the control sensor (pressostat) measures the required volume of water;
- the liquid passes through the compartments with the powder and enters the tank;
- Water under pressure is supplied to the chamber containing the laundry.
The pump works both during washing and after it is completed. It is needed to drain and pump out waste water after washing or rinsing. But she does not participate in the spin cycle. Having received a signal from the control module, the engine pumps dirty water into the sewer. It flows through a rubber pipe connecting the tank and the volute with special clamps.
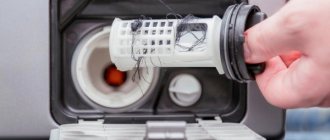
The dirty liquid then passes through the filter and enters the pump. The filter device is located inside the scroll - it traps debris, preventing it from getting onto the impeller. The liquid then flows through the drain hose into the sewer.
What will be needed for verification?
The diagnosis itself is not difficult if the following tools are available:
Rice. 1 - Diagnostic tools
- multimeter (a tester is enough);
- medium-sized pliers;
- screwdrivers – Phillips and flathead;
- awl.
To find out if there are problems with the drain pump, it must be removed from the machine.
Where is the water pump located?
It is located at the bottom - under the tank, and is fastened to the plastic snail with several (usually three) self-tapping screws. The snail itself is attached to the body. It is located so that, if necessary, it can be easily cleaned of dirt.
Two types of pumps are used in SMA:
- Circulation. They are installed in premium class machines - Indesit, Ariston, etc. Water is supplied directly to the washing area and at the same time circulates through the system - this improves the quality of washing clothes.
- Simple. These are installed in budget cars. They simply send dirty water down the drain.
Before inspecting the device for blockages and then cleaning it, the equipment is de-energized. Using a special device - a multimeter, check the contacts suitable for the pump. You need to be sure that there is no tension on it before you start disassembling. Technical characteristics of the drain pump:
- power - 25–40 kW;
- fastening with a snail - screws or latches;
- contacts - separate/paired.
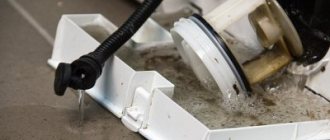
The nodes under consideration may differ in the type of cochlea. If the drain is clogged, not all of the water flows out of the chamber; due to the stagnation of dirty liquid, a musty, putrid odor appears. The first action when an odor appears is to check the filter. Sometimes cleaning the latter is enough to solve the problem.
Preventing drain clogging.
To increase the service life, maintenance of equipment is necessary. Of course, each unit has its own resource, but neglect can shorten its service life. Some tips on how to avoid frequent contamination of the drain system:
- Use powders designed for washing machines.
- It is better to pre-rinse heavily soiled items in a separate container.
- Clothes decorated with small elements should not fall into the washing machine drum or be washed in a special bag.
- Be sure to install a filter for the machine at the water intake point.
- If you notice any extraneous sounds or increased operating noise of the machine when draining, you should disassemble (at the end of the washing process) the drain system and remove debris from the hose and pump.
All manipulations associated with washing and caring for the machine can be easily done if you follow the basic rules for operating the equipment.
Why did the blockage happen?
During the operation of the SMA, alarming signs may appear:
- Water drainage is unusually slow.
- A buzzing sound is heard when pumping. The efforts of a device that wears out do not lead to results.
The diagnosis is clear - the pump is clogged. Causes of clogging:
- Debris and contaminants that come with water from water pipes.
- Debris and small objects that fall into the drum along with clothes placed in the wash.
- Poor-quality detergents - they clog the drain if they do not dissolve completely.
It happens that owners of automatic washing machines never clean the drain when using them. But no matter how “smart” and efficient the machine is, no matter what famous brand it represents - Samsung, Ariston, Electrolux or Indesit, they all need regular cleaning of all parts that come into contact with water. Cleaning the drain assembly is difficult because you still need to get to it.
Preventive measures
You can protect your washing machine from breakdowns, especially from clogging of the pump (drain sediment). To do this, you need to adhere to the following recommendations:
- Carefully check the pockets of items before washing for the presence of foreign objects (for example, small money, metal or plastic objects). These parts can damage the inside of the pump or block the drain hose.
- Soften washing water. Synthetic products (Kalgon, Uplon, Kupava) and special filters will help with this. The former remove plaque formed by small particles of salts and metals (components of hard water), and filters prevent these particles from penetrating inside the washing machine.
- Do not overload the device (load the amount of dirty laundry into the drum as recommended by the manufacturer).
Regular cleaning of the filter, which is located between the pump and the drain hose, will also help protect the machine from such damage. By following these rules, you can protect the device from damage.
[custom_ads_shortcode3]
How to get to the pump?
The process of removing the unit depends on the design of the washer. Take a basin for draining water and a simple set of tools:
- wrench;
- screwdrivers - Phillips and flat.
Before disassembling, be sure to familiarize yourself with the structure of the device; it is important to determine the exact location of the unit you are interested in. The procedure depends on the design features of a particular model.
Through the bottom
- There should be a panel or door at the bottom through which you can reach the pump. Open it by prying it open with a screwdriver. Find the screw that secures the drain filter and unscrew it.
- Tilt the device and let the remaining water pour into the basin prepared in advance. Turn the filter device clockwise: this will allow all the liquid to drain out.
- Now twist the filter clockwise and, pressing it into the housing, remove it through the bottom.
- Disconnect the hose, wires and clamps - now you can remove the pump.
Important! All actions to disassemble the washing machine must be carried out after disconnecting it from the power supply and turning off the water supply tap.
Through the façade
- Take out the detergent container and unscrew the screw located at the bottom.
- At the bottom, remove the panel to access the filter. Unscrew the second screw and remove the front panel.
- Having found an internal panel under the front panel, screwed with self-tapping screws, unscrew them too. Disconnect the cuff, remove the clamp from the hatch and release the clamps. Having reached the desired unit, drain the water, disconnect the hose and other elements.
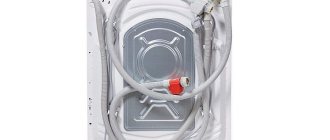
Through the back wall
- Unscrew the clamps that secure the drain hose and disconnect it. Unscrew the screws securing the back wall and remove it.
- Disconnect the wires and unscrew the pump.
When the unit is removed, begin cleaning it.
Finding the problematic part
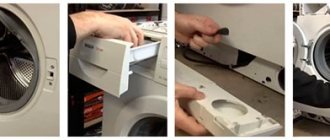
It is impossible to get to the pump on Bosch washing machines through the bottom. There is only one way - remove the front panel, and only then remove the pump. The procedure is more complicated, but if you follow the instructions it will not take much time. The algorithm is like this:
- unhook the technical hatch door from the body;
- remove the powder receptacle (pull the tray towards you until it stops, then press the special “tab” and pull it out completely);
- Unscrew the screws hidden under the tray;
- unscrew all the fasteners holding the dashboard and remove it;
- open the hatch, feel the outer clamp on the cuff, loosen it and remove it;
- tuck the edge of the rubber seal into the drum (there is no need to tighten the cuff completely - putting it back in place will be problematic);
- disconnect UBL from the machine;
- loosen all the bolts securing the end panel;
- disconnect the front wall from the housing.
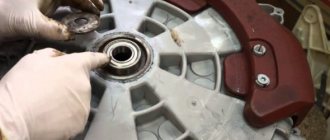
After removing the end, all the “insides” of the machine will open before your eyes. All that remains is to find the pump in the lower part of the body, under the drum. The pump is a metal “washer” with blades mounted on a snail stand. To remove the part completely, just disconnect the connected wiring and pipes, and then unscrew the holding bolt and pull it out of the seat.
How to clean?
The cleaning process boils down to cleaning the impeller. A lot of garbage fibers are usually wrapped around it - wool, hair, threads. Procedure for disassembling the pump:
- Remove the casing - the snail by unscrewing the screws. In this case, you need to remember the relative position of the engine and the cochlea.
- Cleaning the filter is done using a wooden stick to remove dirt and scale. Wipe rubber elements with a slice of lemon.
- Unscrew the impeller with a screwdriver - unscrew the screws that connect the two parts of the pump to each other. Then you get to the impeller - the element that rotates during operation. Remove debris carefully to avoid breaking the blades. Wipe the inside of the snail.
- Reassemble the cleaned pump - assembly must be done in reverse order. To avoid mistakes, record your actions during disassembly - take a photo. Put all the parts in place and start the machine. If assembly is done correctly, there will be no leaks.
Possible problems
The work doesn't always go smoothly. Sometimes users are unable to unscrew the part or remove it. This occurs if the sump pump assembly is not cleaned often enough.
What they are doing:
- Use pliers. Use a tool to grasp the protrusion of the filter, turn it carefully so as not to break it.
- Clean the element through the removed pump. This can be done by owners with plumbing skills.
Average users are advised to call a service technician.
Where is the drain filter in the washing machine?
First, let's figure out where to look for the node we need. Everyone's cars are different, both in brand and model. They also differ in the type of laundry loading. But with all the variety of types of equipment, its manufacturers install filters at the bottom of the washing machine next to the pump.
Since this is an internal part of the machine, it is closed from the outside with a hatch or removable panel.
To make it easier for you to understand your washing machine, we have put together a photo table with the location of the filter for the main brands of SMA.
| For LG washing machines, the pump filter is located at the bottom left behind the hatch. | |
| For machines of the Indesit and Ariston brands, look for the filter behind the lower removable panel on the right. | |
| For Candy washing machines, the drain filter is located on the left side behind the hatch. | |
| For Bosch and Siemens cars, the unit is located on the right behind the hatch or decorative strip. | |
| In the Electrolux or Zanussi brands, the filter is located at the bottom right and covered with a plastic hatch. | |
| In Samsung washing machines, look for the filter in the lower right corner behind the plastic panel or behind the hatch. | |
| On top-loading washers, such as the Whirlpool, the part is located at the bottom left. | |
| In the Atlant washing machine, the filter is hidden behind the hatch at the bottom right. | |
| In Electrolux and Zanussi washing machines with vertical (top) loading, the drain filter is built into the edge of the machine drum and is removed from inside the drum. |
Repair
It is best to take a broken circulation pump to a specialized service center, especially if it is still under warranty. Most of the models currently on the market, unfortunately, are non-separable or partially disassembled, so if problems arise with its internal spare parts, entire units or the pump assembly must be replaced. If the warranty period has already expired, and the design of the pump allows you to disassemble it and get to all the main components, then, if you have the appropriate skills, you can carry out the repair yourself.
Having determined the cause of the malfunction from the table above, it is enough to disassemble the pump, as indicated in the paragraph on prevention and maintenance, and replace the faulty part.
The main elements in the pump control unit are:
- 1-5 microfarad capacitor;
- terminal block for connection;
- speed controller.
Due to the small capacitance of the capacitor, you can check it using a multimeter, which has a built-in C-meter with a limit of up to 20 µF
If the readings deviate significantly from the nominal value, the capacitor should be replaced; it is important to maintain the polarity of the connection and be sure to have its voltage tolerance. For a conventional single-phase motor, capacitors with a tolerance of up to 450 V are used
The speed controller assembly is replaced with a new one. It is enough to disconnect it from the terminals, remembering the position of each pin and connect a new one.
The terminal block must be perfectly clean, dry and without signs of obvious overheating or burnt. If the above problems exist, then it should be replaced with a new one, the same or similar in the number of connections.
Popular models of circulation pumps are from the manufacturers Wilo, Ggrundfos, Dab. Not least due to their reliability. You can expect these pumps to break down within the warranty period only if the recommended operating conditions are violated. However, during the post-warranty period, Wilo often has problems with support bearings. Only replacing them helps.
Ggrundfos and Dab can “please” the impeller to become overgrown with scale for high-temperature heating systems, as well as silting of the stator cup. It is better to prevent these problems by installing a good filter and preparing the water. Otherwise, breakdowns are often justified by external problems.