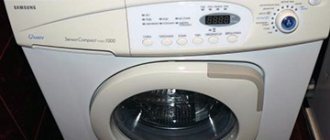
For many years, Samsung washing machines have been leaders in sales in the consumer market. Probably, many owners have such an assistant who can make their daily life as easy as possible. Despite their quality characteristics, washing machines even from this leading manufacturer, like any equipment, can fail due to various breakdowns. One of the reasons for the poor functioning of the unit or its breakdown is the bearing assembly.
You can fix the breakdown with the involvement of companies working in the field of repairing various types of household appliances, but this will require additional financial costs. If this is not possible, you can do this work yourself. How to change the bearing on a Samsung washing machine will be discussed in this article. To carry out repair work, you must carefully read the instructions provided.
Dependence of the performance of washing equipment on the bearing
You may be interested in:Pioneer GM-D1004 car amplifier: characteristics and reviews
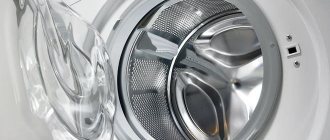
The performance of the washing machine will depend on the quality functioning of the bearings, since it is these parts that carry out the function of uniform rotation of its drum. Two bearings are installed in the units, and their location is the inner plane of the tank. They are not the same size and therefore carry different loads. If the bearing fails, the quality of the “Wash” and “Spin” options will immediately change. In this case, the question arises of how to change the bearing on a Samsung washing machine, because further use of the device can lead to more serious damage.
You may be interested in: Antenna "REMO": review, reviews
Final Thoughts
Disassembling Samsung washing machines is a labor-intensive process that requires a responsible approach. The principle of disassembly is practically no different from different manufacturers, since the units themselves are designed approximately the same. Some differences in the procedure are typical only for Samsung washing machines with a vertical loading type. The main thing is to accurately remember the location of each of the parts while installation is underway. Then it will be easier to reassemble in the reverse order, following the manufacturer’s requirements. It is important to assess your own strengths in advance so that disassembly later does not turn out to be overwhelming.
Any washing machine breaks down over time. Units from the South Korean manufacturer Samsung are no exception. Replacing some parts requires almost complete disassembly of the device. In this article we will talk about how to disassemble a Samsung washing machine with your own hands.
Main causes of wear and tear
They are divided into two types:
1. Natural wear and tear. The service life of the bearing installed in the washing unit is 5-6 years. As a result, replacing a bearing after 5 years is not a failure, but is defined as natural wear and tear of the part.
2. Premature failure. It may be due to several reasons, such as:
- Wear of seals. They perform a protective function for bearings from contact with water. Violation of its tightness due to the penetration of water will lead to the gradual washing away of the lubricant, which will be the main reason for the formation of bearing corrosion.
- Failure to comply with the standard weight of laundry placed in the machine drum for washing.
- Failure to comply with the installation instructions for the unit.
About troubleshooting basic problems in Samsung devices
Unexpected stops during washing
Insufficient water pressure is the most common reason why this happens. The car just stops. To fix the problem, the device is turned off and on. If there is too much laundry, then the excess is simply removed. Because of this, Samsung washing machines can also stop.
Periodic shutdowns also occur in situations where there is a failure in the power cord and the power button initially has poor contact. Another reason for stops is a slight misalignment. In this case, disassembly is not required.
Problems while collecting water
First you need to check how water flows throughout the entire plumbing system. Separately, you need to make sure that the valve involved in the water supply is open.
Only compliance with certain conditions protects against water pouring out of the device. The free end of the hose is connected from below. Its standard height is no more than 2/3 of the device itself. This is taken into account when disassembling.
If there is a leak from the unit
Problems with a Samsung washing machine can occur for several reasons.
- Sometimes simply cleaning the container where the powder is stored is enough to fix the problem.
- If the hoses have been checked and everything is fine with them, the cause is definitely only the O-ring.
- Checking the tightness of the seals is carried out in the door, at the junction of the hoses.
- If some of the material is worn out, it is replaced.
- The hose and the drain pump are checked separately. Problems may arise due to clogging of these parts in a Samsung washing machine. Disassembly requires minimal time.
Wear of the heating element, failure of this part
If the Samsung washing machine is really broken, the washing water simply will not heat up. But do not rush to change the heating element itself - in some cases, the cause is electrical wiring.
It is recommended to carry out a thorough check of the entire electrical network. The same applies to the contacts of the heating element. For work, a so-called multimeter is used. If everything is in order with the voltage, then the heating element of the Samsung washing machine itself is changed.
A new device is installed only after thoroughly cleaning the area where the previous one was installed. Disassembly is carried out carefully.
The appearance of noise and vibration during operation
The noise often appears due to the fact that the machine itself was not installed correctly. Because of this, a strong hum appears during the spin cycle. Then the position of the Samsung washing machine is simply leveled and checked with a special level.
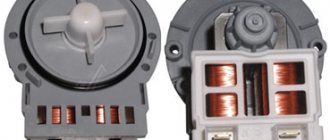
Another possible cause of the noise is that the bearings are very worn. The parts cannot be repaired; the owner can only make a replacement. This is a difficult task for those who have no experience at all. It is necessary to saw and then glue the tank behind which the bearing is located. It is recommended to seek qualified help if you are not completely confident in your abilities. Then disassembling the Samsung washing machine will go faster.
Reasons for replacing bearings
You may be interested in:Connecting an LED chandelier with a remote control: installation secrets and recommendations
The bearing replacement process is complex and time-consuming. It involves complete dismantling of the device. Therefore, before changing the bearing on a Samsung washing machine (6 kg) (on the drum), you should correctly determine the culprit of the breakdown. To do this, you need to pay attention to the following signs of the unit’s performance:
- sound changes during execution of different options;
- poor-quality spinning of laundry;
- the appearance of a leak under the lower base of the housing;
- the formation of backlash during the rotation of the machine drum.
If bearings are not replaced on time, more complex failures may occur:
- destruction of the seats of parts, which will lead to failure of the tank;
- mechanical damage to the shaft connected to the cross mounted on the drum.
Common replacement mistakes
When replacing these parts on their own, users often make a number of mistakes that can only complicate the problem:
- damage to the hatch cuff;
- a break in the wire coming from the sensor that blocks the hatch;
- damage to the shaft pulley when removing it from the axle;
- broken wires from the temperature sensor and heating element;
- damage to mounting bolts;
- failure of pipes due to forgetting to loosen the clamp;
- damage to the sleeve during the process of knocking the bearings out of the drum, as a result of which the latter will require replacement.
These errors will only add problems, so it’s better not to take on the job if repairing a washing machine is beyond your capabilities.
If you are far from technology, then seek help from a professional. For those who are familiar with household appliances, this video will help.
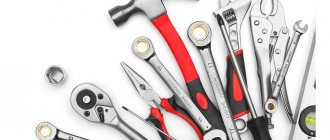
Tools required for repair work
To replace the bearing on a Samsung washing machine you will need:
- A set of hand tools including screwdrivers and wrenches.
- Metal hammer.
- Cold chisel.
- Pliers or other types of electrical installation tools.
- Lubricant.
- A sealant with high resistance to high temperatures.
Recommendations from repairmen
When performing repair work to replace a bearing on a Samsung washing machine, you should pay attention to some recommendations from specialists in the repair of such equipment:
- Lay out the removed parts, separating them by location.
- Record the removal procedure.
- To eliminate the problem of finding the required fastening element when assembling the machine, after removing the part, the unscrewed fasteners should be returned to their seat and lightly screwed.
- All work on detaching parts should be carried out carefully to prevent mechanical damage.
Samsung washing machine diagram
Before you start disassembling the washing machine, it is advisable to get an idea of its structure. The unit diagram will show the location of the functional parts and will help when making repairs.
Here is a diagram of the internal structure of the washing machine
If you suspect that the problems are caused by poor electronics, it will be useful to have the electrical diagram of the unit on hand.
Here is a schematic diagram of a Samsung washing machine.
For an ordinary user, a schematic representation of a machine’s structure may seem complex and incomprehensible, but if anyone wants to understand the circuit, anyone can understand it.
Preparatory work
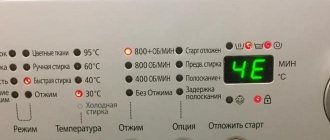
These are mandatory steps that must be completed before changing the bearing on the Samsung WF F861 washing machine or any other model. You can begin the dismantling process only after the following conditions are met:
Removing the body panels of the washing unit one by one
You may be interested in: Air grills "Redmond": reviews from housewives
Owners of modern equipment often have a question about how to change the bearing on a Samsung Diamond washing machine (6 kg). This is a fairly popular model, affordable for almost everyone. Dismantling work must begin as follows:
1. Removing the top panel.
The master will:
2. Disconnecting the control panel.
To do this you need:
- Remove the pull-out tray intended for detergents. To do this, pull it out and press the latch located in the middle cell of the tray.
- Unscrew the two screws located on the surface of the control panel.
- Unscrew the three self-tapping screws that secure the internal base. They are located on the metal frame of the unit.
- Unscrew the screws connecting the control unit to the front panel and the device body.
- Pull the control panel in one direction (toward you), and pull the dispenser tank in the opposite direction. This will cause the dispenser to become detached from the base.
Do not completely disconnect the control unit. You can leave it on the plane of the case, since it is quite possible to change the bearing on a Samsung washing machine (4-5 kg) without completely dismantling it. It will not interfere with removing the tank from the housing.
3. Removing the narrow panel. It is located at the bottom of the case on the front side.
4. Removing the front housing cover.
Necessary:
- Unscrew the screws that secure the inner plane of the base, where the container for powdered products is installed.
- The rubber cuff located between the round bases of the hatch and the drum must be removed. To do this, bend the rubber part and lightly engage the clamp with a screwdriver. Remove it and put it aside with the removed parts.
- Unscrew the fastening elements located on the front part of the case (3 pieces at the top, 4 pieces at the bottom).
- We remove the panel. The process of detaching the panel from the body must be carried out with extreme caution to prevent mechanical damage to the plastic latches.
- Disconnect the electrical connector from the door lock element.
- Place the removed panel aside.
Video
We invite you to watch a video on how to disassemble a Samsung washing machine at home.
She graduated from the Institute of Tourism of the Federal Pedagogical University with a degree in Management, loves to travel and communicate with people. She is interested in psychology, enjoys dancing, and studies English. During the five years of maternity leave, I thoroughly mastered housekeeping, not forgetting about my own development. He skillfully uses words and can support a conversation on any topic thanks to his interest in different areas of life.
Found a mistake? Select it and click the buttons:
For washing small items on the road or in a hotel, it is convenient to use a regular plastic bag. Socks or tights are kneaded inside a tied bag along with water and a small amount of detergent. This method allows you to pre-soak things and wash them without damaging the fabric or wasting a lot of powder and water.
The expression “soap opera” (“soap”) did not arise by chance. The very first series and shows that had a female audience were broadcast on television at a time when housewives did cleaning, ironing and laundry. In addition, to attract female viewers to the screens, commercials for detergents: soaps and powders were often played on air.
History knows the fact that a kitten fell into the drum of a washing machine and, after going through a full wash cycle on the “Wool” program, got out of the unit unharmed. The only trouble for the pet was an allergy to washing powder.
Washing machines equipped with the “No Iron” or “Easy Iron” functions can wash clothes with little to no wrinkling. This effect is achieved through a special approach to spinning - it is performed at low speeds, with long pauses, and a small amount of water is retained in the tank.
Astronauts, while in Earth orbit, solve the problem of dirty things using an original method. Clothes are dropped from the spacecraft and burn up in the upper atmosphere.
In the 19th century, washing ladies' toilets took a lot of time. The dresses were first ripped open, and then each part was washed and dried separately so that the fabric did not become deformed. After washing, the clothes were sewn again.
There is a washing machine “for bachelors”. Linen washed in such a unit does not need to be ironed at all! The thing is that the device does not have a drum: some things can be placed inside the container directly on hangers (for example, jackets and shirts), and smaller things (for example, underwear and socks) can be placed on special shelves.
There are a variety of balls that are used in the washing machine. Antistatic ones will prevent the fabric from sticking to the body after washing, balls with special loops will “comb” the lint and prevent the appearance of pills, and silicone ones with pimples will prevent fluff from matting when washing outerwear.
The first officially patented washing machine was made of wood and was a box with a frame, half filled with wooden balls. Laundry for washing and detergent were loaded inside and the frame was moved using a lever, which, in turn, made the balls move and grind the laundry.
Samsung washing machines are permanent appliances. Therefore, maintaining good condition remains an important factor. After all, washing clothes occupies a really important place in human life. You can learn how to disassemble the cars yourself if you follow the simplest instructions possible. This article will tell you how to disassemble a Samsung washing machine. .
The process of detaching components
Having completed the process of removing panels, we move on to the next stage of disassembling the machine:
How to replace a bearing: step-by-step instructions
Bearing replacement for models Indesit WISL 82, WISL 102, WISL 105 X, IWSD 5085 and others is carried out according to a general algorithm. The only difference may be the order in which the tank is opened. In devices of this brand, both collapsible and solid elements are installed. In the first case, getting to the bearing will be easy; you just need to disconnect the tank mounts. If the washing machine is equipped with a non-separable element, the plastic sheet will have to be sawn and then the two parts re-glued.
First you need to remove the top cover from the unit. This is easy to do by unscrewing two screws from the back of the washing machine and carefully sliding the lid back a little. Then it needs to be lifted and removed from the support. In some Indesit models, the lid is additionally held in place by plastic latches at the front. If there are any, use a hammer and lightly tap away from you to remove the cover from the latches.
Next, remove the back wall. To do this, unscrew the 6 screws on it, after which the panel should come off without any extra effort. You will see a motor behind it, but it will need to be disconnected at the end of disassembly. If the machine is equipped with a drive belt, it must be removed at this stage so that it does not interfere with further actions.
Then proceed to detach the instrument panel. First, remove the powder receptacle by pressing the lock inside the element. In the compartment free from the hopper, unscrew the bolts that secure the instrument panel and remove it from the holders. The connecting wires must be removed and the completely separated part placed aside so as not to damage it during operation.
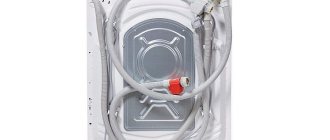
After removing the dashboard, it is necessary to remove all parts located in the upper part. These include a concrete counterweight, a pipe located between the tank and the powder compartment, a pressure switch and a water inlet valve, as well as their contacts.
Before removing the front wall, unscrew the hatch door and remove the rubber cuff. First, use a screwdriver to bend the seal and carefully wrap it into the tank so as not to damage it. Unscrew the bolts that hold the hinge in place and remove the door.
From the rear side below, you need to disconnect the electric motor and heating element, shock absorbers, drain pipe and counterweight from the housing. To remove the motor from the machine, disconnect the power supply and ground wire, then unscrew the bolts that secure the element. Using the same principle, disconnect the heating element wiring.
Using pliers, remove the clamp and disconnect the drain pipe from the pump. It is recommended to unscrew the filter before doing this. To release the shock absorbers from the fastenings, you need to unscrew the nuts on the left and right sides. When all elements are removed, make sure that nothing is holding the tank and dismantle it. Then unscrew the pulley using a T40 hex key. Loosen its fastening by gradually loosening the bolt. If this is not easy to do, use WD-40 to soften it.
Next, you need to disassemble the dismantled tank to get to the drum and bearings. In a collapsible tank, it is enough to unscrew all the bolts around the circumference and carefully separate the two parts. The solid part must be cut in half at the joint using a hacksaw or grinder. First, you need to drill holes around the perimeter of the tank, the distance between which should be no more than 4-5 cm. This manipulation is necessary in order to assemble the tank after completion of the work and secure it with bolts.
After this, all that remains is to unscrew the bolts holding the tank to the drum, unfasten the retaining latches and remove the plastic walls of the tank. Then you can proceed directly to replacing the bearing on the drum of the Indesit washing machine. The procedure is carried out in the following order:
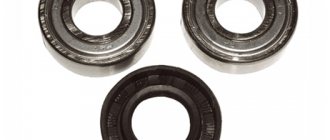
- Remove the worn oil seal from the socket and carefully knock out the metal washers.
- Place the drum on the side of the hatch.
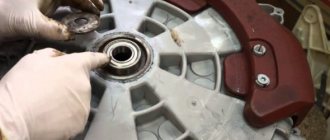
- Place a chisel on the rim of the outer bearing and knock out the part with a hammer.
- Repeat the manipulation of the inner bearing, making sure that the chisel does not hit the drum body and damage it.
- Clean the sockets and treat them with lubricant and WD-40.
- Drive the new elements into the vacated spaces until they stop, hitting the outer edges of the parts with a hammer.
- Treat the oil seal with lubricant and install it on the inside of the tank.
- Reassemble the washing machine in reverse order.
Replacing bearings is a labor-intensive and time-consuming process, but by doing it yourself, you can save on the services of a service center. We hope that our article will be useful to you.
The process of removing the drum from the tank
To disconnect the tank, it is necessary to position it so that there is a pulley in the upper part, which must also be dismantled. But first you need to remove the drive belt from the electric motor and pulley and disconnect the tank from the motor by unscrewing the motor fasteners. Only after completing these steps do we unscrew the bolt installed in the center of the pulley using a hexagon. Then we remove the pulley using the method of slightly scrolling the part.
We remove the clamps, divide the tank into two parts and remove the seal installed between them. One of them will have a drum. We knock out the shaft using a hammer and remove the drum from part of the tank.
Drum
The most troublesome task is to understand the fastening of the washing machine drum and get to the drum.
- Disconnect the washing machine from the network.
- Remove the cover. It is attached with self-tapping screws to the rear stack. Having twisted the screws, we move the cover towards the wall and remove it to the side.
- Remove the control panel. The panel is held on by several self-tapping screws, which can be found by carefully inspecting it. The electronics are attached through connectors; they must be carefully disconnected.
- To detach the front panel, you need to remove the bottom panel by releasing the latches.
- Remove the cuff. Let's find the spring with our fingers at the junction of the clamp. We press on it and pull out the clamp.
- We unscrew the screws at the top and bottom that hold the front panel.
- Disconnect the hatch lock.
- Lift the panel so that it is removed from the holders.
- To unscrew the back wall, you will need to unscrew the mounting bolts; they are visible to the naked eye.
- Having previously twisted the clamps, disconnect all the hoses attached to it from the tank (from the powder receiver, drain hose, and pressure switch hose). Don't forget about the photo! If some hoses seem similar in appearance, it makes sense to mark them with different markers, stickers, or simply number them with a pen before photographing.
- The electric heater (TEH) is located at the bottom of the drum, it can be either on the front or rear side. Wires are connected to it. We take a photo and disconnect the heating element completely by unscrewing the nut and removing it, or unscrew the wires from it.
- Unscrew the wires from the engine.
- If other wires are also secured to the tank with ties, they must also be disconnected.
- There are counterweights on the top and bottom of the tank. They are quite heavy and can be removed to lighten the tank before removal. To do this, unscrew the bolts on the counterweights.
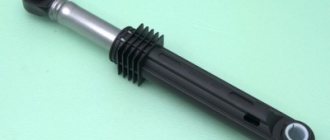
- Using a wrench, unscrew the bolts that secure the shock absorbers to the car body and remove them.
- We carefully remove the tank, having first removed it from the springs.
- Remove the belt, unscrew the engine and shock absorbers.
- Now we disassemble the tank to get to the drum. To do this, unscrew the bolts or unlock the latches around the perimeter of the tank and remove the front part of the tank.
Securing the drum in the washing machine
- To disconnect the drum from the tank, you need to remove the pulley from the back of it. We unscrew the bolt that secures it to the drum and remove the pulley from the axle. Screw the bolt back in.
- Using light blows of a hammer, knock out the shaft. When only the bolt head remains, unscrew it and remove the drum from the tank.