Last updated April 2, 2022 at 11:57 am
When operating gas fueled vehicles, drivers often encounter incorrect operation or breakdowns of the gas equipment. The efficiency of this equipment largely depends on the serviceability of gas injectors. Their operation takes place under conditions of high temperatures and sometimes low-quality fuel.
Owners of gas-powered vehicles are advised to know how to repair, clean and adjust 4th generation LPG gas injectors with their own hands. This will help in some situations and save money.
First, a little introduction...
Everyone knows that it’s not just gasoline and diesel fuel that we’re running out of. A long time ago, gas stations learned to “inflate” our brother, not with gas, but with air, mixing various nasty things into the gas fuel, which adversely affects the condition of the gas equipment and the entire engine as a whole.
So one day it was noticed that the engine was unstable on gas; when switching to gas, the engine stalled, and there was simply no idle. Among other things, the dynamics deteriorated, traction disappeared, gas consumption increased and dips appeared during acceleration. Moreover, the above-described “glitches” appeared, as a rule, “in the cold”. Some time after the engine warmed up to the optimal temperature, all these “sores” practically disappeared.
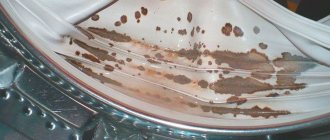
The problem did not allow me to live and drive any car. Having scoured the Internet, I found similar cases, as well as reviews from those who “overcame” this problem. Suspicion fell on the filter (how to change filters and drain condensate is written here and here), as well as gas injectors. The filters were replaced, by the way, during the replacement a large amount of resin was discovered in the filter elements, this alarmed me and made me think. If there is so much “poop” in filters, then what is in gas injectors? The decision was made - it was necessary to clean the gas injectors, as well as their further calibration. What came of it - read on...
results
At idle, the engine no longer stalls, gas consumption has returned to normal, and when “cold,” the engine operates the same way as when the internal combustion engine is warm. Simply put, everything has returned to normal, dynamics, traction, everything is as it was before. I'm happy! Thank you for your attention, see you again at HBOshnik. I hope the article was useful to you!? Bye.
When operating gas fueled vehicles, drivers often encounter incorrect operation or breakdowns of the gas equipment. The efficiency of this equipment largely depends on the serviceability of gas injectors. Their operation takes place under conditions of high temperatures and sometimes low-quality fuel.
Owners of gas-powered vehicles are advised to know how to repair, clean and adjust 4th generation LPG gas injectors with their own hands. This will help in some situations and save money.
Equipment for home use
Ideally, you can buy a professional washing stand for chemical cleaning, but its price deters many car owners. In addition, such specific equipment will only have to be used periodically, and the costs will never be recouped. However, you can ask your friends - some have a homemade installation, which they will probably provide free of charge. If there are no such people in your immediate environment, you will have to, with patience, desire and available materials, assemble an improvised washing stand yourself. Here are its components.
Liquid pump with pressure gauge.
PET mineral water bottle.
Rubber hose - 2 m is enough - and 4 clamps to secure it.
Two "nipples" similar to those used in a tubeless tire.
Wires with terminals and other small devices.
Despite its simplicity, such a “homemade” installation in most cases is not inferior in efficiency to industrial equipment. Especially if high-quality chemicals are used for washing. As for the use of various additives, which are simply added to the fuel tank, and then supposedly the injector is cleaned “automatically,” this is not so. Of course, in this case, the fuel itself somewhat cleans the injection system, in addition removing carbon deposits from the valves. But still, this method rather belongs to the category of preventive measures, rather than effective methods of cleaning injectors.
Cleaning the engine without removing the injectors
You can clean the injectors without removing them. To do this, you will need a flushing cylinder - made from a two-liter plastic bottle. A hole is drilled at the bottom to which the compressor is connected. A hose is attached to the neck, which is connected to the ramp. We operate without removing the engine.
The washing liquid is poured into the bottle. The fuel pump in the car is turned off and the compressor is started, which will supply flushing to the system. When all the liquid has been used up (and it was supplied instead of gasoline), the engine is turned off and everything is put back together. Install new spark plugs. The disadvantage of the engine cleaning method is the lack of visual control of the result.
Repair of gas automotive equipment
Before proceeding to a detailed analysis of specific symptoms caused by the malfunction of certain parts of the gas equipment: gearbox, injectors, electronic unit, cylinder and multi-valve, it is worth noting three associated factors:
Some of them cause intense corrosion, while other resinous substances clog passage tubes and rubber valve plugs that are difficult to clean. By skipping the next change of gas filters in a car, the owner will reduce the gas filter of any manufacturer and generation to a terrible state, even with first-class installation and fine tuning.
DON'T WASTE MONEY ON REPAINTING! Now you can remove any scratch from the body of your car in just 5 seconds.
Repair of VALTEK gas injectors
It happens that the life of one or several gas injectors comes to an end. This manifests itself in the fact that the machine, when operating on a gas mixture, begins to stall, there is a loss of power, unstable engine operation and a characteristic “clatter” of one or more gas injectors. It is this “clatter” that appears after the sealing rings and rubber bands on the rods wear out and means that it is time to repair the gas injectors.
What do we have to do
Repairing VALTEK gas injectors involves several simple steps, namely:
- removing the ramp from the car;
- dismantling the ramp and all its components;
- replacement of rods, springs and rubber rings with new ones from repair. kit;
- subsequent assembly of injectors and their adjustment;
- installing the ramp back onto the car.
Disassembling gas injectors
The first step to removing the ramp from the car is to shut off the gas supply to the LPG line by closing the flow valve on the gas cylinder.
- Exhaust all the gas from the line; to do this, start the car with the valve closed and wait until it switches to gasoline, then force the system to switch to gas two or three more times.
- Before disconnecting the wires and removing the ramp, be sure to mark which wire belonged to which of the gas coils. This can be done using a marker or multi-colored electrical tape. When assembling, you must accurately determine whether the wire belongs to one or another coil.
- Unscrew the fasteners and remove the ramp. When unscrewing the clamps, you will hear residual gas escaping - this is a normal situation.
- Using a 12mm wrench, unscrew the calibration jets.
Remove the corkscrew rings, carefully folding them so as not to lose them. Remove the coils. If you made marks on the coils with a marker, mark which coil was in which place so as not to confuse them during assembly. If you made marks on the ramp itself, the order of installing the coils may not be followed.
Using a 14 key, unscrew the guides and carefully remove them. If one rod is being replaced, during disassembly, it is imperative to mark the rod-seat pair so that they are not confused during reassembly. If all parts are replaced, the order may not be followed. Remove the rods and springs from the guides.
Conduct a visual inspection of the rods and rubber bands, determining whether you need to use a repair kit or not. If the rubber band is completely worn out, metal comes into contact with metal, resulting in a characteristic “clicking” sound.
If the rod itself has a satisfactory appearance, you can replace only the rubber band and the spring (also in case of wear); to do this, remove the old rubber band from the rod with a sharp object (an awl) and place a new one in its place. If the mileage of the injectors is significant, the rod should also be replaced.
Carefully inspect and replace worn parts with new ones on all injectors, then reassemble the ramp in reverse order.
Signs and possible causes of malfunctions
Symptoms of a malfunction of one or more injectors may include:
- high fuel consumption;
- deterioration of the dynamic characteristics of the machine;
- unstable engine operation, internal combustion engine is tripping (one or a couple of injectors do not work);
- dips when pressing the gas pedal;
- malfunctions of various sensors, appearance of “Check engine” errors (for example, MAP sensor);
- knocking in the injectors (they “click” loudly);
- gas leaks through injectors (pouring/poisoning);
- The car stops idling and the injectors do not turn on.
The reasons for this may be:
- wear of the damper rubber rings on the valve stems (this causes the injectors to knock);
- development of the seat (seat) of the valve or its locking rubber;
- wear of the rod (also called piston, anchor) or sleeve (also called core, cylinder, bulb);
- armature jamming in the cylinder;
- weakening of the elasticity of the piston return spring;
- failure of the electromagnetic coil (solenoid);
- violation of the integrity of the electrical wiring.
All of the above reasons can appear naturally or due to low-quality parts, untimely maintenance of gas equipment, or violation of the rules for installing injectors. For example, if gas filters are not replaced on time, gas condensate (oily liquid, water, dirt) can get into the injectors, which can cause them to jam or accelerate wear.
Also, the horizontal position during installation affects uneven wear (ellipse) of the liner body and rod. And simple non-compliance with the rules for installing wires (twisting instead of soldering, mixing, improper fastening) can cause problems over time. One way or another, injectors of this type rarely survive up to 70 thousand km. mileage without repair (repair kit change). It all depends on the conditions of their use.
Do-it-yourself step-by-step repair of gas injectors
To repair 4th generation LPG injectors type Valtek or OMVL, you will need to remove the entire rack assembly:
- shut off the gas supply to the cylinder. To do this, you need to tighten the corresponding multi-valve tap;
- start the engine for a while to remove any remaining fuel from the system;
- disconnect the battery terminals;
- disconnect the hoses and power supply;
- Unscrew the vibration dampers and remove the gas train.
Disassembly and washing
In order to disassemble and wash the nozzle (let’s look at the example of Valtek type 30), you need to:
- Using a 12mm wrench, unscrew the calibration jets/nozzles from the bottom of the ramp;
- Using round pliers or a screwdriver, remove the retaining rings of the coils;
- remove the coils;
- unscrew (key 14) the valve cores and remove the pistons from them.
Disassembling Valtek type injectors
Next, you need to check for wear: rubber parts, valve seats and rods with sleeves.
Wear of the valve sealing rubber
Carry out troubleshooting of parts. Identify squashed rubber rings, bumpers and seals, and also check the cylinders and anchors for wear. The valve rubber should not have large indentations from the seat. The saddle also tends to shrink over time. Discard unusable parts.
Then clean the injector parts from dirt deposits; this can be done conveniently using a rag or cotton swabs. Using carburetor cleaner (carbocleaner), acetone, gasoline or other similar products. Rubber products (if a decision is made not to change) must be removed and cannot be washed with aggressive substances. Rubber can swell from such compounds. For the same reason, it is not advisable to clean/rinse injectors (non-removable) such as Hana, Barracuda, Brc, the effect of such cleaning does not last long, if they work at all after that.
Selecting and replacing a repair kit
The repair kit for gas injectors, as a rule, is equipped only with rubber products (RTI), a rod and a spring, for one injector or the entire ramp. You can also buy a complete set of parts (rods with core bodies and return springs assembled). Everything happens separately. On average, the price of a standard repair kit for one rail will be about 500 rubles.
Based on numerous reviews from drivers, for Valtek injectors, and these are LPG Tech, GREEN GAS (Green Gas), Atiker (Atiker), WentGas (ventgas), Tomasetto (Tomasetto), Yota (iota), Digitronic (Digitronic) even Lovato ( Lovato), original repair kits from RAIL are best suited.
The peculiarity of r/k is that their piston has a hole in the body; this solution reduces the effect of the syringe
If the choice fell on another manufacturer, you should pay attention to the lack of magnetic properties of the metal parts (this should not happen), dimensions, weight
The entire replacement process involves assembling the mechanism block in the reverse order:
- if the pistons are not changed, then remove them from their seats on the rods and replace the rings (rubber dampers/bumpers);
- install (new/old) armatures and return springs into the sleeves;
- change the O-rings of the rod stroke adjusting screw, as well as under the coil and core;
- screw the sleeves into the rail;
- put on the coils and retaining rings.
All seals are recommended to be used once. The outlet calibration nozzles/fittings do not need to be installed at this stage.
Do-it-yourself cleaning
Having discovered obvious signs of clogging, many car enthusiasts try to clean gas injectors themselves. The process of their cleaning consists of several stages:
- Close the supply valve located on the gas cylinder. This must be done to prevent gas from entering the engine.
- Use up all the fuel remaining in the line. When the gas runs out and the car switches to gasoline, you need to force the switch to gas several more times so that all the remaining gas is used up.
- Mark the wires going to the coil and the ramp with injectors differently. This way you will avoid any tangles in the wires when they are reinstalled. It is convenient to use electrical tape or markers of different colors for marking.
- Remove the ramp with injectors, unscrew the calibration jets.
- Remove the corkscrew rings and spool, unscrew the guides.
- Remove the rods, springs and O-rings. In this case, you must remember from which injector this or that rod is removed.
- Remove dirt and deposits from the rods, avoiding getting the rubber seals wet.
- Clean the inside of the nozzle body. A rag is best for cleaning, since using it does not leave fabric lint on the parts.
- Restore the arrangement of all parts in reverse order.
After all the injectors are returned to the ramp, all that remains is to install it in its original place and connect the wires correctly. Before using the equipment, be sure to check the system for leaks
. To do this, apply a soap solution to all connections and turn on the flow valve. Bubbles will appear in places where gas will escape. These places need to be additionally fixed.
Second cleaning method
The unit must be cleaned every 6 months, but at least once a year. If there is an agreement on gas supplies, then the company’s specialists must carry out timely maintenance of gas boilers. If you want to clean the column yourself, then you must follow the following instructions:
- 1 Initially, you need to close the gas; the tap is usually located under the device. Then you need to loosen the bolts that secure the casing, then unscrew them and clean everything with a needle with 4 edges. Today it is possible to buy a special brush for cleaning boilers, which is more convenient to use than a needle. The next step is to wash the burner sections in a degreaser. If the wick is clogged, it also needs to be cleaned with a needle or metal scraper. At the last stage, you need to assemble all the parts of the column in the reverse order and fill the unit with water before starting the gas.
- 2 To clean the burners in the pipe through which the gas flows, you can use a stiff brush. The pipe must be cleaned with wire and rinsed with water and solvent. The upper area of the burner is cleaned with fine sandpaper.
- 3 Units that are cleaned in a timely manner will last much longer. The fire will be glare-free and uniform. If it is noticeable that the column is smoking, the fire is uneven, weak or, conversely, strong, then it needs to be cleaned. An uncleaned unit is dangerous.
A little theory
So, in general terms, what is a rod gas injector (injector).
The design of a gas injector is similar to that of a gasoline injector and consists of:
- housings,
- electromagnetic coil (low resistance of the order of 1-3 Ohms),
- rod (plunger) with seals,
- springs,
- fitting with a calibrated hole.
Often, for convenience, several injectors are collected into one common set - a ramp, mainly by the number of cylinders (if the engine is in-line) or by the number of cylinders in a row (opposite and V-shaped engines).
The rod coil operates on the principle of a simple solenoid valve: when power is supplied to the coil, the solenoid overcomes the force of the rod return spring, and by retracting the rod, it opens the supply of propane-butane gas through the calibration hole into the engine intake manifold. Since the injector electric coil has low resistance, the electrical signal is supplied to it not in one, but in several short pulses.
Rod injectors are among the cheapest and most repairable. However, due to the peculiarities of their design, they are also the “slowest”.
Nozzle design
When starting to clean a gas injector on their own, a car enthusiast needs to have a clear idea of how it works. In terms of its design, it is identical to the gasoline one, with the only difference being that its flow sections are much larger. This is due to the fact that the volume of evaporated gas entering the engine cylinders is more than 200 times higher than the equivalent dose of gasoline. The rod gas injector body contains:
- electromagnetic coil (it has a fairly low resistance - about 1-3 Ohms);
- rod with seals;
- spring;
- fitting (it is used instead of high-precision sprayers and has a special hole of a certain caliber).
For more convenient and efficient use, several parts are combined into one structure - a ramp. The number of injectors in one ramp may vary. It is determined by the number of cylinders in an in-line engine or the number of cylinders in a V-twin or boxer engine.
Adjusting Valtek gas rod injectors
In the previous article, we discussed the issue of disassembling, cleaning and reassembling rod gas injectors using Valtek products as an example. To ensure proper operation of this system unit, after cleaning or replacing parts, as well as assembly into a ramp, it is necessary to carry out adjustment and subsequent calibration. We will look at how to adjust Valtek gas injectors with our own hands in this article and provide step-by-step instructions.
Required Tools
To adjust rod gas nozzles (using Valtek as an example), you must have the following tools:
- dial indicator with measurement accuracy of at least 0.01;
- extension rod;
- adapter sleeve for fixing the dial indicator;
- connector for supplying power to the gas injector;
- hexagon.
Adjustment
Adjusting Valtek gas injectors begins with unscrewing the adjusting jets from them. This can be done using a 12 key.
Next, install the extension rod and secure the dial indicator to the ramp using the adapter sleeve.
- Check that the extension rod is touching the gas injector rod. If the arrow of the device begins to move, it means that contact has been achieved.
- Set “0” on the indicator device. Apply power to the controlled part for up to 1 second.
- Write down the value obtained on the dial indicator as a result of the measurement.
- Do the above for all engine gas nozzles, recording the values.
- Next, using an internal hexagon screw located at the end of the electric coil, we set the required stroke of the rods. By rotating clockwise, we reduce the stroke of the rod, and vice versa, if we rotate counterclockwise, we increase the stroke. We set the same stroke of the rods, but not more than 0.7 mm, according to the recommendations of Valtek.
Stages of work
You can clean gas injectors with your own hands both in assembled and disassembled states, it all depends on the type and structure. To achieve maximum efficiency, you should clean in two ways. The first method is to wash the injectors with a special liquid, and the other is to use ultrasonic cleaning on a special stand.
Self-washing is carried out according to the following principle:
- Initially, the gas supply is shut off by the valve on the cylinder itself.
- Then it is necessary to drive the remaining gas out of its lines until the car automatically switches to gasoline.
- Switch back to the gas system again until everything works out completely.
- In order to put the wires in their places in the future and not confuse anything, it is better to remember or write down which connector fits the coil and which one fits the ramp.
- Remove the calibration jets from the ramp, remove the corkscrew rings with the coil, and unscrew all the guide components.
- Remove the rods, springs and rings.
- Soak a lint-free cloth in alcohol or carburetor cleaning fluid and gently wipe the rods to remove dirt.
- Clean the inside of the injector body in the same way.
- Reassemble all components in the order in which they were disassembled.
If you have a special stand for cleaning injectors, cleaning can be done quite quickly. To do this, you need to connect the injectors using an adapter to the fuel rail of the stand. Using the minimum possible pressure, clean with lighter fluid or Galosh gasoline. Calibrate the gas ECU to adjust the operation of the injectors.
Why do you need to flush the injectors?
During the combustion of the air-fuel mixture, a tar deposit is formed, which is deposited not only in the combustion chambers of the power unit, but also in the nozzles, gradually contaminating them. The diameter and shape of the hole in the nozzle through which fuel is supplied changes over time. This not only leads to insufficient supply, but also to changes in the spraying process. The mixture becomes heterogeneous - instead of fuel mist, streams of gasoline are supplied. There may be excess gasoline or oxygen in the mixture. This negatively affects engine performance, fuel consumption, etc. In winter, when fuel evaporates worse, pollution occurs more intensely.
To restore normal engine operation, you sometimes need to clean the injector, removing all deposits inside their channels.
The component is designed so that when using “ideal” gasoline, cleaning is not necessary. For example, high-quality European fuel saves EU car enthusiasts from cleaning car engine injectors.
Principle of operation
Such a seemingly simple element as a gas atomizer has a very important function. It is responsible for the dosed supply of gas to the engine intake manifold. When gas enters the reducer-evaporator from the cylinder, it is converted into steam. Next, it reaches the injector, where, based on a signal from the ECU, its supply to the nozzle and into the combustion chamber is carried out or stopped. The necessary ECU firmware provides full control of the entire process. Gas nozzles are located under the hood of the car in special places selected according to their configuration.
Removing the ramp
At this point, the washing device is ready and you can begin to disassemble and remove the injectors. To remove them, you will have to remove the fuel rail.
We will consider all this using the example of a VAZ-2110 car with an 8-valve engine.
POPULAR WITH READERS: How to properly check the engine oil level in winter and summer
To do this you will need:
- Set of open-end wrenches;
- Screwdrivers, flat, Phillips;
- Set of hexagons.
The sequence of work is as follows:
- Relieve the pressure in the fuel rail. One of the simplest ways to do this is to disconnect the wiring from the fuel pump and start the engine. During operation, it will remove all the gasoline, completely relieving the pressure. You need to keep the engine running until it stalls, after which you should try to start it again; if it does not start, you can proceed to further work.
- Next, we disconnect the air filter pipe, the wiring of the ramp, the idle speed control, the TPS sensor, and the pipe from the fuel pressure regulator. Additionally, you can remove the accelerator cable.
- Using open-end wrenches, unscrew the fuel pipes going to the ramp. It is advisable to place a rag under the place where they connect, since there may still be some gasoline left in the ramp.
- Unscrew the bolt of the pressure plate of the fuel pipes.
- Using a hexagon, unscrew the two ramp mounting bolts.
- Carefully pull the ramp up (along the axis of the injectors). In this case, you will have to make an effort, since the nozzles sit quite tightly in their seats. After this, we move the ramp a little to the side.
- To remove the injectors, first disconnect the wiring from them. They are held in the ramp using clips that need to be removed. To do this, use a flat screwdriver to move these clamps along the ramp, after which it can be removed.
- We take out the nozzle. It sits tightly in the ramp, so we remove it with light rocking. In order not to mix up the elements, it is better to remove and wash them one by one.
On engines of other vehicles, removal of fuel cells for washing may be carried out slightly differently. But the essence remains the same - you need to remove the ramp to remove the elements.
That's when I encountered the problems of HBO.
The car is equipped with Lovato LPG with Matrix injectors. To be honest, I didn’t appreciate this package at the time, because... I was far from all this equipment and had never encountered it. Now I can already say that Matrices are cool injectors, although they are no longer produced.
Initially, the car switched to gas and because of the HBO, it was running. But after working a little, the engine began to work normally. The former owner of the car immediately made me happy, saying that the injectors needed to be changed, because... The gas at our gas stations is bad and it’s time for them to be replaced. When I went to the LPG service station, they immediately changed the filters (they really had some tar in them), and the master told me not to bother with replacing the injectors, but to drive until the LPG stops working completely. Well, that's what I did. Naturally, the further we went, the more problems there were with HBO.
When switching the LPG, the car was shaking and twitched while driving, but after a couple of hundred meters the operation of the LPG leveled out, and you could drive around calmly. Although due to the HBO, the revs fluctuated for some time.
So autumn passed unnoticed and winter began.
While warming up in the morning, the car switched to HBO and stalled. Although no. At first, she was Troil, specifically Troil. Well, a month later she was completely deaf. Only specific warm-up saved the day, and after a few kilometers, it was possible to switch to gas. But the HBO really didn’t want to switch, the car almost stalled.
Well, when the frosts came, you yourself understand what happened: I switched to gasoline.
Types of gas filters for cars
Depending on the location and functions performed, these mechanisms are divided into liquid and vapor phase devices. The propane-butane mixture passes through each gas equipment filter in different states, so they differ from each other, both in design and principle of operation.
- A coarse gas filter (also called liquid phase or high pressure) is located in front of the reducer, as part of the solenoid valve, or is part of the evaporator design. Its purpose is the primary cleaning of fuel from foreign mechanical inclusions. Applicable to all systems.
- A fine gas purification filter (vapor phase or low pressure) is located directly in front of the nozzles in the 4th generation LPG. As fuel passes through it, it is cleaned of oil particles and moisture.
When propane is supplied from a cylinder to the reducer, the gas passes through a special fine mesh installed on the multivalve intake.
Also, gas (propane) can undergo primary purification directly in front of the cylinder, through a filling filter built in after the VZU (remote filling device). Its filter element is made in the form of a fine mesh of sintered bronze, which is designed for repeated maintenance using the blowing/rinsing method. This device is installed optionally.
Material of manufacture
By analogy with a gasoline filter, an LPG gas filter consists of a housing and a special cleaning element. The material of the body parts is metal or plastic, resistant to high temperatures; it can be dismounted or non-dismountable.
Filter elements are made from:
- cardboard (filter paper);
- fiberglass;
- polyester;
- foamy substance called bulprene.
Filter paper is the most common raw material for the manufacture of gas filters. Cardboard blanks are impregnated with a special composition, due to which the material gains strength and is not afraid of moisture.
To prevent paper parts from losing their original shape and becoming deformed, the structures are reinforced with the help of reinforcing meshes.
Fiberglass elements have low resistance to gas flow and are less susceptible to destruction.
The design of the coarse filter (liquid phase propane) sometimes includes a magnet. It is necessary to attract and retain small metal inclusions contained in liquefied gas.
Products made from polyester are also resistant to damage and deformation. Synthetic raw materials are not subject to natural aging, external factors do not have a negative impact on them.
Thanks to the foam structure filling the entire body in a bulprene filter, the fuel is maximally cleaned of oil fractions and other debris. When passing through small pores, gas flows experience almost no resistance.
To purify gas in methane plants, felt or viscose wads are used.
How to choose a HBO filter?
When choosing a gas filter, it is best to rely on reviews from car owners and recommendations from installers. Not forgetting the important points:
- The selection must be made according to the characteristics recommended by the LPG manufacturer in the instruction manual;
- Price. A good consumable cannot be too cheap;
- It is advisable to consider original products from well-known manufacturers;
- The quality of packaging plays an important role;
- Availability of a set of replaceable seals (repair kit);
- It is better to buy from trusted stores.
The car market is full of fakes therefore:
It is worth paying attention to the presence of manufacturer logos (holograms) on the packaging and body of the device; The assembly quality of the liquid phase element can be assessed visually. Check the sizing of paper to plastic or metal parts, as well as the uniformity, density, number of layers of material
A filter of a non-separable type (fine cleaning), except for inspecting the housing assembly, cannot be checked. It is not uncommon for an element to be missing inside.
Do-it-yourself adjustment of Valtek Type 30 gas injectors
Successful products Valtek Spa Unipersonale
The Italian company Valtek Spa Unipersonale, created in the 90s of the last century, produces high-quality gas equipment sets that have a long service life. Valtec injectors meet quality standards of the European Union and America.
Having its own research laboratory allows the company to produce safe, high-tech products, which are mainly exported.
The basis of Valtek gas injectors is a rod made of durable metal with a rubber tip. This design eliminates gas leakage. The electromagnetic coil is secured with a retaining ring. Special screws allow you to adjust the fuel supply; they have nothing to do with fixing.
Ramps are available that include 2, 3, 4 nozzles. You can choose products that match the number of engine cylinders.
The ramp includes a set of nozzles for the manifold, but calibration fittings, the diameter of which can be from 0.75 to 3.0, must be purchased separately. The diameter can be selected according to the table or drilled according to the power of the car’s power plant.
Injectors are knocking, gas consumption has increased
Injectors are knocking, gas consumption has increased
Post by Andrey-Saransk » Wed May 07, 2008 11:07 am
Post by Propan » Thu May 08, 2008 5:42 pm
Post by Andrey-Saransk » Sat May 10, 2008 9:31 pm
Post by Andrey-Saransk » Fri May 30, 2008 3:47 pm
Post by Propan » Sat May 31, 2008 9:33 am
Post by Andrey-Saransk » Mon Jun 02, 2008 9:03 am
Post by Propan » Sun Jun 08, 2008 6:07 pm
Post by Andrey-Saransk » Wed Jul 09, 2008 10:25 am
Post by Propan » Thu Jul 10, 2008 12:27 pm
Post by Andrey-Saransk » Fri Jul 11, 2008 9:39 am
Post by Propan » Fri Jul 11, 2008 4:47 pm
Post by Andrey-Saransk » Sun Jul 13, 2008 11:14 am
Post by Propan » Sun Jul 13, 2008 11:50 am
Source