No matter what anyone says, purchasing an automatic washing machine is still a definite event. If it hasn’t happened before, this event is quite serious and expectations are very high.
If there was already a washing machine, something more is expected than it was before. Absolutely normal and justified desires. And now, after a careful selection of various “candidates”, the choice is finally made, the washing machine is paid for in the store and delivered.
In the end, it’s already even connected. Everything seems to be fine. The car starts. Washes and rinses. Everything seems to be fine. The process comes to spinning the laundry. And then an unexpected problem: the car begins to vibrate strongly. It doesn’t just vibrate – it just jumps.
We have to hold her so that she doesn’t “go away.” And then joy turns into disappointment. My first thoughts are that I was sold a defective product. Just don’t rush to call a store or service center. Do you think it's the washing machine? Let's try to figure it out.
My recipe
In general, I looked up a lot of things on the Internet, checked the shock absorbers, counterweights, and level in my washing machine, but nothing helped, I walked and walked.
Especially strong if there is little laundry (when there is a lot of laundry, there was practically no noise, just correct balancing). In general, I once came across special anti-vibration pads on the floor, under the legs of the car. Many people may also call them damper legs, dampers, spacers, etc. In general, there are many names, but the essence is the same - they should remove unnecessary vibrations and the machine should not jump.
I went to the well-known store “LEROY-MERLIN” and bought these pads for some ridiculous money (about 150 rubles). They are made of durable, either rubber or rubber with plastic, you can’t tell.
I came home, installed and started the machine. Imagine my surprise that the machine, even with a small amount of laundry, jumped much less (once 5-6 times). I thought this was a victory!
BUT it's so simple. The pads themselves reduce vibration much more strongly, but do not completely eliminate it. As a result, after 3 - 4 days of intensive washing, the machine still moved a little (from the place where I put it).
The design needed to be completed. As a result, on one forum there is an elegant and cheap solution, you need to glue 3M tape (over the entire area) under the two front “spacers”! Take “3M” because it is strong and adheres very strongly to almost any surface.
As a result, now the machine stands like a glove, as it was set at the same level, so it is on it. If there are vibrations, they are dampened by these “stands”. What’s interesting is that there is a kind of recess in them and the machine cannot get out of them. I advise everyone - IT WORKS.
Watch the video, here I tried to tell you in more detail.
This is where I end, I think my experience was useful to you. Read our construction blog, there will be a lot more interesting things.
On a wooden floor
It will not be possible to install equipment correctly on an old wooden floor without special preparation of the base. Before installing on a wooden floor, make sure it is strong enough to support the weight of the machine. If it is strong, it won’t hurt to strengthen it with additional fasteners (screws, self-tapping screws) - it can weaken under the influence of vibrations. If there is any doubt about the sufficient strength of the boards, they must be dismantled to prepare a new base for the device. The work is performed in the following order:
- mark the dimensions of the machine on the boardwalk with an allowance of 4 cm in each direction;
- dismantle this section of the floor and lay supports under the sagging trimmed boards;
- make formwork and cover it with polyethylene for waterproofing;
- lay the reinforcement grid inside the structure;
- make cement mortar and pour it into the resulting mini-foundation with the top mark just above the floor level.
The final hardening time of the solution is about a month, so the work should be done in advance. After this, you can install the washing machine on the manufactured foundation in the usual manner.
If it is impossible to dismantle the weakened section of the floor, you can raise the base on which the unit will be installed above the floor surface. This is done by installing four sections of pipes (at the corners of the machine contour), resting through holes in the floor on the main floor. The upper part of the segments must be in the same horizontal plane. On them you need to lay a sheet of plywood or chipboard 2 cm thick in dimensions slightly larger than the size of the machine in plan. After fixing the sheet on tubular supports, the structure is ready for use.
How to adjust a washing machine yourself
- Tools.
- Dowels.
- Liquid Nails.
- Plywood.
- First, you will need to check the surface on which you are going to install your washing machine. If the floor is uneven, then it doesn’t matter what kind of covering it has - tiled or concrete - the machine still won’t fit as it should. This means that even with slight vibration, the machine will still jump and slowly move from its original location. If this applies to your case, then you need to level the floor , and then you won’t even have to adjust the washing machine.
- If your floor surface is flat, then you should look at how the legs of the washing machine . To do this, you need to gently rock the machine back and forth. You can also tilt it slightly to the sides. This is necessary in order to understand which legs should be raised for adjustment.
- Now let's move on to the process of regulating the washing machine. To do this, those legs that need to be lifted should be untwisted (or rather, the washer on them), and then we scroll the leg clockwise or counterclockwise. This is the adjustment process itself. To check the installation accuracy, use a building level . Ideally, the level bubble should be located centrally. To measure, it will be most convenient to place a level on the machine itself and make adjustments.
An additional device can be used to adjust and level certain types of machines. Take a sheet of plywood and cut out a base for the machine. Next, you should attach it to the floor using dowels or liquid nails.- The following operation can be called a popular method: wipe the floors with very sweet water and immediately place your newly purchased device on them. It should stick to the surface. The method, frankly speaking, is dubious, but those who did it claim that everything went perfectly.
Motor and belt
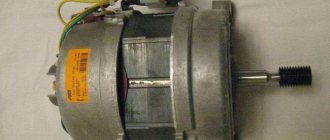
There are two types of washing units. These are direct drive washing machines, and those that are attached between the motor and the drum with a belt.
The first type is more convenient, the machine does not shake. Even over time, it is in perfect condition only if the jumps and vibrations are not associated with springs, suspensions or bearings.
The second type of machine, where the drum is attached to the motor using a belt, often breaks. Because of which? Because the belt is worn out.
Due to its weakening, the drum shakes. Because of this movement, the machine may not just vibrate, but jump and make loud banging sounds. This means that the damage is serious, the drum is hitting the body.
The washing machine jumps for several reasons:
- the belt is worn out;
- the pulley fastening is broken;
- the engine became loose;
- the shaft is deformed;
- the crosspiece is damaged;
- The belt is not installed correctly.
All these reasons are related to the motor and belt. The washing machine may vibrate strongly and may even jump during the spin cycle.
If the reason is related to the motor, call a technician. You should not repair such parts yourself. In addition, the master always gives a guarantee.
And the belt can be replaced yourself. When washing machines jump and move during the spin cycle, they must be placed in such a way that there is free access to the back wall.
Then unscrew the bolts, remove the back cover and immediately see the belt that requires replacement or tensioning
You need to get rid of it carefully. To do this, pull it towards you and rotate the pulley at the same time
Then put on the new belt. How to do this? First put it on the motor shaft, then pull it onto the pulley and rotate it at the same time. That's all. Check that the belt is tight.
Screw the back wall into place, put the machine in its original position and test. If the drum moves normally, there is no vibration or jumping, everything is done correctly.
Faulty bearings
One of the reasons why the car jumps is a bearing failure.
Replacing bearings is not an easy process, so it is advisable to call a specialist who will professionally perform this work. The metal from which the bearings are made deteriorates over time:
- When the bearings are destroyed, the machine first begins to work noisily, and then the drum completely jams. If the bearing has just begun to fail, it is not easy to “make a diagnosis.” As a rule, professionals determine the wear of parts by detecting the slightest extraneous sounds.
- And if the bearing is seriously damaged, you can move the drum. If it is too mobile, then this is a signal to call a specialist.
What to put under the washing machine to prevent it from jumping
To securely secure the washing machine to the floor, you can try weighing down the equipment. Some people put a stack of books and a large package of washing powder on the top cover. Such measures help reduce vibration and increase stability, but too much weight can push through thin material. It is better to use special stands that reduce the shaking of the machine during washing.
Anti-vibration stands
Such products help level the floor surface and provide stability to the body. The anti-vibration stands have a nice appearance. There are various models on sale that differ in color and shape. They are easy to install and there is no need to turn off the equipment. The machine is tilted and a product is placed under each leg. The stands are made of material that can place equipment in a horizontal position.
Anti-vibration mats
They look thin, but they help set up the device for normal operation - they reduce vibration during spinning and reduce noise levels.
The porous product consists of 2 layers with different characteristics:
From the rugs available on the market, you can choose a product based on texture, shape and color. Shahintex universal mats are suitable for any washing machine. They are easy to clean and do the job well. High-quality Proflex products are environmentally friendly. They have no smell. Anti-vibration mats and mats from Mattix-Vibromats are highly resistant to wear. They are suitable for use in low temperature conditions, in rooms without heating.
If the washing machine moves and jumps, it can damage nearby objects or cause the hose that supplies water to become disconnected. As a result, there will be a flood in the room. Mechanisms experiencing a destructive load will lead to more complex and expensive repairs, so the device must be securely fixed.
Source
Video
To understand the nuances of installing a washing machine, watch the video:
Young mother, wife and part-time freelancer. Being a lawyer by training, I am accustomed to collecting and providing the most complete and reliable information. Constantly improves in the professional field and strives for personal growth and development.
Found a mistake? Select the text with the mouse and click:
The easiest way to remove scale and carbon deposits from the soleplate of the iron is with table salt. Pour a thick layer of salt onto the paper, heat the iron to maximum and run the iron over the salt bed several times, applying light pressure.
Stretch ceilings made of PVC film can withstand from 70 to 120 liters of water per 1 m2 of their area (depending on the size of the ceiling, the degree of its tension and the quality of the film). So you don’t have to worry about leaks from neighbors above.
Before removing various stains from clothing, you need to find out how safe the selected solvent is for the fabric itself. It is applied in a small amount to an inconspicuous area of the item from the inside out for 5-10 minutes. If the material retains its structure and color, you can move on to stains.
There are special traps to combat moths. The sticky layer with which they are covered contains female pheromones that attract males. By sticking to the trap, they are eliminated from the reproduction process, which leads to a decrease in the moth population.
Threads made of gold and silver, which were used to embroider clothes in the old days, are called gimp. To obtain them, the metal wire was pulled for a long time with pliers to the required fineness. This is where the expression “to drag out the rigmarole” came from - “to do long, monotonous work” or “to delay the completion of a task.”
If your favorite things show the first signs of gestation in the form of untidy pellets, you can get rid of them using a special machine - a shaver. It quickly and effectively shaves off clumps of fabric fibers and returns things to their proper appearance.
The habit of using an automatic washing machine “sparingly” can lead to the appearance of an unpleasant odor in it. Washing at temperatures below 60℃ and short rinses allow fungi and bacteria from dirty clothes to remain on internal surfaces and actively multiply.
Fresh lemon is not only suitable for tea: clean dirt from the surface of an acrylic bath by rubbing with half a cut citrus, or quickly wash the microwave by placing a container of water and lemon slices in it for 8-10 minutes at maximum power. The softened dirt can simply be wiped off with a sponge.
The dishwasher cleans more than just plates and cups. You can load it with plastic toys, glass lamp shades and even dirty vegetables, such as potatoes, but only without using detergents.
How to properly install a washing machine and prevent it from jumping
After purchasing and turning on the washing machine for the first time, we may encounter problems such as vibration and “jumping.” This trouble creates a lot of difficulties for us. Especially if you mount the unit under a sink or install it in a bathroom with a tiled floor, you risk damaging their integrity, which will lead to additional costs. And if the drain hose pops out from the “jumps,” then your flooded neighbors may also have to spend money on repairs. There is no need to talk about the discomfort from the constant noise and rumble during the spin cycle. Therefore, today we will talk about whether it is possible to install a washing machine so that it does not jump and in what ways to do this.
How to get out of the situation
What makes a washing machine jump? As a rule, this is the relief of the floor covering on which it is installed. Therefore, you will definitely have to ensure that the device stands as level as possible. If you cannot achieve this, then the constant “dancing” of the machine during the spin cycle will lead to a gradual unwinding of the machine’s legs. Therefore, first of all, you need to take care of the quality of the stand.
Wood will help you achieve your goal. In particular, you can use:
Place the washing machine so that it stands level, and the problem will solve itself, at least until the stands wear out, you can forget about the existence of this problem.
Adviсe
When purchasing a washing machine, vibration and noise levels are the last thing they think about. This is often due to limited choice due to the small size of the apartment or bathroom. Or after a child appears in the house, noise disturbs sensitive sleep. How to reduce the volume of unpleasant sounds?
- Do not ignore the help of special stands for the feet of the device or shock-absorbing carpets. They will help with problematic floors, and a flat floor will protect from traces of hard supports and chips.
- When using cabinets for a regular and built-in machine, keep in mind that they need a few centimeters to move during the spin cycle, and leave a small amount of space. Otherwise, the cabinet will not last long.
- Some owners glue a layer of sound insulation behind the wall of the washing machine. This way you can protect the walls and body of the device.
- It is difficult to calculate the exact weight of wet laundry. Therefore, leave the machine one third free when loading laundry. It's enough.
- Wash large and small items separately. Separate large sheets and clothing items so that there is no laundry bunched up in the drum initially. When wet it is difficult to untangle.
Of course, technology does not last forever; over time, you will want to upgrade old units with new and functional devices. However, the service life of large household appliances can be more than 10 years if treated with care. If you do not pay attention to malfunctions and extraneous noises, rocking of the machine, then this will result not only in sudden equipment repairs, a flood, but also in large expenses. Taking care of technology and following simple recommendations is the path to reasonable savings and planned pleasant purchases that will bring you pleasure.
Important external factors
When installing and connecting the device yourself, external factors such as the floor covering at the installation site and air temperature are taken into account.
Flooring
As mentioned above, the surface where the machine is placed must be durable.
We list the main types of floor coverings and their advantages and disadvantages from the point of view of installing a washing machine.
Tree
Not the best basis for installing the device. Firstly, wooden flooring is rarely perfectly level, secondly, it “plays” under load and, thirdly, it deteriorates when exposed to moisture.
If you still have to install the machine on a wooden floor, then it must first be strengthened to reduce vibration. A washing device with a depth of at least 45 cm is installed on the tree.
Laminate
Laminate flooring, like parquet boards, is laid on a waterproofing or soundproofing base. Such a substrate is elastic and will cause vibration of the floor covering during operation of the unit. In addition, parquet and laminate deteriorate when exposed to water.
Linoleum
Installing a washing machine on a wooden floor covered with linoleum is the least preferable option. It contains all the disadvantages: softness, slippery surface, hidden floor irregularities. When installing the device on such a surface, choose only a full-sized unit with a depth of 60 cm.
Ceramic tile
A ceramic tile floor is a good base for a washing machine. It is smooth, durable and well dampens vibration from a running drum.
The only drawback of this coating is its smoothness. During operation, the machine may slide on such a floor and shift. A special rubber mat or pads under the machine’s feet will help solve this problem. You can purchase such accessories at a hardware store.
Concrete
Concrete is perhaps the best option for installing a washing machine. It is hard, smooth and not at all slippery. A device of any depth is installed on such a coating.
Ambient temperature
Another important external factor is the air temperature where the machine is installed. It should not be below +10°C. You should not choose a place such as an unheated garage, loggia or veranda for the device. The problem is the lack of ventilation in such rooms and low temperatures in winter.
During operation, the washing machine generates heat. If the room is cold, moisture condenses on the inside of the machine, damaging the electronic components. Condensation also causes the appearance of black fungus and rust.
Installation features and location selection
The most suitable place to install a washing machine in the house is a separate room (laundry room). Not only the washing machine itself is placed here, but also a dryer, baskets for dirty and clean laundry, an ironing board, an iron and household chemicals.
However, for most Russians, a separate laundry room in an apartment is a luxury, and the unit is placed where there is space. Where to place the washing machine so that it is convenient to use and has a long service life?
The kitchen is the next best place. Why? The answer is simple. Installing the unit in the bathroom condemns it to work in conditions of high humidity, which leads to breakdowns and failure of the machine’s electronics.
Attention. Excessive humidity reduces the service life of the device by an average of 1.5 times.
The steam generated in the bathroom when washing with hot water is especially harmful to the car. It condenses on electronic components, causing short circuits.
If your device is installed in a bathroom, do not turn it on in high humidity. First, let any condensation that has formed dry. It is also necessary to protect the device from direct moisture, for example, with a cover.
When installing the machine in the kitchen, give preference to a place in close proximity to the kitchen sink. This will simplify the connection to communications for draining and collecting water and reduce the likelihood of leaks.
If it is not possible to place it next to the sink, you will have to additionally purchase connecting hoses for extension and decide how to hide them so that they do not spoil the look of the kitchen.
Level adjustment of legs
The drum of the machine, rotating even at low speed, creates vibration. If the laundry is unevenly distributed, it becomes stronger. Vibration is dangerous because it wears out machine parts faster. How to install a washing machine so it doesn't jump? The answer is simple - align the legs.
To begin with, by adjusting the height of the legs, the machine is brought into a stable state (so that it does not swing). After this, take a building level and install it parallel to the front wall. The front legs are adjusted so that the air bubble is exactly in the middle.
Then the level is alternately moved to the side walls of the machine and the rear legs are adjusted. The end result of the work should be a position where the body of the machine is stable, and the level shows a strictly horizontal position both in front and on the sides.
Installation without level
If you don’t have a building level, you can use a glass or saucer of water instead. Place the dishes with water on the top lid of the washing machine and adjust the legs so that the water in the glass or saucer is at the same distance from the edge of the dish.
How to fix the problem?
Where to start troubleshooting? First you need to visually inspect the drum. Perhaps during the spinning process, small things collected in the laundry and got stuck in the duvet cover, which began to complicate the process of spinning out the contents.
If the drum is full, then next time you need to put in half as many dirty things so that the problem does not happen again.
Look at the display, on some models the vibration may be affected by the UE and UB error on the display.
If you started the washing machine for the first time, check whether the transport bolts have been removed; they are located on the back cover of the equipment in the amount of 4 pieces.
Look again to see how firmly the machine stands, use a level to accurately fix its correct position.
If you did everything correctly, looked to see if there are any small things in the drum, then you need to move on to looking for a more serious breakdown. For this purpose, it is best to invite a specialist so that you do not have to pay twice later.
Use the correct mode
A washing machine has many modes, and they are needed for a reason. If you are constantly using the same routine, it is time for you to change your approach, otherwise you may ruin your things. Don't be tempted to throw everything in the wash at once and wash it at the highest temperature to get the task done quickly. This harms both the car and clothes. Wash delicate items separately from heavily soiled items for best results. Also, check label directions.
Habits that destroy a girl's charm. Eternal tension - for men
Neighbors ask me the secret to the beauty of my dacha flowers. Banana helps me out
We decorate a plastic flower pot with a tree: I laid out the pieces in the form of a mosaic
We buy legs for the washing machine
Now retail outlets sell a lot of all kinds of anti-vibration feet for washing machines: they are united only by the functional load that these devices perform. We will tell you about their advantages and disadvantages:
- Anti-vibration rubber pads. The simplest option: they do not have superpowers. Sometimes these legs are made from silicone.
- Paws for washing machine. Devices identical to the legs. Their differences are only in their unusual “appearance”, so this is a more expensive option for legs for a stylish car.
- Or you can buy a rubber mat that you can lay under the washing machine.
Installing the legs
Everything is very simple here: adjust the washing machine so that it stands perfectly level on the floor, using a level. Place rubber caps on the legs of the device. Anti-vibration stands have a larger diameter than the legs of the device: therefore, silicone devices will be easy to put on and the vibration of the device will stop. How to adjust the stands and legs of the washing machine? Just spin them clockwise or counterclockwise. This is how you will lengthen or shorten the legs. So the question of how to regulate it will disappear by itself. To have a complete idea of how the legs are put on, look at the photos and videos on our page.
The main reasons for drum imbalance
- Availability of transportation bolts.
- Incorrect operation, over- or under-loading.
- Installation on an uneven surface.
- Damage to shock absorbers.
- Tachogenerator malfunction.
- Bearing wear.
- Confusion and destruction of counterbalances.
Each of these reasons leads to imbalance, and as a result, increased vibration, knocking, noise, and movement of the machine from its intended place.
Availability of transportation bolts
Most often, bolts are left behind due to carelessness when installing the machine yourself. They serve as a tank mount and protection during transportation. If they are not removed before use, the washing machine will not be able to operate normally and will shake and bounce. The solution to the problem is to unscrew the bolts on the rear wall of the unit. Usually there are no more than 4 pieces.
Incorrect operation
The instructions clearly indicate that things need to be sorted before storing, and the appropriate mode must be selected for each type of fabric. You cannot wash materials with different densities at the same time: when wet, the weight of the clothes increases and overload may occur. In this case, the machine will reduce speed during spinning, and over time, more important components will fail. Often the drum is filled completely to save money, or only one or two items are put in - both of which cause an imbalance.
Poor installation
All four feet should be firmly planted on the floor. The worst base option is a wooden floor covered with linoleum, the best is concrete or tiles. If the installation was done manually, then leveling the machine could be neglected. You can correct the situation by placing a water level on the lid of the washing unit and changing the height of the legs. You can additionally place a thick rubber mat to neutralize vibrations, but in case of a serious malfunction this will not help. If, after aligning the legs, the unit continues to shake, then the reason is internal.
Damage to shock absorbers
This is a common problem in Ardo and Veko models. At the bottom of each washing machine you can find a shock absorber or damper, depending on the model. They perform the same function, but have differences in design. Thus, the damper does not contain return springs, but only a piston and rod. If you remove the lid and press on the tank, it should not swing or jump, but rise a couple of centimeters up and stop. In this case, the shock absorbers are in good working order; if not, then most likely the gasket between the rod and the piston or the fasteners have worn out.
Manufacturing defects or deformation during transportation are also possible. You cannot turn on the unit with such a breakdown; the part must be replaced with a new one or repaired yourself. If a damper is installed, imbalance may result from deformation and weakening of the springs to which the tank is attached.
To replace them, you need to open the top cover, lift the drum, place something to fix it at the highest point, and remove the springs with pliers. To remove a shock absorber or damper, you will need to tilt the body and remove the front or rear wall, depending on the model.
Instructions for replacing shock absorbers
- Unscrew the mounting bolts on the rear wall, remove the top cover, powder box and protective panel.
- Remove the control unit, it is also bolted and connected with wires. Before disconnecting the wire, you need to take a photo to ensure correct connection. If their length allows you to do without disconnecting, then it is better to do so.
- Thread the cuff into the tank.
- On the front part, unscrew the fasteners at the top and bottom, the loading hatch lock, and the panel.
- The dampers are attached to bolts or plastic latches; if you cannot open them right away, it is better to lubricate the part with machine oil. The latch must be pressed in to release the fastening pin.
- The shock absorber is attached to the side wall of the tank or using a rod; in the latter case, to remove it you will need to remove the tank or remove most of the parts.
- Replacement with a new or repaired part is carried out in the reverse order, paying special attention to the wires.
Shock absorber repair
The part is a piston that enters the cylinder under external pressure and a return spring. Most often, the cylinder gasket wears out; you can replace it yourself or buy a new part, its price is about 1,500 rubles.
To replace the gasket, you will need a piece of leather or rubber with a thickness of at least 3 mm and machine oil for lapping. The length of the gasket is calculated by the internal diameter of the cylinder multiplied by 3.14. Twist it and insert it into the cylinder, tightening it with a plug. Lubricate with oil or special lubricant. It would be correct to replace the rubber inserts that attach to the tank and the wall.
For brands Samsung, LG, Bosch, the design of the part may differ. If it is impossible to make the seal yourself, it should be replaced with original spare parts, preferably purchased from the manufacturer’s service center. Repairs give conflicting results; such a spare part can last from 4 wash cycles to 3–4 years of operation.
The set of shock absorbers should be replaced, even if one of them has not yet worn out.
Tachogenerator malfunction
The tachogenerator measures the rotation speed of the drum and is located on the motor shaft. It looks like a ring with two wires; it measures voltage while the motor is moving due to a magnetic field. If it fails, the control unit will not be able to control the spin process or regulate the rotation speed. In this case, the machine either does not spin at all, or does everything at critically high speeds, which leads to an imbalance.
To verify its malfunction, you do not need to remove the motor from the car, just disconnect the tachogenerator wires. The resistance between them should be about 60 ohms. If you switch the multimeter to measure voltage and rotate the shaft manually, the voltage should increase.
The fault may be caused by the sensor mount; it may become loose during operation. To fix the problem, just tighten it tightly. Failure of the tachogenerator is a rare occurrence; if the multimeter shows no resistance, then the motor must be removed and the sensor replaced with a new one.
Bearing abrasion
If other manipulations are unsuccessful, the bearing may be the cause of the increased sound and vibration. Replacing it is not so easy; you should not start work without a full set of tools, as well as without experience in repairing washing machines. To get to it, you will have to dismantle almost all the parts and completely disassemble the unit.
It will be useful at work:
- Set of hex, socket and open-end wrenches.
- Rubber or simple hammer.
- Screwdrivers to fit the fasteners.
- Adjustable wrench.
- Oil seal, bearing.
- A dull chisel for removing the bearing.
- Lubrication.
All your actions should be photographed, because the unit will have to be reassembled. It is advisable to entrust such work to a specialist at a service center.
- First of all, you need to remove the back and top covers with the dispenser and the control unit, as when replacing the damper.
- Open the drum door, remove the clamp, and thread the cuff.
- Unscrew all fasteners and remove the front wall.
- Loosen the clamp and remove the counterweight.
- Take out the heating element, paying special attention to the wires and where they are connected.
- Disconnect all pipes, the belt from the pulley, and remove the motor.
- The tank cuff must be removed, marking its correct location.
- Unscrew the fastening bolt and disconnect the pulley.
- Use a rubber hammer to knock out the shaft; you can use a simple hammer if you place a thick piece of rubber.
- Divide the tank into two halves and clean it on all sides.
- Use a blunt chisel to knock out the bearing, remove the oil seal, and apply grease to the seat.
- Install a new oil seal with bearing into the prepared seat.
- Reassemble everything in reverse order.
Counterweight defects
The constant position of the washing machine and the reduction of vibration are ensured by a special heavy block placed inside the body. It is made of concrete or plastic and is attached to the tank with bolts. According to the standards, there must be two counterweights that can be destroyed over time. Sometimes the concrete counterweight cracks and a piece breaks off, throwing off the balance.
Fasteners on parts can weaken due to vibration when there is excessive load on the drum (often due to loads of laundry above normal).
You can guess about problems with counterweights if the machine knocks and shakes during operation, but there is no grinding noise. Repair consists of inspecting the integrity of the counterweights, replacing them with new ones, tightening the fasteners or replacing them.
Bearing wear
The bearing becomes unusable due to water ingress. Over time, it rusts and becomes deformed. At first, you can hear a metallic grinding sound and notice an increase in vibration when spinning clothes due to the free movement of the drum. The drum may then become completely jammed.
It is important to correct the situation as early as possible. Otherwise, the problem may result in serious damage that will require expensive repairs.
You can diagnose wear by moving the drum. If it moves easily in different directions, then you should contact a service center. Only a specialist with the knowledge and skills can replace the bearing correctly.
Why does the washing machine jump?
The first cause of strong vibrations may be transport bolts that have not been removed. They firmly fix the tank inside the housing so as not to damage it during transportation. Before starting work, bolts and other fixing elements must be removed. It is strictly prohibited to operate the machine with them. The next reason for vibration is the uneven distribution of things in the tank. If you start the device with an empty tank, it will not vibrate. The same thing will happen if you distribute things perfectly evenly - in an even layer around the entire circumference of the tank. In reality, such a distribution is impossible to achieve; even those evenly distributed at the beginning are mixed during the washing process.
Faulty tank suspension and support bearings. Loosening of the counterweight.
The purpose of the system of springs, dampers and counterweight is to make the natural frequency of the tank much lower than the frequency of its rotation. This reduces the amplitude of vibrations and the amount of vibration transmitted to the body. To better understand the content of the previous paragraph, remember: at the beginning of the spin cycle, the body of the loaded machine sways more strongly, and then, with an increase in the rotation speed of the tank, the swaying turns into a slight trembling or, with the correct distribution of the laundry, practically disappears.
Swing the tank - after that it should make no more than one oscillation and stop. Otherwise, the shock absorbers are faulty and must be replaced.
Open the casing, inspect the elastic elements - metal ones should not have deformations, rubber ones should not have tears or cracks. Defective parts must be replaced! Check the counterweight fastening - if it is loose, tighten the nuts.
Faulty bearings. There should be no squeaks or knocks when the equipment is operating. Rotate the tank by hand and rock it from side to side. If you detect squeaking or beating, replace the faulty parts.
Tips on how to reduce machine vibration
- The centrifuge suspension system is designed for a certain weight of dry laundry. Do not put more than the recommended value into the tank: this leads to increased vibration and premature breakdown of the machine.
- When placing laundry, try to spread it evenly across the diameter of the inner container. Of course, during the washing process, things will be mixed, but at the initial stage of work, the moment of starting the centrifuge will be much easier.
- To avoid damage to the external surfaces of the unit due to impacts against walls or nearby objects, the machine should be placed at a certain distance. It is recommended to leave a gap of at least 5-6 cm.
- Many people use a horizontal loading washing machine. To reduce the vibration of the washing machine, you can install some heavy object on the outer surface. A laundry basket is perfect. Other items can also be used. The main thing is not to overdo it with the weight of this item.
Transport bolts
The first reason why a washing machine jumps during spinning or washing is forgotten shipping bolts.
The unit is delivered in special packaging to prevent damage to the equipment. If it is enough to surround a TV with a foam plastic frame, then this is not enough for a washing machine.
For transportation, special bolts are used. They are necessary to fix the tanks rotating inside.
If transport bolts are not used, they will damage the walls of the equipment. That is, these are kind of fuses that protect it from internal damage.
If you recently bought a device, and it starts jumping during the spin cycle, the reason may be the bolts that you forgot to remove.
They do not prevent things from being washed, the drum will spin, but not as quickly as it should. If you do not notice this problem, the components will immediately begin to wear out.
What can I do to prevent the washing machine from jumping? It is necessary to remove the fastenings used for transporting equipment. They are located on the back of the equipment. The main thing is to dismantle them correctly.
All such fasteners number from 2 to 4, some install 6 fasteners.
How to remove shipping bolts:
- Turn the washer towards the light.
- Take a key of the appropriate size. Loosen the fasteners.
- Remove the bolts from their mounting sockets by slightly tilting the machine downwards to the rear, otherwise the fasteners may fall inside the device.
- Close the holes with special plugs.
That's all. Dismantling will not take much time, and knowledge of how to properly remove shipping bolts will be useful in the future.
Small object or foreign part
The washing machine hums and whistles during the spin cycle due to the fact that some small item has gotten into the space under the drum. Let's look at the main reasons why they get there:
- Clothes pockets are considered one of the main problems. Saving just a few minutes before washing, which you need to spend on double-checking, develops into a real disaster.
- Loading items with buttons, beads, accessories and bras comes with additional risks. Small items of clothing may come off during the main or spin cycle. Try to use laundry bags whenever possible.
- A child can quietly place a toy in the tank or something small in the powder tank.
In the long run, foreign parts can ruin the operation of the machine. To prevent this from happening, you need to extract the excess by following simple steps:
- Disconnect equipment from electricity.
- Remove the top and then the bottom walls.
- Find the heating element, disconnect it and unscrew it.
- Carefully remove all objects and debris from the hole.
- Assemble the car, performing the steps in reverse order.
Most models are equipped with a special sump with a debris filter. As a rule, it is located at the bottom of the front panel. In this case, it is enough to open the door and remove the dirty filter for cleaning. If the washing machine does not start spinning clothes silently, return to parsing.
Place for washing machine
The reliability of its operation and the period of trouble-free operation depend on where the washing machine will be installed. Typically, the following rooms are used to place a washing machine:
- Bathroom. Ideal in all respects. Connected communications are located at arm's length, and the flooring is hard - tiles or concrete.
- Kitchen. This room is convenient in terms of connecting the device to the network, but the floor covering may be soft, which does not contribute to the stability of the machine. A wooden floor can sag, and then it needs to be reinforced.
- Hallway. This option is rarely used. In addition to problems with coverage, there is also the distance from pipes and sewers, which will require additional steps for their installation.
Other accommodation options are much less common. This could be free space under the stairs, a utility room or a storage room.
When placing the washing machine, you need to pay attention to the position of the device relative to surrounding objects. Contact of the device body with a bathtub or sink, cabinets and other objects located within its radius should be avoided.
Direct contact with them initiates the destruction of the source of vibrations, that is, the machine itself or the objects it affects (furniture, plumbing fixtures).
Common errors during connection and operation
We list the common mistakes made during installation and subsequent operation of a washing machine.
Incorrect installation of the drain hose
The end of the drain hose is installed at a certain height. The recommended height for each model is indicated in the instructions for the device. The general principle is that the highest point of installation of the hose should be slightly higher than the maximum water level in the machine tank.
Incorrect installation results in water leakage from the tank, a reverse siphon effect, and an unpleasant odor in the machine.
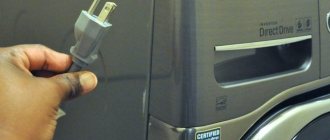
Network connection errors
A typical mistake is the use of non-standard electrical wiring (insufficient wire cross-section, single-layer insulation). This leads to overheating of electrical wiring, melting of insulation, short circuits, and electric shock.
Important. Improper connection of the device to the electrical network is not only dangerous to life and health, but can also cause malfunctions in the machine.
If the room was not originally designed for the installation of a washing machine, then the power supply is carried out using an individual (three-core) cable of the appropriate cross-section. The cable leads from the distribution panel with the installation of automatic switches rated for a current of at least 16 A.
Attention. The use of faulty or low-quality two-wire sockets and extension cords is unacceptable.
Incorrect water connection
The machine is connected to the water supply through autonomous taps located in an accessible place for operation. This makes it possible to quickly turn off the water if necessary.
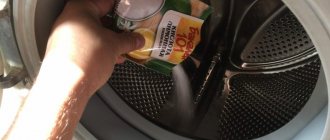
Use of highly foaming powders
Excess foam fills the internal cavities of the machine, leading to malfunctions and breakdowns in the operation of electronic components.
Entry of foreign objects
Foreign objects falling into the machine along with laundry cause serious damage to internal parts, including engine failure. Therefore, before loading the laundry, carefully check it and remove all foreign objects from the pockets, as well as loose buttons and fasteners.
Incorrect switching of operating modes
The mode change is set after turning off the power and in a clockwise direction. Failure to comply with this requirement leads to damage to the control apparatus of the washing machine.
Call the master
In case of complex equipment breakdowns, you need to call a specialist from a washing machine repair company. By giving preference to responsible companies that have been operating for years, you can protect yourself from scammers and unprofessionals.
The cost of repair work does not include the price of new parts. The average prices in Moscow are as follows:
- removal of transportation bolts – from 1,400 rubles;
- replacement of springs - from 2,500 rubles;
- replacement of shock absorbers - from 2,900 rubles;
- removal of a foreign object – from 1,700 rubles;
- replacement of counterweight – from 2,300 rubles, etc.
The final price for LG repairs is determined on the spot. After the washing machine is restored to working order, a test run is performed and the technician issues a guarantee for the work performed.
Why does it vibrate and bounce so much?
During normal operation, LG washing machines should experience some vibration, especially during intensive drum rotation stages. Moreover, for devices with a belt drive it is higher than for direct drive ones. This is explained by design features. But there shouldn't be any significant shaking.
All the reasons for the “bouncing” of the LG washing machine can be divided into two conditional groups:
- Associated with device failure.
- Caused by user errors and equipment malfunctions.
Violations of the rules for using equipment include:
- the transportation bolts were not removed in a timely manner;
- uneven/smooth floor;
- installation is not level;
- overload;
- shoe spinning;
- foreign object entering the drum.
With device breakdowns, the situation is more complicated. Vibrations that can cause the machine to literally jump around the room are:
- problems with the counterweight (displacement, destruction, etc.);
- bearing wear;
- motor breakdown;
- presence of foreign objects in the tank (coins, paper clips, etc.);
- damage to shock absorbers;
- spring wear.
Lighter and narrower LG models are more susceptible to vibration and “jumping” than solid, large and heavy ones.
Reasons for washer vibration
To avoid vibration, it is necessary to install the washing machine correctly. When installing it yourself, carefully study the instructions that come with your purchase. There are several reasons for jumping equipment; if they are identified in a timely manner, costly repairs can be avoided.
New technology
A new machine often vibrates because the bolts securing the drum have not been removed. They are located on the back wall of the machine, there are only 4 of them, and they can be easily unscrewed. If you plan to transport this equipment in the future, it is recommended to save the bolts.
Another reason for a model that bounces a lot is an improperly installed machine. To ensure precise fixation to the floor, it is recommended to use a level. If the equipment wobbles even in a non-working position, then during washing or spinning it will definitely jump.
The cause may be a slippery tiled floor if the machine is installed directly on it.
If the installation is done correctly, but the washing machine still jumps, then the cause may be uneven distribution of laundry in the tank. It is also necessary to correctly calculate the weight of the laundry, taking into account the washing mode.
Before loading laundry, you should check all pockets in your clothing to remove any foreign objects.
If everything is installed correctly, I follow the instructions when loading laundry and selecting a washing mode, but the machine still jumps, then the reason may be its manufacturing defect. It is not recommended to repair new equipment yourself; you should contact a service center for help.
Old car
If the washing machine is no longer new and suddenly begins to vibrate during washing or spinning, then in addition to the reasons listed above, there may be the following:
What to do?
If the noise occurs due to worn parts, then only repairs can help. Until the warranty period has expired, you need to contact the service; you cannot break the seals to find out the reason yourself.
In other cases, you can understand what the problem is and fix the situation:
- If there is an overload, an error of type UE or UB may appear on the electronic display. With front-loading machines, you may see uneven distribution of laundry throughout the drum. It’s easier to prevent imbalance if you don’t load the machine completely and don’t put large and small items in the wash together. If there is a malfunction, you need to stop the wash and turn off the machine. Make sure that the liquid is completely drained from the drum or carry out an emergency procedure (according to the instructions). Having eliminated the cause of the imbalance (removing some things, disassembling the lump), you can turn on the machine and start the spin cycle.
- An uneven base and sagging floor under the machine also contribute to noise and vibration. It is easy to determine whether the unit is level: lean on it from the side, alternately from all sides. If the machine doesn't move, then everything is fine. If the device “shudders” on an ideal floor, then its legs need to be leveled. There are special locknuts for this.
- You can remove small items or torn buttons that have fallen out of your pockets yourself. Shining a flashlight inside the drum, rotate it slightly with the machine turned off. Stuck objects will become visible or fall out. If they are seriously stuck, you will have to call a specialist.
If the seals are removed from the washing machine, then you can look for the cause of the noise inside.
Any work must be safe: turn off the device, disconnect it from the power supply by unplugging the cord from the outlet.
- Checking the shock absorber. Remove the front or back wall. Having released the fastening on one side, you need to “shake” the part. If it gives in easily, then replacement is necessary. In good condition, shock absorbers dampen vibration, showing resistance during similar mechanized shocks. Both shock absorbers will need to be replaced, even if only one is not working. The second one had an increased load, and it will also soon fail. It is enough to pull out the fasteners, install new spare parts, and secure them with the same bushings or bolts. The shock absorber is ready for use.
- Problems with dampers are reflected in the condition of the linings (plastic parts, fitting parts that extend from the tank). Cracked or damaged parts must be disposed of. To install new ones, you need to loosen the fasteners, replace the part, spreading the tails of the U-shaped rods. After inserting the replacement into place, gradually loosen your grip, returning the fixing rods into place, and then screw in the nuts and screws to strengthen the structure. Design features may influence this procedure.
- Counterweight - concrete or plastic parts that reduce vibrations. They are installed in the upper and lower parts of the machine. Concrete options can break due to wear and tear. If the counterweights are in order, and the clamps are loose, then they need to be tightened, and the unusable ones need to be replaced.
Shock absorbers
The first and quite serious breakdown is the shock absorbers. Usually there are two of them (rarely four), they hold the drum from below. If they don't work new, then it's just a defect and needs to be replaced under warranty. BUT they mostly fail due to prolonged use (like shock absorbers on a car).
At the same time, the machine loses its dampening properties and begins to jump and rumble; many write that it still wanders either throughout the kitchen, or in the bathroom or bathroom (depending on who it is).
It happens that these shock absorbers simply break, one of the fastenings simply breaks. In any case, you need to either disassemble the body or turn the machine on its side and see if everything is in order. If there is a break, that’s one thing, we just buy a new one and install it, but if there is no break, but “walking and rumble” occurs, then the shock-absorbing elements need to be checked:
- Unscrew
- We try to compress and unclench them. They should walk “stiffly”, that is, they should not compress or unclench easily. This is a shock absorber, it dampens vibrations, and therefore if there is free movement, it means it is not working properly.
If you can’t determine whether it works or not, go to the store, get a new shock absorber and try to compress it (I think then all your questions will disappear).
Reasons for the movement and noise of the machine during spinning
There are factors that cause the washing machine to vibrate and jump. Some require scrupulous diagnostics and labor-intensive and correct repairs. There are some that are easy to detect and eliminate yourself.
Counterweight defects
In order for the washing machine to stand still and vibrate less, there is a special heavy plastic or concrete block inside it. It is bolted to the tank. Normally there should be two counterweights. Over time, they crack and pieces break off, resulting in an imbalance. The fact that they need to be replaced or the fastenings tightened can be judged if knocking noises are heard when the equipment is operating, and it begins to shake.
The springs are worn out
These elements for fastening the tank dampen vibrations of the drum during its operation. During operation, they wear out and must be replaced.
Washing machine jumps and vibrates during spin cycle due to limescale build-up
Many owners are interested in why the washing machine jumps during the spin cycle and what to do in this case. The reason may be a large amount of scale, which slows down the rotation of the drum. Sometimes a special powder cleaner helps. But if after this the equipment continues to vibrate when wrung out, you should call a specialist.
Engine damage or manufacturer defect
The drum rotates thanks to the drive from an electric motor. When its brushes wear out or interturn short circuits occur, the motor begins to move at half its power. This is not enough for a normal spin. The fault can only be determined by a technician after diagnostics.
Unsuitable floor surface
A washing machine that is installed on a floor that is too slippery will run and shake during operation, even if everything is done according to the level. To avoid distortion, it is recommended to place a rubber pad of the same thickness under the legs. You can do this yourself.
Loosening the belt
Those models of machines in which the drum and motor are attached with a belt, the latter will become loose. As a result, the drum will begin to shake. The unit will vibrate, move, and make loud banging sounds. This serious breakdown is related to the motor and requires specialist intervention.
Preparatory stage
This stage is divided into preparing the machine itself for installation and preparing the selected location.
Preparing the device
If the car is new and just brought from the store, then first of all you need to unpack it. If the packaging is damaged, this may indicate damage to the machine itself.
Advice. When unpacking, try to remove the box undamaged. Subsequently, if a return is required, damage to the packaging may be grounds for refusal of a replacement. The packaging is stored during the entire warranty period.
After removing the packaging, the equipment is inspected for defects. Carefully check the completeness, checking the list in the passport.
After this, remove the bolts and fasteners installed for safe transportation. These parts are needed to secure the drum during transportation.
Important. Be sure to remove shipping fasteners before installation. If this is not done, the device will quickly fail. Moreover, the manufacturer's warranty will not apply in this case.
The location of the fasteners is indicated in the instructions. The holes for the transport bolts are usually closed with special plugs. Bolts are stored for the life of the equipment. They are reinstalled if the device needs to be transported.
Preparing the site
The main requirements for the surface at the location are strength and strictly horizontal location of the machine.
During operation, the device is constantly exposed to vibration from the centrifuge. Therefore, a surface that is not sufficiently rigid and strong will quickly wear out, creating a misalignment.
Preparation of engineering systems
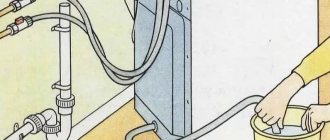
To connect the washing machine you need the following communications:
- Water pipes . In order to save money, it is better to provide a supply of both cold and hot water to the machine. If this is not possible, then only cold water is connected. At the same time, the amount of electricity consumed to heat the water in the device increases. The most convenient place to connect to the water supply is under the sink in the kitchen or under the sink in the bathroom. If you organize the water supply through a filter, this will increase the life of the machine.
- Drain . During washing, the unit changes the water several times. Dirty water is drained into the sewer. The drain hose is connected to the sewer system using special connectors. Any washing machine is also equipped with a special hose, the end of which can simply be placed in the bathtub.
- Electricity supply. When placed in a bathroom, it is necessary to make special wiring to install an outlet for the machine. It is placed above the device to prevent water from entering. Using an extension cord in the bathroom is prohibited as it creates dangerous operating conditions. The outlet installed in the bathroom must be grounded.
Correct installation of the washing machine
First make sure the floor is level. At the slightest deviation, the car will slide down the slope. To avoid this, install a special platform securely attached to the floor. It will ensure that the bottom surface is horizontal.
The washing machine is installed so that the top surface is strictly horizontal and the sides are strictly vertical. It is enough to set one surface: horizontal or vertical. Otherwise, the loads will be distributed unevenly, which will cause vibration and constant movement of the washing machine.
Leveling the car
To make adjustments, you need an ordinary level, no more than a meter long, and two wrenches to match the size of the adjusting nuts on the legs. You may need a set of foot pads and a piece of rubber.
Incorrect operation
The washing machine may start jumping due to improper loading. There are some rules you should know to follow in order to avoid vibration:
- Do not load the machine above the designated limit. If it is noticeable that the drum is more than half full, then this is already considered to be exceeding the required volume.
- It is unacceptable to put things in one lump, this will lead to an imbalance of the laundry. Before placing them in the machine, you need to lay out the products.
- If one thing is being cleansed, you should be prepared for strong vibration. It’s better to pause and reload the laundry.
Types of Vibrating Machines
There are certain rules by which their ability to vibrate can be determined. Do not forget that it is impossible to completely eliminate vibration. High revolutions, according to the laws of physics, provoke this phenomenon even in well-installed machines.
Narrow models of LG machines can shake and make noise the most. This happens because they have insufficient support area. Consequently, the car has poor stability, which leads to jumps. Also, the small machine is equipped with a narrow drum, so laundry often bunches up in it, thereby causing an imbalance in the drum.
https://www.youtube.com/watch?v=U-E7lmy1owkhttps://www.youtube.com/watch?v=kXqlWZVJU2k
Why the car “jumps” and how to deal with it
Increased vibration is typical for recently installed machines. But sometimes time-tested equipment begins to bounce or even move across the floor. It is necessary to determine the reasons for this behavior of the machine before it completely fails. The following options are possible:
- Before installation, the fastening elements - bolts, brackets - were not removed.
- The floor is not level enough, the machine wobbles.
- On the contrary, the floor is too flat and slippery, then you can put a rubber mat on it.
The most easily resolved problem is that damp laundry has curled up inside the drum into a single lump. You need to stop the machine, distribute the laundry inside it with your hands and continue spinning.
There may also be factors of a technical nature. Only a repair specialist can identify and eliminate them:
- The shock absorbers have failed.
- The springs on which the tank is attached are worn out.
- The counterweight mounts are loose.
- The bearing has failed.
The quality of installation of a washing machine depends not only on the connection of the equipment itself, but also on the choice of installation location. It is quite possible for any person to correctly assess the situation, take advantage of its benefits and compensate for the negative aspects. If communications are available, the installation process itself does not take much time. At the end of it, you need to carry out a test run - washing in an empty machine without laundry. If no extraneous noise is detected, the machine can be used.
Simple reasons for knocking
There can be many reasons for the appearance of extraneous sounds during washing and spinning, and knocking does not always indicate a malfunction of household appliances. First of all, you should eliminate the simple causes of the problem:
- uneven distribution of things in the drum;
- improper installation of the washing machine;
- foreign object in the internal space.
Incorrect installation
If installed incorrectly, the knocking occurs due to the drum hitting the walls of the machine. This can lead to a more serious breakdown, which will then require specialist intervention. It is quite simple to identify installation flaws: when spinning at high speeds, the machine can not only knock, but also sway and bounce strongly. Make sure you choose a level surface and calibrate the installation with a level. Washing in a properly installed washing machine will be much softer and without strong rocking.
Unevenly distributed laundry
This problem is typical for older models. Modern devices practically do not rattle, of course, if they are in good working order and installed correctly. Good alignment is facilitated by the presence of electronics, which allows you to distribute things more evenly and prevent imbalance in the drum. Old devices cannot assess how well the drum is centered, and whether there are crumpled laundry in it. Spinning occurs in any case, and then the drum may knock on the walls or other elements of the washing machine.
Foreign element in the interior of the machine
During operation of the washing machine, foreign objects may enter the interior of the housing. The machine, rotating (especially during spinning, at high speeds), creates centrifugal force. Under its influence, small but rather heavy objects (coins, buttons) can penetrate into the machine through holes in the drum or under the rubber seal.
You can try to get them through the hatch cuffs. If that doesn’t work, you’ll have to remove the front or back panel (depending on the machine model) to gain access to the interior.