Printing production is rapidly developing, opening up new additional opportunities for modern people. One of these is creating pictures that can be “translated” onto clothes at home. The basis of such images is a special film. And the products themselves are appliques, only with the “thermo” prefix.
Self-application of thermal decal is possible only on a cotton base. In the case of other materials, it is better to sew decorative elements so as not to inadvertently damage the item.
Types of decals
Before gluing the applique onto the fabric, you need to select it and purchase it from a specialized store that sells sewing supplies. There are several fundamentally different types of thermal application, which differ from each other in the base and material of the design element. The table below lists all existing types of thermal adhesives, indicating their features.
Table - Types of thermal decals
| Type | Peculiarities |
| Flex | — Thermal film; - has a smooth front side |
| Phlox | — Thermal film; - has a velvety “face” |
| Thermal adhesive with increased elasticity | — Stretches well on fabric; - used for silk, guipure, synthetics and other delicate materials |
| With effect | — Shiny surface (glitter); — with 3D drawing; - holographic |
| Reflective | — With special coating; — the “face” of the application shines when exposed to light in the dark |
| Phosphorescent | — Has the ability to accumulate sunlight; - glows at night |
Applications with an adhesive layer must be stored away from sunlight. Ultraviolet light reduces the adhesion of glue to the fabric surface. The shelf life of such products should not exceed 12 months.
Tips for choosing
If you intend to apply a iron-on adhesive to clothing, but do not know what type of product to prefer, answer a simple question: “What exactly do you want to apply the applique to?” The choice of sticker type depends on the type of fabric on which it will appear in the future.
- Knitwear and thin cotton items. To decorate or “save” these elements of your everyday wardrobe, thermal film with a thin base is suitable. It is easy to stick to a cotton base. During use, the applique will shrink and stretch along with the product, without a single hint that it is not “native” to it.
- Jeans, bologna jacket, fabric bag. Thermal films with a thin base are not suitable for thick clothing. The best option for this case would be applications with a thicker base. For example, thermal stickers made of fabric.
- Overalls or child's clothing. In this case, you should give preference to phosphorescent thermal stripes on clothes or applications with reflective elements. At night, these details will attract the attention of others to their wearer, which is especially important for road safety.
- Fashionable wardrobe items. If your goal is to decorate your favorite item, use holographic applications or thermal stickers with a 3D effect. They are suitable for skirts made of leatherette, synthetics, and silk.
If desired, you can order a thermal sticker with any image, even a photo from a family album. It is enough to provide a drawing or photograph to the printing house - and specialists will transfer it to thermal film.
DIY decorating ideas
The design depends on individual taste preferences and creativity. Experienced needlewomen create real works of art from T-shirts; beginners sometimes need to make just a few cuts with scissors, and a completely new model will appear. In both cases, you can add a stylish item to your wardrobe. A suitable T-shirt design is selected in accordance with the lifestyle and interests of the fashionista. The following elements are most in demand:
- Beads, stones, sequins. Lovers of Arabic themes will love it.
- Ribbons, fringe, embroidery, appliqués. Relevant for fans of the hippie style.
- Rhinestones, multi-colored inscriptions, stars, hearts, cuts. Glamorous fashionistas will love it.
- Lace inserts, flounces, ruffles. They help make the modest style of T-shirts more interesting and romantic.
- Metal fittings, patches, buttons, located chaotically. They give the images a deliberate negligence.
The use of special fabric paints allows you to change the color of T-shirts, apply an original print (locally or over the entire area), making the clothes brighter and more stylish. Craftswomen who know how to sew will be able to change the cut and completely transform the appearance of the product. The decor of T-shirts should be simple and light, which will emphasize the sophistication and style of the image.
It is not recommended to decorate a T-shirt with elements with sharp edges. Because of them, the fabric will quickly become unusable.
How to apply iron-on adhesive to clothes...
The process of gluing decorative decal is quick and simple. And this is its main advantage. Follow the eight steps below to avoid damaging the fabric.
- We choose a location. Gluing must be done on a hard and flat surface. This could be a table or chest of drawers covered with a cotton blanket. Or better yet, a traditional ironing board.
- Test Drive. If you decide to take a risk and stick an applique on a synthetic T-shirt with your own hands, be sure to test drive the fabric. Heat the iron as high as possible and check what temperature the material can withstand. It is advisable to carry out the test in an inconspicuous area of clothing, so that in case of a fiasco, the T-shirt does not have to be thrown away.
- Turn off steaming. Before heating the iron, you must turn off the steam mode and drain all the water in the household appliance.
- We create the ideal layout. The place where the applique will be applied must be laid out on the ironing board in such a way that a crease does not form on the location of the adhesive element.
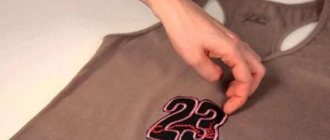
- We apply a thermal adhesive. We place the appliqué on the laid out piece of clothing so that its “face” looks directly at you.
- Cover with paper. Now the “face” of the design element must be covered with a sheet of white paper. For the same purpose, you can use confectionery parchment or tracing paper.
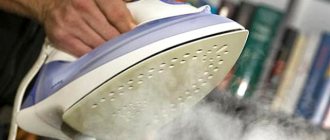
- Press the hot iron. Place an iron heated to maximum temperature on paper, tracing paper or parchment so that the sticker is in the center of its heating element. Then we press the household appliance and hold it under pressure for about 15 seconds.
- Let the paper cool. After the specified time has passed, remove the iron from the protective layer and leave it until it cools completely. After five to ten minutes, the paper can be removed and the process can be considered complete.
If the applique is so large that it does not fit under the iron, glue it in several stages: first the top, then the bottom. Pay special attention to the edging and miniature elements, pressing them as firmly as possible with the iron.
If there is no adhesive layer
You can often find applications whose reverse side is no different in structure from the front. These are decorative elements that lack an adhesive base and require auxiliary materials for adhesion to clothing. Therefore, in addition to the application, it is worth purchasing adhesive tape. It is a thin paper rolled into a roll, with glue applied in diamond shapes on the reverse side. To properly apply a sticker to clothing using this method, follow three simple steps.
- We connect the adhesive tape to the product. To do this, heat the iron to maximum temperature, apply an adhesive layer to the wrong side of the applique and firmly press the household appliance against the paper side of the tape. After a couple of seconds, the glue applied to the back of the paper will melt and adhere well to the back of the decorative element. If this does not happen, spray some water from a spray bottle onto the paper and do the same thing again.
- Tear off the adhesive paper. After the glue has been successfully applied to the back of the applique, the roll must be torn off at the edge. This way, the used piece of adhesive tape will be detached from the main one.
- Glue to clothes. We place the decorative element with the adhesive layer applied on it “face” towards you, and the back side towards the front side of the clothing. Cover the applique with a clean sheet of paper on top and press it again with an iron to a hard, flat surface. We hold the iron under pressure for about 20 seconds, remove it, let the paper cool, remove the paper layer - and enjoy the result.
Video on the topic
To patch a hole
Most often, housewives undertake to transfer thermal stickers to clothes not for the purpose of decorating and decorating them, but with the aim of patching up a hole formed after a fall. In this case, you need to add an adhesive interlining to the process, which will protect the damaged edges from “spreading.”
- Choose a sticker. When choosing a patch sticker, it is important to consider the size of the hole. The applique and a piece of adhesive interlining that will be used in tandem should be approximately 1 cm wider than the damaged area.
- We lay a non-woven base. Carefully insert a piece of non-woven fabric cut along the contour of the sticker into the hole. The auxiliary material should cover the resulting hole from the inside. The adhesive surface should be facing you.
- Glue the applique. Place a thermal sticker on top of the hole, covered from the inside with non-woven fabric. Cover it with a layer of paper or parchment and press the paper with a hot iron for 15 seconds. Then we wait until the paper has cooled completely and complete the process by removing the paper layer from the decorative element and making sure that the work is done efficiently.
If you think the iron-on sticker is too eye-catching, complement it with another stylistically appropriate decorative element. Glue it onto an undamaged area of clothing. People around you will think that this is factory decor.
Open top
A tank top without a top is exactly what you need for summer. First you need to trim the sleeves and top of the T-shirt. Then you can start decorating it. Why not complement the design with a bright insert. To do this, you need to cut the front of the T-shirt in half, pick up a piece of fabric, and carefully sew it in.
note
!
All seams must be ironed and then stitched again. You need to pull the lace through the resulting hole.
...and how to eliminate it later
It is very easy to apply a decal made of leather or fabric. But is it easy to remove it later, when the drawing gets tired, cracks or deteriorates? The table will tell you how to remove the thermal sticker from a T-shirt, depending on the method of its application and the features of the application.
Table - Ways to remove thermal decal from clothing
| Sticker type | Elimination method |
| Sticker with adhesive backing | — Put the clothes on the ironing board; — place a paper napkin under the sticker; - We also cover it with a napkin on top; - iron with a hot iron until the design completely disappears onto the paper |
| Application on adhesive tape | — We process the application with a hairdryer; — we are waiting for the adhesive base to melt; - carefully remove the decorative element |
| Sewn on applique | — We rip the threads with manicure scissors; - carefully remove the seams so as not to damage the clothes |
| Thermal printing | — Place a book or other hard object under the T-shirt; — moisten a cotton pad generously with alcohol; - using swiping movements, remove the pattern from the surface of the fabric |
After you manage to completely remove the thermal sticker from your clothing, a greasy stain may remain in the place where it was previously. To eliminate it, simply apply dishwashing detergent to the contaminated area, leave it for an hour, and then wash the item as usual. If, after you peel off the thermal sticker from your clothing, a “trophy” shiny mark remains on the item of clothing, use acetone or alcohol to remove it. Soak a cotton swab in one of the indicated substances, blot the stain thoroughly, leave for five minutes, and then wash in the washing machine.
Reviews from Internet users warn: ironing snow-white cotton or heating it with a hairdryer is strictly prohibited. High temperatures cause yellow stains to appear on fabric.
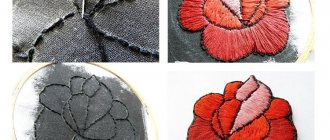
Embroidery
One of the most versatile ways to decorate anything, any way!
Artistic colored satin stitch: basic stitches
Pocket embroideries, such as bouquets of flowers or (for advanced embroiderers!) animals, are very popular, so if you have a T-shirt with a pocket, it's worth a try.
Photo: Sara Barnes, Hiroko Kubota
In general, embroidery can be placed anywhere: on the chest, on the back, on the shoulders, on the neckline, and it will look great everywhere.
Photo: HandyshopStore, Tessa Perlow
With your own hands
If you can’t buy a sticker, but you still need one, you can create a decal yourself. It's not as difficult as it seems at first glance. And besides, it's quite interesting. You can involve your child in the process. Both he and you will enjoy creating a thermal sticker with your own hands.
Available materials:
- plastic bag with a beautiful pattern;
- parchment paper;
- stationery scissors;
- iron.
Algorithm of actions
- Cut out the picture you like from a plastic bag. This will be the basis of the application.
- We apply the cut piece of polyethylene to the place on the clothing where it will subsequently be glued.
- Cover the polyethylene print with a clean sheet of paper.
- Heat up the iron and press it onto the paper covering.
- We hold the household appliance under pressure for up to 30 seconds, remove the iron, let the paper cool completely and check the quality of the work done.
Having a printer that prints on fabric, you can make thermal transfer stickers for clothes right at home. After printing the design, all you have to do is cut it out and glue it onto a T-shirt or jeans using adhesive tape.
Wardrobe items decorated with appliqués require special care. By following simple rules, you can maintain the original appearance of your clothes for a long time. Washing items with thermal stickers should be done in water with a maximum temperature of 40°C. Before putting the item in the washing machine, it is recommended to turn it inside out.
It’s not enough to know how to glue an applique onto clothes. The owner of a decorated item, among other things, must have ironing skills. You can only apply the iron to the wrong side of the fabric, avoiding the area with the sticker side if possible. Using a hot iron is also not recommended. It is better to give preference to the average temperature of the metal plate.
Video on the topic
Decorating a T-shirt using stencils
Another good idea for decorating a plain white T-shirt is screen printing.
To make it more beautiful and vibrant, you can add stunning 3D effects. For example, these pink tulle tutus make ballerinas even more beautiful.
A Brazilian travels 36 km by bike every day to take his loved one home.
It’s good to wash often: myths about shampoo and hair care that only harm
Lost weight: what Sofia Tarasova sacrificed for the sake of “VIA Gra” (new photos)
Ordinary paper napkins work well as a stencil. A beautiful lace pattern looks romantic not only on T-shirts, but also on jeans.
Pareo
If you have old T-shirts in your closet, you can easily make a pareo out of them. This outfit will complement your summer look, making it romantic and unique.
Baby doll style
This item will be appreciated by girls who love exclusive outfits. A T-shirt paired with jeans looks perfect. If you sew transparent fabric to the bottom, you can get a light summer dress.
Execution sequence:
- Cut out the neck.
- If necessary, we sew the product on the sides.
- We sew transparent material to the bottom.
- Don’t forget to make folds, so the fabric will fall beautifully.
The new thing is ready, you can try it on.
Bright poppies
An ordinary T-shirt can be turned into a stylish item. To do this you will have to use applique and make drawings. A little patience, and the result will not be long in coming.
Execution sequence:
- Place the T-shirt on a flat surface and place a sheet of cardboard inside. We fix the product along the edges with clothespins. Using felt-tip pens we draw flower stems.
- While the paint dries, we begin making poppies. We cut out blanks from chiffon and finish the edges with a zigzag stitch. We collect the petals, forming a concave shape.
- We make poppies from the petals and sew them to the T-shirt.
The new thing is ready, you can start working. Such a bright product will not go unnoticed.
