Creaking, thread breaks and other troubles are familiar to every seamstress. Problems in operation are not a reason to take the device to the workshop. Perhaps simply lubricating the sewing machine is enough. Models Janome, Chaika, Astralux, Brother, Family and others are processed according to similar rules; find out the details in the instructions for your device.
How to properly use a sewing machine
In addition to the basic rules for working with fabrics, needles and threads, described in the instructions for each sewing machine model, it is necessary to regularly clean and lubricate the complex mechanism.
Care can be divided into:
- independent – carried out at least once a month during active use;
- professional - it is recommended to do it once every 2-3 years in a repair shop.
Proper storage of the device is also considered an important criterion for the safety of metal components if it is rarely used.
Professional help
The listed service operations can be performed independently, at home. However, experts recommend periodically contacting authorized service centers, where professional cleaning and lubrication is possible.
This is true for sewing machines that are used regularly. For example, if a housewife sews things to order, or dresses the whole family, creates unique outfits. In such situations, you need to take the device to professionals once every 6 months.
Yes, sometimes this service is quite expensive, but it will help keep the machine working for many years and eliminate the need for complex repairs or the purchase of new equipment.
Self care
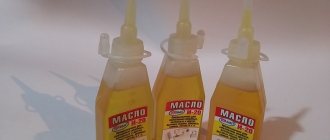
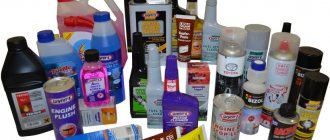
It is necessary to prepare specialized oil for lubricating sewing machines (it is made on a kerosene basis, so it penetrates perfectly into all components), a small screwdriver (Phillips or flat-head), a brush to collect dust or fiber residues, a soft piece of fabric for small debris and old technical oil.
Sequence for vertical shuttle
- Remove the bobbin case, remove the latches, remove the retaining ring and the hook base.
- Clean all the grooves, as well as the carriage, with a brush, then remove any remaining old grease with a soft cloth.
- Drip oil onto the landing stage, under the pusher, onto the edge of the shuttle itself.
- Insert the hook, apply oil to the top of the housing before placing the retaining ring.
- Be sure to lubricate the spool holder axle. You can then close the latches and place the bobbin case in place.
- After lubrication, it is necessary to make several revolutions with the flywheel.
Horizontal hook lubrication
Despite the assurances of some sellers that horizontal structures do not require maintenance, professional sewing machine technicians consider lubrication mandatory.
Steps:
- Remove the protective window and needle plate.
- Take out the bobbin insert, clean all surfaces with a brush, and use a cloth to remove any remaining oil from the step where the hook mesh comes into contact with the bobbin holder.
- Fresh oil drips onto the metal landing stage and also into the center of the bearing.
- When assembling the bobbin insert, you need to check the correct fit. When the wheel moves, it must remain in place. Next, the needle plate is installed (secured with screws).
Cleaning the needle bar
Access to the needle movement mechanism can be provided by opening the cover on the top of the case (horizontal shuttles) or by unscrewing the screw and removing the panel on more budget models.
The importance of lubricating the needle bar is justified by the fact that dry movement of the mechanism can create backlash, loosen the needle and lead to poor stitch quality.
The needle bar is lubricated along its entire length, capturing the bushings and fasteners. Afterwards, you need to spin the flywheel to see which connecting rods provide its movement. They also need to be cleaned of debris, followed by application of lubricant.
Bobbin case device. Cleaning the bobbin compartment
1-Bobbin case. 2-Hook fastening levers. 3-Central rod for fixing the bobbin case latch. 5-Shuttle. 6-Shuttle guide. 7-Protrusion of the shuttle.
The bobbin compartment becomes dirty with fabric frays and thread fragments, which sometimes penetrate the bobbin case and are pressed onto its walls, interfering with the free movement of the bobbin. You should inspect it before installing it back and, if necessary, clean the walls from fringes with a stiff brush. In addition, it is necessary to disassemble the shuttle itself, as shown in the diagram. Be sure to lubricate the shuttle movement grooves with a small amount of oil.
In general, try not to waste too much oil in the shuttle compartment. Oil can get in as the thread moves upward and stain your product, even after a long time. If your machine has a horizontal shuttle, the grooves do not need to be lubricated. The shuttle is made of plastic and does not require lubrication. But the swinging shuttles are completely metal, so a little lubrication will do the trick.
When installing the hook back, position it as shown in the figure so that the hook guide 6 forms a crescent moon on the left side of the sewing machine. Holding the shuttle 5 by the central rod 3, position it so that it forms a crescent on the right side. Protrusion 7 shown in the figure will be at the bottom. Place bobbin plate 4 on top. Return levers 3 to their original position until they click.
Machines with horizontal shuttle
Like all other parts of the automatic machine, the rubber seal requires periodic maintenance. You will learn how to properly treat the protective cuff and extend its service life here.
Expert opinion
Ekaterina Korneva, expert in the field of care, cleanliness and beauty
I will help you understand all the intricacies.
Dirt, hair, lint and debris accumulate in large quantities in the folds of the cuff; everything that was not removed through the filter and drain hose. The remains of garbage are subject to rotting and mold infection, unpleasant odors and black spots of colonies of fungi and bacteria appear. Machines with a rotating rotary shuttle If you have any questions, please contact me, I will be happy to answer!
Cleaning and lubricating your Janome sewing machine
Let's look at the process of disassembling, cleaning parts from dust accumulations and lubricating a Janome home sewing machine.
What you need for work
To carry out the procedure, you will need to stock up on a certain set of tools and materials.
- Use a lint-free cloth; any cotton rag will work just fine.
- Brush with hard bristles. Usually a toothbrush is used for these purposes, but art brushes also do an excellent job.
- Oil for sewing machines.
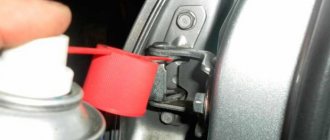
- WD-40, you can ask at car stores. This is a special substance with which the moving part of any mechanism is usually lubricated. It is sold in aerosol form.
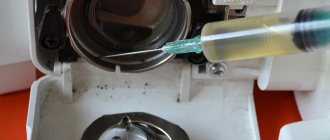
How to lubricate a home sewing machine in hard-to-reach places? Professionals usually use a 5 ml disposable syringe, which can be purchased at any pharmacy. Its needle allows you to penetrate into the smallest holes and dispense oil.
Step-by-step algorithm
Let's proceed directly to the procedure.
- Unplug the device from the outlet and remove the needle from the mount - this will protect you from accidental injuries while working. After this, look for the screw on the front of the case; it is usually hidden under a decorative plug.
- Remove the plug and unscrew the screw using a screwdriver. Then you need to unscrew the fastening screws from the bar of the rack and pinion mechanism that performs the function of moving matter. The released plate must be pulled out and the space under it properly cleaned.
- The next step involves some hard work. It is necessary to remove dust from all connections that you can safely reach. Remove any old home sewing machine oil and apply a new coat. Carefully distribute the substance using an oil can. Two drops of oil will be enough for each connection. Blot the excess that flows down with a cloth and erase all traces left behind. To ensure even distribution of lubricants, rotate the drive wheel slowly.
- The next step is to release the shuttle fastening mechanisms and carefully pull it out of the socket. The operation is completely done manually; you will not need additional tools.
- Apply the required amount of lubricant to the roller. This part must rotate well so as not to interfere with the movements of the shuttle. Also carefully process the shaft attachment points. Some models may have felt and felt pads there, don’t be surprised and don’t rush to pull them out. These parts are designed to absorb any sewing machine oil that has leaked out of the unit.
- Check the functionality of the shuttle mechanism fastening clamps. They should move easily, not jam or create obstacles.
- Like the previous units, the carriage and the plate that secures it require your attention. Simply pull the part out and clean off the old oil and dust. After this, the carriage is lubricated with a thin layer of fresh lubricant and put in place.
- Underneath the fabric guide plate is usually where most of the dirt and dust accumulates. It gets there along with a piece of material that passes through the foot with the needle. Use a toothbrush and thoroughly clean out any debris that has accumulated while working. Pay special attention to rubbing parts - you must wipe off old deposits from them. How to lubricate our sewing machine in this place? Using a special oiler or syringe. In this segment, you need to be even more careful, because oil that has leaked into the wrong place will definitely end up on the threads, and then on the fabric of the product.
- Don't neglect the shuttle either. Thoroughly clean all its elements from dust. A dry, hard bristled paint brush can help with this. Do not use a damp cloth or wipes with cleaning solution as this may damage sensitive parts.
A substance called WD-40 will serve you well in all this work. It perfectly removes old sewing machine oil and dust accumulated in the joints of mechanisms.
The procedure for cleaning a sewing machine can take quite a long time. If you are not ready to spend it or are not confident in your skills, it is better to call a specialist. Errors during assembly and disassembly, as well as careless handling of small parts can lead to problems in the future.
Where to lubricate: instructions
Before work, remove all threads and remove the needle to avoid injury. Don't forget to unplug the device. For lubrication you will need a small piece of soft cloth (without lint) and a dust brush. If these tools were not included, use a toothbrush and a piece of cotton cloth.
- Remove the panel under which the sewing machine mechanism is hidden. Try not to confuse the bolts, arrange them in the right order.
- Remove dust and debris from the threads using a lint-free cloth or a stiff-bristled brush. All parts need to be cleaned.
- Next, lubricate all moving metal parts. Find the rod that moves while the machine is running. Apply a couple of drops of oil - for convenience, use a small pharmacy syringe. Its needle will allow you to accurately dose the lubricant. To ensure that the substance is evenly distributed throughout the mechanism, slowly rotate the flywheel. In some machines, places for a drop of oil are indicated by a round hole.
- All that remains is to clean the shuttle compartment and lubricate the roller to stabilize the movements of the mechanism.
We recommend: Quickly sew a fabric Christmas tree for the New Year - with my pattern it’s easy even for a novice needlewoman
Miss Clean magazine recommends measuring the amount of oil for lubrication. More doesn't mean better. Always remove excess with a clean cloth. If you overfill the oil, it will eventually mix with dust, fibers of fabrics and threads, and turn into dirt that is difficult to wash off.
Look for the lubrication diagram in the machine manual. The designs of Podolsk, Juki, Toyota, Jaguar, Veritas devices may have certain features. If the instructions are lost, then don’t worry: everything that needs care is intuitively clear. As a last resort, call a professional.
Lubrication Features
The biggest mistake is the idea that sewing machine oil needs to be applied in large quantities. In this situation, more does not mean better. During use, an impressive layer of dust accumulates on the internal parts of the device, which gets there along with the fabric. Over time, this may cause problems with the advancement of the canvas. In addition, deposits of dirt on moving elements create a serious load on the device drive. An excessive amount of oil, applied by the generous hand of an ignorant owner, accumulates tiny pieces of matter, scraps of thread, and dust. Falling into lumps, this mass accumulates in one place, causing problems with the sewing machine.
Lubricate the parts in the shuttle compartment (lower part)
To do this, unscrew and carefully remove the needle plate, making sure that the needle is raised (or removed).
Using a dry, clean cloth, immediately wipe the entire surface of the needle plate. We take out the bobbin holder part and clean it with a brush. We also use a brush to go over the shuttle part and other elements around it.
Here, using a disposable syringe or bottle, drop just one drop of oil into the very center of the shuttle (no more). The drop will be evenly distributed, all parts of the shuttle compartment will be evenly lubricated.
You can also apply oil to the rim of the shuttle (also no more than 1 drop), but this is no longer necessary. All sewing parts should be moderately lubricated so that the liquid does not drain. Next, insert the bobbin holder back into the shuttle so that the lever is positioned next to the stopper in the shuttle. This completes the lubrication of the shuttle compartment; all that remains is to close it with a plate and secure it tightly.
How to choose a lubricant oil
Sewing machine oil has a viscosity index. By using too thick, you risk not lubricating the internal parts of the mechanisms, which account for the main friction. Taking a more fluid one, you can again be left with nothing, because it will simply flow down, and the mechanisms again will not receive lubricant. Lubricant for the average household sewing machine should have a medium viscosity. Usually this indicator is indicated directly on the label. It is worth noting that oil for industrial sewing machines is sometimes not needed at all: high-quality professional units are equipped with an automatic lubrication system.
Which oil is the best? The one that comes with the machine. If it was not there initially, then choose a special lubricant of only the best quality. Its cost can start from 100 rubles and more. It can be sold with a special oiler and in a simple plastic bottle.
Don’t even think about using car or vegetable oil - this is strictly prohibited, as it has a detrimental effect on the functioning of the entire system.
Experts do not recommend saving in this matter. Cheap oil may smell unpleasant, dry out quickly, or clump together. It is not recommended to store this oil for a long time after opening. You can use it only if nothing else is at hand.
Causes of unpleasant odor and fungus
The unpleasant odor of the seal appears for the same reasons as in the drum of the unit:
- Incorrect installation of the device - if the machine is placed on the floor at an angle, the water does not completely drain out of the pipes.
- Abuse of low-temperature washing mode - the insides of the machine cannot be disinfected with hot water.
- Inadequate care of parts and detergent container.
- Refusal to use anti-scale agents and powders with bleaching properties.
- If the device door is constantly closed, the drum and rubber band do not have time to dry out, but remain wet.
- Storing dirty laundry in a “washing machine”, where bacteria multiply intensively and a stench appears.
- Lack of preventive cleaning of the washing machine - inside and outside the body.
- Incorrect use of rinse aid - it must be washed off with a double rinse, otherwise an oily residue remains, ideal for fungus.
Important! Poor water quality is one of the causes of odor and mold. It is recommended to use water softeners that will fight limescale on the gum.
Find out now how to get rid of mold in your washing machine.