The hot pre-New Year days of 2020 are the best time to address the issues of cooling our little iron “pets”. After all, holidays and subsequent vacations are rest only for us. And they have to plow day and night for our pleasure and comfort. Will they withstand such a load or howl from overheating?
In order for the computer to cool well and not make noise, the fans inside it must be properly lubricated. The effect of factory lubricant lasts for several years, and then the question of how to lubricate the cooler may arise for you very unexpectedly.
How to choose a lubricant for a cooler?
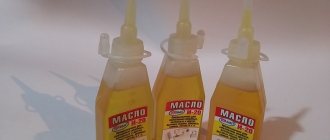
For coolers, it is necessary to use inert organic silicon, that is, silicone grease or a mixture of silicone + Teflon.
The best option is to use silicone grease from a trusted manufacturer. It lasts about 4-5 years and then dries out.
Silicone grease Molykote DC4
If such a lubricant is not available, Litol-24 will do. This is a refractory lubricant that is not afraid of heat.
The third option is solid oil. The principle of action is the same.
Synthetic or semi-synthetic engine oil creates a surface film at any temperature. As a result, there is less noise and almost no wear. Motorists usually have leftovers in cans in the garage. But it is best to use it together with Litol-24.
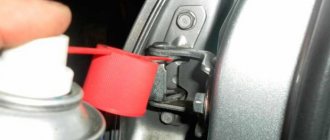
WD-40 is well suited for lubricating non-separable coolers. The tube attached to the can can be conveniently inserted into the gap between the body and the impeller. Adhere to the following rules:
- Insert the tube as deeply as possible so that the lubricant (at least partially) penetrates the bearings and does not spray all over the gap.
- When inserting through the gap between the impeller and the housing, do not use much force to avoid damaging the parts.
- If after this procedure the problems remain (noise, “wedge”), repeat the process.
What kind of oil can be used to lubricate a computer fan?
In addition to special lubricants, it is permissible to use various oils as lubricants.
Machine. This is a good option; it will optimally lubricate the moving elements and eliminate unpleasant noise from the cooler. It is recommended to use oils of medium viscosity, for example SAE 10W30.
Oil for sewing machines or electric shavers. If you don’t have special lubricant or machine oil on hand, then this option is quite acceptable.
Vegetable. This is the worst thing you can think of to lubricate a cooler. Due to their properties, such oils do not remain on the surface, like machine oils, but dry out, coke and become very sticky, which contributes to the accumulation of dust and, as a result, failure of the cooler.
We recommend: 5 tricks for safe preservation: how not to scald your hands and drain the first boiling water from the jar
Types of bearings
Before you begin disassembling and lubricating, it is advisable to know the type of bearing that is used in your cooler. This affects the choice of oil and lubrication method.
The following bearings are used in fans of household and computer equipment:
- Sleeve bearing is the most common and simplest type, which consists of a bushing with a rotating shaft. The bushing is covered with anti-friction material. WD-40 is suitable for lubricating them.
- Slides with screw threads (rifle bearing, Z-Axis bearing) - have specific threads on the axle bushing that recirculate the lubricant.
- Hydrodynamic (FDB bearing) - a modernized sliding bearing, where the rotation of the shaft is carried out in a layer of liquid substance, which is held inside the sleeve due to the pressure difference created during operation
- The rolling element (ball bearing, ceramic bearing) consists of two rings (balls), rolling elements and a separator. Ceramics can be used as a material. For rolling bearings, grease (silicone) is used.
- Oil Pressure Control (SSO) - Improved fluid dynamic bearing. A distinctive feature is a large amount of liquid (lubricant). To reduce wear, the shaft is centered by a permanent magnet installed in the base.
- Self-lubricating plain bearing (LDP) is an improved plain bearing. There is IP6X dust protection and a special slot for recovered oil, which increase the service life of the fan.
- Polyoxymethylene bearing (POM Bearing) is a modernized plain bearing. To increase service life, the shaft is coated with polyoxymethylene, which has a low sliding friction coefficient.
The article will discuss the lubrication of coolers with bearings of the first and fourth types: sliding and rolling.
The best brands
Silicone lubricants for coolers appeared on the domestic market relatively recently. And they are currently supplied by a limited number of companies. But still, some brands of such products have already earned excellent reviews from consumers.
So, what is the best silicone lubricant for laptop cooler treatment? The highest quality and most popular among consumers products in this group today can be considered:
- Steel Glide Silicium SPO-2;
- Boko;
- SI-180;
- SILICOT;
- PMS-200.
How to remove the fan?
When removing the processor cooler, be careful not to damage the chip and surrounding elements. Fans are attached in two ways: using locks or bolts. There are also non-removable ones.
If the cooler is secured to the radiator with latches, simply bend it out and pull it out of the latches. Then disconnect power from the motherboard. The same goes for the bolts - unscrew them with a screwdriver and remove the fan.
With a fixed structure, only surface cleaning can be carried out.
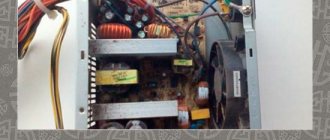
To remove the fan from the power supply, unscrew the power supply from the case and disconnect all wires. Then unscrew the cap and remove the cooler. Remember how the fan is positioned so that you can return it to its original position at the end of the procedure. In some power supplies, the power cable cannot be disconnected because it is soldered to the board - in this case you will have to work in cramped conditions.
There are 120 and 80 mm fans on the power supply, usually small ones are noisy
To remove the cooler from the video card, remove it from the motherboard slot. Then use a thin screwdriver to unscrew the cooling system bolts. Depending on the video card model, the cooler can be built into the radiator or mounted with separate bolts. You only need the fan itself.
Step-by-step algorithm for disconnecting a video card cooler
Step-by-step instruction
We found out what to lubricate and what not to lubricate, it’s time to start maintenance. For work we will need:
- Phillips screwdriver;
- scalpel or knife with a sharp end;
- awl;
- tweezers;
- sash tool;
- vacuum cleaner;
- cotton buds;
- oil;
- Galosh gasoline or alcohol;
- paper with pen.
Before servicing the cooler, you need to get to it. This is what we will do.
How to remove the cooler
The fan is located in the power supply, so it needs to be removed and disassembled. Turn off the computer, disconnect the network cable located on the back wall of the system unit. It is difficult to confuse it with an interface one.
Now we remove the left side wall of the system unit, if you look at it from the front. To do this, use a Phillips screwdriver to unscrew two screws. In some cases, these screws have a large knurled head. They can be unscrewed with bare hands. In the photo below, the screws have already been turned out, and their seats are marked with circles.
The side wall mounting screws are out
Move the wall back a little and remove it. The power supply is located at the very top (less often at the bottom) of the system unit, closer to the rear wall.
The power supply is marked with an arrow
We take a brush and clean the inside of the system unit, sucking up the dust with a vacuum cleaner so that it does not scatter throughout the house.
We arm ourselves with paper and a pen, disconnect all cables going to peripheral devices - CD drive, hard drive, video card, etc. What and where we pull out, we write down, since in any power supply many cables remain unused, and when installing the power supply in place it is easy to forget what -connect. We write it down precisely for this purpose, and not so as not to confuse anything. Sticking something in the wrong place simply won’t work.
Peripheral power connectors
Now it's the motherboard's turn. There are only two connectors: the main one is the largest and powers the processor. Let's turn them off.
The power supply can be removed. To do this, unscrew the 4 screws securing the power supply to the back wall of the system unit, and hold the unit itself so that it does not fall on the motherboard and destroy the processor along with the video card. We remove the power supply from the system unit.
Places of screws for fastening the power supply and the system unit with the power supply removed
Healthy! If the length of the power cables allows you to remove the power supply from the system unit, then they do not need to be disconnected. There will be less work, and there will be no confusion with the connection.
Place the power supply unit on the table and unscrew the 4 screws securing the cover. Here you will need a very small Phillips screwdriver. In the photo below, the cover securing screws are marked with arrows.
These screws secure the power supply cover.
We remove the cover and find the cooler. It can be located on the back wall of the power supply unit or on the cover itself.
Two fan locations
We unscrew the screws securing the fan, dismantle it, not forgetting to disconnect its power cable from the power supply board.
Again, arm yourself with a brush and a vacuum cleaner, clean the insides of the power supply and the cooler itself from dust. At this point, dismantling the cooler can be considered complete. We put it on the table and carry out maintenance.
How to disassemble the cooler?
Having completed these simple steps, proceed directly to disassembling the fan itself:
- Peel off the label on the side where the wires are located.
- Using a sharp object, pry up the rubber plug and remove it.
- Remove the retaining ring with a slot on one side. To do this, insert the tip of a knife or thin screwdriver into the slot and turn it 90° so that it moves apart and lift the ring.
- Remove the rubber sealing ring framing the rod.
- Disconnect the impeller from the fan frame.
- Then you can clean and lubricate.
Remove the sticker and pull out the retaining ring
Following the retaining ring, pull out the rubber seal and separate the parts of the cooler
Description of Steel Glide Silicium SPO-2
Lubricant for computer coolers of this brand is most often supplied to the market in syringes. The kit, in fact, with the Steel Glide Silicium SPO-2 itself also includes an alcohol wipe and several plugs for the fan. One dose of oil in a syringe is designed to lubricate approximately 4 coolers.
This silicone product is produced domestically. One such syringe costs around 130-150 rubles. In addition to the napkin and plugs, this lubricant also comes with instructions for its use, of course. Directions for using this product are printed directly on the packaging.
How to lubricate a cooler?
First, remove dirt and old grease with a napkin or cotton swabs. Pre-moisten them in alcohol or any solvent. Apply a thin layer of new grease to the rubbing parts of the bearing.
Top - dirt removal, bottom - lubrication
The rolling bearing on the housing is designated by the word BALL. Such a bearing can be disassembled with a thin needle. It also has a locking ring that secures the cap that covers the balls. Opening this cover, inspect the condition of the lubricant and add it if necessary.
No disassembly
To lubricate the cooler without disassembling it, remove it from the computer, peel off the top sticker and pull out the protective cover. Then carefully pull the blades up and drop a couple of drops of oil from a pipette or syringe into the gap formed. Then rotate the blades with your hands to disperse the lubricant and repeat the operation.
Cooler on video card
Almost all air-cooled video cards, from the old GeForce GTS 450 Gainward to the new Nvidia RTX 2060, have a similar cooling system design, which also needs to be serviced periodically.
As with the processor, you will need thermal paste for this:
- After unscrewing the retaining screws and unfastening the wires, remove the video card from the motherboard.
- Unscrew the screws holding the fan. They are usually located around the perimeter of the board.
- Unscrew the radiator screws and remove it.
- Clean the video chip and heatsink from thermal paste.
- Apply fresh thermal paste to the video chip using the same technology as for the processor.
- Assemble the video card and connect it.
We recommend: Is it possible to wash natural and synthetic fabrics with citric acid?
Consumer Reviews
According to most experts, Steel Glide Silicium SPO-2 is currently the best purified silicone grease on the domestic market intended for computers. The undoubted advantages of this product include, first of all, good penetration, low cost, low consumption and, of course, complete set.
According to the experts, Steel Glide Silicium SPO-2 has practically no disadvantages. The only thing is that some experts believe that the manufacturer could have included more degreasing wipes in the kit with lubricant - at least 2-3.
What to do with a non-separable cooler?
Modern computers are often equipped with non-separable coolers. Moreover, most often they can be found on some nvidia geforce video cards. Lubricating such fans is much more difficult. After all, there will be no special rubber plug, removing which you gain access to the bushing. Of course, someone, pardon the pun, manages to disassemble a non-separable cooler. However, most often this ends in the breakdown of fasteners and other parts.
A less risky option is to make a hole in the center of the axle to pour grease into. To do this, you can use a drill or a hot needle. If you still decide to disassemble the cooler, then for many models you will have to make several holes at once in order to cut off the latches holding the bearing sleeve.
But you may also come across a non-separable fan, where the impeller can be easily removed with a flat-head screwdriver. Then the procedure for cleaning and lubricating it will not cause any difficulties.
The most important thing is to identify the source of the increased noise. This will save you not only time and money, but also nerves.
Determining the location of increased noise is easy. Open the system unit... /Turn on the computer/
If you can’t tell by ear, then slow down one by one with your hand or a soft brush:
Power supply fan;
CPU Fan;
Video card fan
and if there are additional fans.
After this, take a vacuum cleaner and a soft brush (with the computer turned off) and remove all accumulated dust. It would also be a good idea to wipe the fan blades with vodka. Experienced specialists find everything in fans - from crumbs of crackers and screws, to balls of wool and broken blades.
We turn on the computer and listen. If it doesn’t help, we move on to the fan lubrication stage.
Turn off the computer.
For the Power Supply, regardless of the design, it will have to be removed.
We disconnect all (!) connectors with wires that come from it.
We remove the power supply. It is usually attached to the back wall of the case with 4 screws or screws, but there are options with latches.
We open it / usually 4-6 small screws / and start vacuuming and shaking off the dust with a brush.
We unscrew the fan itself (usually 4 screws or screws) - gently wrap it with a brush, and lightly wash the blades with vodka.
Next, notice that there is a sticker in the center of the fan that can be removed. Remove it with a sharp knife; there will be a hole underneath.
Depending on the design (there may or may not be one), there may be a metal, plastic, or even rubber pad on top of the bearing.
Remove the cover plate that covers the bearing. Having thoroughly cleaned the surface of the fan from dust and washed the bearing with alcohol or vodka to remove the remnants of the old lubricant, we apply new lubricant.
It may be possible to disconnect the rotor and clean and lubricate it normally, but if this requires effort or unusual intelligence, don’t even try.
Now - advice, for a drop of oil, use a syringe, a needle or the smallest watch screwdriver. Drop exactly on what you think is “Val” and shines.
One drop is enough for a year. And over time, excess drops will collect dust exponentially and corrode your PC and the fan in particular.
Place the sticker back and screw on the fan.
We collect the power supply. We connect the wires from the power supply to the standard places. We attach the power supply to the case.
Turn on the computer and listen for 3 minutes /until the oil distributes itself throughout the bearing/
If the noise level has not changed, without a twinge of conscience we buy a new fan for the Power Supply / yes, and they cost from 70 to 300 rubles /
There may be difficulties with installation, since the wires from the fan
usually soldered, but also available with connectors. /It is difficult to confuse during installation - black to black, red to red/.
For the Video Card, everything is the same. It will also have to be removed.
For the CPU fan, in the vast majority of cases, it is not needed. If you really have to, stock up on thermal paste for re-installation.
The fan impeller should rotate very easily and smoothly; no extraneous sounds or crackling noises should be heard while the fan is operating. If you remove the fan and, holding it in your hands, turn it on, then there should be no other sounds besides the noise of the air flow.
If the fan stops or the speed drops significantly, it needs to be lubricated. It will be much more economical than buying a new fan and will take a few minutes.
There are two types of fans:
- fans on rolling bearings (ball bearings are most often used)
- fans on plain bearings (more common)
If you still have the box from under the cooler, then it usually indicates the type of fan bearing ( SLEEVE
- plain bearing,
BALL BEARING
- ball bearing or rolling bearing).
Only liquid lubricants(!) are used as lubricants in sliding bearings. It is recommended to use the following lubricants: 1) silicone oil; 2) motor oil.
If the fan does not squeak, then the lubrication is purely preventive in nature, and medium-viscosity oil or silicone oil (10-15W) is used. If the fan has already started to squeak and make noise, i.e. signs of wear appear, then it is necessary to use high-viscosity oil (20-25W).
During operation, the bearing wears out, the gap between the rubbing parts increases and liquid oil can simply leak out, leaving the bearing without lubrication. Thick oil, on the contrary, seals the resulting gap. In addition, the situation is worsened by misalignment of the rubbing parts, which also increases wear (misalignment is often caused by “no name” fans). I repeat, it is advisable not to use very thin oils due to the risk of leakage.
As a rule, rolling bearings do not require lubrication during their entire service life. However, this rule, unfortunately, has exceptions. Rolling bearings use grease lubricants. Greases, or greases as they are also called, perform the same function as liquid oils. But the specificity of some friction pairs, such as, for example, rolling bearings, does not allow the use of liquid oils due to the fact that the liquid will not linger on the bearing balls and will leak out, while the thick lubricant retains its shape and is retained on the rubbing parts. Naturally, during operation it heats up, slightly liquefies, but even then it does not leak beyond the rubbing parts. In addition, greases are not demanding on the tightness of the lubricated components and have a very long service life and storage. It is advisable to use lithium greases, for example, Litol - 24 or similar imported ones, for example, from TEXACO, since lithium greases have the best characteristics (moisture resistance and heat resistance). If the fan on a ball bearing, and these are the ones used as rolling bearings, begins to make quite a noise (which indicates intensive wear of the bearings), as a temporary solution, you can add 2-3 drops of transmission oil.
In short, at home, if there is no silicone grease, then household, spindle. But the latter cannot be used for long and is not recommended.
Incorrect installation of computer equipment (assembly with one screw or loose fasteners due to vibration) is usually determined by tapping on the case, pressing on the case, or rocking the case.
There may be increased noise when using CD/DVD drives.
One of the reasons is the loosening of the fasteners / tighten the screws tightly /, or fastening with 1 screw / check the quantity - it should be 4/
The motherboard, power supply, and all the peripherals on the screws must be tightly screwed onto all the screws (!!!) / the designers have already received money for this /.
It’s the same with the Case - tight and for everything. If you were able to manually determine the “vibrating” part, then it is advisable to use insulating materials to reduce the beating, but first try to tighten the screws.
Cases where special programs regulate fan speed / depending on temperature and processor load / are not considered here.
There is also a way to lower the voltage on the fans, but if you can’t control the temperature, then it’s not worth it / the fan is much cheaper than the processor /
There are two ways out of this situation - either replacing the noisy fan, or cleaning and lubricating it.
In general, if it makes noise, it means it’s still working and somehow cooling.
The computer is noisy, cleaning and lubricating the fan
A cooler is part of the cooling system of a desktop computer or laptop. Since each model has an open architecture, dust gets inside the mechanisms over time, which accumulates on the cooler. Users understand that the computer needs to be cleaned if starting up the computer is accompanied by additional sounds, creaking, or noise. When the cooler is not operating at full capacity, the computer quickly heats up and may turn off spontaneously, which will lead to complete or partial loss of important documents. To prevent this from happening, it is important to lubricate the cooler and clean it from dust in a timely manner.
How to clean a cooler yourself
All electronic components of a computer come into motion when interacting with electricity, and through joint work, thermal energy is generated. The higher the temperature, the worse the computer's performance! As a cooling element, laptops and desktop computers are equipped with coolers - fans that reduce the temperature inside and actively cool the electronics. The cooler comes from the English “cooling”; it will work noisily if the grease on the bearings has dried out under the influence of high temperatures. Getting to the cooler is easy - you need to remove the protective cover of the computer, and you will see the fan, which is first cleaned of dust with a soft brush or mini-vacuum cleaner, and then lubricated.
How to lubricate the cooler
Any mechanisms will be in working order if they are constantly properly maintained. You can lubricate your computer cooler with machine oil or any other type of technical oil, but under no circumstances use edible oils (olive or sunflower). It is enough to drop 3-4 drops from a pipette or syringe into the bearing. Do not use lubricants that may thicken during operation. These include salidol, fatty lubricants, litol.
Choosing the right lubricant
The fan rotates quickly, so the lubricant tends to be forced out of the bearings rubbing against each other. The cooler on the processor can be lubricated with oil that is suitable for machines; it can be synthetic or semi-synthetic. This type of lubricant has an adhesive base, which allows the parts to stick together or be pressed tighter during rotation, and the lubricant is not thrown out. Also suitable for a computer or laptop is silicone grease with a medium consistency.
Cooler cleaning process
It is best to first clean the inside of the computer from dust and dirty deposits using a brush and a hand-held vacuum cleaner. After cleaning, all mechanisms can be wiped with a soft cloth soaked in an alcohol solution.
To get to the inside of the cooler, you need to carefully peel off the sticker, which is located in the very center of the fan. The motor axis is visible under it and the bearings are partially visible. We take the oil into a syringe or pipette and drop it into the cooler. If there is a rubber plug inside the fan, you don’t have to remove it; take a syringe with a needle, pierce the gasket and pour a little oil inside. In order not to flood the mechanism, draw the required amount into the syringe in advance (5-7 drops will be enough).
There is no need to re-apply the sticker on top. Instead, you need to cut a piece of tape to the required size. This is necessary so that the remaining oil does not flow out, because the edges of the sticker will no longer fit tightly. It is better to lubricate the laptop cooler several times, each time bringing it into working condition, since it is a built-in mechanism. After filling with oil, the mechanism must stand idle for several minutes so that the lubricant has time to reach all parts of the fan. After cleaning and lubricating the cooler will operate silently. In order for your computer to serve you for many years, the cooler needs to be cleaned and lubricated once a year with constant use.
Not lubricated. Many people believe that this is not necessary. And that's wrong. The presence of lubricant must be checked regularly. After all, elevated temperatures cause it to dry out. Let's see how to lubricate a CPU cooler. Doing this is not as difficult as it might seem at first glance. You will need a couple of screwdrivers, special paste and a little patience. All work is performed with the power turned off; this is required by safety regulations.
Lubrication and installation
Be extremely careful when removing the washer as it is very easy to damage! If this happens, you will have to look for a new one, and finding the same one will be very difficult. Most modern coolers are equipped with a special hole through which lubricant can be supplied using an oil can. In this case, you don’t even have to dismantle the device from the radiator, but get down to business right away. But since it is much more difficult to lubricate a processor cooler if there is no hole, this is exactly the case we will consider. First, you must prepare the surface by removing wear debris and cleaning areas for lubrication. This can be done with a damp cloth. Don't forget to machine the bearing bushing. Next, graphite lubricant must be applied to all rubbing surfaces of the cooler. The layer should be thin. The entire working surface of the bearing is also coated with lubricant. After this, you can begin assembly, which is performed in the reverse order of removal.
Means SI-180
This lubricant is also available on the market in small syringes. SI-180, according to experts, can also be considered a good answer to the question of how to lubricate a laptop cooler. This oil belongs to the group of high-temperature silicone products. It is a homogeneous plastic mixture of white color. The highest operating temperature of SI-180 is +230 °C.
Most often, this product is used to treat fans. Also, silicone grease SI-180 can be used for some other mechanical components with plastic and metal interfaces.
Making your own lubricant
For this we will use graphite, which is considered the best option. Do not forget that it is unacceptable to use mineral-based oils; synthetic ones are best. To make the lubricant, you only need graphite and oil. Next, you need to thoroughly mix the mixture until you get a homogeneous mass. After this, the lubricant can be applied to the surface in a layer of 1-2 millimeters. As for graphite, you can get it from a pencil. To do this, take fine-grit sandpaper and rub the pencil lead against it. Then add a few drops and mix. ready. As practice shows, all problems with the processor cooler are solved in this way for a long time. But if the problem is in the o-rings, then you will no longer get rid of the hum, which is caused by wear of parts. All that remains is to perform a comprehensive replacement. But I would like to draw your attention to the fact that if we tolerate it, then we can leave the situation unchanged, since the backlash does not affect the efficiency of the cooler.
Consumer reviews about SILICOT
The advantages of this lubricant include, first of all, a long service life. After using it, you may never have to treat the cooler again in the future. This silicone lubricant, which, according to consumers, is quite suitable for coolers, acquires this feature due to its heat resistance. In addition to durability, experts also attribute environmental friendliness and moisture resistance to the advantages of SILICOT. According to consumers, this product does not have any negative effect on the plastic of coolers and their metal parts.
Experts consider the disadvantage of this oil to be somewhat inconvenient to use. Silicone grease is still universal. And therefore, of course, no syringes, napkins or stickers come with it.
What is silicone grease PMS-200
This is also a fairly popular product, most often supplied to the market in small plastic bottles with a screw-on screw cap. Additionally, containers with PMS-200 are equipped with a dispenser-plug with a long spout, through which lubrication should be carried out. You can also find this oil packaged in syringes in stores.
Like the previous product, this lubricant belongs to the group of universal ones. In addition to coolers, for example, it is very often used to process rubber profiles of windows and doors, skis, rubbing parts of exercise equipment, reels, etc. The operating temperature range of this oil ranges from -50 to +200 °C. The viscosity of this product is 200 cSt. This polymethylsilicone liquid is produced in Russia by several manufacturers. In any case, when producing this silicone lubricant, which is used quite often for coolers, companies are required to comply with the standards provided for by GOST 13032-77.
Processor Cooling System Lubrication Procedure
Having disassembled the cooler, proceed directly to lubricating its parts:
- Under the rubber ring there is a bushing and fan axis that need to be lubricated. Apply a small amount of oil to the fan axis.
- The lubricant should cover the axle, but do not drip very much, otherwise, by applying a rubber plug, the liquid may leak from the recesses into the housing itself and stain it. In addition, the previously removed label will not stick to the greasy area. Using a medical syringe will help you avoid all this. It will help distribute the oil more evenly over the entire surface. The lubricant should not be thick, as this will prevent it from flowing out of the syringe.
- You can also treat the inside of the fan with oil, but to do this you need to completely disassemble it. Experts do not recommend doing this at home unless you are sure that such delicate work will not end in damage to the cooler.
- Now you need to return the rubber plug to its original place, making sure that the lubricant does not spread and stain the body.
- Wipe the body from any remaining oil, and then return the label to its place. Often, after peeling off, it loses its shape or does not want to stay in place. In this case, it is advisable to replace it with stationery tape. Cut out a piece of the same shape and size.
- They assemble, install the fan, and at the end connect it to the connectors. That's all, actually.
Cleaning the processor cooler will have a positive effect on its performance. But we must not forget that after a certain period of time, due to thermal effects, the lubricant will evaporate - which is why this procedure must be carried out on a regular basis.
Why lubricate the cooler?
During computer operation, the fans are constantly subject to mechanical stress - the cooler rotates regularly. As the lubricants inside are depleted, the device begins to make a lot of noise.
If the noise is constantly felt, then this indicates that it is time to service the device. If this is not done, the bearing will wear out and the fan will have to be replaced.
Consumer reviews about PMS-200
Among the advantages of this product, consumers include, among other things, its low cost. The price of a 10 ml bottle of PMS-200, for example, is only about 70 rubles. At the same time, this amount of product is enough for a fairly large number of lubricants. According to consumers, using this oil is quite convenient.
The dispenser spout on the bottle with PMS-200 is quite thin. Therefore, pouring this oil into the cooler hole after removing the plug can be very convenient. Of course, PMS-200, supplied to the market in a syringe, is also easy to use. But there are no stickers or napkins in this packaging for this oil, since it is universal.