How to refill the marker? This question is asked by every person whose drawing is interrupted by the rough grinding sound of a dry felt-tip pen. There is absolutely no need to go to the store for a new package of markers, because there are many ways to bring old drawing accessories back to life. Thanks to them, you can restore permanent markers, as well as those that are made on a water basis.
How to refill a marker at home? Basic methods
How to refill the marker? This question is asked by every person whose drawing is interrupted by the rough grinding sound of a dry felt-tip pen. There is absolutely no need to go to the store for a new package of markers, because there are many ways to bring old drawing accessories back to life. Thanks to them, you can restore permanent markers, as well as those that are made on a water basis.
How to clean marker from Flipchart?
If White Board markers were used, you can wash the flipchart with a regular dry cloth or magnetic sponge. If exposure to writing materials has been extremely intense and messy, a magnetic whiteboard cleaner is ideal.
Interesting materials:
Who is a stock trader? Who is a Store Manager? Who is this treacherous man? Who is the raven in Brawl Stars? Who is a dentist-surgeon? Who is the customer and the performer? Who is the collateral? Who are Zeus and Poseidon? Who are the lark and the owl? Who took part in the great migration of peoples?
We restore water-based markers
How to refill water-based markers? To restore them, you must perform the following steps:
- You need to pour 250 ml of warm or hot water into a bowl. Cold water will also work, but the recovery process will not be as fast.
- Next, the markers are placed in the water with the tips down. You must first remove the caps. The tips should be completely submerged in water and remain there for 5 minutes.
- After this, the accessories are laid out on a piece of cloth for 24 hours to dry. In this case, the ends must be wiped to remove excess water. Do not allow it to dry out, otherwise the marker will stop writing.
- Once the process is complete, the caps are put back on.
You can also moisten the writing part of the marker with a few drops of clear white vinegar. Follow all the steps described above and apply a couple of drops of the substance to the tip.
You can also inject water into the writing instrument shaft using a syringe. In this case, the needle is inserted through the tip and enters the body. You will need a small amount of water (1 ml), which must be administered slowly. Next, the felt-tip pen is dried on a piece of cloth.
Now you know how to refill a marker at home if it is water-based. As you can see, no special substances are needed.
It's better not to refill markers
Many of us remember the popular Soviet-era method of refilling felt-tip pens using any alcohol-containing solution. Mom's French perfume, dad's triple cologne, medical alcohol from the medicine cabinet - everything was used. Today, this method is no longer relevant (to be honest, even in those days, filling with an alcohol solvent “revitalized” felt-tip pens for a very short time) for a simple reason: the sets of felt-tip pens produced in our time have water as a solvent, they are called “water-based felt-tip pens.” basis."
Of course, you can fill water-based ink with an alcohol-containing substance, which will also soak the dye, but, alas, not for long. Don’t forget about such an important aspect as the specific smell that your markers will acquire after filling with alcohol or even perfume.
We prepare a special dressing from simple ingredients
There are two ways to prepare a special dressing. So, what to refill the marker with?
For the first option, you will need: water, gouache, ink, powder, PVA glue, two tablespoons of sugar and a half-liter container.
First you need to fill the vessel one third with water. Next, gouache and powder are added to the water. Beat thoroughly and slowly add mascara. To prevent the dressing from turning out too black, it is important not to overdo it. After this, you need to add 20 drops of glue to the mixture and mix the mass thoroughly again. Sugar is added to achieve homogeneity. The mixture is whipped again - the dressing is ready!
For the second method you will need: two containers, a ballpoint and gel pen, a touch-corrector, nail polish, acetone, hairspray, brilliant green.
First you need to pour the bar corrector into one container and then let it dry. Grind the dried mass into powder and pour into another container. Ink from a ballpoint pen and ink of the desired color from a gel pen are also added there.
Add brilliant green and nail polish of a suitable color to the resulting mass. All this is fixed with hairspray and mixed thoroughly. Next you need to add nail polish remover or acetone. That's all. The gas station is ready!
The important thing is that these refills are moisture resistant.
Restoring permanent markers
How to refill permanent marker? It all depends on what solvent was used in its manufacture. Modern manufacturers add isopropyl alcohol or acetone inside the rod. Therefore, you can use alcohol or nail polish remover as a dressing. Water is not suitable for restoring permanent markers. You only need 1 ml of the substance, which is injected into the marker using a syringe through the tip.
To find out which liquid solvent is used for the ink of your art accessories, you need to study the information on the packaging.
It's better not to refill markers
Many of us remember the popular Soviet-era method of refilling felt-tip pens using any alcohol-containing solution. Mom's French perfume, dad's triple cologne, medical alcohol from the medicine cabinet - everything was used. Today, this method is no longer relevant (to be honest, even in those days, filling with an alcohol solvent “revitalized” felt-tip pens for a very short time) for a simple reason: the sets of felt-tip pens produced in our time have water as a solvent, they are called “water-based felt-tip pens.” basis."
Of course, you can fill water-based ink with an alcohol-containing substance, which will also soak the dye, but, alas, not for long. Don’t forget about such an important aspect as the specific smell that your markers will acquire after filling with alcohol or even perfume.
On thematic forums you can find a recipe for a dressing that will make the marker eternal. According to it, you need to mix 0.5-1.0 ml of alcohol (preferably isoamyl or isobutyl) with an alcohol-soluble dye of the required color (sudan black, brilliant green, auramine, etc.) and use a syringe to inject the solution into the end of the marker. Perhaps this method is indeed effective, but not everyone will be able to find all the ingredients necessary for it.
Ready solution
If you do not dare to experiment, but at the same time do not want to buy new art supplies and are still wondering what to refill the marker with, we suggest you use a ready-made solution. The fact is that many manufacturers sell ready-made refills for markers. They are special inks of different shades and are supplied in convenient jars with a spout, and are also additionally equipped with a dispenser for more accurate measurement of the substance. This is a great solution for refillable markers.
Production technology
Let's try to figure out how markers are made. Manufacturing involves making all the components and assembling them into a single whole, but first things first.
The basis for the production of felt-tip pens is plastic housings. They and the caps are made in the following way: a scattering of white plastic granules and dye are mixed and poured into a cauldron, in which they turn into a hot viscous mixture. It is poured into a mold and plastic tubes are made by pressing, which will serve as the body. You can read more about how plastics are made and the method of pressing them.
The ink reservoir is a bundle of hundreds of thousands of very fine nylon fibers, which are twisted very tightly on a special machine. After which they are wrapped in cellophane wrapper, resulting in a long sausage, which is cut into containers to the size of a felt-tip pen.
For felt-tip pen ink, concentrated dye is diluted in water with a hygroscopic substance that prevents drying.
The rod, as a rule, is made of nylon or felt, because only these materials are able, on the one hand, to prevent the felt-tip pen ink from leaking out, and, on the other hand, to allow a sufficient amount of it to pass through.
marker paint writes, for example, white on any surface, concrete, polyethylene, what to refill with
How to refill the marker? We prepare the dressing at home. Is your marker running out of gas? Let's start with the fact that you cannot refill the marker. The first is paint mixed with all kinds of solvents. Since the body of the markers is plastic, solvent can corrode it. Second, the marker cannot be filled with very thick paint, as it may not pass through the marker rod. And don't try to freshen the paint with alcohol. But this does not mean that you need to buy a new marker. Let's prepare a marker dressing with our own hands. And believe me, the quality will be no worse than the factory one. We present several ways to prepare dressing at home.
First method We will need:
◦PVA glue; ◦gouache; ◦water; ◦ mascara; ◦powder; ◦capacity 0.5 l ◦sugar 2 tbsp. l. 1.Pour 1/3 of water into the container. Take gouache of any color and pour it into water. Next add powder. Beat the resulting mixture thoroughly. 2. We begin to slowly add mascara and the main thing here is not to overdo it, otherwise our dressing may turn out very black. 3.Next, add 20 drops of glue to the mixture and mix thoroughly again until foam appears. In order for the dressing to be homogeneous, you need to add sugar. 4.Beat the mixture. The gas station is ready. Second method We will need:
◦2 containers; ◦stroke corrector; ◦ballpoint pen; ◦colored gel pen; ◦ brilliant green or caller (sold in hardware stores); ◦ nail polish; ◦hairspray; ◦acetone or nail polish remover. 1.Pour the barcode corrector into the container. Let it dry. 2. Take the dried corrector out of the jar and grind it into powder. And pour it into the second container. Squeeze ink from a ballpoint pen into the same container, and squeeze ink from a gel pen into the same container of the desired color. 3. Pour brilliant green and nail polish of the corresponding color into the resulting mixture. We fix all this with hairspray. 4.Mixing the mixture thoroughly, add acetone or nail polish remover. The gas station is ready. Let us note an important fact. These refills are moisture resistant.
Source
How to restore a dried marker
A marker is a writing accessory that is quite affordable in price, and there is no shortage of it on store shelves. There are so many of them, choose to suit any composition, color and budget. However, there are times when, completely unexpectedly and, naturally, at the most inopportune moment, a marker leaves a barely noticeable mark on the surface instead of a bright line, and the work needs to be completed urgently.
We'll show you how to quickly restore a permanent marker
Then the advice of those who have already had experience with similar experiments in resuscitating an untimely deceased office tool and know perfectly well how to restore any marker comes to the rescue.
The main rule is to refill markers with the same composition stated on its packaging.
How to Restore a Water-Based Marker
The easiest way to breathe life into a dry water marker is to briefly soak it in a bowl of water. The hotter the water, the faster the revival process will occur.
A dry marker leaves a dry, transparent mark instead of a bright and expressive line.
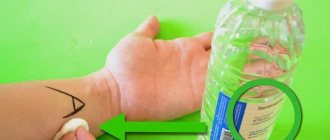
- Remove the cap and immerse the marker in water for about five minutes.
- Remove the marker and place it to dry on a paper towel folded in several layers to prevent possible pigment stains from leaking onto the table.
- After a couple of hours, check the writing ability of the marker - if the quality of the line suits you, continue working, and do not forget to put on the protective cap in a timely manner.
An alternative to using a bowl is to slowly inject water directly into the tip using a syringe. At the same time, be careful, do not enter too much, because the output will be a constantly flowing marker and instead of clear lines - blurry spots with jagged edges.
How to Restore a Dried Alcohol-Based Marker
The method for restoring an alcohol marker is similar to the methods for restoring water-based markers. The only difference is that you should use alcohol instead of water. Of course, we won’t pour it into a bowl - just drop a few milliliters into the bottle cap and dip the tip of a permanent marker there.
If there are several dried markers, put only those of the same color in the lid to prevent them from mixing.
After five minutes, remove the markers and put caps on them, place them in the pencil holder with the lead facing up and leave in this position for 24 hours.
Before refilling the marker, measure the required number of milliliters using a syringe.
You can also use a syringe to inject alcohol or acetone directly into the body of the marker through its tip. The alcohol will flow inside and dissolve any remaining paint that has dried there. About one milliliter of solvent is enough for about a day for the marker to fully restore its functions.
Before carrying out manipulations, do not forget to wear an apron and gloves so as not to accidentally get dirty.
LiveInternetLiveInternet
Method 3: Restoring water-based markers Restoring erasable markers Restoring permanent markers
How many times have your drawing or writing been interrupted by the dry, rough sound of a “dead” marker? If you think your marker has ended prematurely, fear not—dead markers can usually be brought back to life (temporarily, at least) using one of a few simple methods. Whether you use water-based markers, erasable markers, or even permanent markers, the solution to dry markers is often as simple as soaking the markers for a few minutes.
Method 1 of 3: Restoring Water-Based Markers
- 1
Pour about one cup of warm water into a bowl. If you have one or more dry water-based markers, try this simple trick to bring them back to life. Start by filling a small bowl with warm or hot water. Next, this water will be absorbed by the dry marker nibs and this should allow the ink to start flowing freely again.- Note that it is not necessary to use warm or hot water—cold water will also work. However, since ink dissolves more quickly in hotter water, this is usually faster.[1]
- 2
Place the marker(s) in the water with the tips facing down. Remove the caps from your dry markers and place them in water until the tips are completely submerged. Let the markers soak quietly for about five minutes. You may notice some ink leaking from the marker tips into the water, and this is normal.- As noted above, this method is only recommended for water-based markers. If you are unsure whether your marker is water-based, check the packaging (if available). Typically, water-based markers are used for drawing and coloring and are marketed to children, although there are exceptions (for example, high-quality markers are sold to adult crafters).[2]
- 3
Place the markers on a rag to dry. Remove your markers from the water. Wipe the tips with a rag to remove excess water, then place the markers on a rag to dry. You need to dry the markers so that the ink on the tips is no longer watered down, but not so much that you stop writing.- This may take up to 24 hours.[3] To check the writing ability of a marker, it is best to test them on a piece of paper every few hours.
Please note that this process will likely leave some ink on your towel or rag. Even though the marker is water-based, this ink can leave stains that are difficult to remove, so you'll likely need an old, worn-out rag that you don't mind getting dirty.
- 4
Replace the caps when finished. Once your markers start writing again, be sure to cap them. Leaving the marker without the cap will likely result in a dried out marker again. Therefore, capping markers between uses will help retain moisture in the tip, ensuring long-lasting use.- If you've lost the cap of your marker, don't worry—you can use a small piece of plastic wrap and a rubber band as a temporary solution. You can also make a more durable removable cap by wrapping a piece of tape around the tip of the marker (sticky side out), then wrapping another piece of tape over the first piece (sticky side in).
- 5
You can also use a few drops of vinegar. Another home remedy for dry water-based markers involves using vinegar. With this method, you need to place the markers tip-side down in a bowl and wet the tip of each marker with one or two drops of clear white vinegar. Allow the markers to soak for a few minutes before drying as described above. Don't dip the tips of the markers as you would with water - you only need a few drops for each.- To use just a drop or two for each marker tip, fill the cap of a vinegar bottle and then, using a small stick (like a grill skewer) or dropper, add vinegar to each marker a drop at a time.
- 6
Consider injecting water into the marker. The final way to get your markers back into shape requires a long, sharp, thin needle (like a hypodermic syringe). For this method, fill your syringe with water, then insert the needle directly through the tip into the marker body. Inject a small amount of water into the marker very slowly, allowing air to escape through the tip as you add water. Once you have added no more than a milliliter (ml) or so, leave the marker alone for a short time on an old rag and allow to dry before use (as above).
Method 2 of 3: Recovering erasable markers
- 1
Tie a long rope around the end of the marker. Erasable markers don't use the same types of water-based inks as regular art markers, so you won't usually be able to revive them by dampening the tips. Instead, try using whatever ink is left inside the marker itself. Start by tying a long piece of string around a dry marker. Secure it with strong tape.[4]- The next step is to use centrifugal force to agitate the ink in the dry marker tip. The meaning of centrifugal force is that objects moving in a circle wobble, experiencing a force that pushes them “outward,” that is, away from the center of the circle.[5] In our case, the buoyant force will move the remaining ink from the body of the marker to the tip.
- 2
Twist the marker around your head like a lasso. Gently hold the end of the rope in your hands and spin the marker in a circle above your head (like a lasso). The marker tip should be facing outwards, not inwards. Centrifugal force will begin to push the ink in the marker towards the tip. Do this for about a minute or two before checking your marker.- Make sure there is enough space around you before you start swinging the marker. While it's unlikely that you'll get seriously injured when spinning a marker, you could still break your marker or injure someone if you accidentally hit his or her eyes with the marker, so be careful.
- 3
Alternatively, you can twist the tip using pliers. If you can't get your marker to write after using the lasso in the above manner, grab some pliers and try this method. Take the soft tip of the erasable marker with the pliers and pull it out. For many markers, the tip should come out without much effort.[6] When you pull it out, and if the tip on the other side is the same soft material, try turning it over and replacing it. The marker should start writing immediately. Once the ink has been absorbed through the previously dried part of the tip, you can remove the tip and flip it back over again if you wish.- You will need to wear gloves and protect your work area with an old rag while using this method. While it's unlikely, it's possible that your marker will bleed ink as soon as you remove the tip, so having some protection against stubborn stains is a good idea.
- 4
As a last resort, try buying ink. While the above methods are effective, they will only work if there is some ink left inside the marker. For erasable markers that are completely dry, meaning both the tip and the inside of the marker are dry, you may need to purchase ink.- Ink for erasable markers can usually be purchased at office supply stores or specialty online stores. Typically, ink is quite cheap - sometimes costing around 45 rubles for a small bottle of ink.[7][8]
Method 3 of 3: Restoring Permanent Markers
- 1
Soak dry marker tips in rubbing alcohol. Most permanent markers (like Sharpies, etc.) with dry tips can be made to write again using a method similar to the soak for water-based markers described above. For this method, start by filling a small container with alcohol. For example, you can use the cap of an alcohol bottle.[9]- You don't need very much alcohol - just enough to dip the tip of your marker (or markers). Filling an entire bowl with alcohol (as you might do with water for water-based markers) can be wasteful.
- 2
Leave the markers to dry with the lids on. After soaking the markers in alcohol for a few minutes, you should notice a small amount of ink in the liquid. Remove the alcohol markers and put caps on them. Place them tip side up in a glass or mug and leave them for 24-48 hours. After this, if there is any ink left in the markers, they should write well again.- Alcohol evaporates very quickly compared to water, so you should not leave markers uncapped like you would after soaking water-based markers.[10] If you do this, they will dry out again quickly.
- 3
Consider using leftover alcohol as ink. If the alcohol you soaked your marker tips in has absorbed some of the ink, you can try using it as paint if you have art projects. Alcohol paints are quite effective on inert materials such as metal, while other paints may not be effective. For example, to make special, colored paper clips, simply dip them in the remaining alcohol you used to wet the tips of your colored permanent markers.
- 4
You can also inject alcohol or acetone into the marker. As with water-based markers, sometimes you can give new life to a dried out permanent marker by injecting liquid directly into it. However, in this case, you should not use water, but rather your marker ink solvent. Typically this is isopropyl alcohol (alcohol) or acetone (the active ingredient in nail polish remover), so simply inject about a milliliter of one of these chemicals into the marker, as you did with the water above.- Check your marker packaging for a list of ingredients if you are unsure of the exact solvent used for your ink.
How to Restore a Whiteboard Marker
If your whiteboard erasable marker stops writing, try carefully removing the tip using pliers or tweezers. Turn it over and insert it back with the opposite side inward: if the marker's ink is not completely dry, the rehabilitation method will work. Otherwise, you will either have to throw it away or consider refilling it yourself.
Changing the tip will help restore the whiteboard marker
How to open a marker cap?
Wear clothes that you don't mind getting ruined, place a newspaper on the table so as not to stain it with dye, then carefully, so as not to hurt your fingers, pry the cap with a sharp knife to move it slightly. Once the cap gives way, pull it out using pliers.
Interesting materials:
What is the highest temperature ever recorded in Africa? What kind of folding do the Sayans have? What kind of folding does the Eastern Sayan have? What speed should be on the bridge? What is the speed of a soccer ball? What internet speed is needed for Microsoft Teams? What Internet speed is needed for a smart set-top box? What speed is needed for video communication? What is the speed of the lioness? Which dog stars in the TV series Dog 4?
How to refill the marker
When looking for an answer to the question of how to refill a marker at home, most will prefer a bottle of ink stored in advance that is specially designed for this purpose. Since the container is equipped with a convenient dispenser, the procedure will not take much time and will not require any specific skills or special devices - except perhaps the apron and gloves that we mentioned earlier.
A spare bottle of ink is a better cure for searching headaches than refilling a permanent marker.
But there will be a small fraction (or a considerable number) of people who will not want simple solutions and will go a different route. For example, they will mix gouache, powder, PVA glue and a spoonful of sugar with water, and beat the suspension until finely dispersed. Or they will take the contents of a gel pen, a stationery corrector, hairspray and brilliant green, mix it, dry it, grind it into powder, and then dilute it with nail polish remover. Or they will soak old ink from an inkjet printer with distilled water or alcohol.
Which path to choose is up to you. It is possible that during your experiments you will be able to invent your own, completely new and effective option for refilling a permanent marker.
Varieties
Felt pens are made from water or alcohol. There are not only felt-tip pens for drawing on paper, but also on metal, concrete, leather, glass, rubber and other various surfaces. In addition, they are collapsible and non-dismountable. Also, on some felt-tip pens and markers, the manufacturer indicates that they are strictly prohibited from being disassembled or refilled. Let's take a closer look at all these nuances.
How to extend the life of a marker
If you have to google how to recover a token too often, it could mean the following:
a) you make desperate attempts to save money and buy low-quality products, as a result of which you have to spend twice as much money;
b) you store them incorrectly.
A high-quality marker will last longer without refills
And if everything is clear on the first point, then on the second we suggest following the manufacturers’ recommendations:
- Always keep the marker tightly closed.
- A cheap Chinese marker stored horizontally will last longer than one stored vertically. This rule doesn’t have to apply to high-quality branded markers; they don’t care how they are stored.
- Protect the marker from regular sunbathing and keep it away from heating devices, ideally in your desk drawer.
Source
How do you know when it's time to refill the marker?
The first step is to check both tips of each marker to make sure they are wet with ink. The main sign of running out of marker for drawing is the streaks that a wide chisel pen can leave. These streaks are caused by insufficient ink inside the marker.
It is also not difficult to identify an almost empty marker by its brush tip. In this case, you will notice that the ink has difficulty reaching the very tip of the brush or you have to press hard on the pen to get a full fill.
Sometimes only one of the nibs of a double-ended sketch marker becomes dry, but the other one continues to draw perfectly. As a rule, in this case it is also worth refilling this marker as soon as possible, because soon the second pen will stop writing.
If over time you have to make more and more efforts to evenly color the areas on the paper and the color does not “fit” in any way, then most likely you should refill the marker.
How to refill a marker or Two simple ways to restore an old, dried out marker
How to refill a marker or Two simple ways to restore an old, dried out marker.
Any craftsman uses a felt-tip pen, but not everyone knows that the name of this tool comes from the name of the company of the same name, Flo-Master, which first launched such a product on the market. Since that time, people have had a new problem: “How to refill a marker, how to restore a dry one?”
As far as I remember from my childhood, previously almost any felt-tip pen (marker) could be opened, refilled and used without much effort. It even seems to me that the first “eternal brushes” were made for reusable use.
But now manufacturers are apparently overcome by greed and they tightly seal the body of the felt-tip pen and force us to become more sophisticated and invent different ways of restoration and refueling.
I will describe the two methods that I use, and you choose which one suits you best in your case.
So, method One (urgent and reliable).
If this cannot be done, then we drill a hole in the rear plug of the marker that we are going to restore. I do not recommend burning, as there may be flammable vapors of alcohol (solvent) there.
- Then, using a regular syringe with a needle, we take a little alcohol (cologne, perfume or any liquid containing alcohol), insert the needle in through the hole and release it little by little.
Before refilling the marker
— Be sure to take care to protect your table or other work surface from ink. To do this, you can lay down rough paper or fabric.
- Make sure you select the correct ink shade for your specific marker. Typically, the color number on the refill bottle exactly matches the number on the body or cap of the marker.
— For convenience, it is worth preparing wet wipes containing alcohol or another alcohol-based product for cleaning your hands, marker or table from ink drops.
What to do?
- First way. Pour alcohol into a marker cap or another small container and place the marker there. Leave it there for a while until it collects the required amount of liquid.
- Second way. Carefully drill or pierce a hole with a hot nail, through which pour a few drops of alcohol with a syringe. Then solder it or install a removable plug.
Attention! When using this method, do not use hot objects, as highly flammable alcohol vapors may collect under the lid. Simply heat a nail or any other sharp object slightly.
Determining the required ink volume:
If you are still faced with the need to refill a marker, then first of all find out how much ink the marker can hold. This value may vary for each brand of art markers. Also pay attention to ink bottles; most of them have special measuring divisions that you should use when filling markers.
Copic Marker Capacity:
Copic Ciao - 1-1.5 cc. cm
Copic Sketch - 2 cu. cm
Copic Classic - 2-3 cu. cm
Copic Wide - 3-4 cu. cm
Drip method for refilling markers
This is the most common way to refill most brands of drawing markers. Use the thin spout of the ink bottle to extract drops.
It is most convenient to start filling using the drip method from the side of the wide tip. When refilling the marker, make sure that all drops of ink fall on the marker pen itself. With this refilling method, you can also lean the narrow “nose” of the ink bottle close to the marker nib and carefully fill it. On average, about 20-30 drops are needed to refill one marker.
Attention! Wait until the drop is completely absorbed into the marker pen before applying another one.
The drip method of refilling markers for drawing takes quite a lot of time, but on the other hand, the risk of ink leaking or damaging the marker pen is minimal.
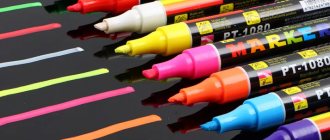
What markers should a beginner buy?
For beginners, I recommend Sketchmarker (budget price) or Touch Twin (mid price). ... Markers
- Sketchmarker (Russia), refillable – review of SKETCHMARKER markers.
- Potentate (China)
- Stylelife (Germany)
- Touch Twin (Korea), refillable
- Copic (Japan), refillable
16 Dec
2022 Interesting materials:
Is it possible to take phosphalugel on an empty stomach? Is it possible to take glycine constantly? Can I take Kagocel? Is it possible to take Captopril continuously? Is it possible to take Creon on an empty stomach? Is it possible to take but shpa for pancreatitis? Is it possible to take Panangin for arrhythmia? Is it possible to take prednisolone continuously? Is it possible to take radon baths with endometriosis? Can older people take fish oil?