This could happen at any moment. Especially when jeans have been worn for a while. Of course, you can try to fix the zipper as suggested. But it’s not a fact that these manipulations will help. After all, the zipper teeth themselves can be damaged.
Another option is to rip out the broken zipper and sew a new one in its place. This will radically solve the issue. But sewing a zipper is not so easy. It is tightly integrated into the codpiece. Yes, even to the waist. This all needs to be sorted out. Fussing won't get you anywhere. The option proposed today does not involve sewing in a new zipper at all. Jeans externally, after changing the fastening method, look unchanged. This work will take no more than half an hour.
If the zipper does not fasten smoothly
By the way, it happens that the halves of the zipper are fastened one higher than the other
This can also be fixed on your own. Remove the limiter
Gently lift the zipper half to the desired level with your fingers.
Now you can return the stopper to its place or sew the zipper halves together
Voila!
Source
If the zipper teeth are damaged enough, replacing the slider may not be enough. Then you need to replace the zipper on your jeans. Let's try to replace a zipper on jeans without disturbing the decorative stitching.
How to quickly change a zipper
For needlewomen:
Zipper repair
Repairing a zipper: Teeth
The pawl has broken off or is held on to one half of the zipper
In this case, you need to proceed as follows:
- We cut the fabric between the teeth at the bottom of the lock so that you can attach the pawl to the second half of the zipper.
- Move the slider to its lowest position, setting it in place and fasten the zipper.
- Sew up the cut with thread.
Important! Select threads that match the tone of the denim and remember that in this case the zipper will not go all the way, since the cut will interfere, but will not affect the functionality of the zipper.
The castle diverges
The only thing that needs to be replaced is the fastener on the jeans, which suddenly came apart. If this is not possible, then you can do the following:
- You should insert an elastic band for money into the tongue of the carriage and hook it to the button after fastening it.
- The zipper on jeans can be temporarily fixed using a stapler or paper clip.
- When you have pliers or another similar tool at hand, you need to pinch the edges of the slider on both sides. A weak carriage is most often the reason why the zipper keeps coming undone.
The zipper on my jeans keeps coming undone
If the zipper on your trousers constantly comes apart, for example, when bending or squatting, a simple design made from improvised means will help you avoid the inconvenience. A small metal ring or twisted piece of soft wire should be attached to the pawl and placed over the button in the fastened position. This solution to the problem is temporary, but will protect you from awkward situations for a while.
Often the reason for the sudden opening of the zipper is excessive tension in the fabric at the zipper fastening point, when the jeans are small or too tight.
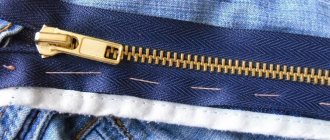
Marking the fold line of both parts of the codpiece
On the right side of the codpiece, mark the future fold line at a distance of 4 cm from the cut of the fabric.
It is best to apply dots and draw lines using a special pen for fabric. Just check first on an experimental piece to see if you can wash these lines off the fabric with a wet sponge without consequences.
The second part of the codpiece also needs to be marked, as shown in this photo.
Anyone who has tried to sew a skirt with their own hands and, accordingly, sew on a hidden zipper, knows well how difficult it is to do this. Therefore, if you want to sew a zipper neatly and beautifully, make all the markings, and then the basting.
Now you can start sewing in the zipper.
Lightning parted in the middle
If a zipper unzips right in the middle for no reason and has no obvious faults, then one of the popular methods will help prevent an awkward situation. As a temporary rescue measure, you can try to connect the moving teeth together with your hands when fastening. In this case, you need to act carefully, slowly moving your fingers along the snake.
What about the jacket?
There is no difference between zippers and zippers, so if suddenly something bad happens to your jacket, don’t worry! Feel free to adopt one of the listed methods. Of course, in this situation, not only the aesthetic, but also the practical side of the issue is very important. Therefore, I would still recommend contacting a specialist as soon as possible and having the latch repaired. All of the above methods are good, but it is better to protect yourself and not “joke” with your outerwear. But if, for example, the tongue of a child’s jacket is slightly damaged, and the zipper still works as it should, then a bright pin can be an unusual and original element.
How to care for zipper: prevention tips
It is easier to prevent a breakdown than to look for non-standard solutions to the problem later. Proper operation and preventive maintenance of the fastener can significantly increase its service life.
Follow these guidelines:
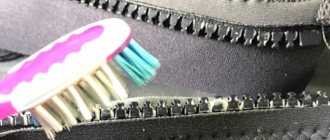
- Avoid getting sand, dust and other fine particles into the lock mechanism, as they will get stuck between the teeth and prevent the slider from moving normally. If grains of sand have already gotten into the cracks of the fastener, you can remove them with a brush or toothbrush.
- Protect the plastic elements of the lock from melting with an iron. One careless movement is enough for the teeth to become bent and no longer fit tightly together.
- Before washing, all zippers on clothes must be fastened and items turned inside out. This will prevent damage to the fastener and prevent the pawl from getting caught on the inside of the washing machine drum.
A damaged zipper on your trousers is not a reason to throw away your favorite item. In most cases, the breakdown can be repaired with improvised means or the functionality of the zipper can be temporarily preserved.
Master class on replacing a zipper slider in jeans - 2
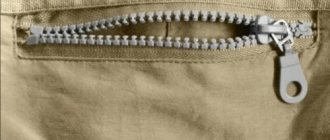
If the slider has come off, you can replace it more easily.
Step 1: Cut the zipper near the base
Step 2. Put on the slider and pull it up a little so that the zipper is fastened
Step 3. Sew the cut area with strong threads
Lightning is working again
Master class on replacing a zipper slider in jeans - 1
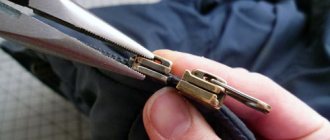
1. We trim the lines at the end of the codpiece and release the lower end of the zipper. 2. Here the stopper secures two edges of the zipper tape at once. We take it out, as in the previous example, using pliers, carefully straightening the “tack tendrils” 3. With some diligence, remove the old slider and in its place, carefully, starting from the first teeth of the fastener, insert a new slider of a suitable size. 4. Holding both ends of the zipper tape with your fingers, move the slider up while closing the fastener. 5. Turn the work inside out and place a stopper a few centimeters above the end of the teeth on the braid, especially if the teeth have been deformed. When installing the bartack, it is necessary to grasp both edges of the tape.
The stitches at the end of the codpiece will have to be restored (repeated) on a sewing machine, choosing the color and thickness of the threads. You can watch the master class here
Wet heat treatment of codpiece
After stitching the connecting seam (to the codpiece), you need to iron both parts of the codpiece along the previously marked fold line.
Before sewing a zipper into any product, you need to perform a wet-heat treatment of the codpiece parts. Only in this case, a sewn zipper in a skirt or trousers will look neat and beautiful.
The left side of the codpiece also needs to be ironed, departing 0.7 cm from the intended line.
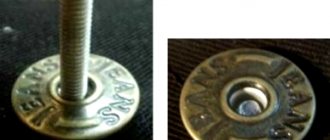
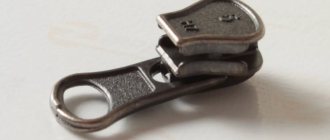
Is it possible to rearrange the slider?
What to do if you over-salted a dish
In principle, it is possible, but this applies to things where it is not fundamentally important which way the lock opens (handbags, cosmetic bags, etc.). Repairing the “snake” in this case is extremely simple
Move the runner to the opposite side, and sew the loose ends together to prevent the runner from slipping
Repairing the “snake” in this case is extremely simple. Move the runner to the opposite side and sew the loose ends together to prevent the runner from slipping.
If the “dog” is completely broken, do not waste time fixing it and buy a new one at a sewing store. If you are unable to select the exact product, do the following:
- Unbend the limiter.
- Insert a slider.
- Rub the teeth of the lock with paraffin or stearin candle.
All! You can use the lock.
Teeth do not close or are moving apart
This is one of the most common and annoying problems. First, try repeating the trick with a pencil and soap, maybe this will improve the glide and allow the teeth to close properly.
If this does not help, then something is preventing the slider from working properly. Look to see if there is any thread or fabric stuck in the lock, carefully inspect all the teeth, maybe one of them is bent. In this case, you need to straighten it with pliers, and the zipper will close normally.
If nothing has gotten into the fastener and all the teeth are straight, the problem may be with the slider itself. Over time, the sliders become loose and no longer hold the teeth together. Take the pliers and squeeze the slider until it catches the teeth again.
If you have damaged a few teeth on your zipper to begin with, you can simply stitch it over the damage if you can get the zipper down enough.