It so happened that the zipper on my winter jacket began to jam. And they even helped me get out of it a couple of times.
It was good when I was “stuck” at home. Which is also not very convenient. When I'm getting ready to go somewhere, I'm in a hurry, putting on a jacket... And suddenly... and in the middle the lock gets stuck. After that, I couldn’t even move it myself; I had to use outside help. It was good when someone was nearby and helped me. And so we had to postpone the visit and reschedule meetings... well, you must admit, it’s not very convenient. Perhaps the most inconvenient thing was when I unfastened the lock in the store, but it did not fasten back. I had to walk home in an unbuttoned jacket in the cold.
I haven't bought a new jacket yet. And since I really like mine, I’m looking for a similar one. But until I found it, I decided to repair this one.
As always, I remembered about her when it started snowing. In the current situation, I don’t really want to go somewhere urgently to look for a jacket. So I went to the store and bought not a jacket, but a lock for it. This is how I will change it, I’ll show you now.
Perhaps it will be useful to you too. Suddenly, someone likes the jacket just like me, but you can’t find a similar one. In this case, you can simply change the lock. Of course, you can contact a studio or a familiar master who will do all this for you. Or you can do everything yourself. Well, shall we change the lock?
I will say right away that I am not a professional tailor and have never learned to sew professionally. More precisely, I studied. But I learned from my grandparents, who were professional tailors. I also had a great labor teacher at school. Under her leadership, we sewed everything. Therefore, if it seems to someone that I am doing this incorrectly, I admit that in your opinion I am doing this incorrectly. But I do it the way that is most convenient for me. And ultimately, you can do this yourself, without going to a studio or professional tailors. So I'm just sharing my experience. So let's get started.
How much does it cost to replace a zipper on a jacket at a studio?
I think that it will not be difficult for any housewife to sew on torn buttons, but if it turns out that a demi-season jacket requires repairs in terms of replacing the zipper, then many will resort to the help of a specialist in the atelier. But believe me, if you have a sewing machine at home and you know how to use it, then replacing the zipper on your jacket with your own hands will not be so difficult. Watch how to change the lock on a jacket in my master class today and save your family budget. After all, the approximate price for replacing a zipper on a women’s jacket in a studio is from 700 rubles.
Replacing the zipper slider "tractor"
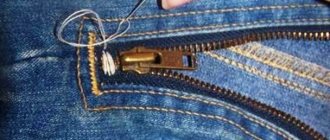
The tractor zipper is a little more complicated. The slider can be removed only after the molded plastic fastener has been removed. It can be removed with pliers, “bitten through”, and the slider replaced. But how can you prevent the slider from popping out when you close the zipper? The easiest way is to remove the fastener from some old metal zipper, preferably a larger one, and place the tractor on the zipper strip. You can remove the slider without removing the fastening if you try to push the slider between the teeth of the tractor zipper and then insert the slider back in the same way. To make removing and installing the slider easier, you can lubricate this area with liquid soap. You should remove and install only in the very top part of the zipper, since with this “barbaric” method you can damage several teeth, and the slider in this place will “slow down” and may even jump out.
In emergency cases, when it is not possible to replace the slider, you can tighten it a little, as shown in this photo. This will not give a long-term effect, but as a temporary measure to repair the zipper of a jacket, it is quite justified. See also How to sew a zipper easily and neatly.
How to choose the right jacket lock in the store
You can buy a zipper that fits your jacket at a sewing accessories or fabric store - to do this you need to measure the non-working old zipper on the jacket. To make the task of choosing a lock easier, you can use a ripper to remove a non-working lock from your jacket and bring it with you to the store for a sample.
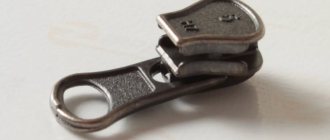
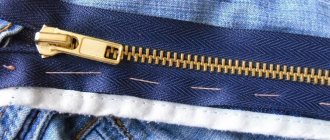
There are several types of locks in the store: tractor and spiral, detachable and permanent, metal and plastic. In my master class I will use a metal tractor split lock, you can choose any one depending on the old model of the zipper. The main thing is that it is detachable. When purchasing, check the suitability of the new lock: you need to unfasten and fasten the zipper once or twice to the end, also checking the connector.
The price of a lock (metal zipper) in the store will cost you much less than what they will offer in the studio. Therefore, if you decide to replace the zipper on your jacket in a studio, it will be more economical to come with what you purchased.
How to replace a zipper on a down jacket
In sewing repair shops, this type of repair is almost in first place. I will tell you and show you how to replace a zipper on a jacket or down jacket yourself. It’s a painstaking task, but if desired, it’s completely doable.
In principle, I always act according to this scheme. There are just complicating elements here - edges. Otherwise, everything is as usual.
The unraveling process was described in a previous article. The link to it will be at the end of the text.
I use hand stitches in my work because they make it much neater.
Edges
I start with them. I lightly coat each part with glue and place it on the zipper tape. The edging adheres to it and cannot move when sewing. This way I avoid any shrinking or stretching of one or the other of the objects being ground. I sew with a single-sided foot.
Lightning. 1 step
Then I lightly lubricate the edging tape with glue. But now from above. And I carefully lay the edge of the jacket on this lubricant (the allowance rolled inside will stick).
I level it, straighten it and leave it on the table. The glue needs to set.
If you go straight to the machine, due to the fact that the jacket is heavy, it will easily come off the zipper.
But if you let it sit for a while, then you can safely crumple it and move it. The glue will hold the zipper quite tightly.
Plank
In the meantime, I’m preparing the other part of the zipper, which has a strip underneath it. This time I lubricate it with glue.
And I lay the second prepared part of the zipper on top. I'm setting it up. Again with a one-sided presser foot.
Lightning. Step 2
I also glue this blank (with the strap) to the edge of the jacket, only on the other side. The process is the same as in step one. And again I leave it to lie. Ten minutes is enough.
Lightning. Step 3
Carefully, without sudden movements, I fasten it. And I check the joints of the horizontal seams.
My stitches came together well.
But the seam on the neck is not very good. I used a pin to mark to what point I needed to tighten it. The zipper was unzipped. And only then did I correct this area.
Lightning. Step 4
I proceeded with each shelf as follows: turning back the seam allowance, I sewed a stitch on the reverse side. I sewed again with a single-sided foot, focusing on the mark from the previous stitch.
Lightning. Step 5
Then I laid out both shelves as needed. Straightened it out.
And I laid the lines along the front side. Trying to follow the old holes clearly.
Collar
I sewed up the corners of the collar from the inside (both to the beginning of the zipper). But first I made several hidden stitches on the front side. To be on the safe side. So that everything works out well right away, without distortions.
Lightning. Wrong side
Turned the product over with the inside facing up. I basted the lining so that it lay evenly along the entire length of the fastener. So that there are no bubbles, folds or, on the contrary, stretched areas.
On both shelves.
And then I sewed the edge by hand with small stitches, focusing on the line, slightly overlapping it.
I don't use a blind stitch here. Neat, even stitches look fine. If only the thread was well matched in color.
Lightning. Step 6
I add one more line from the front side. I try to make it seam by seam.
From the inside, the stitches will not lie perfectly, but quite evenly. If you don't do hand stitches, everything will be much worse.
Below are two pictures with a view of the wrong side after the stitching has been sewn along the face.
A nuance in this work:
Since this coat is contrasting, I had to change the threads all the time. So that the light ones go on a light background, and the dark ones go on a dark background.
Here is the first part of the work, where I ripped and remade the pockets
——
If you have questions, ask via the comment form under the article. I will answer.
Types of zipper
The runner varies in structure. The most common types are:
- Tractor. Outwardly, it resembles the tracks of the voiced car. Its main distinguishing feature is the fastening of plastic teeth to a textile tape.
- Spiral fasteners. Synthetic fiber becomes their basis. The product also consists of a spiral, which replaces the teeth of a zipper.
- Metal runner. In appearance, such a dog can easily be confused with a tractor. The difference is the presence of nickel or brass teeth with increased structural strength. The result is a practical and secure fit.
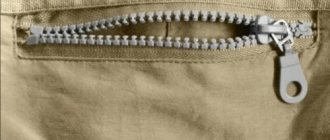
- Secret slider. In this case, there is no need to look for the teeth when they are hidden behind the fabric on the same jeans. In sports dances, such zippers and their twisted base are indispensable when choosing a costume.
With so many varieties available, replacing the slider depends on the cause of the zipper failure.
Repair of the metal slider in the zipper is the least likely to be needed.
After all, we are talking about the practicality of the model.
How the lock works
The zipper is popular for its simplicity and convenience. It is often found on clothing, shoes and bags.
Description of design
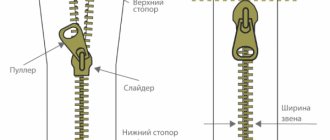
The zipper consists of:
- two strips of fabric;
- lock (slider);
- rings;
- pendants (dog, keychain, duper);
- links;
- limiters;
- pins;
- detachable limiter with socket;
- sealing tape.
How does the lock work?
Two textile tapes with attached zipper links and a stopper on each are assembled with a lock into a common tooth engagement.
Closing work
If you pull the pawl with your fingers, the slider begins to slide along the links of the braid, connects the teeth in turn, and fixes them together: the lock closes. The limiter determines the range of movement of the pawl.
Opening work
When the lock with the suspension moves back, the links disengage and the zipper unfastens.
What type of clasp is there?
Manufacturers produce three link connection designs:
- A spiral (twisted) fastener is a plastic spiral or spring that is sewn or wound onto the base of the braid fabric. It is used in the production of lightweight clothing and bed linen.
- The tractor fastener gets its name from its resemblance to a tractor track. Each Even tooth is made of plastic and separately attached to a fabric base. The connection is used in outerwear.
- The metal fastener is similar in shape to a tractor fastener. At the base of its lock there is a flat wire. The links are made of metal (nickel or brass) and are attached separately using a clamp. The design is highly durable and is used for sewing leather goods, boots and outerwear.
Metal zippers are the most durable in use. Tractor fasteners are highly wear-resistant, and spiral fasteners have good elasticity.
Classification of runners
Locks are made according to the type of each fastener link with different ways of its operation.
Zipper sliders
Each type of zipper uses a specific type of lock.
| Clasp type | Slider number | Sole shape |
| Tractor | 3; 5; 7; 8; 10 | Oval or trefoil shape |
| Metal | 3; 4,5; 5; 8; 10 | Triangular |
| Spiral | 3; 4; 5; 6; 7; 9; 10 | Elongated oval |
The slider number corresponds to the width of the links, measured in mm between the teeth when the zipper is closed. They are marked with a number on the back. The shape of the sole is determined from the underside of the lock.
Castle design
According to the method of operation, runners are divided into:
- an automatic machine whose mechanism does not allow the links to diverge regardless of the position of the pawl;
- semi-automatic, allowing unfastening only when the pawl is in a raised position. The design includes a special lock;
- haberdashery: there is no stopper and the links do not lock. This allows the zipper slider to move freely without any fastening.
Why does the lock break?
The most common cause of fastener failure is wear of the internal cavities of the slider, when the mechanism cannot connect the links and the zipper diverges.
The following are at risk from lightning:
- shoes, as they get clogged with sand and dirt;
- jackets and outerwear when they are fastened with brute force jerks;
- as well as all plastic parts exposed to sudden temperature changes.
The castle becomes unusable due to:
- abrasion of the surface and increase in the gap between the side walls and links;
- formation of microcracks after prolonged use;
- mechanical failure due to careless handling, when the dog is suddenly pulled with great force;
- penetration of dust and dirt between the links and the lock, which begins to slow down the sliding of the slider;
- breakage of the pawl, which transmits the force of the hand to the zipper lock.
Reasons for lock failure
Most often, zippers break for the following reasons:
- Natural wear of the teeth due to many years of wearing clothes or shoes;
- Sharp physical impact on the lock;
- Breaking off the dog's ear and redistributing the force on the base of the runner;
- The lower part of the zipper is frayed due to the weakness of the fabric.
Most often, the teeth break, the pawl weakens, causing the zipper to diverge, or the lower edge of the retainer comes off.
Interesting: How to make a phone case
Zipper replacement service
If you are not confident in your ability to hold a needle in your hands, you should entrust this work to specialists.
Who to contact
This service is provided by sewing studios or home-based craftswomen .
Attention! In order to receive a quality service, provide it only to trusted workers. If there are none, then carefully find out whether you should trust this or that master.
This rule especially applies to needlewomen providing home-based services.
What does the cost depend on?
The cost of such work will be based on the following criteria:
- complexity of cut;
- clasp length;
- jacket material and zippers.
Reference! On average, the price will vary from 250 to 1000 rubles.
The type of fastener also influences the pricing:
- tractor;
- semi-secret or hidden;
- spiral.
How to remove the limiter
The stopper prevents the pawl from flying out of the zipper, and in order to insert a new one or return the one that flew off, it must be removed. The stopper is the bracket at the end of the zipper. It can be metal or plastic. The plastic one can be removed only once - to do this, you need to squeeze it from the sides with pliers, and it will come off. The metal bracket can be soldered and compressed. The soldered one is removed in the same way as the plastic one, taking into account the fact that it will no longer be possible to return it back. The compressed bracket can be straightened with the tip of a knife or other improvised object, and after installing the pawl, return it to its place, clamping it tightly.
Lock and different types of zippers
Very often, snake fasteners are used when sewing jackets, raincoats, and other outerwear.
Metal split clasp
To know how to change the slider on a jacket that has a detachable metal snake, proceed as follows:
- Initially, the limiter located there is removed on one of the sides. To do this, they bite it off with a side cutter. In the case when the latch captures the fabric inside itself, it is carefully pryed off with thin scissors or a screwdriver.
- Using scissors, they cut the thickening of the braid on which the lock is located or make a so-called cut. This is done to remove the old pawl and freely install the new one. It is better to grease the cloves with oil. If the slider is difficult to remove, rock it slightly. To avoid damaging the teeth and the new slider, it is not advisable to use force.
- Insert the slider, holding it slightly at an angle.
- Connect both parts of the zipper, insert them into the slider, and check its operation. Using a buttonhole stitch, the edges of the cut are tightened.
Determining the type of fault
Having investigated the cause of the breakdown, it will be easier to correct it. If the zipper is missing one or more teeth, the problem is more difficult to solve. But it is possible to do this. Find an old lock with similar teeth and take the part from there, following these steps:
- Remove one or more pieces from the old lock using an awl or a sharp-tipped knife.
- Attach it to the lock you are repairing.
This is only a temporary measure. You will have to change the lock.
Before starting work, check the integrity of the fabric on which the teeth are attached. If it is damaged where the element is missing, then you are unlikely to be able to do anything.
If the zipper itself is not damaged, but the lock still does not work, determine the type of damage.
- The lock jams in certain areas. Fixing such a breakdown is not difficult: rub the part with paraffin or soap.
- If the zipper diverges, then press it from all sides.
- The runner jumped out. This damage is more difficult to fix. The repair method will depend on the type of broken lock.
- When moving, the dog does not connect the parts, but slides to the side. Try to repair the old one or buy the same runner at the store.
Before starting repairs, determine what type of lock your lock is.
Partial product repair
It makes no sense to buy a new zipper when you can fix the old one.
Fixing the defect is simple with the help of well-chosen means at hand.
We solve everything with pliers
It is better to fasten the damaged areas of the zipper using less drastic methods. Sometimes it is not possible to set the slider correctly otherwise. Sewing up a section of clothing is a chance to solve the problem just a little.
Is the old element broken?
You should try to clamp if there are no significant defects in the teeth. It is important to change the upper runner retainer. Next, zip load it.
The process must be done carefully when using the slider on the new replacement bracket.
Next, pliers (pliers) squeeze this part of the zipper. At this point, the master sometimes uses a side cutter. All that remains is to check the functioning of the repaired zipper after eliminating the cause. Press and she's in action.
See how to install the pawl using a fork.
Using a fork
Such tools, after using them, will even eliminate the trouble of a flown slider. Brief instructions for its use:
- Inserting teeth into holes. The hole in the slider becomes the downward direction. Do and react quickly: a guide to the lightning socket when placing it on the slider.
- Moving the weak link. Use a fork to push it into place. At the same time, the fasteners move and catch with your fingers, causing great inconvenience.
For small deformations, this method can be counted on and is often used.
In case of more serious damage, it is advisable to use a fork when eating food.
Nail scissors are used
If there is no serious damage to the zipper, the deformed area is clamped with nail scissors at the base of the slider in order to put it on the same skirt. Simply remove a couple of cloves and remove them using a sounded tool. After placing the pawl on a flat surface, the insertion point is secured with a thread in several turns.
The threads must match the tone of the braid.
After all, we are still talking about processing with a hidden seam to bring part of the tongue back to normal.
Cleaning up the dog using PVA
The method is suitable for repairing the product at home and therefore it is worth recommending in such cases. If there are two sliders, it is important to use PVA rationally and act according to a clear pattern:
- Degreasing the lock. If you want to correct any errors that have arisen, alcohol and acetone are suitable. A cotton swab will also be needed to treat the area.
- Applying glue. Apply a solution to tighten the damaged links into the perimeter of the fastening. As a result, the slider is clearly fixed at double size.
- Processing in two layers. This is about liquid glue, after which work resumes. There is no point in taking risks later if a second treatment is necessary.
After this, it is possible to put the dog into working mode with your own hands for some time. How long it will last depends on many nuances.
The most drastic means
Few people are surprised by pliers and vices these days. More creative options when fastening the lock will look more interesting. A candle will do. It can easily be filled with a lighter if the zipper is permanent. Both objects act in the same direction - to fuse the damaged ends. The finished product still involves the use of a candle. It’s clear that this is about a plastic base.
Wax can stop the destruction of some links.
However, we should not forget about the short duration of this process.
Then the snake must be completely replaced, because the connectors cannot be restored.
How to easily make a runner on a jacket
Buying another one is not an option. A more radical way out of the situation is to save your favorite part of the wardrobe. It doesn’t matter its price, from a Chinese down jacket to an exclusive one.
Children often break plastic zippers.
Moreover, both sides of the runner suffer, and they fail very quickly. The ability to make them usable is simple:
- It's not worth saving. It is better to choose a metal structure rather than using plastic fasteners. It is doubtful to temporarily solder them with glue, given the almost zero guarantee of safety of the actions performed.
- Do not clamp indefinitely. In the best case, you end up purchasing a zipper that cannot be used. It can damage the edges of the fabric around the fastening, which should not be forgotten.
- Avoid cracked runner. The dog is not to blame for anything in such a crisis situation for the jacket. It is not recommended to use pliers excessively as they put quite serious pressure on a fragile area.
- Steam the broken area. Initially, getting rid of a fundamental problem is more productive than then losing the item while saving and it is more likely to be saved only by completely replacing the zipper.
The last indicator is considered the last reference point in the once working lightning slider.
Problem: a snake gets caught in the lightning
One of the most common problems with zippers is that they start to separate. Not everyone knows that this difficulty, especially at first, can be solved very easily. After all, the reason that the zipper diverges is the slider (popularly this part of the zipper is often called the “dog”): it has expanded from frequent use and has ceased to press the teeth of the snake tightly against each other. How to deal with this problem?
Take pliers and squeeze firmly first one side of the slider, and then the other. The main thing here is not to overdo it, otherwise the slider will stop moving altogether. Zip up. Usually such simple repairs are enough for the zipper to start working properly.