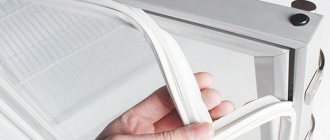
Most often, the normal operation of the refrigeration unit is disrupted due to the fact that the rubber on the door, due to wear or drying out, does not fit tightly to the body. As a result, warm air penetrates into the chambers through the resulting cracks, to cool which the compressor has to work almost non-stop.
Is it possible to do such a repair yourself? Of course, yes! To fix the problem, you will need to repair or replace the seal in the refrigerator. However, before you undertake repairs, you need to make sure that the cause of the trouble is the refrigerator seal and not something else.
How can you tell if there is a problem with the seal in your refrigerator?
- 12.1. Using boiling water
- 13.1. Loosening and deformation of fastenings
- 14.1. Related articles:
The first sign of problems with the rubber seal is the refrigerator door not closing tightly. If you doubt the presence of gaps in the seal, check it using a simple experiment. To do this, you will need a long strip of paper 4-5 cm wide. It must be placed perpendicular to the refrigerator door and closed. If the elastic band is not damaged, then you will not be able to pull the paper out of the closed refrigerator. The falling out of the paper is a sign of the presence of a gap through which warm air enters the refrigerator. To identify the presence of gaps, you need to “walk” such a probe along the entire perimeter of the door.
In addition, indirect indicators of problems with the seal are:
- Constant operation of the refrigerator without shutting down. The entry of warm air into the refrigerator or freezer through the gap formed between the door and the refrigerator body “forces” the compressor to work longer and more actively to create and maintain the set temperature.
- Increased temperature in the refrigerator. This occurs due to warm air entering it. The motor-compressor physically “cannot” cool the air to the required temperature.
- Ice formation on the back wall due to warm air entering the refrigerator. If the refrigerator is single-compartment, heavy ice will also form around the freezer compartment.
- Presence of a snow coat and leakage from the refrigerator. The ice that has grown on the walls of the unit melts due to warm air entering the refrigerator through the gaps between the housing and the damaged seal. As a result of defrosting, water appears under the lower drawers. As it accumulates, it can flow out of the refrigerator chamber along the front of the refrigerator or flow into the drain pan. But since the pan is not designed to hold a large amount of water, it ends up on the floor and a puddle may be visible on the floor under the unit.
It is important to understand that damage to the rubber seal on the refrigerator door is not a trifle, but a breakdown that can greatly affect the operation of the entire unit and lead to more serious troubles.
Symptoms of leakage
As a result of the constant flow of air from outside, the following is observed in the chambers:
- Lack of cold in the cells.
- Constant formation of ice on the back wall of the refrigerator compartment. This is facilitated by the moisture contained in the incoming air.
- Condensation appears on the bottom shelf.
- Rapid accumulation of ice in the freezer.
- Door icing.
The listed symptoms do not always appear due to damaged rubber, but also when the door is skewed due to loosening of the brackets. Therefore, you first need to check them and, after adjustment, securely fasten them. If no visible cracks are found during inspection, check the tightness of the elastic band using a paper strip 1.5-2 cm wide.
It is placed between the body and the door; if there is no gap, the strip will be tightly clamped. In damaged areas it moves freely. The tightness of the seal can also be checked with a flashlight placed inside the chamber. In a darkened room, all gaps will be visible.
What damage does it prevent?
Over time, dents and gaps form on the rubber, and it loses its elasticity. A thinned seal can cause major repairs to the refrigerator. After all, the manufacturer calculates the power of the device under certain operating conditions. Forced to work in extreme mode, the device may simply not withstand the load. Therefore, such a seemingly insignificant detail should under no circumstances be neglected. It turns out that the refrigerator operates around the clock at full capacity. This reduces its service life.
Why does the seal in the refrigerator wear out?
Seal that requires replacement
You can tell that it’s time to replace the old tape with a new one by the ice that forms on the freezer door. Due to the fact that warm air gets inside, the temperature in the refrigerator will not be low enough. Over time, in older models that are used for a long time, the elastic band dries out, cracks and becomes less elastic. The tape may become unusable if the equipment is handled carelessly. The reason that the rubber band will have to be changed may be sagging of the door due to its own weight, as well as a malfunction of the sensor that is responsible for opening it. In case of partial or complete wear, you need to replace the rubber bands on the refrigerator door.
The rubber seal is a simple and rather weak part. It performs an important task, ensuring tightness. When the belt is deformed and destroyed, this immediately affects the operation of the unit. Cold air flows out, while warm air flows in. All systems are overloaded.
If the seal is slightly damaged, it can be repaired. A test will help you decide. A flashlight is placed inside the refrigerator. If the seal is poor, light will show between the seal and the housing. This means there are gaps.
They check it in another way. To do this, take a sheet of paper. Bring it to the body and close the door tightly. They pull on the peeking edge. If the paper is easily pulled out, then the seal must be replaced. They also check the places at the bottom and top of the door. The elastic band should fit snugly along its entire length. The fact that the tightness is broken can be judged by the following on it:
- dents;
- chipped;
- cracks;
- bends.
What else, besides the incorrect operation of the unit, is caused by a faulty seal?
Since the refrigerator door will not fit tightly to the chamber itself, the refrigerator will work almost all the time and rarely turn off. This means that you will overpay for electricity by 30%. Another important point regarding health, it can also serve as an indicator of the health of the seal. If you notice mold inside the camera, the rubber has become unusable and it’s time to change it. Molds are poisonous, they are toxic and tend to accumulate in the body when they get there with food from the refrigerator.
How to check the tightness of the refrigerator yourself
First Step to Troubleshooting Your Refrigerator: If your refrigerator light is on and you can hear it running but the appliance won't stop, make sure there is nothing blocking the passage between the freezer and refrigerator compartments. If, for example, a loaf of bread shoved in front of the aisle restricts the air flow, the refrigerator will not cool down. Therefore, it will continue to work in an attempt to reach the set temperature. If your refrigerator is running non-stop, its refrigerant may be low. A refrigerator with low refrigerant content cannot reach the low temperature setting of the cold control dial. You will need a refrigerator repair technician to check and/or increase the refrigerant levels.
Open the door. If you feel a draft, make sure there is a problem with the seal. In some cases, this is not the cause of such a malfunction, for example, a blocked anti-frost drain is to blame. The defrost drain is usually located on the back wall of the freezer, just above the slope from the floor to the back wall. A buildup of food particles or debris can clog the drain hose, causing ice to build up and water to leak from the freezer and refrigerator. To fix this, try drying the hole from the inside using warm water. Use a long, thin tool, such as a drain cleaner, to remove the clog.
If this doesn't finish the job, you may have to manually remove the buildup that is clogging the valve at the end of the drain hose. Locate the defrost drain hose at the back of the service panel by moving the refrigerator away from the wall. This hose should have a rubber valve that helps catch debris and prevent clogging. Wash the valve with hot water and soap, and then replace it.
When is it time to change rubber bands?
Signs that the refrigerator door seal requires replacement:
- The device began to work unacceptably long and often, reminding of itself with the sound of a working compressor.
- A large layer of frozen ice and snow appears in the refrigerator compartment.
- Gaps have formed between the unit body and the rubber band.
- A visual inspection revealed damage to the sealing rubber (cracks, holes and other defects).
In the first two cases, it is necessary to check whether the elastic band fits tightly to the body; even if the cracks are not visible “by eye,” this does not mean that they do not exist. To check the gap, you must use a special feeler gauge no more than 0.1 mm thick or use a piece of paper 2-3 cm wide. When the door is closed, the feeler gauge should be pressed tightly with the seal around the entire perimeter of the door. If this does not happen, then you should replace the rubber seal on the refrigerator so as not to aggravate the situation. Ignoring problems with the seal, in addition to deteriorating the quality of the unit’s operation, will ultimately lead to failure of the compressor and other important parts.
What needs to be done to make the rubber seal last longer?
Some tips on how to extend the life of your unit's seal:
- open and close the door only with the handle, never slam it, so as not to cause mechanical damage;
- Clean the unit chamber regularly, do not expect heavy contamination;
- wash the seal with gentle detergents to avoid the accumulation of bacteria and germs;
- Once a month, treat the gum with a special silicone compound.
It is quite possible to extend the life of the seal thanks to the proper care described above, but there is no point in restoring it; it is better to replace it. Proper care can also be considered prevention, preventing serious damage.
How to choose a seal
When choosing a seal, pay attention to the type of fastening that secures the rubber to the door and the size of the door itself. You also need to know the brand of your unit, this will help you avoid awkward moments and more accurately select the required spare part.
Depending on the type of fastening, these parts can be: glued with glue or polyurethane foam, screwed with self-tapping screws, or held in place by fastening in grooves. When purchasing a new product, consult with a sales consultant and, if necessary, purchase additional elements (screws, glue, etc.).
Let's look at the process of replacing rubber seals on different brands of refrigerators.
Finished door frame
Stinol, Snaige, Atlant and Nord
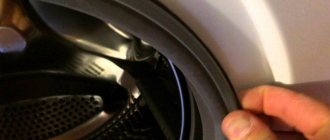
To repair the unit we will need: two flat screwdrivers, screws with a press washer, a screwdriver and a hair dryer. If necessary, the door must be removed; if there is easy access to the repair object, then you can leave it in a vertical position. To remove the old rubber, insert a screwdriver between the seal and the plastic and separate them, then separate the seal from the door in the same way, tearing off the mounting foam connecting them.
Removing the gum
Carry out this operation along the entire length of the seal and release the elastic from the grooves. Afterwards, clean the space from any remaining foam or glue and carefully look to see if there are any pieces of the old seal left there that will interfere with the installation of the new part.
After removal and cleaning, you can begin installing a new seal. When handling the seal, extreme care should be taken to avoid damaging the product. Installation should begin from the corners of the doors. Increase the gap between the plastic and the door by inserting 2 screwdrivers between them on different sides of the corner, 15-20 cm from the corner. Insert the seal into the groove and secure it there. Repeat this with other corners. Then, using 2 screwdrivers, insert the rest of the sealing rubber into the grooves. It should be noted that during factory assembly this part is fixed very tightly, which is problematic to achieve in everyday conditions.
For a tighter fit of the rubber to the door body, you should screw the plastic to the door with screws every 15-20 cm, thereby clamping the seal between them. To ensure the tightest fit of the seal to the body of the Stinol refrigerator, it is necessary to heat the rubber band with a technical hairdryer at a temperature of about 300 degrees, and then allow it to cool by closing the door.
If everything is done correctly, you will have to make some effort to open the door, which indicates that the chamber is sealed. You can see how the rubber seal on a Stinol refrigerator is changed in the video.
Types of seal fastening in Indesit refrigerators
- Fixation with glue (the polymer base of the glue is susceptible to low temperatures and wears out quickly).
- Shrinkage into a groove (the door has a special channel around the perimeter into which the seal is seated).
- Fixation with screws.
Reasons for wear of sealing rubber:
- Mechanical damage (scratches, tears).
- Temperature fluctuations (leads to stretching of the seal and the formation of cracks).
Replacing the seal
To replace the factory rubber seal, you must follow the step-by-step instructions.
Dismantling the old
Dismantling (i.e. replacing with a new one, repairing or re-hanging on the other side) is necessary when the gasket no longer fits tightly to the body. This can happen when the hinges become loose, cracks appear in the body, or the door leaf is damaged. It is carried out in several operations:
- Defrosting (if you need to repair an old refrigerator) or disconnecting the device from the power supply (if the equipment is of the latest generation). You must first remove the contents from the chambers.
- The refrigerator is placed on its side, with the hinges facing up, otherwise the panel will be inconvenient to remove.
- The hinges are unscrewed (starting from the bottom), after which the structure is carefully pulled out of the grooves.
- The sealing gum and fabric are checked for damage. If cracks, rot, old blockages in the cracks or severe deformation of the case are detected, the part must be replaced with a new one, otherwise this may lead to damage to the device or damage to the products.
- If the parts are not damaged, then the canvas is cleaned of dirt, and the gasket is glued back in the right places. If its material begins to mold or loses its elasticity and volume, then the elastic band needs to be replaced.
- After this, the door is installed back.
Surface preparation
To subsequently replace the sealing rubber, remove all remaining adhesive and clean the surface of debris and dust. You will need a rag and a medium strength solvent. Acetone is useful for removing glue, but for final cleaning it is too strong. Solvent for oil paints is too greasy and will not give the desired effect.
An excellent option would be an alcohol-based acrylic paint solvent or white spirit. If you choose to repair rather than replace, you will also need a good solvent.
Installing a seal on the refrigerator door
You need to choose the mounting method that was used previously. If the previous seal was inserted into the grooves, then attach the new one in the same way. Except in cases where, for example, the elements of the refrigerator door are broken.
Important: in production, the seal is attached to the groove using special equipment, so it is impossible to repeat this yourself manually. It is recommended to additionally secure the seal with glue or self-tapping screws. Depending on the situation, you will need to use one of the installation methods. The main thing is to do the work carefully and follow the order of the steps.
The following options can be used:
- - glue it. The most important thing is to clean and degrease the surfaces with a solvent. According to the instructions on the package, the glue must be applied and dried. Do not close the refrigerator door until the mixture is completely dry.
- - screw it with self-tapping screws. If the refrigerator is old, then most likely the fasteners are loose and the seal does not hold well. Attach the new tape to the self-tapping screws.
- - insert into the grooves. The herringbone seal must be inserted into the slots and additionally secured with screws or glue. The screws need to be screwed in at a distance of 10-15 cm from each other.
When the work is completed, you need to carefully inspect the installed sealing rubber to make sure that the tape was not damaged during the installation process. If the installation was carried out correctly, then opening the refrigerator door requires some effort. You can do the test again with a piece of paper.
Important: dirt accumulates in the grooves of the seal; they need to be cleaned, and the surface should be treated with disinfectants without abrasive particles in the composition and without acids.
Removal and installation of the refrigerator seal
Watch this video on YouTube
Removing remaining glue
You can remove the remnants of the adhesive solution on which the seal was held using acetone. Apply the product to pieces of dried glue, wait 5-10 minutes, then treat with a spatula. The final cleaning is carried out with an alcohol solvent intended for acrylic paints.
ZIL
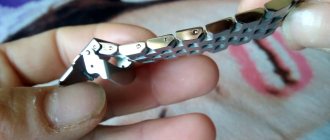
ZIL brand units have one characteristic difference among the others: the rounded upper part of the door, which plays an important role when replacing the seal. To replace the old version of the seal, ZIL brand units now use products with a magnetic insert, which ensures good tightness.
Units of this brand are produced with doors of two sizes; pay attention to this when choosing a seal. The process of removal and installation is similar to manipulations with other units, but during installation the rubber must be divided into two parts, one part will cover the bottom edge of the door, and the second will cover the entire remaining perimeter.
Maximum tightness of the refrigerator is very important for its operation. This tightness is achieved by installing an elastic rubber gasket around the perimeter of the door. But nothing lasts forever; sooner or later it fails, and it becomes necessary to replace the seal in the refrigerator.
Signs of seal failure
You can understand that the sealing rubber in the refrigerator needs to be replaced with the naked eye. Over time, it dries out, becomes less elastic, and cracks. This is due to the temperature difference between the refrigerator compartment and the kitchen, as well as purely mechanical damage due to regular use.
But even if, at first glance, such signs of failure of the rubber seal are not yet visible, but cold air is clearly blowing from the door, and ice freezes heavily on the inner walls, then repair work is also necessary. Otherwise, more and more warm air will get inside, which the device will need to cool, which will ultimately lead to overloads and breakdowns of the motor, as well as excessive energy consumption.
Removing the old seal
Replacing the sealing rubber on the refrigerator begins with removing the old rubber. To do this, the refrigerator is turned off, the food is removed, and the door itself can be removed for convenience, if the design allows it, and placed horizontally. The further dismantling procedure will differ slightly depending on how the sealing rubber is attached.
- If the seal is attached to the door in a groove, its edge must be pulled back, a flat-head screwdriver inserted into the slot and, using it to pry up the material, pull it out of the groove, being careful not to tear it.
- If the old seal is glued, it is also carefully pryed off around the entire perimeter with a screwdriver or spatula.
- With screws it’s even easier - you just need to unscrew them.
Next, the surface must be cleaned of dust and debris with a damp cloth, and also wipe off all remaining glue, small adhered particles of the rubber itself, etc. The rough glue can be easily removed with acetone, but it is better to wipe the door clean with a solvent for acrylic paints or white spirit.
How to choose a new seal
Replacing the sealing rubber in the refrigerator will not do anything if the new material is unsuitable or of poor quality. New rubber should not have visible damage, uneven structure or color, stretching or lumps.
Of course, it’s good if you can find a seal specifically for this refrigerator model. But this is not always possible, and you can purchase any material of suitable size. The only thing is that it should be slightly larger in length and width than the old compacted rubber. If the size you need is not available in the store, this does not pose a problem. The seal can be adjusted in place by cutting off the excess parts and carefully gluing the joints with strong glue like Moment.
As is the case with many building materials, the sealing rubber should be left in the room for about a day to give it time to get used to its microclimate.
Why replacement rather than repair?
Replacing the rubber seal in the refrigerator is a more preferable procedure than repairing it. Because it will give a long-term effect and is a cost-effective and practical solution. So, what needs to be done to change the material yourself and not involve specialists in this procedure? Half the success depends on choosing the right sealing rubber. It is ideal if you find a “native” seal designed specifically for your refrigerator model. In this case, replacement is made as simply and quickly as possible - just fix the rubber band on the doors. If you were unable to find a similar sealant and you purchased a universal material, you will have to spend a little time taking measurements, trimming and gluing the sealant. The following situation may also arise: you bought a seal suitable for your refrigerator model, but for some reason it does not fit well onto the doors. Don’t rush to get nervous - just heat the material with a hair dryer at maximum temperatures. Thanks to this, it will become more pliable, and you will be able to carry out the desired procedure without any problems.
Selection and preparation of sealant
The sealing rubber for the refrigerator comes in single and 2-cylinder types. It is placed in a recess on the door, simply glued or secured with self-tapping screws. There are units that have a groove for inserting a seal. In this case, there is no need to fasten with glue or self-tapping screws, which is very convenient when replacing.
Ideally, it is advisable to purchase exactly the same seal as the one that has become unusable. But if you couldn’t find it, a similar one will do, but a little larger in size than before. After delivery home, the elastic band should lie spread out for 24 hours in order to “acclimatize” to the new conditions. Immediately before replacing, the seal should be kept in warm water.
Can it be repaired?
The elastic material is secured in the door groove securely enough to provide a tight seal. But this does not prevent us from dismantling this strip on our own. If possible, it is better to contact specialists. However, such work can be performed even without much experience.
You can change the rubber seal on the refrigerator yourself if you know the model of the unit. The cross-sectional configuration of this strip differs depending on the brand of the device. There is a groove for inserting it. The principle of location of the rubber strip is different. The shape, as well as the size of the groove, can also vary. For this reason, you should repair the refrigerator seal yourself if you can find an elastic material that matches the parameters of the old strip.
There are universal tapes. They can be used to replace the old rubber on the unit door. However, such products differ in their significant width. To install it on a refrigerator, you must first determine the dimensions of the seal. The key parameters are the following: width and length. Then, if necessary, the excess strip is cut off, after which it is fixed in the groove.
The sealing rubber can be replaced completely or partially. Preference should be given to the first method. This is due to the fact that in this case there are no leaks around the perimeter of the door. The elastic band runs in a continuous stripe. If you replace only partially, gaps may appear between sections of the seal.
It is not possible to change the rubber on the door yourself in the latest models of equipment.
In this case, the unit may be under warranty, which means that the defects are eliminated at the service center. You cannot dismantle the strip yourself. The difficulty of replacing the seal in new models of units is due to the fact that sometimes it is located under the door lining layer. Then it is impossible to remove the rubber yourself; knowledge and special tools are required. Otherwise, the lining of the unit will be damaged, which may reduce the attractiveness of the equipment.
✅CHECKED! STINOL - replacing the seal on the refrigerator door
Watch this video on YouTube
replacing the seal in the refrigerator
Watch this video on YouTube
Replacing the refrigerator door seal Indesit Stinol Atlant
Watch this video on YouTube
Indesit
Replacing the seal in Indesit brand refrigerators is done by analogy with refrigerators Stinol, Snaige, Atlant and Nord. We will also need 2 flat screwdrivers, a screwdriver, screws with a press washer and a hair dryer. If the refrigerator is single-chamber, the door must be removed for ease of repair; if it is a two-chamber refrigerator, you can carry out repairs without removing the door from the unit.
The seals on the Indesit brand unit are also attached to mounting foam or glue, which is torn off using screwdrivers and the old rubber is removed. By analogy, fastening a new part begins from the corners and after installing the rubber in the grooves, it is secured with screws and heated with a hairdryer. The original rubber seal for the Indesit refrigerator is best suited, but if this is not possible, you can replace it with a suitable size. The same applies to other brands Snaige, Atlant and Nord.
Restoring the rubber seal on an Indesit refrigerator
If the rubber seal on the refrigerator door is slightly deformed, it can be restored. The refrigerator must be in a horizontal position, standing level and not skewed. First, the seal must be cleaned with ammonia to remove dirt, dust, and other things.
Ammonia cleanses grease, dirt and makes the rubber seal flexible.
Now you need to find the place where the seal is deformed, for which we take a regular sheet of paper and press it with the refrigerator door, where the sheet is movable, this place is damaged. If the deformation is no more than two millimeters, then you can put a material under the seal itself that will fit in size.
- You can heat the rubber band with a hairdryer up to seventy degrees, after which you need to give the seal the desired shape and glue it to the door of your refrigerator;
- You can also use hot water, but in this method it is necessary to pour boiling water over the seal before heating the gum, then give it the desired shape;
Another more complex method is to use a steam iron.
You can also check for leaks using a flashlight. The flashlight must be placed in the refrigerator, then checked around the perimeter of the door for gaps.
Using boiling water
First, remove the rubber band from the refrigerator door. This process can be quite difficult. More precisely, there can be 2 ways:
Modern refrigerator manufacturers attach this part to foam, in which case it will be easy to remove. In Soviet units, the elastic band is screwed on with nails; it is quite difficult to remove it
Therefore, you should remove it very carefully so as not to deform it. Otherwise, you will have to buy a new one.
So, let's move on to the actual processing of the material. Everything is extremely simple. You just need to scald it with boiling water and leave it in hot water until it cools completely. This way you can restore the rubber band on the refrigerator.
Dry it well and hang it back. After this treatment, the part will begin to fit tightly to the door and its tightness will not be compromised.
How to restore the rubber seal on a refrigerator
If the rubber seal on the refrigerator door is slightly deformed, it can be restored. The refrigerator must be in a horizontal position, standing level and not skewed. First, the seal must be cleaned with ammonia to remove dirt, dust, and other things.
Ammonia cleanses grease, dirt and makes the rubber seal flexible.
Now you need to find the place where the seal is deformed, for which we take a regular sheet of paper and press it with the refrigerator door, where the sheet is movable, this place is damaged. If the deformation is no more than two millimeters, then you can put a material under the seal itself that will fit in size.
Restoration of sealing gum using the hot method:
- You can heat the rubber band with a hairdryer up to seventy degrees, after which you need to give the seal the desired shape and glue it to the door of your refrigerator;
- You can also use hot water, but in this method it is necessary to pour boiling water over the seal before heating the gum, then give it the desired shape;
- Another more complex method is to use a steam iron.
You can also check for leaks using a flashlight. The flashlight must be placed in the refrigerator, then checked around the perimeter of the door for gaps.
How to glue a rubber band in the refrigerator
To begin replacing the rubber seal on the refrigerator door, you need to treat the door surface with a mild solvent. The best solvent option for these purposes is alcohol solvent for acrylic paint.
To replace the sealing rubber, it is imperative to use the same fastening method that was used to fasten the old material.
The rubber seal can be fixed using glue or a screw.
Attaching the rubber seal for the refrigerator can be like this:
- Screw fastening. For this method, you need to try on the rubber seal on the refrigerator door and if it fits tightly and does not give you any doubt that it will perfectly preserve the tightness of your refrigerator, simply tighten the fasteners.
- Fixing the seal with glue. After trying on the new seal on the refrigerator door, you need to apply a thin layer of glue around the perimeter of the door and attach the prepared rubber band.
The glue you need to choose is silicone-based and of very high quality; if you buy a low-quality glue or a cheap fake, you will soon need to replace the seal again. Turning on and using the refrigerator is permitted only after the glue has completely dried.
Let the seal sit for a while
After purchasing the material, do not rush to immediately begin replacing it. Here it is very important to let him rest for at least a day. The new rubber must reach the desired temperature, straighten, and acquire the appropriate moisture content. For greater reliability, experts recommend keeping the material in warm water for a while before replacing the seal in the refrigerator.
Using paper or other available materials
This method will only work if the deviation from the door does not exceed 2 mm
Therefore, first you should measure these discharges (this is important)
After this, you can take a piece of paper, cardboard or other similar materials and place it under the place where the elastic comes off.
Operating rules
We have compiled for you some tips on proper care and use of the refrigerator and seal so that neither one nor the other breaks down and requires constant replacement or repair.
- Clean the seal with an old toothbrush to remove fine dirt and debris;
- Periodically wash with chemicals without abrasive particles to avoid damaging the surface;
- If the part has lost its elasticity, then it is necessary to moisten it in hot water;
- If small cracks are found in the rubber, experts recommend sealing them with sealant or other adhesive;
- Open the refrigerator door using the special handle, do not cling to the seal.
As you can see, the rules for operation and minor installation are not at all complicated and will not take much time and effort. Now we can replace the rubber band from the refrigerator at home according to our instructions.
Why won't the door close
The refrigerator door may not close due to various malfunctions. To eliminate the problem, it is necessary to conduct an inspection and determine the specific cause.
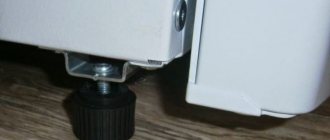
Loosening and deformation of fastenings
If the fasteners are deformed from mechanical stress or become loose as a result of prolonged use, the door no longer fits tightly. If the fastenings become loose, adjustments can be made. To restore deformed elements, professional repair or replacement of parts is required.
Rotten, loose and cracked seal
Due to the detachment of the seal or a violation of the integrity and structure, it cannot fulfill its purpose and does not secure the door. A broken seal is easiest to replace with a new one, which will reduce labor and time costs.
Tips and tricks
If the damage is minor, the seal can be repaired. Places of slight deformation are blown with a hair dryer or for drying hair (the hottest mode), change the shape of the elastic with your fingers and firmly press the door, fix it in this position for 10–15 minutes. Another option for restoring the seal is to remove it and immerse it in hot water, leave it for 15 minutes, when the part takes the desired shape it can be put back. Places where the tape has moved slightly away from the door can simply be glued, and small cracks can be sealed with sealant.
On a note!
If the tape is damaged only on the outside, it can be removed, turned over and reattached. Such a replacement of rubber on a refrigerator cannot be carried out if it was glued.
In order for the seal to last as long as possible, the door must be opened only by the handles or special recesses, without touching the rubber bands. When washing the refrigerator, all grooves in the tape should be cleaned with a toothbrush and soda paste. After replacing and drying the rubber, it must be treated with silicone grease; oils cannot be used, they make the material inelastic.
It is permissible to attach the new type of seals with double-sided tape (on the latest models of refrigerators), but no one can say exactly how long the part will last. Experts do not recommend using polyurethane foam to glue the part. For any mounting method, the tape must not be stretched. You need to measure the elastic from the upper corners (length and width).
Installation of sealing tape is not a complex type of repair, but requires attention and accuracy. You need to choose the right part, carefully remove the remains of the old gum and prepare the surface before work. By following our advice, you can change or repair the rubber seal in the refrigerator yourself, without using the services of service centers; the procedure will not take much time.
Sources
- https://rembitteh.ru/hozyayke-na-zametku/zamena-uplotnitelya-holodilnika/
- https://trg-market.ru/tehnika/zamena-uplotnitelnoj-rezinki-na-holodilnike-indezit.html
- https://NiceDeck.ru/delimsya-opytom/zamena-rezinki-na-dveri-holodilnika.html
- https://vemiru.ru/info/zamena-uplotnitelja-holodilnika-indezit-svoimi/
- https://remont-indesit.su/neispravnosti-indesit/neispravnosti-holodilnikov/15-remont-zamena-uplotnitelya.html
- https://vph-holod.ru/remont/kak-pomenyat-uplotnitel-na-holodilnike-indezit.html
- https://kakchistim.ru/tehnika/stiralnaya-mashina-tehnika/kak-samostoyatelno-pomenyat-uplotnitelnuyu-rezinku-na-xolodilnike.html
- https://WyseDevice.ru/kuhnya/kak-pomenyat-rezinku-na-holodilnike-indezit.html
- https://expluataciya-holodilnika.ru/holodilniki/marki/indesit/ustanovka-uplotnitelnoj-rezinki-na-holodilnike-indesit/
Do you want to understand better than others?
- How to change a light bulb in an Indesit refrigerator - Replacing a light bulb in an Indesit refrigerator: step-by-step instructions Step 1. First, you need to disconnect the refrigerator from the power supply. In addition, you will need to get all the products out of it and...
- Replacing a light bulb in a refrigerator - It would seem that the presence of a light bulb in a household refrigerator does not in any way affect the storage of food. But its absence causes a lot of inconvenience. Especially in the dark. IN…
- Replacing the compressor of the INDESIT refrigerator. Typical refrigerator problems and their solutions - Signs indicating a compressor malfunction The main “symptom” is warming in one (applies to two-compressor models) or in two chambers. Temperature gradually...
- Why is the fan in the Indesit refrigerator noisy or humming - Why is a fan needed? The system is based on a cooling chamber, the design of which has three main elements: an evaporator; cooler; heater. Impeller…
- How to repair the compressor in the refrigerator yourself? — Checking the performance of the compressor The first external sign of improper operation of the compressor is an increase in temperature in the refrigeration chamber, up to its defrosting….