Basic Rules
Indesit household refrigerators come in three types:
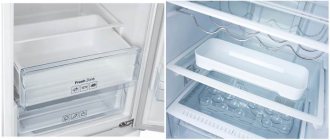
- devices with a know-frost defrosting system in both chambers (refrigerator and freezer);
- mixed-type appliances (the refrigerator compartment is equipped with a drip defrosting system, the freezer is equipped with a no-frost system);
- units with manual defrosting of chambers.
The rules for defrosting household appliances have some differences, depending on the refrigerator model:
- an old-style refrigerator that is not equipped with an automatic defrosting system requires a mandatory procedure at least once every 1-2 months;
- devices with drip defrosting of the refrigeration chamber and a know-frost system in the freezer require defrosting once every 4-6 months;
- Units in which the frost melting process is fully regulated by the automatic know frost system should be defrosted no more than once a year.
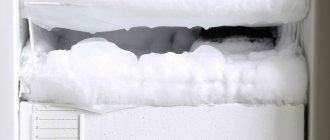
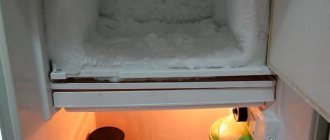
If you notice that a layer of ice has formed in the refrigerator and freezer compartments of the device, regardless of whether you have an old refrigerator model or a modern one (with a know-frost system), the device should be defrosted.
Frost prevents the maintenance of a given temperature in the chambers , as a result of which the risk of premature failure of the motor of an electrical appliance increases many times over.
IMPORTANT! It is advisable to defrost the device in the cool season (autumn, winter, early spring).
This is interesting: how to remove dents on a refrigerator at home.
Possible problems
The operation of the Indesit refrigerator, like any equipment, is associated with the possibility of breakdowns. Some may appear after the unit has defrosted.
Malfunctions of the defrost sensor and timer of the Indesit refrigerator
The defrost sensor of the Indesit refrigerator, which includes a fuse and thermostat, may fail after defrosting. Then the faulty element will require replacement. It is not difficult to check the sensor: the contacts close only at a temperature that is significantly lower than room temperature.
The electronic defrost timer may also need to be replaced. Especially if the defrost sensor is faulty.
Refrigerator does not cool after defrosting
Most often, an electrical appliance does not cool after defrosting due to a compressor failure. In single-compressor refrigerators:
- The cooling does not start, but the lamp in the chamber is functioning.
- The engine hums, but the device does not freeze.
- The light in the main chamber is on, but the motor stops working after starting and both compartments do not cool.
In two-compressor:
- The lighting and one camera are working.
- The motor hums, the equipment does not turn off. The chambers do not get cold or freeze.
- Clicking sounds are heard and the light is on. None of the chambers are cooling.
The reason for the lack of cooling after defrosting is not always due to a compressor failure. In no frost models, malfunctions often occur due to poor quality ice removal.
Problems can also occur if the seal is not tightly sealed.
Auto defrost does not work
Problems with the operation of auto defrost often occur due to a breakdown of the heating element. The malfunction is indicated by flashing indicator lights on electromechanical models and code F07 on electronic ones. Replacing the required element is not always necessary. Sometimes it is enough to check the wires and connections.
If replacement is still necessary, it is better to invite a specialist to diagnose and carry out the appropriate work. If you initially defrost the Indesit Know Frost refrigerator correctly, such problems can be avoided.
detailed instructions
The defrosting process includes several stages, the sequential execution of which ensures rapid defrosting of both chambers.
Do you have an Indesit brand refrigerator?
Not really
Turn off the refrigerator
Set the temperature regulator to position “0”, then disconnect the refrigerator from the power supply : during the defrosting process, the door of the device will be open, while the space of the chambers will be filled with warm air, and the engine will begin to work in increased mode, which can lead to its overheating and breakdown .
In addition, there is a risk of moisture getting on the conductive elements of the device, as a result of which a short circuit or electric shock may occur to the person performing the defrosting.
ATTENTION! After removing it from the socket, it is also advisable to place the plug on some elevation so that droplets of water during operation do not accidentally fall on the part.
Free from food and products
At the next stage, remove all food and food containers stored in it from kitchen appliances and place them in a cool place .
Even if there is very little frost in the refrigerator and it does not take a significant amount of time to remove it, there is a risk that even in such a short period of time the food will have time to spoil.
The temperature of the food in the unit is low, therefore, if you leave food in the chamber during defrosting, the food will “give” cold into the surrounding area, thereby slowing down the defrosting process.
Remove boxes, pallets and grids
After removing the food, remove all vegetable and fruit drawers, egg containers, shelves, and racks in the refrigerator.
This will make removing pieces of melting ice much easier, and don’t forget that all removable elements of the refrigerator also need regular cleaning .
ADVICE! While the household appliance is defrosting, you will have time to wash all the removed parts.
Determine the drainage hole
All refrigerator models are equipped with a drainage system , which is necessary to remove moisture resulting from the melting of frost on the evaporator. The water drain hole is located at the bottom of the rear wall of the refrigerator compartment.
In devices with the no frost system, it is located behind the protective panel at the bottom of the rear wall of the refrigerator compartment.
During the defrosting process, a large amount of moisture will form. To ensure that liquid leaves the chambers freely, be sure to check the condition of the drainage hole; if it is clogged, clean the drain with a special brush or fill a disposable syringe with warm water and forcefully pour it into the drain.
You can learn how to clean the drain hole in your refrigerator here.
Prevent flooding
During defrosting, melt water may escape from the chambers. To avoid causing a flood and damaging the flooring, place old towels and newspapers around the refrigerator, and place rags at the bottom of both chambers .
REFERENCE! Many units also have a drainage tube under the freezer that you can extend slightly and place the end of in a bowl.
Remove ice
You should not wait for the ice to completely turn into water under the influence of warm air.
As soon as you notice that the frost easily comes away from the internal surfaces of the compartments, moisten a soft sponge in warm water and, using gentle movements, without effort, remove the thin snow crust and collect the ice from the bottom .
Wipe off any water that has formed
Once the ice has melted, use a dry cloth or towel to wipe all the internal surfaces of the refrigerator and check the drainage hole again.
ADVICE! Carefully inspect the area around the kitchen appliance for the presence of water, and if necessary, remove moisture.
Wash the refrigerator
After defrosting, you can begin washing the internal and external parts of the device.
Assess the degree of contamination of your device : for minor accumulations of grease and dust, make a weak soap solution (dissolve 1-2 teaspoons of liquid dish detergent in a glass of water) and wash the walls.
After using the cleaning product, wipe the surfaces with clean water and dry them with a towel.
If you are interested in how to clean a No Frost refrigerator, read this publication.
IMPORTANT! Before starting the defrosting procedure, move the refrigerator slightly forward or to the side so that after defrosting you can wash the back wall of the appliance.
Leave to dry
After defrosting and washing, leave the appliance door open for a while to allow all surfaces to dry completely.
If your refrigerator has a manual or drip defrosting type, after drying, close the door, turn on the device and after 1.5-2 hours, return the drawers, containers and shelves to their original places, and load the food.
Equipment with a know-frost system will have to be left turned off for at least 12 hours, and preferably for a day.
IMPORTANT! Ignoring the rule about the procedure for turning on a refrigerator with know frost can lead to failure of the “heart” of the kitchen appliance - the compressor and electric motor.
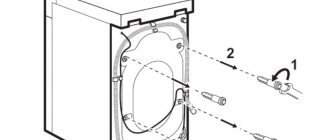
Checking the seals
The sealing tape ensures a tight fit of the refrigerator door to its body, which helps maintain a low temperature inside the chambers. This element fails quite quickly , since the rubber from which it is made loses its elasticity over time, dries out and becomes cracked.
Signs of a faulty rubber seal:
- the refrigerator starts working with short breaks or continuously;
- the temperature in the chambers exceeds the specified parameters.
You can determine that the seal needs repair in the following ways:
- carefully inspect the closed refrigerator door around the entire perimeter: in places where the tape does not fit tightly to the body, small gaps will be noticeable;
- cut a strip of paper 4-5 cm wide and about 20 cm long, open the door of the device, attach the strip to the body and close the unit (the paper will remain sandwiched between the door and the body). Carefully pull the strip towards you: if the paper cannot be pulled out, the seal is in order.
The rubber band needs regular cleaning:
- if the part is slightly dirty, foam a small amount of dishwashing detergent in water and carefully, using a sponge, wipe all surfaces and folds of the seal;
- If mold and a large amount of grease, dust and crumbs are found in the tape, drop dishwashing gel and 1-2 drops of alcohol onto the sponge and wipe the rubber element.
After treating with cleaning agents, be sure to rinse the tape with water and dry with a towel.
IMPORTANT! To ensure that the element retains its elasticity for as long as possible, after cleaning, rub 2-3 drops of olive oil into its surface with a soft cloth. For the same purposes, you can use silicone grease for rubber engine seals.
Features of brand refrigerators
The history of the appearance of Minsk brand refrigeration units began in 1959, when, by order of the government, the Gas Equipment Plant in the capital of Belarus was to begin production of household refrigeration equipment.
The first device with the name Minsk was released in 1962. Later, namely in 1977, the Atlant association was organized, which, in addition to the Minsk plant, also included a machine tool plant in Baranovichi.
This was important because compressors for refrigeration units were manufactured here. Atlant paid great attention to technical developments and their implementation in new models.
Therefore, it is absolutely no coincidence that it was here that the first Soviet two-chamber refrigerator appeared. Of course, Minsk brands. For its time, it became a real breakthrough and enjoyed unprecedented demand.
This is what the first units produced at the Minsk Refrigeration Plant looked like. Some of them still operate safely today, successfully cooling and freezing food.
Later, the association began producing Atlant refrigeration units. Gradually the names Minsk and Atlant merged, and for some time products were produced under the double name.
Today in stores you can more often find the Atlant brand, sometimes the second name can be attributed to it “in the old fashioned way”. Officially, Belarusian products are now called Atlant, but in fact it is still the same good old Minsk.
General characteristics of the manufacturer's models
The range of refrigeration units under the Minsk brand is quite wide. All devices are distinguished by high efficiency of cold production and economical energy consumption.
They are extremely easy to use and come in a variety of colors. Most of the equipment is small in size, which allows it to be placed even in a very small kitchen.
The Minsk plant was the first to begin producing domestic two-chamber refrigerators. These were units with a small freezer compartment located in the upper part of the body
Among the technological features, it is worth noting simple design solutions. The devices are equipped with one, rarely two compressors.
The latter option was used for two-chamber systems. To operate, they were pumped with environmentally friendly, but today obsolete, refrigerant.
None of the Minsk devices had an Anti-frost system installed, which greatly simplifies their repair.
On its units, the Minsk plant installed a drip defrosting system, or as it is also called a “crying” defrosting system. It assumes the presence of drainage that removes accumulated moisture from the refrigerator compartment.
No defrosting system was used for the freezer compartment. It was defrosted manually as ice build-up accumulated. Electronics have also never been used in equipment control systems.
User reviews about brand equipment
Owners speak positively about the refrigeration units of the Belarusian manufacturer. Thanks to the simple design, there is practically nothing to break in the unit, and if a breakdown occurs, you can try to fix it on your own.
All refrigeration units produced under the Minsk brand were easy to assemble. Complex electronic controls and the “No Frost” system were not used here.
Thanks to their design simplicity and high quality of components and assembly in general, Minsk devices are reliable and last a very long time. It is this fact that is appreciated by numerous technology users.
There are often cases when a properly working refrigerator was disposed of only because it was morally obsolete. However, later the owners sometimes regretted it, because it is not always possible to get the same reliability and durability from new devices.
How to speed up the process?
You can speed up the melting of ice by using one of several methods that are safe for refrigeration equipment:
- pour hot water into the pan, place the container in the chamber, having previously placed a wooden board under it for cutting food, or fill a medical heating pad with liquid and place the product at the bottom of the freezer or in the refrigerator compartment;
- fan heater or household hair dryer. Place the devices in such a way that the warm air flow emanating from them is directed into the chambers without hitting the sealing element of the equipment. Also make sure that droplets of moisture do not fall on live parts of operating electrical appliances.
IMPORTANT! It is forbidden to remove frost and ice from the walls of the chambers with a knife - the blade can pierce the plastic wall and the capillary tube through which the refrigerant circulates. Such damage leads to freon leakage and the need for equipment repair.
Is it possible to defrost a freezer without turning off the appliance?
Many models of Indesit two-chamber refrigerators are equipped with two compressors, due to which each compartment (refrigerator and freezer) is cooled by an individual device. In this case, it is possible to defrost the freezer without disconnecting the unit from the power supply.
To carry out the procedure, it is enough to set the temperature regulator in the chamber to the zero position, remove all products from the freezer and after a certain time remove the melted ice, wipe the walls dry and set the required temperature again.
Find out how to turn on the refrigerator after defrosting, how to properly connect the device to the network.
REFERENCE! Information about what type of refrigerator yours is can be found in the operating instructions for the appliance.
First start
Before connecting the equipment to the electrical network, you should set the temperature parameters. The refrigerator is controlled by an electromechanical rotary regulator with a temperature scale. Models of the No Frost series use an electronic corrector with buttons and signal indicators; on some models there is a liquid crystal display that displays the temperature and displays error codes. Modifications with two compressors are equipped with separate temperature indications for the chambers.
What brand of equipment do you use at home?
- Bosch 16%, 1294 votes
1294 votes 16%1294 votes – 16% of all votes
- Samsung 15%, 1203 votes
1203 votes 15%
1203 votes – 15% of all votes
- LG 13%, 1095 votes
1095 votes 13%
1095 votes – 13% of all votes
- Indesit 6%, 513 votes
513 votes 6%
513 votes – 6% of all votes
- Atlant 6%, 505 votes
505 votes 6%
505 votes – 6% of all votes
- Electrolux 6%, 473 votes
473 votes 6%
473 votes – 6% of all votes
- Beko 3%, 286 votes
286 votes 3%
286 votes – 3% of all votes
- Philips 3%, 279 votes
279 votes 3%
279 votes – 3% of all votes
- Ariston 3%, 275 votes
275 votes 3%
275 votes – 3% of all votes
- Xiaomi 3%, 215 votes
215 votes 3%
215 votes – 3% of all votes
- Haier 3%, 212 votes
212 votes 3%
212 votes – 3% of all votes
- Redmond 2%, 173 votes
173 votes 2%
173 votes – 2% of all votes
- Siemens 2%, 135 votes
135 votes 2%
135 votes – 2% of all votes
- Gorenje 2%, 129 votes
129 votes 2%
129 votes – 2% of all votes
- Karcher 2%, 125 votes
125 votes 2%
125 votes – 2% of all votes
- Candy 1%, 123 votes
123 votes 1%
123 votes – 1% of all votes
- Liebherr 1%, 121 votes
121 votes 1%
121 votes – 1% of all votes
- Midea 1%, 120 votes
120 votes 1%
120 votes – 1% of all votes
- Hansa 1%, 118 votes
118 votes 1%
118 votes – 1% of all votes
- Whirlpool 1%, 115 votes
115 votes 1%
115 votes – 1% of all votes
- Zanussi 1%, 107 votes
107 votes 1%
107 votes – 1% of all votes
- Vitek 1%, 96 votes
96 votes 1%
96 votes – 1% of all votes
- AEG 1%, 72 votes
72 votes 1%
72 votes – 1% of all votes
- Dyson 1%, 55 votes
55 votes 1%
55 votes – 1% of all votes
- Scarlett 1%, 52 votes
52 votes 1%
52 votes – 1% of all votes
- Nord 1%, 50 votes
50 votes 1%
50 votes – 1% of all votes
- Thomas 1%, 50 votes
50 votes 1%
50 votes – 1% of all votes
- Miele 1%, 46 votes
46 votes 1%
46 votes – 1% of all votes
- iRobot 1%, 46 votes
46 votes 1%
46 votes – 1% of all votes
- Zelmer 0%, 40 votes
40 votes
40 votes – 0% of all votes
- BBK 0%, 39 votes
39 votes
39 votes – 0% of all votes
- DeLonghi 0%, 34 votes
34 votes
34 votes – 0% of all votes
- Kuppersberg 0%, 25 votes
25 votes
25 votes – 0% of all votes
- Smeg 0%, 15 votes
15 votes
15 votes – 0% of all votes
- iLife 0%, 10 votes
10 votes
10 votes – 0% of all votes
Total votes: 8246
Votes: 4825
22.01.2020
×
You or from your IP have already voted.
By default, the temperature controls are set to the middle position; if the user does not intend to load the chamber with products, then the setting should not be changed. It takes up to 20-24 hours for the equipment to cool down to operating temperature upon first start-up. After connecting the refrigeration unit to the network, the compressor is activated, which begins to pump refrigerant through the refrigeration circuit. If the user disconnects the plug, reconnection to the electrical circuit is allowed after 5-7 minutes.
Where should food go during the procedure?
As a rule, when defrosting in the cold season, the problem of placing food from the refrigerator for temporary storage does not arise - it is enough to put them in a large basin or bowls and simply take them out to the balcony or hang them in tight bags outside the window. It’s a completely different matter when it becomes necessary to remove ice during a hot period.
You can preserve food when defrosting the refrigerator in the following ways:
- Using a thermal package. A similar device can be purchased at any large supermarket. The internal surfaces of the product are covered with special foil; between it and the outer walls of the bag there is a layer of penoplex, which allows you to maintain the temperature of the products placed in the device for 2-3 hours. A cooler bag has a similar operating principle, in which you can also put food during the defrosting period.
- Place the food in strong plastic bags and place them in a wide bowl filled with cold water.
- You can simply put food from the freezer in a large bowl, place pre-frozen bottled water in the same place, wrap everything in old newspapers or cover it with a blanket.
REFERENCE! If you are defrosting only the freezer without unplugging the appliance, move the food to the refrigerator compartment during this time.
Pros and cons of No Frost
Wind freezing is considered more modern and progressive; it has a number of noticeable advantages. However, it is not without its drawbacks.
| Advantages | Flaws |
|
|
Attention! The problem of drying out food is easily solved: just store it in the packaging. Moreover, today kitchen units have a compartment for vegetables and fruits.
What to wash after?
You can wash the internal surfaces of the device from various contaminants using improvised means or chemicals:
- pour 2-3 tablespoons of soda into 1 liter of water, mix the components thoroughly and clean the walls of the chamber with the resulting solution, then wipe them with clean water;
- grate a third of a bar of laundry soap, mix the flakes with water and treat the contaminated areas with the product;
- if an unpleasant odor “settles” in the refrigerator, dilute table vinegar in equal proportions with water and wash the chambers with the product;
- cleans surfaces well and removes yellowness from plastic parts 3% hydrogen peroxide and a weak aqueous solution of citric acid (pour half a teaspoon of powder into 200 ml of water);
- Special sprays and liquids (Silit Bang, Top House and others) are effective in removing grease, dust, mold.
IMPORTANT! It is unacceptable to use chemically aggressive compounds and preparations containing abrasive particles to clean the walls of the refrigerator chamber.
Defrosting the freezer and refrigerator compartments of a two-chamber device is a simple and quick process.
Careful and careful handling of the device and compliance with all operating rules of the equipment can significantly slow down the rate of ice formation on the internal walls of the unit and, accordingly, eliminate the need for frequent thawing.