Why won't the door of your home refrigerator close?
There are several explanations for this. A visual inspection of the door can determine the cause. Physical damage, deformation of the door (dents, distortions of metal, not fastenings), due to which the door does not close. This type of breakdown can only be repaired in a workshop or replaced with another one. Deformed metal, which is used for the external cladding of equipment, is very difficult to level at home. To do this, you need to completely disassemble the door as a part and go through it with a special power tool, and then put it back together. Doing this “on your knees” at home is not recommended.
- Loose or deformed fasteners. If the door curtains show signs of damage or the bolts (sometimes rivets) do not hold tightly, this is a clear sign of the door being skewed. Its elimination is possible at home by one person.
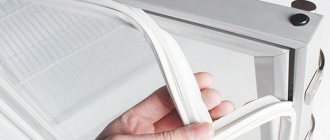
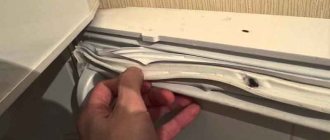
- Rotten, loose or cracked weatherstripping can also cause this problem. After inspecting the rubber gasket around the perimeter, you can find the problem area. If, after a little pressure or tugging on the rubber, the seal crumbles or begins to sag, it’s time to start replacing it.
Replacing the seal in the refrigerator door
What damage does it prevent?
Over time, dents and gaps form on the rubber, and it loses its elasticity. A thinned seal can cause major repairs to the refrigerator. After all, the manufacturer calculates the power of the device under certain operating conditions. Forced to work in extreme mode, the device may simply not withstand the load. Therefore, such a seemingly insignificant detail should under no circumstances be neglected. It turns out that the refrigerator operates around the clock at full capacity. This reduces its service life.
Why won't the door close
The refrigerator door may not close due to various malfunctions. To eliminate the problem, it is necessary to conduct an inspection and determine the specific cause.
Loosening and deformation of fastenings
If the fasteners are deformed from mechanical stress or become loose as a result of prolonged use, the door no longer fits tightly. If the fastenings become loose, adjustments can be made. To restore deformed elements, professional repair or replacement of parts is required.
Rotten, loose and cracked seal
Due to the detachment of the seal or a violation of the integrity and structure, it cannot fulfill its purpose and does not secure the door. A broken seal is easiest to replace with a new one, which will reduce labor and time costs.
Types of elastic band for refrigerator
Old units were at one time equipped with rubber seals. It will not be easy to find a similar tape, but replacing it with an analogue of suitable size will not be difficult.
Most of the refrigerator models on the market today are equipped with “rubber bands” made of polymers, which are so called by tradition.
The main difference between the compactor is the number of cylinders. The most common ones are those consisting of two cylinders.
Some seals have magnets that provide extra grip on the door.
Dismantling the old
Dismantling (i.e. replacing with a new one, repairing or re-hanging on the other side) is necessary when the gasket no longer fits tightly to the body. This can happen when the hinges become loose, cracks appear in the body, or the door leaf is damaged. It is carried out in several operations:
- Defrosting (if you need to repair an old refrigerator) or disconnecting the device from the power supply (if the equipment is of the latest generation). You must first remove the contents from the chambers.
- The refrigerator is placed on its side, with the hinges facing up, otherwise the panel will be inconvenient to remove.
- The hinges are unscrewed (starting from the bottom), after which the structure is carefully pulled out of the grooves.
- The sealing gum and fabric are checked for damage. If cracks, rot, old blockages in the cracks or severe deformation of the case are detected, the part must be replaced with a new one, otherwise this may lead to damage to the device or damage to the products.
- If the parts are not damaged, then the canvas is cleaned of dirt, and the gasket is glued back in the right places. If its material begins to mold or loses its elasticity and volume, then the elastic band needs to be replaced.
- After this, the door is installed back.
Recommendations
When attaching the tape to the “Moment”, you need to press it as firmly and tightly as possible to the place of gluing and hold it this way for about 20 minutes. If it is not possible to do this manually, you can use either transparent tape (reliably presses the elastic with several layers for a short time), or a weighting agent of no more than 5-7 kg (if the door has been dismantled). You can also use a vice if you have one on hand.
It is recommended to use a respirator during operation. If the seal is attached using resin, it is necessary to work with rubber gloves, because if the substance gets on open skin, into a wound, or flows into a hard-to-reach place (for example, under a nail), it can cause hand injury, and getting rid of the frozen clot will not be easy.
You can also attach the elastic band to the refrigerator using nails or self-tapping screws. It happens that sometimes it is not possible to seal the tape or the adhesive coating is not able to hold it on the surface of the door, then this method is used. But this option is only suitable for older models and those in which the tape is attached to factory bolts.
Re-hanging the door
In this case, the refrigerator is usually installed on an uneven floor and at a slight angle. If the front of the refrigerator is tilted forward, the doors will not stay closed.
To check this, use a level to check the refrigerator and then adjust the legs. You will need a second person who can tilt the equipment. At the bottom of each leg there is a twisting mechanism that adjusts the length of twisting.
If you have been using your refrigerator for years, the hinges may become deformed over time due to constant exposure. Tighten them using a shaped screwdriver. It is recommended that the doors can close on their own when they are half open (45 degrees). So, adjust your feet with the door half open and continue to do this until the door closes.
Adjust your feet
On the Internet you can purchase special dense foam mats that go under the refrigerator, reducing vibration passing through the legs to the floor. This fix is especially valuable if people living below you are complaining about refrigerator noise.
Replacing the factory
To replace the factory rubber seal, you must follow the step-by-step instructions.
How to remove
To remove the seal, you will need to unscrew the fastening elements of the door and place it on a horizontal surface. Then the damaged seal is carefully torn off. You can pry one of the edges of the elastic with a sharp object and pull on the seal so that it begins to peel off.
Removing remaining glue
You can remove the remnants of the adhesive solution on which the seal was held using acetone. Apply the product to pieces of dried glue, wait 5-10 minutes, then treat with a spatula. The final cleaning is carried out with an alcohol solvent intended for acrylic paints.
How to replace a seal pressed under a door trim
Using a thin screwdriver, carefully pry up the edge of the cladding and slowly remove the seal, being careful not to damage it. Then install the new seal. At the same time, use one screwdriver to lift the edges of the plastic, and with the other, push the rubber edge into place.
If you bought a repair seal, you will notice that it already has a hard edge that easily fits under the cladding. If the edge has a thickening, it should be cut off with a sharp knife at a distance of about 10 mm from the edge. To more securely fix the seal in place, you can drip a little superglue onto the areas where it fits.
Changing the rubber band of the refrigerator
But if cracks appear on the elastic, it breaks or even begins to rot, then throw it away without even thinking. In this method we will figure out how to change the rubber band in the refrigerator yourself.
The first thing you should pay attention to is the brand of the refrigerator and its manufacturer. After all, each company makes its own individual fastening and each of them has a different elastic band that is attached differently
The rubber band can be glued along the contour of the door and secured with screws and can be inserted into a special groove. In such cases, you can change it yourself.
You just need to remove the old one and attach the new one - using the same method that it was fixed before. But you need to be extremely careful so as not to spoil or deform the new rubber band.
There is an option for the rubber band to be glued into the refrigerator door. In this case, you can’t handle it purely on your own, you should contact the service.
Glue the seal
If the seal has come off just a little bit, then you can simply glue the rubber band in the refrigerator in the places where it comes off. The result can be either temporary or long-lasting - it all depends on the glue you use.
If everything is fine with the rubber band, but the door still does not fit tightly and everything in the refrigerator is defrosting, then you should pay attention to the door fastening. Perhaps some screws and hinges need to be tightened.
Important! If you need to glue the rubber band in the refrigerator, use any solution for this. For example, glue “88” or the usual “Moment” will do. But it is better not to use silicone for this purpose, since it is considered toxic, and food is stored inside the refrigerator.
Tips and tricks
If the damage is minor, the seal can be repaired. Places of slight deformation are blown with a hair dryer or for drying hair (the hottest mode), change the shape of the elastic with your fingers and firmly press the door, fix it in this position for 10–15 minutes. Another option for restoring the seal is to remove it and immerse it in hot water, leave it for 15 minutes, when the part takes the desired shape it can be put back. Places where the tape has moved slightly away from the door can simply be glued, and small cracks can be sealed with sealant.
On a note!
If the tape is damaged only on the outside, it can be removed, turned over and reattached. Such a replacement of rubber on a refrigerator cannot be carried out if it was glued.
In order for the seal to last as long as possible, the door must be opened only by the handles or special recesses, without touching the rubber bands. When washing the refrigerator, all grooves in the tape should be cleaned with a toothbrush and soda paste. After replacing and drying the rubber, it must be treated with silicone grease; oils cannot be used, they make the material inelastic.
It is permissible to attach the new type of seals with double-sided tape (on the latest models of refrigerators), but no one can say exactly how long the part will last. Experts do not recommend using polyurethane foam to glue the part. For any mounting method, the tape must not be stretched. You need to measure the elastic from the upper corners (length and width).
Installation of sealing tape is not a complex type of repair, but requires attention and accuracy. You need to choose the right part, carefully remove the remains of the old gum and prepare the surface before work. By following our advice, you can change or repair the rubber seal in the refrigerator yourself, without using the services of service centers; the procedure will not take much time.
Instructions for replacing the seal
You can change the rubber band on your refrigerator at home.
The list of necessary tools and equipment depends on the method of attaching the old tape.
Video: How to change the seal on the refrigerator door
We recommend reading:
What to do if the refrigerator door becomes leaky and won’t close
Do-it-yourself refrigerator door repair
How to hang the door on two-chamber refrigerators "Indesit" and "Atlant"
To replace you will need:
| in the groove | on self-tapping screws | on glue |
| hair dryer screwdriver | screwdriver or screwdriver | putty knife solvent glue |
Step 1. Removing the old seal
Turn off the refrigerator and defrost. Remove the door and place it on the floor
It is inconvenient to install the part suspended, and it may not fit tightly. Simply pry the rubber band inserted into the groove with a screwdriver and then carefully pull it out along the entire perimeter. If the part is attached to self-tapping screws, you just need to unscrew them. Removing the glued tape is more difficult. It needs to be torn off or cut off
Then clean with a spatula and treat with solvent. The surface must be smooth and clean.
Step 2. Selecting a new seal
When buying a seal, you need to consider:
- refrigerator brand and model. Ideally, if there is a “native” part on sale. It will fit exactly in size;
- size. You need to measure the length and width of the old part. If the parts for a specific model are not in the store, buy a universal one that fits in size. Take the old seal with you to compare the length, width, groove size, profile type;
- quality of a new part. The elastic band may be damaged during transportation or storage. The part must not have creases, cracks, deformations, stains, or seals.
Step 3. Installation of the seal
It is advisable to use the same installation method as originally used.
- In the groove To make the tape more elastic and easier to fit into the groove, the profile can be slightly heated with a hairdryer. Then insert the fastener into the slot along the entire perimeter and seal. This is done at the factory using special equipment. The same pressure cannot be created at home. For reliability, you can additionally use glue or self-tapping screws, screwing them in every 15 cm.
- Self-tapping installation. Secure into existing holes with slightly larger self-tapping screws.
- Gluing. Degrease the surfaces to be bonded with white spirit. Glue (“Moment”, “BF” or similar) is applied according to the instructions. The door is not installed until the glue has completely dried.
Repair with improvised means
This method does not require replacing the worn part. This is its advantage. It is also worth noting that since you will solve the problem yourself and with the help of available materials, the percentage of successful repairs is much lower than if you contact professionals
But material costs are also much lower, which is important
There are several methods that became popular during the Soviet Union, when due to the shortage of certain things and materials, it was still not customary to throw them away. Well, let's look at the methods for repairing the refrigerator seal with our own hands.
Using boiling water
First, remove the rubber band from the refrigerator door. This process can be quite difficult. More precisely, there can be 2 ways:
Modern refrigerator manufacturers attach this part to foam, in which case it will be easy to remove. In Soviet units, the elastic band is screwed on with nails; it is quite difficult to remove it
Therefore, you should remove it very carefully so as not to deform it. Otherwise, you will have to buy a new one.
So, let's move on to the actual processing of the material. Everything is extremely simple. You just need to scald it with boiling water and leave it in hot water until it cools completely. This way you can restore the rubber band on the refrigerator.
Dry it well and hang it back. After this treatment, the part will begin to fit tightly to the door and its tightness will not be compromised.
Using paper or other available materials
This method will only work if the deviation from the door does not exceed 2 mm
Therefore, first you should measure these discharges (this is important)
After this, you can take a piece of paper, cardboard or other similar materials and place it under the place where the elastic comes off.
Change door location
You can try moving the door to the other side. This will help you hide the damaged rubber band and use the good one.
Just be sure to prematurely pay attention to the location of the furniture in the kitchen. Will it be convenient for you to open the door if you change its direction? After all, it may happen that you have re-hung the door, and now you realize that it is inconvenient to open it and you need to change the location of all the kitchen furniture
Using boiling water
Hot water can help solve the problem associated with wear of the rubber seal. This is how you need to act.
First, the seal is removed from the door. This may require a screwdriver.
Care must be taken not to damage the elastic.
After removing the seal, you just need to pour boiling water over it and leave it in the water until it cools down.
3.Then all that remains is to dry the part and install it in its original place. Now the tightness will increase.
Application of paper
A method based on the use of paper will help in cases where the rubber band moves away from the door no more than a couple of millimeters
Therefore, it is important to immediately measure the gap so that the work is not done in vain.
So, if the gap is not very large, you can take a small piece of paper or any other material that has a similar structure and simply use it as a backing in those places where there are voids.
How to glue a rubber band in the refrigerator
To begin replacing the rubber seal on the refrigerator door, you need to treat the door surface with a mild solvent. The best solvent option for these purposes is alcohol solvent for acrylic paint.
To replace the sealing rubber, it is imperative to use the same fastening method that was used to fasten the old material.
The rubber seal can be fixed using glue or a screw.
Attaching the rubber seal for the refrigerator can be like this:
- Screw fastening. For this method, you need to try on the rubber seal on the refrigerator door and if it fits tightly and does not give you any doubt that it will perfectly preserve the tightness of your refrigerator, simply tighten the fasteners.
- Fixing the seal with glue. After trying on the new seal on the refrigerator door, you need to apply a thin layer of glue around the perimeter of the door and attach the prepared rubber band.
The glue you need to choose is silicone-based and of very high quality; if you buy a low-quality glue or a cheap fake, you will soon need to replace the seal again. Turning on and using the refrigerator is permitted only after the glue has completely dried.
What to do if there is a damaged seal
After diagnosing problems related to the performance of a refrigeration device, many people have the question of what to do if the rubber band does not fit snugly. Below are various ways to combat this problem.
After diagnosing problems related to the performance of the refrigeration device, many people have a question about what to do if the rubber band does not fit snugly
Replacing the gum
As stated above, you can completely replace the rubber seal. This method is only suitable if the damage is numerous.
As stated above, you can completely replace the rubber seal
Bonding
For small defects, you can use Moment glue or Superglue. An alternative can be any shoe glue. The effect will be short-lived, but it will help you put off spending money on a new elastic band.
For small defects, you can use Moment glue or Superglue.
Re-hanging the door
Another way is to move the door to the other side. Not all models allow this procedure.
Another way is to move the door to the other side.
Note! If the rubber gasket is severely damaged, re-hinging the doors will not have any effect.
Boiling water will help
Remove the seal from the door and place it in boiling water. The gasket must remain in the water until it cools completely. After this, you need to let the rubber material dry and attach it back to the door. This procedure will help revive rubber that is starting to dry out.
Remove the seal from the door and place it in boiling water.
Good to know! This procedure is well suited for refrigerators that have not been used for a long time.
Paper
If the space between the rubber band and the door is no more than 3 mm, paper folded in several layers will help solve the problem. Cardboard will also work. It is necessary to fill the gap with paper.
If the space between the rubber band and the door is no more than 3 mm, paper folded in several layers will help solve the problem.
Why does the seal in the refrigerator wear out?
Seal requiring replacement
You can tell that it’s time to replace the old tape with a new one by the ice that forms on the freezer door. Due to the fact that warm air gets inside, the temperature in the refrigerator will not be low enough. Over time, in older models that are used for a long time, the elastic band dries out, cracks and becomes less elastic. The tape may become unusable if the equipment is handled carelessly. The reason that the rubber band will have to be changed may be sagging of the door due to its own weight, as well as a malfunction of the sensor that is responsible for opening it. In case of partial or complete wear, you need to replace the rubber bands on the refrigerator door.
The rubber seal is a simple and rather weak part. It performs an important task, ensuring tightness. When the belt is deformed and destroyed, this immediately affects the operation of the unit. Cold air flows out, while warm air flows in. All systems are overloaded.
If the seal is slightly damaged, it can be repaired. A test will help you decide. A flashlight is placed inside the refrigerator. If the seal is poor, light will show between the seal and the housing. This means there are gaps.
They check it in another way. To do this, take a sheet of paper. Bring it to the body and close the door tightly. They pull on the peeking edge. If the paper is easily pulled out, then the seal must be replaced. They also check the places at the bottom and top of the door. The elastic band should fit snugly along its entire length. The fact that the tightness is broken can be judged by the following on it:
- dents;
- chipped;
- cracks;
- bends.
What it is
It is usually not possible to achieve sealing only by tightly joining the door and chamber in household appliances. However, for refrigerators this is an important condition for normal operation: leakage of cold air from the chamber will negate the operation of the cooling system.
The material is fixed in different ways:
fixed with glue - the cheapest, but also the most short-lived method. The adhesive has a polymer base and is not resistant to constant low temperatures;
Replacement process
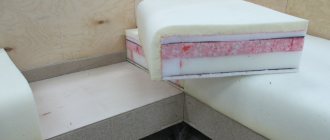
- mounted in a groove - a special channel is formed around the perimeter of the door, inside which the rubber is installed. Greater strength is provided by polyurethane foam. The photo shows the sealing material in the Ariston model;
- fastened with screws - despite the mechanical strength, this method has a noticeable drawback. If in previous cases the deformed seal can be repaired, or rather, installed correctly, in the case of rigid fastening it is necessary to replace both the stretched and damaged material with your own hands.
Rules of care
If you operate the refrigerator correctly and take proper care of the rubber seal, replacing the latter will not take a long time. Rules that must be followed include:
- Timely cleaning of the rubber band from debris that gets into its recesses. You can use a toothbrush for this.
- When washing the refrigerator, be sure to clean the seal with a soda solution.
- Regularly treat the rubber band with silicone grease. It is prohibited to use any vegetable oils for these purposes.
- The refrigerator and freezer can only be opened using the handle. You should not touch the seal again, much less pull on it.
Timely replacement of the rubber will protect the engine from overheating and unnecessary electricity consumption. Replacing the seal yourself is a fairly simple operation. You just need to buy the appropriate material and follow all installation recommendations.
Sticking
The selected seal is applied to the refrigerator door and checked for compliance with the dimensions. If the product is suitable, then you can start gluing, which is done in various ways.
Applying a thin layer
You can apply a thin layer of glue along the perimeter of the entire door and place the product on top. Then adjust the position of the seal until the composition has completely dried. Having fixed the rubber band, all you have to do is wait for the solution to dry.
Gluing the entire perimeter in small portions
It is also possible to apply glue in portions around the entire perimeter of the door. After applying the solution, apply the tape and press. After the glue has dried, you can continue to use the refrigerator.
After the work
Replacing an old seal in a refrigerator is a simple task for an experienced technician
However, it is important to know how to care for your household appliance to avoid repeated breakdowns.
- Compliance with the defrosting schedule (for outdated models);
- Periodic inspection of components and parts for rotting, unpleasant odor, crumbling;
- Avoiding overheating or hypothermia (especially important for equipment that is not currently in use, but is stored in a warehouse or garage.
By following these simple rules, you can avoid the need for repairs and extend the life of your equipment.
It is important to note that a huge amount of cold escapes through the cracks in the seal, which has a detrimental effect on the quality of the food and forces the refrigerator to work harder. This has a detrimental effect on its resource
Even a small gap into which a corner of an A4 sheet can easily pass is a potential problem and has a bad effect on work.
Sometimes it happens that a refrigerator that has been working for many years malfunctions. The causes of the defect can be various phenomena. One of them is damage to the rubber seal. If this is your case, then natural questions arise:
- What to do - restore the old rubber band or buy a new seal?
- Solve the problem yourself or call a professional?
- How difficult is it to replace the seal in a refrigerator with your own hands?
- What to glue the rubber seal on in the refrigerator?
Let's look at each of these questions one by one.
All household appliances require high-quality care, as well as repair and protection. The problem of rubber seal wear is most common in older freezers. Although, if there is a manufacturing defect or improper operation, it can also affect new refrigerators.
Ultimately, when the structure of the sealing rubber changes over time, deformations and cracks appear, condensation accumulates on the walls and door of the refrigerator, and ice forms (exceptions include refrigerators with the NoFrost system).
Also, damage to the sealing rubber leads to changes in temperature in the refrigerator under the influence of warm air entering it. As a result, in order to maintain the set temperature, the freezer compressor starts working without stopping, which can cause it to fail faster.
This will lead to costly repairs, so to prevent this problem from occurring, you must understand that a broken rubber seal on the refrigerator door is not a minor problem, but a fault that can significantly affect the operation of the entire device and lead to serious problems. Also, do not write off the excessive consumption of electricity by a faulty refrigerator - a damaged rubber band can cost you a pretty penny.
Signs of damage to the refrigerator seal
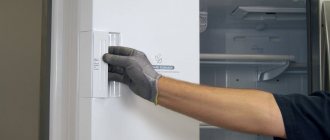
There is a simple way to check the tightness of the refrigerator door. This requires a piece of paper. Place it in the gap between the chamber and the door and close the refrigerator. If there is an area where the paper is not pressed against the camera by the door, it slides freely and falls out, then there is a problem with the seal.
However, in most cases, rubber seal problems are obvious and do not require this test.
What causes a seal failure?
- Water flows onto the floor.
This problem is not only dangerous for people walking around your kitchen, but it is also a bit difficult to solve as it can be caused by many things, but most commonly by warm air getting inside the refrigerator.
- The freezer has stopped working.
Is your food spoiling quickly or noticing that your freezer isn't what it should be? This is a common problem and is the most common consequence of lack of seal maintenance.
- The fresh food compartment becomes warm.
Typically, the cold air generated by refrigerators comes from the freezer, which then flows into the fresh food section of your refrigerator. So if your fresh food drawer is getting hot, it's most likely because you have an airflow problem.
- Frost accumulation in the ice dispenser
In order for ice to fall from your ice dispenser, it must be in an active state. This "door" that opens and closes to allow ice to fall is called a flap. Your damper door is lined with a special material that seals and creates a seal. If this material on the door becomes warped or dirty, it allows moist air to enter the freezer. When it cools, the air turns to frost, causing airflow and cooling problems. So if you are facing this problem, simply inspect your door damper for anything that could be causing an air leak. This could be a case of simply cleaning off dirt or replacing a spare part.
Ice dispenser
Method 1. Hair dryer
In fact, all home methods for restoring sealing rubber come down to the use of heat. To do this, you just need to provide a source of high temperature. It could be a hairdryer.
To restore rubber using a hair dryer, you need to perform several steps in sequence:
- disconnect the device from the power supply;
- heat the rubber with a hairdryer to a temperature of at least 80 degrees;
- straighten the sagging areas with your hands (in this case, you need to stock up on linen gloves to avoid injuries).
You must wait for the heated area to cool down with the door closed. However, you need to understand that this method is relevant for slight deformation of the rubber.
How to choose it?
Modern refrigerators use single-chamber and double-chamber polymer seals. When purchasing, you need to consider the following points:
- brand and serial number of the device;
- seal length;
- fastening method;
- presence of magnetic insert.
Methods for fixing sealing tapes:
- using glue;
- using self-tapping screws;
- with fastening in a groove.
The last option is considered the most reliable. This seal is easy to install and maintain, durable and not prone to deformation.
If you can’t find a ribbon for a certain brand, then you can use any other. In this case, the sealant is adjusted to the required dimensions, and the joints are carefully glued. For this, any adhesive compositions are used, including silicone sealants.
Attention! After purchase, you should not install the seal immediately. First, it is kept at room temperature for about 24 hours and only then installation begins.
A little theory
In older models of units, the design included a rubber strip around the perimeter of the door, which is characterized by simplicity of design and low efficiency.
Today, improved tapes are used. They are characterized by a complex cross-sectional configuration; some types are equipped with a magnetic strip, which ensures a tight fit of the tape to the body.
Kinds
Profiles are made from polymer material. Despite the difference in properties and structure, today the elastic contour is still called a sealing gum. The seal for the freezer or refrigerator compartment is available in 2 options:
- single-cylinder;
- double-cylinder.
The second option is chosen more often due to efficiency: the rubber strip fits more tightly to the unit. This is due to the presence of a magnetic stripe. Without such a part, the polymer product will come off in some places, which will increase the loss of cold from the chambers.
When single-bar elastic bands are used, it is important to install the refrigerator correctly: it is leveled so that there is a slight slope towards the wall. This will allow the door to close independently under its own weight.
Double-balloon seals.
If double-balloon seals are used, it is allowed to place the unit level exactly on the horizon. To control the position, use a building level. The refrigerator door will close under the influence of "magnetic force", even if the user forgets to slam it.
As a result, the load on the compressor is reduced, since the need for intensive cooling of the chamber after opening the door of the device disappears. This increases the service life of the mechanism. For the freezer and refrigerator, polymer circuits of the same configuration are used, differing only in dimensions.
There are gaskets of different shapes. Today complex profiles are used more often. There are adhesions inside that separate the air space. This increases the effectiveness of the elastic.
Installation methods
Installation methods:
- groove mounting;
- installation using self-tapping screws;
- fixation with glue.
The first option is considered preferable because it is easy to install. If the old rubber band has burst or cracked, it is recommended to update it: remove and install a new circuit according to the same scheme (place a polymer profile in the groove, along the perimeter of which there is a protrusion of a complex configuration).
Repair takes minimal time
It is important to choose the right tape: taking into account the dimensions of the door, the width of the groove, and its shape. You can do this kind of work yourself
When other fastening methods are considered, it is better to invite a specialist. The level of installation complexity is higher.
There is adhesive left in some areas that cannot be removed without damaging the plastic panel on the refrigerator door.
If fastening is carried out using self-tapping screws, holes are formed. After replacing the old seal, they must be sealed with sealant, otherwise the effectiveness of the elastic strip will decrease. In addition, it is not always possible to fix the contour exactly. Often after this the door does not close.
How to repair or replace the seal?
Before you replace the old seal, find out how you can restore it. To do this, use a hair dryer or hot water. Repair occurs according to the following algorithm:
- heating the seal in the area of unevenness using a hairdryer or water;
- straightening the shape with your hands.
Then close the door tightly and, after the rubber bands have cooled completely, check for cracks using paper. The sheet is laid at the joint, the door is closed and they try to pull it out. If the paper is easily removed, then you need to repeat the heating procedure again.
Sometimes it happens that the rubber band does not fit tightly due to the appliance door being installed incorrectly. In this case, there is no need to replace the seal; it will be enough to adjust the position of the door.
About repairing the refrigerator gasket in the video:
Dismantling the old
Before you begin the repair, you need to prepare the following tools:
- To install using adhesives, you will need glue, a spatula and a solvent.
- For self-tapping screws - a screwdriver or screwdriver.
- For grooves - a hair dryer and a screwdriver.
The algorithm for removing old gum will be as follows:
- Unplug and defrost the household appliance.
- Remove the door and place it on the floor or table.
- Remove the seal. The elastic inserted into the groove is pryed with a screwdriver and, carefully pulling it up, is removed. When fastening with self-tapping screws, it is simply unscrewed. If the seal “sits” on the glue, it is cut off or torn off. Then the residues are cleaned off using a spatula.
Reference! Experts recommend that you always remove the door, since with vertical installation the quality of installation is significantly reduced.
Installing a new
When installing, use the method that was originally provided in the model.
Into the groove
- The sealant is heated well using a hair dryer or kept in very hot water for several minutes.
- Then they straighten it around the perimeter and insert the fasteners one by one into the grooves. To make the seal fit more securely, you can additionally coat the location of the elastic with glue or silicone sealant. Instead of adhesives, small self-tapping screws are sometimes used, which are screwed at a distance of about 15 cm.
For self-tapping screws
When using self-tapping screws, you need to screw them exactly into the places where they were before dismantling. The fastenings should be placed frequently enough, so the tightness will be more reliable.
For adhesives
The surface under the gum and it itself are degreased using a solvent or white spirit. Then apply glue according to the brand's instructions and apply a sealant, pressing it firmly around the entire perimeter. Experts recommend using adhesives from well-known manufacturers, as they produce a product of the highest quality.
Reinstalling the door in place is possible only after the adhesive has completely dried, but not less than after 24 hours. If you do this earlier, the elastic band may not stick completely and the seal will be broken.
Reference! When installing rubber on the freezer door, you should use special adhesives that can withstand low temperatures.
Installation Quality Check
After the installation of the seal has been completed, it is necessary to check how well and firmly it holds. When installed correctly:
- the elastic fits tightly to the door, there are no cracks or gaps;
- the household appliance opens with little effort;
- The door stands straight without the slightest distortion.
After all work is completed, the refrigerator can be turned on.
Wear of the seal: what threatens it
A sign that the seal is broken is usually not a detected crack, but the formation of condensation on the shelves and walls of the chamber, or even the formation of a characteristic snow deposit. No less eloquent is the long-term operation of the compressor: the temperature sensor does not turn off the device, since it does not record the specified temperature.
The reason is not the only one, it may be damage to the seal.
- Material deformation – elastic polymers are not resistant to low temperatures. And, although it is not so low in the refrigerator - +4 - +8 C in the refrigerator, and up to -14 C in the freezer, this is enough, since the sealing rubber is constantly exposed to its action. As a result, the material loses its elasticity and stretches, forming cracks. For the same reasons, cracks appear - longitudinal or transverse. The first does not pose a danger, the second reduces the level of sealing.
- Damage - tearing of the material, especially at the corners of the door, and great wear when the rubber becomes loose. If damaged, replace it. The work is simple and can be done with your own hands. The photo shows an example of deformation.
Replacing a groove-mounted seal
To work, you will need a flat-head screwdriver, since the rubber is not secured with screws. This installation method is used on refrigeration units Indesit, Stinol, Ariston and almost all Atlant models.
The groove in the door is quite deep; in industrial conditions it is installed during door assembly. Without completely dismantling the sash, the same mechanical strength cannot be achieved, therefore, when replacing it yourself, it is recommended to secure the material with self-tapping screws with a press washer.
- The refrigerator turns off. If the door is large, it is recommended to remove it from its hinges and place it on a horizontal surface. If the sash is small, you can replace it in a vertical position.
- The edge of the rubber is pulled back.
- A flat-head screwdriver is inserted into the gap between the seal and the door, and the screwdriver is used to tear apart the mounting foam that secures the material.
- The seal is pulled out of the groove along the entire perimeter. It is advisable to avoid ruptures in this case.
- The material intended for repair, for the same Indesit or Ariston refrigerators, has a hard edge and does not need modification. In cases where it is not possible to purchase products from the same company, as often happens with Stinol and Atlant devices, a seal of a suitable size is used. Before installation, its thickened part is cut off with a knife.
- If necessary, the rubber channel is cleaned.
- The new seal stretches along the contour of the door. First of all, the corners are fixed: a screwdriver is inserted between the plastic and metal parts of the sash - or the inner and outer ones, as in the Atlant refrigerator, and rubber is placed in the groove.
- The material is inserted into the channel around the perimeter of the sash.
- The edge of the rubber is slightly pulled back and secured into the plastic part with self-tapping screws in increments of 10–15 cm.
- Using a hair dryer, the rubber is heated. Temperature – about 300 C.
- If the replacement is made correctly, the sash should open with some effort.
If necessary, the sealing material can be assembled from fragments. It is installed in the same way, but to ensure sealing, all joints of the segments must be treated with Moment glue and covered with adhesive tape. As a rule, outdated models are repaired in this way.
The video shows the process of replacing rubber with your own hands in an Indesit refrigerator.
Replacing the rubber seal on the refrigerator
Let's start with the nuances of choosing a new sealing material. Thick rubber bands were installed on outdated brands and models of cooling household appliances; they are almost impossible to find; now parts are made of polymers. There are two types of tapes: double-balloon (equipped with a magnet) and single-balloon, the former are more common. The parts differ according to the installation method:
- grooves (herringbone);
- self-tapping screws;
- glue.
On a note!
When choosing a sealing tape, consider the size and type of part needed.
It’s good when there is a tape for a certain model of refrigerator on sale; if there isn’t one, you’ll have to select a similar one. To avoid mistakes, be sure to consult with the seller. A good material has a uniform, smooth structure. Carefully inspect the new seal along its entire length and on all sides; there should be no cracks, lumps, or stretches.
It is almost impossible to find a solid rubber band for an old refrigerator; you will have to take a larger size band, cut off the excess pieces during installation, and glue the joints. After purchase, the part is left for 24 hours in the room where the replacement will be carried out. At this time, it cannot be cut or attached to the door; the material needs to get used to new conditions. Before work, the part is briefly placed in warm water.
Dismantling the tape and preparing for replacement
Before dismantling the old seal, you need to turn off the refrigerator, remove all food from the chambers, completely defrost the device, and wipe it dry. It will be easier to work if you remove the door and place it on the table. When repairing “on the fly”, small gaps or other defects often remain. The process of dismantling the old seal depends on the type of its attachment:
The edges of the grooves are carefully pushed towards you and sequentially (along the entire length) the elastic is pushed upward, trying not to tear it
It is not advisable to rush; it is important not to damage other elements of the doors and body. If the seal constantly returns to its original place, fix it with a screwdriver by inserting it between the edge of the panel and the tape
The seal must be completely removed from the grooves, otherwise it will not be possible to insert a new rubber band. The tape, screwed with self-tapping screws, is removed using a screwdriver or screwdriver. The glued part is torn off from the door and the surface is cleaned with a small spatula.
Attention!
After removing the old tape and attaching the new one, you need to thoroughly clean, then wipe the surface of the door with a degreaser. The glue can be easily removed with acetone.
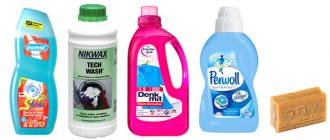
To glue the tape, you need to choose a good product, for example, Moment or BF glue, they perfectly hold surfaces together and hold them securely for a long time. When working with glue, be careful not to stain the surface around the tape. Traces of glue in inappropriate places are immediately removed. Many craftsmen use silicone sealants, which is also a good option, they are flexible and reliable. When choosing products, give preference to those whose packaging is marked with resistance to low temperatures.
Do-it-yourself replacement of sealing rubber
You should not conduct experiments and try to come up with new types of fastening; mount the tape as it was installed previously. It is permissible to change something only if the door is deformed or broken. In production, the tape is secured into the groove using special equipment; it is impossible to repeat the procedure manually. To be on the safe side, it is advisable to place the elastic under the grooves with glue or secure it with self-tapping screws. Replacing the rubber band on the refrigerator door:
- The glue is applied in a thin layer to the side of the tape that will be used to attach it to the plastic. Drying is carried out as written in the instructions for the product; the door must not be closed until the glue has completely dried.
- When screwing with self-tapping screws, it is advisable to use screws of a slightly larger diameter (than they were previously), since after long use the fasteners could become loose. Replacing the seal starts from the corners, screw in the screws without tightening too much, otherwise the rubber will burst.
- The herringbone tape is inserted into the grooves, first in the corners, then around the perimeter. The edges of the plastic casing are moved away from the body and secured with screwdrivers, and the tail of the seal is inserted into the resulting cavity. If additional fixation is carried out not with glue, but with self-tapping screws, then they are screwed in at a distance of 10 or 15 cm.
After the glue has dried, you need to carefully inspect the seal for possible damage. If all is well, the refrigerator can be connected to the network. With proper repair, the door on the refrigerator will not open as easily as before, and if you run your hand along the rubber band, you should not feel cold. If desired, you can test with a flashlight or paper.
How to quickly adjust a skewed refrigerator door?
Refrigerator curtains are a very tricky part. They are attached to the door plane using pins. In order to remove the door and get to the fastening bots, you need to place the refrigerator on its side, with the curtains facing up. Do not place it on the back wall - there is a chance of damaging the thin tubes that conduct the cooling substance. This is fraught with serious consequences.
Having examined the bottom, it is easy to notice small bolts that secure the lower door curtain. By removing it, you can literally “pull” the door out of the upper groove. After this, the bolts (less often self-tapping screws or rivets) of the upper curtain will have free access. Sometimes they are covered with a plastic cover - it’s easy to pry it off with a knife and put it back in place after the repair is completed.
The play of the curtains is determined quite simply - if, under a small load, the curtain “moves” from side to side, rotates or makes a knocking sound - it needs to be secured more firmly or replaced altogether. Bent pins and cracks are a sign of wear on the part; you should purchase a new one.
- Bolts - it is necessary to set the curtain to the level (90 to the bottom level, in line with the lower curtain) and screw it with a key. Sometimes, to strengthen the structure, a thin counter washer is used, which prevents the bolt from unwinding.
- Self-tapping screws are a similar procedure, only here you will need a screwdriver with a straight or Phillips slot.
- Rivets are a bigger problem. You can rivet it using a special set of tools, similar to a metal punch. If possible, replace old rivets with screws or bolts. This way you can quickly repair the door without damaging the refrigerator box.
Lower door curtain
If a crack was found in the area where the bracket is attached, no problem. Most refrigerators allow mounting on the opposite side. To do this, you need to remove the doors, free the pin sockets from the plastic plugs on the other side and assemble the refrigerator, install the curtains on the other side. Cracks or holes in the old mounting location must be covered with plastic covers (included with the refrigerator) or treated with epoxy resin (cold welding) in case of a serious crack.
Replacing the factory seal in a refrigerator?
To quickly install the rubber seal on the refrigerator door, you do not need to remove it from the hinges. However, you must work in a well-ventilated room—the smell of toxic glue can be harmful to your health.
So, if the problem is in the seal, then the first thing you need to do is remove it. Factory rubber bands are one piece that is glued to the metal using universal glue. Removing the gasket is easy - just pry it off with a sharp knife and pull it with your hand. In most cases, you will be able to remove a large piece with one pull.
Door seal
After this, it is worth removing the remaining industrial glue. A rag with soapy water or a rough sponge soaked in alcohol will work well. For particularly strong types of glue, you will have to use chemical solvents. The choice of solvent should be based on toxicity - you should choose only types that are safe for the respiratory system.
After removing the old layer of glue, you need to order or make a new seal yourself. Finding one suitable for popular refrigerator models is not difficult. You should search for the rubber part by the exact model name of your device. For older models, rubber band gaskets are suitable. They are sold in construction stores by the meter or in special rolls of a fixed length.
Rubber Band Gasket
How to glue a rubber band to the refrigerator door?
The best option is Moment adhesive for rubber, metal, and ceramics with an average strength rating. An adhesive that is too strong will be more difficult to remove from the door leaf after an unsuccessful pasting or during the next repair.
New seal on an old refrigerator
Some types of elastic have a groove connection or are screwed on with self-tapping screws. In this case, glue is not needed. Gluing occurs in two stages:
- Applying a thin layer of glue to the corners of the rubber square, leveling with a water level, stretching.
- Gluing the entire perimeter with small portions of glue.
It is worth considering that rubber glue sets in 15-20 minutes. This is sufficient time for the seal to level and stretch. When gluing the perimeter, firmly press the rubber to the metal - the strength of the gluing depends on this. If possible, use clamps. After complete drying, it is necessary to remove the bubbles and wipe the entire perimeter with detergent. The refrigerator is ready for further use.
Is it possible to restore an elastic band at home?
You can try to restore the deformed seal yourself. Modern inventive users have developed a whole collection of methods, among which the most common is the option of hanging the door. Technically this is feasible, but there is no guarantee of complete success.
In addition, when rehanging the door, you need to think about whether opening the door in the other direction will cause inconvenience. After all, a refrigerator is a fairly large unit. A place is carved out for it, taking into account every centimeter. Perhaps, when re-hanging the door, you will have to do a total rearrangement of the kitchen modules. Is it worth it?
Video material
Now you know all the ways you can repair the rubber band in the refrigerator. We hope that we have helped you solve the problem and that your household appliances continue to work properly without causing you unnecessary hassle or inconvenience.
Replacing household appliances with new ones is a problem even for members of the middle class. A refrigerator is a fairly expensive and important element of any kitchen. Its breakdown can seriously affect both the budget and the morale of the family.
The most common failure is the door being skewed and the seal coming loose. How to solve these problems will be discussed in this article.