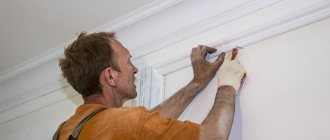
In this article I will present detailed step-by-step instructions for installing a stretch ceiling with a harpoon fastening system.
The ceiling has the shape of a rectangle with sides of 2.0 x 5.3 m and its installation is quite simple and straightforward.
Required tool:
- Laser level;
- Painting (beating) cord;
- Hammer;
- Screwdriver;
- A hacksaw for metal or an angle grinder with an abrasive wheel;
- Heat gun;
- Special spatulas.
Thermal gas gun for heating the stretch ceiling
material Materials:
- Custom ceiling fabric;
- Special profile – baguette;
- Fasteners (screws and dowels);
- Punched paper tape;
- Chandelier base;
- Ring;
- Super glue.
1st stage. Applying markings along the perimeter of the ceiling
At this stage, we need to decide how much the suspended ceiling will be lowered. The following principles should be followed:
- The suspended ceiling must be at least 10 mm lower than protruding obstacles. These obstacles will be: distribution (socket) boxes, platforms for lighting fixtures;
- It is also worth considering that when installing the ceiling, a special profile is used - a baguette, which must be securely fastened along the entire perimeter of the site, that is, you need to evaluate the possibility and convenience of installing the baguette;
- In rooms with small wall heights, every centimeter is precious, so you need to “lower” the ceiling very carefully, otherwise the new stretch ceiling will simply “press” and cause discomfort. Therefore, in small rooms it makes sense to use glossy stretch ceilings to create the effect of expanding the space.
When we have decided on the height of the ceiling, it is necessary, using a laser level and a painting cord, to draw a line along the entire perimeter of the area.
Applying markings using a tapping cord
Fastening
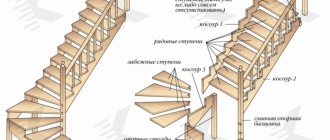
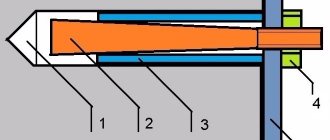
Installing a baguette should start from the most inconvenient or hard-to-reach corner. It is not allowed to join the profile in the corners, even if it is cut at 45°. When the canvas is stretched at an angle, the greatest load is applied, and the film will simply tear at the joint. Therefore, the baguette on the inner corners is sawed as follows: only the back wall is sawed, while the front wall remains intact, after which the profile is bent at the place of the saw.
Having secured the first baguette whip, we move on to the second. It is mounted end-to-end with the first one, and it is important to adjust the joint horizontally as best as possible; you should not get any steps. Having reached the next inner corner, we need to measure the distance. This can be done in two ways: using a tape measure or using a whole strand of baguette. The second option is more convenient and much faster. Turn the profile with the back wall outward, so that the groove for the harpoon is located at the bottom. Place one end against a corner, and direct the other along the level line, overlapping onto the secured baguette. Place a mark at a distance of 1 cm from the future joint, you need to move it towards the corner. Follow this mark and file the back wall. It is also not difficult to prepare the outer (or outer) corner. Press the end of the profile against the end of the already secured baguette and draw a line along the back wall, right at the corner. This will be the first cut. Further along the fastening path, place another mark at a distance of 2 cm from the first one. This will be the second cut. Saw through the back wall along both marks. Now we need to cut out the remainder between the cuts. For PVC profiles this is done with a regular construction knife; for aluminum it is easily broken off with pliers. After all this, fold the baguette exactly in the middle of the resulting recess.
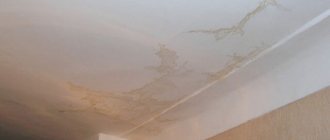
After you have securely fastened the entire sheathing, be sure to seal the joints with tape. You can use gray utility tape sold at any hardware store. And for aluminum profiles, metallized tape is also suitable. It is important to be careful at all stages of installing a stretch ceiling.
2nd stage. Installation of baguette
There are several types of baguette, in this case I used a PVC baguette. During installation, we align the bottom of the baguette along the line obtained in the previous step.
Installation of baguette around the perimeter of the ceiling
The following rules should be followed:
- The baguette must be securely fastened; it is advisable to twist the screws into all the holes in the profile;
- The joint of adjacent baguette slats should be smooth, without differences.
To avoid damage to the tension fabric during installation, it is advisable to glue the joints of the baguette with tape
Also, when installing a PVC baguette, the question arises - which side should the profile be adjacent to the wall? You need to mount the baguette as shown in the figure below:
Installation of baguette in corners
In my case, the installation area has four internal corners, so the baguette is cut as shown in the photo below:
Installation of a baguette - internal corner
That is, in the corner of the room the baguette is not completely cut off, but cut from the back side in order to be able to carefully bend it.
Example of an internal and external ceiling corner
A small digression. If our ceiling had a complex shape and had an outer corner, as in the figure above, then the baguette would be mounted on the outer corner in the following way:
Cut out part of the strip from the inside of the baguette, and then bend it:
Fastening the baguette
In my case, the baguette is attached to a concrete wall on two sides, and on two more sides to a step made of plasterboard and profiles (diagram below):
When attaching to a concrete wall, we use a hammer drill, a screwdriver, screws and dowels.
The question immediately arises - which fastener to choose for the baguette?
? I can recommend a universal and inexpensive solution: a polypropylene dowel 6x40 mm + black wood screw 3.5x45 mm.
fasteners for baguette (dowel 6x40 mm and self-tapping screw 3.5x45 mm)
The technology is simple: using a hammer drill (use a ⌀6 mm drill) we drill a hole in the wall directly through the hole in the profile (baguette), then install a plastic dowel and screw the screw into it with a screwdriver .
In the place where I installed the gypsum plasterboard step, I first laid a metal profile, as shown in the photo below:
Additional metal profile in gypsum plasterboard steps
To attach the baguette to the gypsum plasterboard step we use a screwdriver and metal screws about 30 mm long.
When attaching a baguette to a gypsum plasterboard structure, it is very important to provide embedded parts or use special fasteners.
In general, there is nothing difficult about installing a ceiling molding. You can move on to the next step.
Purpose and types of baguettes for stretch ceilings
The baguette is responsible for the reliable fixation of the canvas. It is fixed at some distance from the main ceiling.
How to attach a baguette for a tension structure depends on the type of profile:
- Harpoon baguette made of polyvinyl chloride. Reliable and popular method. The price is a little more expensive than the others. The reason is that the canvas is welded onto the harpoon. You have to use special equipment and carefully measure the canvas. During the dismantling process, the suspended ceiling is not damaged.
- Pin. An elastic clamp is used here - a clip. The advantage of this method is that it does not require heating the canvas for installation. The edges of the material are tucked in with a round staple. Re-installation is eliminated because after installation, excess fabric is trimmed.
- Bead or wedge. Here you need not only a profile that is attached to the wall, but also a glazing bead for fixing the canvas. You will also need masking tape.
Features of installation on various surfaces
The installation process and choice of fasteners differ depending on the selected surface. Dowels and anchors are suitable for concrete. For wood, it is better to choose galvanized screws. If the walls are loose, several fasteners are installed in one hole at once.
Loose walls such as foam concrete
When self-tapping screws cannot fix the structure properly due to looseness of the walls, there are two options: using spacers or screwing additional screws into one hole for fastening. The second method should be tried first. 2-3 additional screws are simply added to the hole. If this does not help, resort to spacers.
Wood and drywall
The walls can be wooden or covered with wood and plasterboard.
- If wood panels or drywall are attached directly to a concrete base, then it is necessary to use a longer fastener so that the screw goes deep enough into a solid base.
- If the cladding is attached to a metal frame, the baguette must be attached to the frame elements. A magnet is used to find them.
- Before installing the plasterboard structure, you can lay a mortgage at the future location of the profile. Then standard self-tapping screws will do.
- You can use special dowels for hollow walls.
Concrete
Concrete walls are strong and can withstand significant loads. For concrete and brick, it is better to choose an anchor or dowel as a fastening.
Adhesive for plinth moldings
When choosing glue, do not purchase silicone sealants. They are not covered with paint.
- If the planks are not white, they can be glued using “liquid nails.”
“Liquid nails” are applied in a continuous line to the furrows on the back side. Apply enough glue so that when you press the strip, a small part comes out - remove it with a damp cloth. The disadvantage is the high cost. - You can buy polyurethane glue.
- The finishing putty left over after finishing the walls is well suited for baguettes: it is fine-grained, it fills the cracks, the residue is easily removed with a damp sponge, leaving an even seam.
- Satengips. Applies like “liquid nails”, but is cheaper.
1.7. Level transition device
A level transition is a connection along a straight or curved section of several surfaces (both flat and higher orders) formed by suspended ceilings. This technique is usually used to bypass beams and crossbars. Level transitions are primarily divided into convex and concave (see Fig).
Sorry, this text is only available to dealers. You must be logged in as a dealer to see the hidden text.
A concave transition requires much more labor. It is available in two versions: with “separated by canvas” or “with a gusset”.
Sorry, this text is only available to dealers. You must be logged in as a dealer to see the hidden text.
After the installation of the form-building structure is completed, when the ceiling is stretched, the fabric will cover it and the required level transition will be obtained.
Glue skirting boards to the ceiling
The first step is to decide what mixture will be used to fix the ceiling plinths. There are several options:
- Acrylic mounting adhesive. It is not cheap, but its consumption is low. If during work the glue gets on the outside of the baseboard, ceiling or wall, it can be removed with a damp sponge.
- Finishing putty (gypsum or universal) + PVA glue. It is better to use construction glue rather than office glue. Both components are mixed together in a ratio of 1:4 immediately before use. This is the most budget option.
- "Liquid Nails". For rooms with high humidity, choose a mixture based on neopropylene, for all others - acrylic. With the help of “liquid nails,” the plinth is literally firmly glued to the wall, and if in the future you want to remove it, it will not be easy.
- Acrylic putty. By the way, like acrylic mounting adhesive, it can be used to fill the gaps between the baseboard and the wall.
Next you should prepare the tools:
- two spatulas (large and smaller);
- roulette;
- stationery knife.
Step-by-step instruction
Before gluing the skirting boards to the suspended ceiling, check whether they fit together correctly. To do this, simultaneously attach adjacent pieces of baguette to the walls. If you are satisfied with what you see, proceed to further work:
- Take a spatula and apply the selected adhesive to the part of the molding that is adjacent to the wall. Do not apply it to the upper part - stretch ceilings must “breathe”, so you cannot attach plinths to them. Don't skimp on glue, but don't put too much of it on, because you'll have to spend time removing the excess later.
- Place the baguette against the wall and gradually press it along its entire length, starting from the joint. Control the pressing force, otherwise dents may remain on the baseboard.
- Run the edge of a putty knife under the baguette to remove excess adhesive. If a gap has formed between the wall and the baseboard, fill it immediately.
- Take the next piece of baguette. If it fits entirely, glue it end-to-end with the previous one. If the piece is too long, first cut the corner, then attach the baguette to the wall so that the corner cut takes its rightful place. On the other hand, where the second piece of baguette overlaps the first, make a mark with a pencil. Use the vertical template on the miter box to cut off the excess. Next, apply adhesive to the baguette and repeat the steps described in step 2.
- After the adhesive has dried, the baguette can be painted.
By installation method
Depending on the location of installation, the slats are wall, ceiling and universal. The choice of type is based on the shape and size of the room where the tension structure is planned to be installed. For interiors with curved walls, universal baguettes are suitable.
There are several more subtypes of baguettes that are used when assembling tensile structures in two or more levels:
- Dividing. It is used for large areas when the ceiling can be made of only several panels. It is installed in the center of the room to fix the canvas in the middle, preventing it from sagging and obtaining a flat surface over the entire ceiling area.
- Angular. It is mounted in two places at once - to the ceiling and to the wall. It has locking grooves in which one panel is secured horizontally and the other vertically. They allow you to carry out complex installation of a multi-level ceiling structure, as well as obtain a wavy ceiling surface.
- Flexible. Made from flexible plastic and cut to create a curved shape.
Wall
Attaching a stretch ceiling to a wall is suitable when there is a need to lower the ceiling level in order to place electrical communications in the resulting space. This type of profile is mounted in the same way as a frame for finishing with plasterboard. The blade is secured with a straight spatula.
Ceiling
Ceiling mounts are used less frequently than wall mounts. The installation of a profile for a suspended ceiling is done to the ceiling. Suitable if the walls are not smooth enough. Installation is complicated by the fact that during the process of drilling the floor slab, you can get into its void or rest against the reinforcement. The fabric is fixed using a straight spatula. Masking tape is used to close the gap between the wall and the profile.
Universal
The universal decorative baguette is a slotless type of slats and there is no need to install masking plugs. Attaches to both the ceiling and the wall. Used to work with wavy and semicircular walls.
Which profile is better to choose?
The choice of aluminum baguettes for stretch ceilings is based on the following conditions:
- the walls and ceiling are smooth and form an angle of 90°;
- installation is carried out to the floor slab;
- a niche for curtains is planned;
- installation of multi-level structures;
- a safety margin is required for a large room area;
- financial possibilities allow.
A plastic baguette is suitable in the following cases:
- the need for simple and inexpensive finishing;
- there is curvature of the walls;
- there are oblique angles;
- small room area.
Loose walls
Unfortunately, in our profession, cases of loose walls are not uncommon. What to do if the self-tapping screw screwed into the wall does not hold the profile well? There are two ways out: use spacers (jibs) or screw additional screws into one mounting hole. The second method in most cases saves the situation. One or two additional screws can securely fix the baguette. Well, if they didn’t help, then you should resort to using spacers. Take a 15 centimeter piece of baguette and drill a hole in one of the ends. Open the jib into the molding and the ceiling and place a mark through the hole in the ceiling. Drill under the dowel and drive it there. Take the jib and, tightening it with a self-tapping screw, open the baguette. The spacer should be rigid, and the profile should not move up and down and be pulled away from the wall.