The birthplace of tulle is France. The material is named after the city in which it was invented and first used. Having “penetrated” our homes, he firmly established himself there. Nowadays it is impossible to imagine home decor without tulle. We have great success with tulle nylon.
Curtains or curtains made of tulle, organza and other thin “capricious” materials should be hemmed with special care.
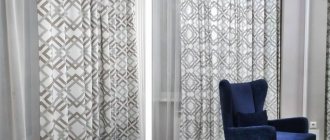
Well-chosen tulle is one of the most important decorations in your kitchen, living room, bedroom or hallway. It's quite light. At the first stage of choosing tulle for your home, we pay attention to the color, pattern, and quality of the material.
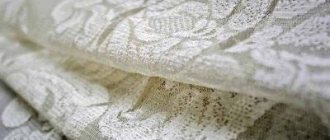
This is a very thin and delicate fabric that requires delicate handling.
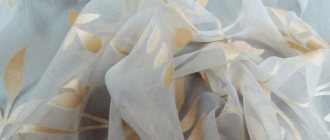
Tulle is a light, transparent material. It can be made from natural fabrics, synthetic, or a mixture of different fibers. It can be cotton, linen, silk and other materials.
In the design of modern rooms, tulle of various colors and sizes can be used.
You have chosen the material, now you need to bring it into the form of a finished product.
You need to decide on the length and width of the curtains.
Let's consider the following options for arranging tulle.
- Length to window sill.
It is advisable to give this length to products in children's rooms. This is convenient and solves some problems. For example, a very small child crawling on the floor will not get confused in the product.
Hemming tulle correctly on your own is not an easy task due to the nature of the material.
- The height of the tulle is to the floor.
This is a classic option. The length of the product reaches the floor. The tulle completely hides the wall and does not reveal the baseboard.
When creating comfort in a home, curtains play an important role, and this is no coincidence. After all, the absence of curtains makes the windows “naked”, and in some cases even defective.
- Standard tulle height.
The most common type of product. It is attached from above, the lower part is two or four centimeters higher than the floor. This option is very functional. When moving, contact with the floor is excluded. The product is less susceptible to contamination and is not subject to friction on the floor, which increases its service life.
In order to best satisfy the needs and desires of each customer, manufacturers produce wide canvases.
- Slouchy tulle.
A very nice option. Waves of tulle lie on the floor, completely covering the bottom of the wall and baseboard. The waves are laid on the floor by hand. The length of the overlap is fifteen or twenty centimeters.
When purchasing ready-made tulle, it must be hemmed to give the curtain the required dimensions.
Please note that such a product will look great in spacious rooms with high ceilings. And it is absolutely not suitable for arranging small rooms with low ceilings. The product visually reduces the size of the room.
When modeling and sewing a product, do not forget about the standards for filling width. The finished product should look beautiful and rich.
The best filling is 1:2. The product will look good. This option is perfect for material with a large pattern. Please note that with less filling, your tulle will look more than modest.
The most optimal filling is a ratio of 1:3. The product will look rich. In this case, you need to take tulle as a basis with or without a small pattern on the bottom.
If the fabric has a beautiful coupon figured part, then the bottom of the product is left as is, immediately moving on to the side cuts.
How to cut tulle evenly with your own hands
Attention! Please read the instructions below before cutting your tulle.
When sewing a tulle product, it is very difficult to trim the edge of the product evenly. The reason is that tulle is a thin and delicate fabric. The canvas constantly slides; any inaccurate movement leads to the formation of puffs and small holes on the surface.
In order to fold the canvas in half and join the edges symmetrically, you need a hard, flat surface. Our apartments are not equipped with industrial tables for cutting tulle and nylon fabrics, so we have to use improvised material. In this case, you can use the floor of the apartment. You may need the help of another person.
How to shorten tulle? We recommend several methods for cutting fabric.
- Pull out the cross thread.
Lay out the fabric on the floor. We mark the desired length by placing marks at a certain distance from each other with a pencil or a piece of chalk. We make a small cut in the fabric, pick up the thread from the edge and pull it along the entire length of the fabric. We observe the formation of a strip along the length of the fabric. We make a cut along the strip. You can use a utility knife or regular scissors, but they must be sharp enough.
Please note that when cutting, the fabric strip laid out on the floor should not slide. To reduce slipping, you can place a cotton base under the canvas or secure it with masking tape.
To process tulle fabric, a simple technique is used: a thin thread of fabric is carefully pryed in the right place and pulled out.
After this, the material is carefully cut along the resulting “path” with scissors.
This bending method is considered the simplest and most reliable.
- Making cuts on the material
Fold the fabric in half, carefully aligning the edges. We make a small cut in the place where the edges diverge. Then again, very carefully fold the material in half. The fabric must be constantly smoothed to avoid fractures and unevenness. Again we make an incision where the previous marks can already be traced. Please note that the cuts must be symmetrical. Then, making sure that the fabric does not move, we unfold it back.
After all the manipulations we get the fabric folded in half. We take a ruler or similar straight long object and connect the marks together, drawing strokes using a piece of chalk or a pencil.
Cut off the excess.
We have given you the easiest ways to trim fabric. Try to act consistently, following the instructions given, so as not to damage the fabric.
Selection of threads and needles
You should take a responsible approach to the choice of needles and threads; incorrectly selected equipment can damage the curtain.
Threads for sewing
Needles
Tulle is a thin and quite fragile material, so the needles for hemming it must be selected thin and sharp. If the needle is dull, it will damage the fabric and leave unaesthetic marks on it. The same will happen in the case of a thick needle - there will be traces on the tulle from making the seam. Over time, they may cause stretch marks and arrows.
Threads
Threads are also chosen according to the same principle as needles:
- they must be thin and durable;
- The threads must match the shade of the curtain.
You might be interested in this: The procedure for sewing a bedspread for a sofa with your own hands
Note! The maximum number of threads used for hemming tulle is No. 40.
It can be thinner, but not thicker. If the curtain shimmers and has a pearlescent sheen, then it is best to use threads a couple of tones lighter than its shade. During the work process, the housewife will also need a tape measure, scissors, crayons or a pencil, and an iron. If a ribbon of a contrasting shade is used to play with color and highlight accents, then the threads can be taken in a darker shade than the curtain itself.
Threads for hemming tulle
How is tulle hemmed? Description of methods
Hemming tulle at home is not difficult. You need a little patience, accuracy and have a simple set of tools in the house: threads, needles, scissors.
To hem curtains made of tulle, organza and other thin fabrics, use thread No. 40 or thinner.
Please note that tulle requires thin threads, size No. 40 and smaller. The color of the threads and fabric should merge. Remember, first you need to process the sides of the canvas, then proceed to the bottom edge.
If the fabric is translucent, the color of the threads can be chosen a little lighter than the fabric, so they will be less noticeable in the light.
The lower part of the canvas is processed in several ways.
The easiest way is double hemming. We processed the side seams using the same method, but its width in this case is greater, at least two centimeters.
You can hem the tulle on the sides in several ways. Most often, preference is given to the traditional Moscow type of processing.
The bottom of the fabric is often treated with a Moscow seam. Fold the edge of the fabric one centimeter and iron it. We sew the line at a distance of two or three millimeters from the edge of the hem. Excess fabric must be trimmed. We fold the material again, iron it and stitch it, we must try to put the line exactly along the first seam.
Folds up 0.5 cm. Irons. A regular stitch is sewn 0.2 cm from the edge.
Excess fabric is cut 0.2 cm from the stitched edge.
The tulle is folded over one more time and ironed again. It is stitched at a distance of about 2 mm from the first stitch.
This method allows you to save the amount of material on the hem.
Often the lower cut is treated with bias tape - this is the edging of the lower cut with a special tape.
We lay the curtain section on bias tape, which we then bend. The raw seam remains inside the finishing tape, which we put under the foot of the sewing machine. The stitch runs along the edges of the tape. You can purchase the tape at the store or make it yourself from scrap material.
It is best to attach the binding using a special foot or snail foot.
Secrets of a home seamstress
Before processing tulle at home, the fabric must be washed and ironed.
A beautiful looking and even fabric will be easy and pleasant to hem. It is very convenient to use the American seam at home; it is quite light and at the same time almost invisible. To sew elegant curtains, you must initially choose a durable material that is not prone to fraying at the edges. Then the curtains will definitely not tear and will last a long time. If you need to shorten industrial curtains, do not trim the edges, otherwise the threads may fray and the work will become noticeably more difficult. You just need to carefully bend the fabric to the desired length, and then there will be no problems with sewing. It is better to sew by hand than by machine, because an incorrectly set machine can only ruin delicate material.
The correct cut is of great importance, so it is best to use ready-made patterns from the Internet or specialized literature. There you can also read about how to properly hem curtains and tulle.
When working at home with particularly demanding fabrics, you need to do cutting and sewing at a level, well-lit table. Any dents or indentations on the surface of the work table can prevent the dressmaker from cutting the fabric evenly. If the surface of the table is not perfectly smooth, it should be covered with a thin woolen blanket or a sheet folded several times.
You can also attach a sheet of plywood or thick plexiglass to the surface. It is advisable that the table be located near the window, then it will be very convenient to work in daylight. For right-handed people, the main source of lighting should be on the left; for left-handed people, this rule applies exactly the opposite. The scissors that a seamstress uses while cutting need to be sharpened regularly. Using dull scissors, you can easily ruin thin fabric and also easily cut yourself, because working with such a tool requires significant physical effort.
Curtains made at home will certainly enliven the interior . The main thing is to know how to work with fabrics, and then you can easily sew original curtains.
Of course, this work requires a certain skill, but it is certainly worth the effort. Homemade tulle products will decorate any interior.
Weighted tulle, hemming methods and processing
Weighting agents are used to give the lightweight material its shape. They are produced in the form of cords or plates. They give the air product a completed look and establish its shape.
If the fabric is equipped with a weighting agent, it becomes difficult to adjust the length.
There are two options for resolving the issue: trim the material from above or rearrange the weighting material. Basically, housewives choose the first option, because it is difficult to rearrange the weighting material, or rather, it is difficult to make the seam with which the weighting material is sewn. Not every housewife can repeat such a seam.
What to do if the material is wide and you need to remove part of the width? You will need to shorten the weighting material. We move the overstitching, exposing part of the tip of the weighting material, and cut off the excess part. After the manipulations, we move the stitching to its original place. If the pattern on the fabric allows, we perform the intervention only on one side; otherwise, similar actions must be repeated on the other side of the material.
If the tulle has a special weighting or decorative treatment at the bottom that you want to preserve, then hem the curtain only on the sides.
Adjust the length of the curtain from above.
Gusset
Additional attractiveness can be given to finished curtains by using a hidden diagonal seam to finish the corners. The method of its implementation is complex, but it looks very good on any rectangular products.
Procedure: Fold and iron the fabric 1-1.5 cm from the bottom and sides inside out. In the same way, we make the second hem, selecting the width that we plan to hem.
We unfold the second hem and make a corner diagonally with the front part of the fabric inward. We combine the edges and secure with a pin or needle along the line of the second fold closer to the corner.
Mark a 45 degree bevel to the fold marked with a pin, starting from the point at which the fold begins and towards the edge. We sew the corner along the resulting line and, stepping back from the seam 1 cm, cut off the corner.
We turn the product inside out and sew the folds along the contour. Iron the bend.
The video below details the diagonal blindstitch process.
Tulle mesh: how to cut and hem fabric
The material requires a certain approach and extreme accuracy. It can be treated at home if you follow certain recommendations. Before hemming the tulle, it must be marked on a flat, non-slip surface. This could be a floor covered with cotton fabric. If necessary, you can additionally use masking tape.
Fine structure mesh tulle can be cut in a very simple way. Before cutting the tulle, measure the length you need at the side end and make a mark. Then take sharp scissors, make a small cut on the side of the tulle, on the marked mark and, using light pressure, “slide” the scissors to the opposite edge of the material.
This way you get a perfectly even cut.
How is tulle hemmed? Start hemming from the sides of the material. This must be done using a regular closed seam. The width of the seam should be from two to three centimeters. It depends on the thickness of the material; the thicker the material, the wider the seam. How to process the edges of tulle? Iron the ends of the fabric before seaming. After heat treatment it will be easier to suture.
When ironing, try not to stretch the fabric, otherwise the product will lose its shape.
Usually the fabric on the side seams is secured with pins before sewing. When stitching, we recommend setting the average stitch length. The line in this case will move much faster. The thread tension needs to be loosened a little, this will allow you to sew the product correctly and avoid it from pulling.
If the stitching loops or skips, try using a knitting needle or zigzag stitching before hemming the tulle at home.
After processing the side seams, proceed to processing the bottom edge of the product. First you need to iron the bottom seam inside out. Then use the same technology that was used when processing the side edges of the product.
Hemmed tulle bottom edge.
Tulle mesh can be processed using a Moscow seam using the following technology. You need to purchase non-woven tape at the store. The width of the tape is not important; any width of tape will do. Iron it onto the wrong side of the material, then perform a regular Moscow seam. We make a line two millimeters along the edge, grabbing the tape, then cut off the allowance with part of the tape. About two millimeters remain in the seam, this is enough to make a seam.
A quick way to shorten curtains is to buy a special adhesive tape.
Zigzag stitch
Using a zigzag stitch, you can quickly hem the tulle from the bottom. The work is carried out in several stages:
- Turn the edge in at least 10 millimeters.
- Run the iron along the hem.
- Set the necessary parameters on the sewing machine: thread length, tension, stitch size.
- Finish the edge of the curtain with a zigzag stitch.
- Remove excess fabric using sharp scissors.
How to hem tulle by hand, without a machine? Recommendations for housewives
All of the above methods for sewing curtains are suitable for manual processing, without the use of a sewing machine. But this activity is costly in terms of labor and time spent. For housewives who do not have special materials in their household - threads, needles, a sewing machine - we offer a method of hemming using adhesive tape.
It's simple, excess fabric is placed between layers of tape and ironed.
When using adhesive tape for the first time, we advise you to first experiment on a small piece of fabric and only then move on to working on the main material.
In addition to adhesive tape, special clamps are used to regulate the length of finished products. Attaching the desired length to a curtain using clips is not an easy task. A symmetrical result will not be obtained immediately.
When hemming tulle, follow our recommendations, and the windows of your home will be decorated with wonderful products sewn by your own hands.
Don’t be lazy and don’t be afraid to hem drapes and light curtains yourself - the process is simple, although not quick.
Curtain tape
Curtain braid can be divided according to the type of drapery:
- Column. Forms the simplest folds, such braid is easy to sew yourself;
- A ribbon that, when tightened, can create folds in the form of intricate glasses or butterflies.
- Transparent. Lightweight fabrics are draped: . This braid is represented by a fishing line that has no color and remains invisible.
- Opaque. This refers to curtain fabrics.
Depending on the width, curtain tape is divided into types:
1. Narrow. They are used if there is a closed cornice or it is hidden in a niche. It is possible that the niche covers the top of the curtain or there is one that covers the hooks.
2. Wide. In this case, the cornice must be open. In addition, if the number of fastenings is small and it is necessary to prevent sagging, then a wide tape will successfully accomplish this.
Tulle of various lengths in the interior - 50 photos:
PreviousCurtainsRules for washing curtains in a washing machine: mode, temperature
Next
CurtainsDescription of cobweb tulle: photos in the interior, reviews
What is curtain tape
Curtain tape is a longitudinal braid that acts as a frame for draping curtains. Inside the tape, in special pockets, there are cords, the tension adjustment of which allows you to form decorative folds in the upper part of the curtains.
The technology of curtain draping is quite complex; without proper experience, it is almost impossible to give the fabric the desired appearance. Curtain tape greatly simplifies this process - when using it, you can create folds of any density and shape; moreover, any needlewoman can calculate and sew the tape to the fabric without any problems.
All braids on the market can be divided into the following groups:
- Opaque - intended for dense curtain fabrics, and transparent - used for decorating tulle and curtains made of light materials such as organza and polyester;
- Narrow - width from 2.5 to 5 centimeters, and wide - from 6 to 15 centimeters;
- Sew-on - attached to the fabric using a sewing machine, and braids glued with a hot iron;
- Depending on the method of fixation on the cornice, there are tapes with Velcro or loops.
The braids also differ in the number of gathering cords and compartments with hooks, the configuration of which determines the appearance of the formed folds.
The most popular are ribbons that create the following forms of drapery:
- Vertical pencil folds;
- Puffed diamond-shaped folds;
- Fan (French) folds;
- Bell folds.
Bell pleats
Pencil pleats can be assembled using the simplest tape with two cords without fixing hooks. All draperies of complex shape belong to the shaped category; for their formation, braids with a rather complex design are used, in which there are limiting hooks that prevent the fabric from straightening.
Material preparation process
Before you sew the braid onto the curtain, you need to prepare it. For this:
- The curtain is being ironed. There should be no folds left on it. The fabric is ironed in accordance with the rules for caring for the material from which it is made.
- If the edges of the product are not processed, then they are hemmed, bending them twice.
- The loops on the tape are checked using an awl, screwdriver or any thin object. This is done so as not to sew the braid on the wrong side.
The simplest pins
This is a very elegant and elementary way. You just need to raise both ends of the curtains so that they reach the middle of the window. To do this, you need to have a thread and a needle on hand. Safety pins for notes also work well.
You need to raise the curtains on both sides until it looks nice. After this, you just need to stick the needles into the folds. If there is a need or desire, then you can also sew it all on, but so that the seams are on the inside. And to make the curtains look even more aesthetically pleasing, you can iron the edges. The reader can see an example of such work in the photo above.
Fabric edging
The treatment of curtains made from fabric edging looks very neat.
- standard sewing “trio”: threads, needles, scissors;
- As an edging, you can use any strip of fabric: ready-made ribbon or braid cut from the material. The main thing is that its length is no less than the width of the curtain fabric.
How to make edging with a machine, step-by-step instructions:
- If you are not using ready-made tape with finished edges, cut a strip of fabric to the desired length.
- The finished braid is simply folded in half, the cut tape is folded several times: first in the middle, then the raw edges are folded inward again. The formed strip is ironed.
- We insert the edge of the curtain between the folded tape, baste it, and then sew the parts together with a machine seam.
An alternative to edging is a frill, behind which the raw bottom of the curtain is hidden. But this method requires a certain stylistic decision. The way the work is done is also different:
- The edge of the canvas is hidden not between the layers of the strip, but behind the frill.
- It is recommended to pre-treat the bottom of the curtain with an overlocker.