Probably every family uses an automatic washing machine, and no one can even imagine being left without its help. But over time, it may also happen that the washing machine stops heating the water, for unknown reasons, the program time lengthens or the quality of the washes deteriorates.
If your assistant experiences such symptoms, it means that it is most likely necessary to install a new heating element on the Indesit washing machine due to the old one failing. The fact is that when the heating element is not working, the effectiveness of detergents deteriorates, programs become longer because the processor does not understand why the required water temperature is not there, and if there is a breakdown on the heater body, the Indesit washing machine may turn off completely.
You can find out how much it costs to replace a heating element for an Indesit washing machine in any specialized workshop, but if you have skills in repairing any equipment, you can solve this problem with your washing machine yourself.
Replacing the heating element of an Indesit washing machine will require a little time, tools and patience.
On all models of this brand of product, the heater is located in the rear of the tank; to access it there is a removable part of the device body and therefore complete disassembly of the washing machine is not required.
Replacing the heating element in an Indesit washing machine with your own hands, tips
A heating element is a device that heats water in a washing machine.
The washing process depends on the water temperature of the program you initially set.
It is such a device as a heating element that can heat the water in the washing structure to the temperature you need.
- Ten's operating principle
- Location of the heating element
- Heating element, which is located behind the front panel
- Heating element, which is located behind the rear panel
What is it, why is it needed?
A tubular electric heater (TEH) is an element that represents a hollow tube (curved in a w-shape or v-shape), inside of which there is a spiral.
For better heat transfer, the free space inside the tube is filled with a dielectric insulator (crystalline magnesium oxide). It is this that accumulates the heat emanating from the spiral and transfers it to the outer shell of the tube. On the outside, the heating element tube is coated with a protective anodized layer. The ends of the spiral in the tube are soldered to the contacts through which electricity flows. Nearby there is a thermal unit that measures the degree of heating of the water in the washing machine.
The main purpose of the heating element is to heat the water in the washing machine to the required temperature by converting electricity into heat.
When the washing machine starts, a signal is sent to the heating element through the control unit. The tube begins to heat up, bringing the water temperature to the value specified by the program. As soon as the water warms up to the required temperature, the thermostat is activated. It transmits a signal to the control unit, which turns off the heating element, thereby stopping water heating.
Ten's operating principle
The water that the heating element heats can be of any kind, for example, if the water has impurities or is hard, then during its heating scale will form, which can break your washing unit at any unexpected moment, provided that you do not clean it regularly .
This is not the only reason why a washing machine may fail. If you notice that the water in your structure does not heat up, then most likely your heating element is broken. You need to urgently check the heating element, and if it is broken, buy another one.
If you want to do this without the help of specialists, then for this you need to know how to change/repair the heating element yourself. Now we will tell you how to check the operation of the heating element yourself, where is its location and how to understand whether it is broken or not.
Our advantages
- Free repair consultation. There is a Question and Answer section on the website especially for your questions. Professional experts answer. Describe your problem in detail, and a specialist will respond within 48 hours. You can also leave a repair request: the technician will contact you by phone and advise you on possible breakdowns of your washing machine and the cost of fixing them.
- Free visit and diagnostics. If you agree to replace the heater by RemBytTech, a specialist visit and diagnostics of the machine are free.
- Repair at home within 24 hours after calling the specialist. Thanks to the territorial presence of specialists in all districts of Moscow and most cities of the Moscow region, our specialists serve orders in the shortest possible time - within 24 hours after the request. All work is carried out at the customer’s home; there is no need to take the equipment to the workshop.
- Opening hours: 8 a.m. to 10 p.m. daily. Our technicians visit clients’ homes from early morning until late evening, seven days a week and seven days a week. You can easily choose a repair time that is convenient for you.
- 6 month warranty. For work on replacing the heating element of a washing machine, a guarantee is issued for a period of 6 months (for work and for spare parts, if they were purchased from our specialist).
We invite you to read WHAT CAN YOU MAKE FROM YELLOW TOMATOES FOR THE WINTER?
Location of the heating element
But you won’t be able to get to it easily, although for the most part it depends on the model of your unit. In some designs, the heating element is located behind the front cover, in others - behind the rear panel. There are cases when the heating element is located on the side, but this is mainly in washing units with side loading.
First, you need to determine where your heating element is located, to do this, remove the back panel and look under the tank to see if this device is there, if it is there (it’s easy to determine, because the heating element, as usual, will be the first from the back cover and is quite easy to remove), then you need to remove it.
If there is no heating element behind the back panel of the machine, then all that remains is to look behind the front cover. So, we have already overcome the first step. Now you need to pull out the heating element and check whether it is broken or not, and if so, replace it.
In the future, we will tell you how to do all this one by one, and also provide two ways to disassemble the washing structure. The first method will be deployed if your heating element is located behind the front panel, and the second method when the device is located behind the back cover.
Here are a few rules that are recommended to be followed when disassembling the structure (does not depend on the model and type of washing unit):
- When disassembling the washing machine, you need to make sure that the machine is unplugged from the network; if not, then do it immediately by unplugging the plug from the socket.
- Before disassembling, it is necessary to drain all the water from the tank; to do this, use a drain filter or otherwise use a drain hose. To drain the water from the hose, you need to lower it slightly below the level of the machine.
- In any case, some amount of water will still remain in the tank, therefore, it is necessary to keep some container and floor rags nearby.
The preparatory work has been completed.
For future work you will need the following tools:
- A set of screwdrivers (flathead, Phillips, and possibly Torx);
- A wrench, either a socket or an open-end wrench, size 8 or 10.
As you can see, no special tools are required when removing the washing structure, and it is already becoming clear that the heating element can be repaired and replaced without any help from specialists.
Heating element, which is located behind the front panel
As mentioned above, mostly in washing machines the heating element is located behind the rear panel. Perhaps your washing unit is from Bosh, Samsung or LG, then behind the back cover you can only find a drive belt attached to the motor.
We suggest doing further work step by step:
- The first step is to remove the top cover of the washing unit. The cover is held in place by two screws that must be unscrewed. Their location is always at the back. The screws must be unscrewed with a flat or Phillips screwdriver; you may need a Torx screwdriver (in a few cases). After unscrewing the screws, carefully lift and pull the cover back and you can easily remove it.
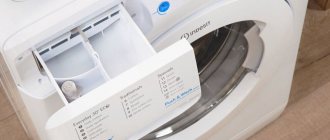
- Second step. It is necessary to remove the box for detergents (powders, etc.). This tray will also be screwed to the machine with two self-tapping screws, which need to be unscrewed. On the parallel side of the front panel there is a latch, by pulling which you can remove the box.
- The third step will be to remove the steel hoop. This hoop holds the rubber seal on the loading hatch. This ring tightens a simple wire spring. In order to remove the above elements, it is necessary to stretch this spring a little and pull out the parts accordingly.
- Fourth step. Removing the rubber seal.
- The fifth step is to unscrew the screws located on the front or bottom of the front cover. When you find them and unscrew them, we proceed to removing the cover. Be careful and attentive when preparing to replace the heating element in the washing machine, because the cover can be attached not only with bolts and self-tapping screws, but also with clips. Therefore, it is better to remove the cover in the following way - simply move it forward a little and then lower it down.
- Sixth step. Not far from the hatch there is a door lock. There is no need to unscrew or remove it, you just need to disconnect the wires. Now it is possible to remove the cover and begin removing the heating element.
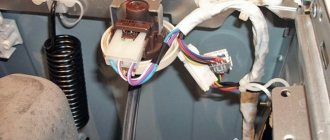
- Seventh step. The heating element is located at the bottom of the tank. At the end of this device you will notice a ground wire, power terminals (two pieces), and a connector for a temperature sensor.
- The eighth step is to remove the terminals, disconnect the ground and remove the temperature sensor. If you want to connect everything correctly and successfully in the future, then it would be best for you to remember the locations of the disconnected wires, write them down or take a photograph.
- Ninth step. All that remains is the nut, which must be unscrewed with a wrench (open-end or socket). There is no need to unscrew the nut all the way. Press the bolt inward a little, after which you can remove the heating element.
- Tenth step. To remove it, simply wiggle it up and down and then carefully remove it.
- Eleventh step. Tank maintenance is necessary. To do this, simply clean the tank of scale, detergents and other debris. Now let's move on to the main thing, replacing the heating element.
- Twelfth step. Purchase a new heating element in advance (we recommend starting from the model that you originally had). Insert the new device after connecting the temperature sensor to it. If there are guides, then you need to get into them and also push the heating element inside. After that, screw the nut back, while attaching the remaining wires to the heating element, use a photograph that will show how everything was in place of the previous heating element (the photograph is discussed in the eighth step).
- The last, thirteenth step will be the reassembly of the washing unit.
Well, that's all, we replaced the heating element in the washing machine. Fasteners can be located in completely different places, but this does not change the principle of operation.
Heating element, which is located behind the rear panel
Washing structures from manufacturers Indesit and Whirlpool and other similar models are disassembled from the rear. These options are simpler, more optimal and faster.
We will provide you with a step-by-step procedure for replacing the heating element in an Indesit washing machine with a back cover:
- First step. Turn the machine with the back cover towards you.
- The second step is to disconnect the unit from the network and drain the water.
- Third step. Unscrew the screws with screwdrivers and remove the back cover.
- Fourth step. We immediately see our heating element, all that remains is to disconnect the wires.
- The fifth step is to unscrew the nut (also with a socket or open-end wrench) not completely, press the bolt inward and carefully pull out the heating element.
- The sixth step is to remove the sealing rubber; it will interfere with you and prevent you from pulling out the part, so loosen it little by little and carefully pull it out.
- Seventh step. Maintenance of the tank is necessary, during which you clean it of unnecessary debris, powder and scale, and then replace the old heating element with a new one. The sealing rubber can be lubricated with dishwashing liquid before insertion; this is necessary so that the device fits in smoothly.
- The eighth and final step will be connecting the wires. Then screw the back cover back on and turn the front panel of the machine towards you. Connect the unit to the network, having first installed all communications back. Check the design for functionality.
This is the end of our article. After replacement, your washing unit is ready to take on new heavy-duty washing tasks. The process of replacing the heating element device itself is quite quick and not very difficult, as it might seem at first glance. Don’t be afraid and feel free to take the necessary tools to disassemble your structure.
Replacing the cuff (sealing rubber of the hatch)
When the cuff is even slightly damaged (and the machine leaks slightly), it is better to replace it immediately: there is a risk of flooding the neighbors.
1. First, remove the hatch; to do this, you only need to unscrew two screws.
Removing the hatch
2. Find the spring on the clamp, pry it up with a flat screwdriver, and move it to the side to remove the clamp.
Pry up the spring on the clamp with a flat screwdriver
3. Disconnect the outer edge of the cuff from the front wall, moving in a circle.
Detach the outer edge of the cuff from the front wall
4. Remove the top cover to gain access to the inside of the machine.
Remove the top cover from the machine
5. Now you need to remove the second spring clamp. Carefully pull it out along with the cuff.
Carefully pull out the second spring clamp along with the cuff
6. We begin installing the new cuff from the top point. We tuck the cuff inside the body.
We begin installing the new cuff from the top point
7. Next, install the spring clamp. First you need to remove the lock by removing two screws. Fix the clamp with a screwdriver.
Fix the clamp with a screwdriver
8. We tighten the clamp around the perimeter. The main thing here is to make sure that the screwdriver does not jump out. Check to see if the spring is tight. Screw the lock back into place.
We tighten the clamp around the perimeter
10. Put on the outer clamp. We install the hatch in its original place.
We put on the outer clamp and install the hatch in its original place
11. Start the wash. If the machine still leaks, we begin to understand that we should have called a technician.
A case from one's life
My friends' Indesit washing machine broke down after 12 years of impeccable service. The master was called. The master replaced the heating element and brushes and charged 2,400 rubles for the work. - and 4700 rubles. for spare parts. In total, they paid 7,100 rubles for repairs. This happens, but, in my opinion, at such costs it is better to buy a new car or look for a more affordable repair.
Find a master who will do it cheaper
If you call a washing machine repairman from a normal company, he will come and diagnose the breakdown for free. And then you decide whether to repair the machine or throw it away. For example: replacing a heating element in an Indesit brand machine will cost you 500 rubles. for the work of the master plus 700 rubles. there is a new heating element. Total - 1200 rub. Replacing brushes in the engine - 1200 rubles. for work plus 300-500 rubles. for new brushes.
Buy a used washing machine with a guarantee with this money
In Moscow there is a secondary market for washing machines. Several companies sell used cars, giving them a warranty from 3 months to 2 years. A fairly new Indesit machine (used) costs from 6,000 to 8,000 rubles.
Please note: the cost of spare parts for washing machines in different stores may vary by 1.5-2 times. For example, a heating element for Indesit costs on average 700 rubles, but if you search, you can find it at a discount for 400 rubles
Well, if you didn’t succeed in bringing the machine back to life, you can still give it another chance to serve you faithfully. For information on how to do this, read the materials:
- Brazier from the drum of an old washing machine
- The second life of a washing machine, or How to prepare a gas boiler for winter
Text: Yuri Deev Photo: eSpares/Youtube
Causes of failure
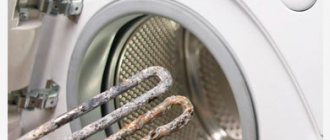
First, let's look at the reasons for the failure of the heating element. It can be:
- voluminous scale deposits that form due to too hard water;
- rust on the surface of the heating element due to moisture, the reason for which is the depressurization of the tank;
- A rare occurrence is a factory defect.
All these factors lead to the fact that the water does not heat up to the required temperature during washing, that is, only cold washing is possible. In some cases, the unit reacts in such a way that high-temperature programs simply do not start.
Thanks to advertising, there is an opinion that as a result of a breakdown of the heating element, water will suddenly flow from the bottom of the car, but this is not true.
Diagnosing the problem is very easy: just touch the surface of the hatch in the middle of the wash cycle . It will be cold, and the laundry will not be washed properly after such a wash. If you have a multimeter, you can check the resistance of the heating element yourself: this method will give an accurate answer to the question about the serviceability of the heating element.
How to understand that a part needs to be changed
Signals of problems with the heating element are:
- the water does not heat up during the washing process (easy to check by placing your hand on the sunroof glass);
- the machine draws water, but turns off five minutes after the start of the wash;
- when you turn on the washing machine, the plugs in the panel are knocked out;
- During washing, the machine emits an unpleasant burnt smell;
- when touched, the body is pierced with electric current;
- The electronic display of the washing machine displays error codes related to water heating.
It is possible to understand whether the problems that have arisen really require replacing the heating element only by testing the heating element with a special device - a multimeter.
Algorithm of actions:
- Disconnect the heating element from all wires.
- We switch the multimeter to resistance measurement mode (200 Ohm range).
- We apply the multimeter probes to the extreme contacts of the heating element and look at the tester readings. “Zero” on the tester display indicates a short circuit has occurred, “one” or “infinity” indicates a break in the conductive thread. In any of these cases, the heating element must be replaced with a new element.
If, when you touch the contacts with the probe, readings close to the calculated ones are displayed on the multimeter screen (defined as the network voltage squared and divided by the power of the heating element), then the heating element is working and there is no need to change it.
Testing of the heating element is carried out only after the washing machine is turned off from the network.
Replacing the heating element on an Indesit washing machine
So, let's start the repair.
- Disconnect the unit from the electricity and water supplies, and also remove the drain.
- Turn the back of the car towards you and unscrew the screws located in a circle to remove the metal part of the body.
- After removing the cover, at the bottom of the tank you will see a heating element to which a temperature sensor, ground terminal and power wires are connected. Using pliers, remove all connections from the element one by one.
- Disconnect the heating element mount using a socket wrench.
- Carefully pry the part with a screwdriver along with the holding rubber band, and slowly remove it from the socket, gradually rocking it from side to side. You can use any lubricant, for example VD-40, to facilitate the movement of the heating element.
- After you manage to remove it, you can clean the coils from the layer of scale, if the part is still in good condition. A complete replacement will be required if the heating element is burnt out.
- Before inserting a new part into the socket, you can use this trick: lubricate the rubber base of the element with dishwashing gel. This can make it much easier to fit the heating element into place, otherwise it will fit very tightly. The use of other types of lubricants is detrimental to rubber seals.
- Do not forget also about the correct installation of the heating element. A special guide stop is usually installed on the surface of the tank. It should fit between the coils of the heating element, rigidly fixing its position in the tank. Otherwise, parts of the element may be touched by the rotating drum.
This is how you can easily and simply fix a washing machine yourself if it stops heating the water. In order for the heater to last as long as possible, it is worth using simple measures to prevent its wear and tear.
Part replacement
If you managed to purchase a similar working heating element for a Samsung washing machine, then it’s time to replace the burnt part and put the washing machine back into operation. We take a socket wrench and unscrew the nut that is located between the contacts of the heating element. This nut is the main fastening element that holds the heater, but in addition to the nut there is also a spacer inside, so we proceed like this:
- unscrew the nut;
- We take hold of the contacts of the heating element and slightly rock it from side to side;
- We take a small hammer and lightly hit the stud from which we twisted the nut;
- if everything is done correctly, the pin will partially fall inward;
- take a flat screwdriver and pry up the heating element as carefully as possible to dislodge it from its seat;
- pull the part by the contacts and pull the heating element out.
Having pulled out the old heating element, you can see what condition it is in. The part is almost certainly covered with a layer of scale, and in some places black spots are visible, which indicate that the heating element has burned out. We take a new heating element, check its resistance and make sure it is in good condition. Lubricate its rubber with a drop of machine oil, and then insert the new part into the tank of the Samsung machine. We put the temperature sensor in place, connect the wires to the contacts, and then reassemble the washing machine in the reverse order and check its operation.
Related Actions
During long-term operation, a fairly large amount of debris accumulates at the bottom of the tank of a Samsung washing machine: pieces of scale, clothing buttons, pins, paper clips, coins and other things. Over time, this debris can negatively affect the operation of the washing machine, so when changing the heating element, we will take the opportunity to remove all excess from the tank. The fact is that the hole in the heating element is quite large. Through it you can relatively easily penetrate inside the tank and remove everything unnecessary with a stick or fingers.
To make the task easier, experts advise taking a tablespoon, inserting it into the hole for the heating element and slowly pulling out all the debris from there. Remember, a washing tank without debris is the key to the normal operation of a Samsung washing machine, so do not neglect this important accompanying action, even if replacing the heating element is a priority. Happy renovation!
Preventing heating element damage
Service specialists always remind owners that it is always easier to prevent a malfunction than to completely replace a worn-out part later. In order for the heating element to last as long as possible, the following simple recommendations should be followed.
- Do not fill the machine drum too tightly; the weight of laundry for one wash should not exceed the calculated weight provided for your model.
- Soften the water using special detergents, such as Calgon.
- Do not use cheap, low-quality powder, because it is the high content of various salts and impurities in it that often damages your household appliances.
- It is worth carrying out periodic preventive cleaning of the heating element from scale - this can be done without disassembling the washing machine.
Thus, replacing a heating element in a car cannot be called a very complex repair, which requires special knowledge and skills. You can easily handle this yourself, while saving on expensive service.
Samsung
Samsung washing machines are most in demand among domestic buyers, because thanks to the production of household products of this brand in our country, it is possible to reduce the cost as much as possible.
The heating product on almost all models is located at the bottom of the device, so to remove it you will need to remove the covers that block access to the heater. In automatic washing devices of the Samsung brand, with a load of laundry up to 5 kg, the heater is removed in the following sequence:
- Remove the back cover by unscrewing several screws holding this part.
- Disconnect the wires.
- Use a socket wrench to unscrew the nut located between the contacts.
- Remove the element using gentle rocking movements.
On some models, access to the heating element is possible only from the front panel. Typically, this category of household products includes Samsung washing machines with a load of laundry of more than 5 kg. If it is necessary to remove the heater from such a device, then the work is performed as follows:
- Remove the top cover. To do this, you need to unscrew the 2 screws holding this part with a screwdriver and move it towards the front panel.
- Remove the dispenser container and unscrew all the screws holding the front cover.
- Remove the bottom false panel.
- Unscrew the bottom bolts holding the front panel.
- Remove the rubber loading door panel.
- Unscrew the fastening of the door and the locking mechanism and remove them.
- Remove the front panel.
- The wires are removed from the heating element located in the lower part.
- Unscrew the nut located in the central part.
- Using a light blow of a hammer, press the bolt inside the container.
- Using a screwdriver, pry up the gasket and remove the part from the household appliance.
At this point, the removal procedure for this product can be considered complete.
Causes of malfunction
Premature failure of a part does not mean that the heater was of poor quality. The main causes of problems are:
- Scale. Our tap water contains insoluble sediments - salts. Since the element is in water, salts settle on its body, forming water stones - scale. The thicker its layer, the more difficult it is for the heating element to transfer heat to the water. Therefore, more time and electricity are spent on heating. As a result, the element burns out.
- Damage to contacts due to short circuit. Sudden voltage changes in the network are not always suppressed by a noise filter. Therefore, the heater contacts burn out.
- Natural wear and tear. The heating element constantly heats up and cools down, works actively, so it does not last as long as we would like.
We remove the old one
To change the heating element, the old one must be removed. This is done as follows:
- The machine body must be disassembled;
- The drive belt (if any) should be removed so that it does not interfere with operation;
- The wires going to the heater terminals must be disconnected (remembering their location);
- Disconnect the positive wire from the temperature sensor terminal;
- Loosen the central nut fastening the heating element (without unscrewing it completely);
- Push the pin on which the nut sits inside the housing (but carefully so that the heating element does not fall into the tank;
- Using several flathead screwdrivers, remove the heating element, being careful not to damage the washing tub.
Before carrying out the above steps, you should determine where the heater is located. After this, the back or front walls of the machine covering it are removed. In different models, the covers can be attached in different ways, namely, with a different number of bolts.
If the car has a drive belt, then it can be removed using a screwdriver, which should be used to carefully pry it up and then it can be easily pulled out. The main thing is not to scratch the belt, otherwise it will definitely break later.
As for the heating element terminals, there are usually four of them. This is grounding, a wire from the positive terminal of the temperature sensor and two power cables. The first two may not exist, depending on the car model.
Important: be sure to disconnect the washing machine from the electrical power supply for the period of repair work!
When removing the heating element, a situation may arise where it will not be easy to get it out. This can happen due to deformation of the rubber o-ring, which hardens over time and sticks to the edges of the heater. In this case, you should carefully pry it off with a flat screwdriver and, helping with your hand, remove the heating element. If the seal is unsuitable, then it should be changed.
Preparation for repair
Let's find out where the heating element is located in the Indesit washing machine. Depending on the model, the heater can be located in the front of the case or in the back. In these washers, the element is located in the back.
Before you remove and replace the heating element in the Indesit washing machine, prepare everything you need.
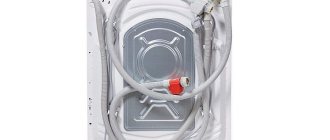
Disconnect the Indesit AGR from the network and turn off the water supply. Disconnect the inlet hose and drain it into a sink or prepared container. Now move the CM away from the wall, allowing access to the rear panel.
How to access the heating element
In order to get to the heating element in the washing machine, you need to disassemble it a little. But the problem is that in different types of washing machines the heating element can be located either in the front or in the back. Therefore, we first need to decide which cover to remove: front or back.
Look at the back of the washing machine - if the back wall is large enough, then most likely the heater is located behind it. You also need to take into account that the back wall is much easier to remove and install than the front. Therefore, if the back wall is removable and large, we recommend unscrewing it. Even if you make a mistake and the heating element is not there, you can easily screw it back on.
First, unscrew all the wires, then check the heating element for functionality. Only after you are sure that the heater is faulty can you begin to replace it.
How to replace a heating element in an Indesit washing machine: where is it located, connection
Probably every family uses an automatic washing machine, and no one can even imagine being left without its help. But over time, it may also happen that the washing machine stops heating the water, for unknown reasons, the program time lengthens or the quality of the washes deteriorates.
If your assistant experiences such symptoms, it means that it is most likely necessary to install a new heating element on the Indesit washing machine due to the old one failing. The fact is that when the heating element is not working, the effectiveness of detergents deteriorates, programs become longer because the processor does not understand why the required water temperature is not there, and if there is a breakdown on the heater body, the Indesit washing machine may turn off completely.
You can find out how much it costs to replace a heating element for an Indesit washing machine in any specialized workshop, but if you have skills in repairing any equipment, you can solve this problem with your washing machine yourself.
Replacing the heating element of an Indesit washing machine will require a little time, tools and patience.
On all models of this brand of product, the heater is located in the rear of the tank; to access it there is a removable part of the device body and therefore complete disassembly of the washing machine is not required.
Device Models
LG
In machines from this manufacturer, the heater is often located at the back.
The contacts come out, but most of the spiral is hidden inside the housing. It’s difficult to get confused - the device of this brand has a direct-drive motor, which is attached to the tank, and the heating element is under the tank. The case does not require extensive disassembly. Tip The power of the new heater should match the previous one. LG brand machines have power ranging from 1900 to 2000 W.
Indesit
Here the heater will be located at the back. Close the inlet valve before work, disconnect communications. The rear wall of the Indesit machines has a small hatch. Prepare a shaped screwdriver or an asterisk. The heating element is secured inside with a special bracket: make sure that the part fits directly into the bracket.
Samsung
The heating element is located on the flange (together with the fuse). While the heaters of other machines can be repaired, this is not possible in Samsung machines - you will need to buy a new one. Price - in the range of 700–1500 rubles.
How to remove heating element on an Indesit washing machine
Before removing the heating element from the Indesit washing machine, you need to make sure that it is the cause of the breakdown. For this:
- We disconnect the washing machine from the outlet and water supply, and, if necessary, from the sewer.
- We place it in a free place for repairs;
- We turn it towards us with its back side;
- Remove the rear inspection cover of the case by unscrewing the screws that secure it;
- We remove the wires from the heating element, which is located in the lower part of the tank (we rewrite the location of the wires or take photographs for correct reassembly) and test it with a multimeter or a test light for integrity and breakdown on the body.
If the cause of the breakdown is a heating element, then it is necessary to replace the heating element of the Indesit washing machine and you should:
- Unscrew the fastening nut on the heater body and press the pin into the tank (if it does not give in, tighten the nut and press the bolt in with a hammer);
- Use a negative screwdriver to pry up the metal bar and pull out the heating element of the Indesit washing machine from the tank. Removing the heater from the machine can be difficult due to the presence of a large accumulation of scale on it, and therefore you need to do this carefully so as not to damage the seat of the heater.
- If a part is “jammed,” you need to “stir” the heater in its seat with translational movements and remove it after foreign deposits have fallen off it. If possible, scale that has flown off a part should be removed from the tank using a handy tool to avoid getting through the hose when draining into the pump. If you cannot do this, then after the first test wash after repair, clean the coarse filter in front of the drain pump. The filter is located at the front of the machine at the bottom of the machine under the false panel.
The design and principle of operation of the heating element
The heating element in a washing machine is an element that heats water to the required temperature in various washing programs. In warm or hot water, the chemical reagents of the washing powder react best with various types of contaminants, which leads to high-quality washing of clothes. For some fabrics, washing modes are provided only in cold water, so the heating element is not included in the work in such cases.
A heating element for a washing machine looks like a curved tube, inside of which a nichrome or fechral wire is placed. The space between the walls of the tube and the conductive thread is filled with a dielectric, which has sufficient thermal conductivity and resistance to high temperatures.
The most commonly used electrical material is peraclase (magnesium oxide). The heating element tube is soldered or welded to the contact pad on which the current-carrying terminals are mounted. Typically, contacts are made of copper plates for clamping. The length of the rods and the type of contact pad in washing machines may vary, but the general structure and operating principle are the same.
When an electric current passes through a filament with high resistance, it becomes very hot. Heat passing through the dielectric material and the metal tube is released into the environment. In a washing machine, this medium is water. As a result, the water temperature rises to the required value for a specific washing program, and then the heating element turns off.
A special temperature sensor (thermistor) is installed in the tank or heating element, which sends a signal to the control board when the required temperature is reached. The processor processes the signal and interrupts the voltage supply to the heating element. The processor also receives a signal from the water level sensor in the tank (pressure switch). It informs the central processor about the presence of water in the washing tank, and the temperature relay about its temperature. If necessary, the control processor turns on the heating element. In washing machines with electronic control, an electronic module is responsible for the operation of the heating element; in models with electromechanical control, a programmer is responsible.
https://youtube.com/watch?v=G14Ub6aXEqU
Disassembly for replacement on top-loading models
In these machines, to get to the place where the part is replaced, you need to:
- Remove the right removable part of the housing;
- Turn the product towards you with this side;
- Unscrew the screws from the end on the right;
- Remove the plastic false panel from the lower front part and unscrew the 2 long screws under it;
- Then remove the lid, moving it to the right and at the same time downwards;
- To make it easier to check and replace the part, you can remove the belt; when reinstalling it, carefully place it correctly on the pulleys so that it falls off during operation.
Reassemble in exactly the reverse order, tightening the 2 screws under the false panel first. When purchasing a part, be sure to inform the seller about the exact model of your machine and its loading method. The parts on your appliance may differ markedly from those found on front loaders.
Self-repair instructions
The procedure for replacing the heating element of a washing machine is as follows:
First determine which side the heater is located on. Move the body away from the wall and turn it towards you. If the back cover is large, most likely the heating element is squeezed under the tank from the back side. There will be less work here. If the lid is medium in size, through it you can only get to the washing machine belt, and the heating element is clearly located below, but in front. You will have to completely disassemble the front panel, which will take more time than in the first case. Having determined the position of the heater, it’s time to move on to disassembling the housing (you can see instructions for disassembling washing machines of different brands here). First, unplug the device to avoid electric shock. If the heating element is located at the rear, disconnect the water supply, drain hose, drain the remaining water from the machine (this can be done by lowering the drain pipe below the level of the device body or using a special drain filter). Then there are 2 options: If the heating element is behind the back cover, remove it. If it is behind the front, remove the lid from above, pull out the tray into which detergents are poured (it is attached with self-tapping screws and secured with a latch
Carefully disconnect it too). Pull the steel hoop off the seal
It is held by a spring - stretch it a little. Next, remove the seal, the door blocker (disconnect the wires from the blocker), and remove the front panel.
The next step is replacing the heating element. It is held in place by only one nut, but before unscrewing it, disconnect the power terminals, wires from the temperature sensor, and grounding. To unscrew the nut, take a socket wrench (if you don’t have one, take an open-end wrench). Unscrew the nut slightly (not all the way, but to the length of the thread), then, pressing the pin inward (this will allow you to pull the part out of the seat), unscrew the nut completely. Use a screwdriver to pry the heating element around the perimeter and slowly tear it away from the rubber. This is done with loosening movements. Check its functionality. When you go shopping for a new heater, take your old one with you. This will allow you not to make a mistake when choosing a new one, because different heating elements are produced for each model. The part may differ by literally a few centimeters or even millimeters. This is done in order to assign a new series to a line of devices and sell them at a new, higher price. And heating elements are no longer interchangeable. Over time, the installation site becomes covered with a layer of calcium and carbon deposits, so it must be cleaned before work. Do not ignore the tank (how to repair a washing machine tank with your own hands?). Help yourself with a flashlight. Loosen the nut and insert the new heater into place. Tighten and connect all wires. Carry out a test: pour a little water into the tank, turn on the heat for a few seconds. After turning it off, touch the heating element. If it is warm and there are no water leaks, screw on the remaining parts.
How to change the heating element on an Indesit washing machine
Replacing the heating element in the Indesit washing machine is as follows:
- Purchasing the heating element itself in advance or after removing the old one according to its sample. When buying a new one, you need to follow the rating of the old one in terms of power and size. A larger size may not fit properly in the tank on the mount where the heating element is located in the Indesit washing machine, and excess power will contribute to premature wear of the controls;
- Inspect the fit of the heating element in the tank and, if there are contaminants there, remove them; Remove the finger-type temperature sensor from the old heater, clean it and place it in the new heater until it stops;
- Replace the heating element of the Indesit washing machine by tightening the nut and putting on the wires.
It is better to put the back cover of the case back in place after checking for leaks in the place where the new part is installed, to make sure that replacing the heating element of the Indesit washing machine with your own hands was successful.
To do this, we connect the washing machine back to all communications and turn it on for a short washing or rinsing program.
If during the check the installation site remains dry, then turn off the machine and mount the back wall and put your unit in place. Now, after replacing the heating element, washing in the Indesit washing machine will noticeably improve. Washing powders will dissolve better and create a better efficiency of the washing solution for washing things, washing times will be respected and there will be no failures in programs.
Heater prevention
The correct replacement of the heating element of an Indesit washing machine also lies in the fact that after repair, maintenance of the tank is necessary to remove deposits accumulated there. There may be solid deposits in the tank in the form of scale, or undigested fats from clothing may be deposited in the form of mucus, which creates an unpleasant odor inside the Indesit machine.
Maintenance of the washing machine must be done at certain intervals, depending on the frequency of washing, temperature conditions and the quality of the water used.
The great convenience of machines with vertical loading is that they can be used to monitor the presence of unwanted deposits on the outer part of the drum through the loading hole and promptly clean them using chemical methods.
To prevent deposits in washing units, it is recommended:
- Install a salt filter-water softener in the break in the supply of used water and replace it in a timely manner;
- Use high-quality washing powders and gels;
- Periodically carry out scale prevention using special means. Removal methods such as vinegar and citric acid will remove accumulated deposits of scale and grease, but it is unknown how their chemical composition will affect the quality of rubber parts and seals of your unit;
- Do not overuse long washes at high temperatures. Modern detergents can effectively combat stains at low temperatures, thereby being gentle on fabrics without subjecting them to high heat treatments.