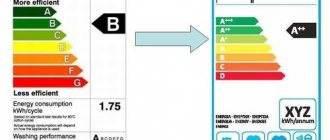
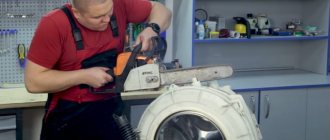
A washing machine is a household appliance without which it is difficult to imagine modern life. Sooner or later it fails as a result of improper operation or power surges. Equipment breakdown requires an immediate solution to the problem, since washing is required regularly. If the washing machine is under warranty, repairs are carried out by the company providing the service.
After the warranty period expires, all problems related to restoring the device to working condition fall on the user’s shoulders. Most device breakdowns can be done by yourself. But how to disassemble a washing machine at home? To perform repair work, you will need to familiarize yourself with the internal structure of the equipment, study the instructions, prepare the necessary tools, and purchase consumables.
Washing machine device
Before starting work, a technical diagram of the washing machine is studied, which clearly shows the structure of the equipment and the location of the connecting nodes, the location of the engine, electronic unit, control panel, etc. The standard device includes the following elements:
- Lid.
- Front Panel.
- Back wall.
- Control Panel.
- Tank.
- Drum.
- Electronic module.
- Inlet valve.
- Drain pump.
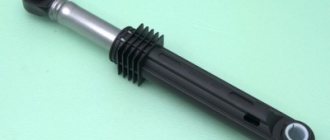
- Shock absorber.
- Pressostat.
- Powder tray.
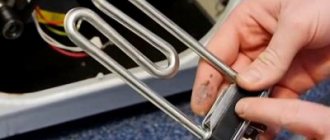
- Heating element (heating element).
- Belt.
- Electrical engine.
Particular attention is paid to the study of the main components that most often fail. These include:
- tank ventilation;
- place of water inlet and distribution;
- WPS and WCS valves;
- control electronics (“brains”);
- drum imbalance sensor;
- counterweight location;
- fastening spring suspensions;
- heating element;
- ball valves;
- laundry load sensor;
- drum;
- door cuff;
- engine;
- shock absorbers;
- siphon, drain pump and filter;
- network shutdown;
- drum illumination (if equipped).
After carefully reviewing the instructions, you can begin preparatory work. If you have any questions regarding the repair process or the location of parts, it is recommended that you turn to online resources for help. The network is filled with a lot of videos from professional craftsmen who explain in detail the sequence of all actions, give recommendations, advice, reveal the secrets of the process, and point out the weak points of the equipment.
Scheme
Before starting work, familiarize yourself with the structure of the washing machine. The diagrams will give you a visual representation of the structure of the unit and the location of its components.
Automatic washing machine device
Location of main components
Preparing to disassemble the washing machine
Regardless of the brand of the washing machine, the internal design of the machines is similar for all models. Before you start disassembling, you should determine the place of work. An area of at least two square meters will be required. The room should be well lit. To prevent damage to the floor covering, the floors are covered with dense material, film or cardboard sheets.
It should be remembered that the machine is heavy with sharp corners, so linoleum can easily be pressed through, and laminate can be scratched.
Disconnecting the washing machine from the power supply
It is very important to turn off the power to the device. Do not disassemble the device while the power plug is connected. Any actions can lead to serious injuries to the technician, as well as damage to the washing machine. Safety precautions must be followed. After removing the plug from the socket, accumulated current may remain inside the appliance. You can check its presence using a special measuring device - a multimeter.
Turning off the water supply
To turn off the water supply from the main line, you must close the tap installed in front of the washing machine. Then disconnect the hose from the water supply fitting, fix the drain pipe in a vertical position on the body of the machine (you can use tape or special holding clips on the back panel of the body). The retractable tray for detergents is removed, the filter at the bottom of the front part of the case is unscrewed, and excess water is drained.
Preparing the necessary tools
Proper disassembly and removal of parts without damage is possible only with special tools. To work you will need:
- a set of Phillips screwdrivers with a long and small bit;
- screwdriver with bits;
- flat screwdriver;
- pliers;
- nut wrenches;
- hammer;
- multimeter;
- colored markers;
- lubricants WD-40, CV joint;
- Hydra-2 lubricant for oil seal and bearings;
- rags for cleaning dirt and cotton pads for degreasing.
If you need to cut a tank, you will need a drill, a hacksaw, a burr, a set of drills, a glue gun, a soldering iron, silicone sealant, self-tapping screws and bolts.
Note! Not all breakdowns can be fixed at home. Diagnosing and repairing an electronic device requires knowledge and skills. It is impossible to replace bearings if the tank is soldered without special tools.
Recording the sequence of disassembling washing equipment
During the process of disassembling the washing machine, it is recommended to take photo or video recordings so as not to forget the location of all the parts and where the colored wires are connected to the engine and electronic unit. Having captured the entire sequence, you don’t have to worry about the correct assembly of the equipment.
Why can’t I unscrew, remove and remove the filter?
The main reason is foreign objects. Lint, wool, hair, small foreign bodies, handkerchiefs, napkins, socks fall into the trap in front of the pump and tightly block its movement in the cochlea.
More rarely, removing the washing machine filter is made difficult by scale deposits on the threads. It forms if it has not been cleaned for a long time.
We recommend! Once every 2-4 months, clean the filter from debris and foreign objects. Detailed instructions are in the article “How to clean the filter in a washing machine.”
Disassembling a top-loading washing machine
Washing machines with vertical loading of laundry have other types of breakdowns. Most often, diagnostics reveal spontaneous opening of the snare drum. Corrosion of the metal block is often encountered, which also damages household appliances and leads to breakdowns of the moving unit during the washing process and the bearing unit during rotation of the drum.
You should be aware that top-loading units often suffer from loss of elasticity of the upper door sealing rubber. As a result, its deformation is observed, after washing, puddles form on the floor, and rust appears on the body. To fix this problem, you will need to dismantle the control panel and replace the old seal with a new one. Then put the panel in place and check the functionality of the equipment.
Disassembling a top-loading washing machine has its own characteristics. Such equipment can also be repaired at home, subject to certain rules and safety precautions.
Before starting repair work, you should prepare a place for disassembly, disconnect the unit from the electrical networks, remove the water supply hose to the drum, and remove the drain pipe from the sewer.
During the disassembly process, residual water will leak out, so you should stock up on a rag and a basin.
To independently disassemble the washing machine, home craftsmen need to follow a certain algorithm of actions:
- The screws on the side walls of the device are unscrewed.
- The working unit is carefully moved towards itself, and all the wires are disconnected (after marking the input and output of each wire with a colored marker, and taking a photo of the original network).
- The control panel is dismantled.
- The top and side walls are removed.
- The fastening clamp is detached.
- Carefully, taking care not to damage it, remove the plastic casing.
During the process, it is very important to remember (photograph) the sequence of work and the place of attachment, the location of all parts, conductors and motor elements.
You can begin to repair and replace broken elements. Upon completion of the work, the device is assembled according to the reverse order of dismantling. After assembly, the functionality of the mechanisms is checked.
Tools
First of all, it is necessary to provide sufficient space and good lighting. You won't be able to disassemble the car without tools. It should be noted that manufacturers use different solutions in manufacturing.
Set of tools
Do you wash your shoes in the machine?
Oh yes! No
Therefore, let's consider a universal set. It will allow you to disassemble any car. List:
- Socket wrench with ratchet. Size - 10 and 13.
- Screwdrivers - T10, T15, T20, RN1, RN2, slotted SL 2-20.
- Set of socket heads with ratchet - from 5.5 to 13.
- Flashlight.
- Pliers.
- Round nose pliers.
- Wire cutters.
Tools needed
Expert opinion
I work in the household appliance repair industry. Extensive experience in restoring washing machines and dishwashers.
Ask a Question
Important! We recommend taking photographs of all stages of work, as well as the fastening of parts.
Features of disassembling washing machines of different brands
Washing machines produced by different brands have a similar structure, a basic set of internals, and identical parts. But their location inside the case varies significantly. This should be taken into account during repair work. For correct operation, you should know the intricacies of the models and the procedure for disassembling them.
LG
Household appliances from LG differ from their competitors in the complexity of their design. For example, to dismantle the front panel, you will first need to unscrew the mounting bolts using a key that secure the hatch cover. The screw that tightens the clamp and holds the rubber cuff is also removed. Only after this can you remove the upper weighting material, then remove the tank with the drum for repair or replacement.
The company's South Korean specialists have developed new models of washing machines, which are equipped with a self-diagnosis system. The unit itself displays the error number on the electronic display, which corresponds to the breakdown of a specific part. Now the user can assess for himself what is broken inside and whether he can fix the device at home.
Samsung
Household appliances from Samsung are quite easy to disassemble. But there are some nuances. The tray for loading powder can be removed only after unscrewing the two retaining screws. The heating element is located below the tank, right next to the panel, so removing it is not difficult. Otherwise, the disassembly process is identical to the standard scheme. The main thing is to follow safety precautions and record every step in the photo.
Electrolux
Washing machines from Electrolux are considered one of the most reliable. They are rarely seen in service. It is very simple to disassemble the case for diagnostics; just remove the front panel and all the main components, as well as some parts, will be visible to the technician. The equipment of the machine is important. The individual parts have their own working oil seals and bearings, so replacing them does not require completely disassembling the unit and removing the drum. This design greatly facilitates the maintenance of the household appliance.
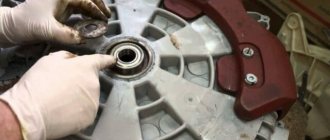
Ariston
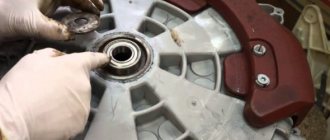
Most often, in models from Ariston, the bearings and oil seals on which the drum rotates fail. The design feature does not allow replacement of parts, which forces you to purchase a whole tank from the manufacturer. But skilled craftsmen can fix this damage too. Modern models are equipped with a self-diagnosis system, which makes it easier to identify faulty units. Deciphering the error code also allows you to understand the impending problem and eliminate it before it breaks down. Machines are dismantled in a standard manner. There are often models with a soldered tank, which makes repair work inside the drum difficult.
Atlant
The design features of Atlant machines make it possible to carry out repair work on any part without much difficulty. First, the counterweight is removed, then the upper control panel. The drum is assembled from two halves, which are securely bolted together. If it is necessary to replace bearings and seals, you only need to unscrew the bolts and separate the two parts. After collecting the tank, you should double check the quality of the connection between the two halves of the tank to prevent leaks during washing. While the tank is disassembled, the inside should be cleaned of fungi and scale.
What to do if none of the methods helped
This means that the washing machine filter cannot be removed due to scale or lime deposits from hard water. Follow the following steps one by one to resolve the issue. This will help minimize possible costs for new parts.
- the glass, soak the glass with the filter in a solution of water and citric acid to dissolve the lime. Or run a preventive wash with lemon juice if you have not yet had time to disassemble the pump. For soaking, you will need a container in which a glass with a filter is placed so that it is completely under water. Pour hot water, but not boiling water, in the region of 40-60°C to reduce the likelihood of damage to the plastic parts of the assembly and the rubber filter gasket. Pour about a tablespoon of citric acid onto the basin. You may need to weigh down the snail with the filter with something so that it does not float up after filling the container with water. Leave the filter to soak for 1-2 hours, then try to unscrew it. It’s not a fact that it will work, but if it works, you’ll save on new parts. The only thing that can be damaged is the rubber filter gasket. Acid can damage it, and then it will need to be replaced. A sure sign of gasket damage is leakage from the filter after reinstallation.
- Try to carefully break the filter out of the snail and install a new one . The plastic is quite fragile and can be cut with wire cutters, and then unscrewed and cleaned out the remains. Proceed carefully, do not damage the thread of the glass (snail). Otherwise, you will need to replace the entire snail, not just the filter. With damaged volute threads, the new drain filter will leak.
- Replace the snail assembly with filter . Immediately, if you don’t want to bother with unscrewing, or when you couldn’t carefully break off the filter. This will cost more than buying a gasket or a new catch filter. But replacement guarantees that the filter will not leak after installation.
If you read the article and realized that removing the washing machine filter yourself is an impossible task for you, then entrust this work to the RemBytTech specialists.
Assembling the washing machine
Assembly is one of the important stages in the process of repairing a washing machine. It is important to correctly install all the parts, securely fix the fasteners, connect the control unit, connect the wiring and then check the operation of the device, including the heating element. To do this, the machine turns on to heat the water. In order not to run the equipment idling, you can load a couple of towels during the test wash.
Note! Before you start assembling the machine, you should clean all parts, rinse the drum, eliminate fungal and mold areas, and remove scale from the heating element.
Assembly is carried out in the reverse order of disassembly. Often the problem is placing the tank on the springs. If there is no assistant, then you can do it yourself only by securing the spring with wire in the upper part, and then tensioning it, moving counterclockwise.
When assembling top-loading equipment, special attention is paid to installing the rubber cuff. You need to make sure that it fits into the grooves and is locked in the right place on the hatch door. The triangle icon should correspond to the loading direction, and there should be a drain groove next to it. When tightening the bolts, it is important to ensure that they are at the level of the free brace pin.
The assembly of any model must be consistent and carried out with due care. If necessary, it is better to look at the photos taken once again before analysis.
Recommendations from professionals
- Before disassembling, check again whether the water supply is stopped and whether the device is turned off from the network.
- There are many plastic parts in the machine that are easy to damage. Make sure that they do not break during disassembly.
- Take photographs of each dismantling step so you don’t forget the sequence later during assembly.
- Another way to help yourself during assembly: use felt-tip pens to mark the parts that you remove at a particular stage. You can write the number on the part itself, you can put it on a sheet (or sheets) of paper and sign the stage number next to it.
Why remove the top part of the front wall?
By removing the cover and the upper part of the wall, the repairman gains access to the control module, pipes and wires for:
- diagnosing and solving problems with starting the device;
- eliminating leaks and short circuits when pipes break;
- dismantling the lower part of the front panel when replacing the drum bearings, the container itself, and fasteners;
- complete disposal of the device.
The techniques used to remove the panel of an LG direct drive washing machine are not fundamentally different from the disassembly of representatives of other companies: Samsung, Indesit, Bosch and even Atlant.
The similarity of the layout of all these devices:
- The top cover on almost all washing machines is attached to the body with two screws from the back.
- Most of the fasteners are hidden under the front of the powder container.
- The plane with the program module is fixed with self-tapping screws on the upper mounting corners, one on the left and one on the right.
- The wires leading to the block are disconnected at the connectors.
Control Panel
The electronic control panel of an LG washing machine is one of its most important parts, so when removing this part you must be as careful as possible. You will need a Phillips and flathead screwdriver. The first step is to unscrew the screws that became accessible after you removed the top cover. Now you can start opening the plastic latches; this process will require accuracy and patience.
Why is the lower part of the front wall removed and how to do it
It is necessary to remove the front panel of an LG direct drive washing machine or its predecessor that has a belt drive to gain access to the drum mounting points. This need also arises on washing machines such as Samsung, Indesit, Atlant and Bosch, when bearings or oil seals need to be replaced.
Disassembling the LG washing machine
To dismantle the lower part of the outer panel, in which the loading hatch is located, on Indesit units you need:
- Remove the top front panel.
- Remove the outer part of the sealing collar by first pulling out the wire retaining ring inserted into the recess around the hatch.
- Unscrew the two screws and remove the door lock from the housing.
- Unscrew the three screws under the powder container and the two located at the very bottom of the front wall.
- Lifting and prying along the edge, remove the wall from the grooves and pull it out (towards you) along with the door.
Bottom of front panel
Please note that at the bottom of the front panel there is a metal cover, on the right side of which there is a hatch, which provides access to the filter and pump of the device. The front panel fasteners are located under this cover, so it will have to be removed.
Under the hatch you will find a few screws that need to be removed, after which the cover can be removed with a little force and perhaps the help of a flathead screwdriver. Pry the bottom part with a screwdriver, this will release it from the fasteners, after which you can easily remove it.
How is withdrawal made?
The disassembly rules are as follows:
- Before removing the top front panel from a washing machine, for example, Indesit with front loading, you need to remove the top cover and pull out the powder tray.
- To completely remove it from the grooves, you should press the “tongue” of the central latch between the detergent grooves (or simply move it down) and pull it towards you.
- Next, unscrew and remove the screws hidden under the top cover on the right and left.
- Remove the fasteners holding the container cavity and the front wall with buttons and indication: slightly lift this plane and pull it towards you.
Washing machine without top panel
When removing the control unit from the body of the Bosch device, you need to follow the same sequence. On the Bosch model of the “Classic 5” series, the cover is additionally fixed on its right side with an asterisk screw.
There are many wires leading to the control module, which should be disconnected only after fixing their accessories on a paper diagram or photographing them using a phone.
Lid
To release the top cover of the machine from the grooves, first unscrew the two screws that secure it to the back wall. Depending on the model, the screws may have a Phillips head or an asterisk, so to unscrew them you will need a different tool, a Phillips screwdriver or an asterisk wrench. After the fasteners are removed, you need to pull the cover towards you and lift it up, then simply move it to the side.
Preservation of the machine
It is necessary to understand that there is always water inside the washing machine, and if it is not drained, when tilted or jumping during transportation, the liquid will easily get on the wiring or electronic board. The consequences of such moisture are sad, so it is better to carefully “preserve” the machine. To do this we do the following:
- We place the prepared containers behind the machine below the waterline, and spread the prepared rags around, be prepared for the water to spill and splash;
- we check whether the water supply valves are closed; it is worth considering that you can easily turn the switches to the open position by accident;
- wait about a minute after closing the valves for the pressure in the hoses to normalize;
- remove the clamps on the inlet hose from both sides, lower it into a bucket or basin and drain the water.
Some tips
When disconnecting the power supply to the control panel or motor of older Bosch, LG, Samsung or Indesit models, do not pull the wires. Fingers must be placed on the connector body. If it does not give in, you can lightly shake it in different directions. When tugging on the wire or using force, the core may be torn off from the crimp.
To remove the front upper and lower covers, you will need screwdrivers: flat-slotted, Phillips, or asterisk. It is better to prepare everything that is available at once and not be distracted.
Depending on the year of manufacture, manufacturer and model, the panels on washing machines are connected to the frame using additional plastic latches. To avoid damaging them when separating the surfaces, you must carefully press the teeth not with a screwdriver, but with the handle of a tool, finger or nail, since the metal can damage the surface of the part. For the same purpose, you cannot use force: if the component does not give in, it means that not all fastening elements have been separated yet.
Source