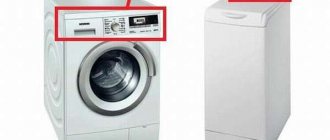
Electrolux washing machines are distinguished by their stylish design, functionality, and high build quality.
The device incorporates the latest achievements of developers in terms of electronics, allowing you to control the washing process from the moment you load the laundry until the end of the working cycle.
You can appreciate all the advantages of Electrolux washing machines only if you use the household appliance correctly.
We will tell you further about how to properly use an Electrolux washing machine.
Inclusion rules
For the first launch, the manufacturer LG has a number of requirements that must be followed.
One of the rules is that the start must be idle - without loading things into the drum. Procedure:
- Plug the plug into the socket.
- Close the hatch door until it clicks.
- Pour powder or gel into the detergent cuvette.
- Turn on the machine with the button.
- Using the settings, select the “Cotton” mode and set 60°C.
- Click the “Start” button.
When operating an LG washing machine that is started for the first time, you should pay attention to all the nuances of the operation of the device:
- correct rotation of the drum;
- no leaks;
- absence of sounds uncharacteristic for washing;
- no error messages on the display.
If the device is faulty, its operation must be stopped.
Connection and first launch of the LG washing machine - in the video:
Safety precautions when using an Electrolux washing machine
The developers took into account almost everything to ensure safety during its operation. However, manufacturers consider it their duty to still provide some safety recommendations.
- After transportation, the machine should be checked for damage. If any are detected, the machine should not be installed and put into operation until they are eliminated;
- Before loading, you should check that there are no foreign objects or pets in the drum;
- You cannot change the technical characteristics or design solutions of the machine. After such modernization, the washing machine may become dangerous during operation;
- If an operating mode with high temperatures is used, the door glass may become hot. Therefore, in order to avoid getting burned, you should open the door only after it has completely cooled down;
- Wash small items (socks, handkerchiefs) in special bags or pillowcases. This will prevent them from getting into the cracks between the drum and the tank;
- You cannot load things into the car that have parts made from whalebone plates, as well as torn or raw-edged clothing;
- You should not repair the car yourself. This may lead to an accident.
Algorithm of actions
For each type of Electrolux washing machine (depending on the loading method), a specific parsing algorithm is prescribed.
Horizontal loading household appliance
The body of a front-loading washing machine consists of two halves (back and front, connected by fasteners along the side line).
Taking into account this design feature, the Electrolux washing machine is disassembled as follows:
- We find two screws located on the back wall of the case and unscrew them. We slightly push the cover towards the back wall, lift it and remove it from the body.
- On the left and right side panels, unscrew the two screws that secure the rear panel.
- At the bottom of the rear panel, unscrew the two fasteners.
- On the sides, after opening the plugs, unscrew the fixing bolts.
- Unclench and lift the plastic holders that secure the panel in the upper part of the case.
- Remove the back panel.
- Inside the powder receptacle we find a plastic tab, press it, and carefully pull the dispenser out of the washing machine body.
- We unscrew the fastening bolts and remove the hatch door along with the hinge.
- Carefully prying up the clamp spring with a slotted screwdriver, pull the metal ring off the cuff. We put the rubber seal inside the drum.
- We unscrew the screws located on the left side of the control panel, carefully use a screwdriver to open the latches on the top and sides of the panel, without disconnecting the wiring, remove the control unit.
- We unscrew the screws located around the hatch lock, under the control panel and around the drain filter, and remove the front panel from the body.
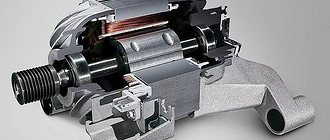
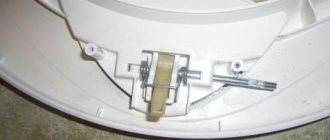
- Hold the pulley with one hand and remove the drive belt with the other.
- We unscrew the fasteners holding the motor, disconnect the terminals of the power wires, move the motor slightly toward itself, and remove the mechanism from the housing.
- Disconnect the wires from the drain pump, unscrew the fasteners, carefully turning clockwise, and remove the pump from the housing.
- We disconnect the wiring from the heating element, unscrew the central bolt (located between the contacts) and, using gentle rocking movements, remove the heating element from its seat.
- Having unscrewed the central bolts, we dismantle the counterweights.
- Using pliers, pull out the pin holding the shock absorbers and remove the paired elements from the bottom of the tank and the body of the washing machine.
- In the upper part of the housing, we disconnect the powder receiver pipes, the wiring of the filling valve, the springs, after first disconnecting the tube, we dismantle the pressure switch.
- Carefully lifting it, remove the tank from the springs and remove it from the housing.
At this stage, the analysis of the Electrolux front-loading washing machine is completed.
From vertical
Algorithm of actions:
- Carefully prying the latches on the right and left sides, lift the control panel, disconnect the wiring from the board connectors, and remove the panel from the case. Before you disconnect any wires, you need to take a photo of their connection diagram.
- Disconnect the wires, unscrew the fasteners, and remove the electronic board.
- Having previously disconnected the pipes and wiring, we dismantle the fill valve.
- Having unscrewed the fixing elements located on the rear panel and one at the bottom of the front panel, we dismantle the side walls of the case.
- From the opened space we pull out the engine, drain pump and water level sensor (all elements are located under the tank). To do this, unscrew the fasteners, remove the wiring, and pull the mechanisms out of the housing.
- We block the pulley wheel with a wooden block. Carefully remove the drive belt.
- Raise the top panel (cover), take out the powder receptacle (fixed with latches).
- Unscrew the bolts holding the cover.
- We pull back the rubber cuff, under which we have access to the screws that secure the plastic strip. They also need to be unscrewed. Remove the top panel.
- We unscrew the hardware holding the shaft, close the tank doors, and remove the tank from the housing.
At this stage, the disassembly of a top-loading washing machine can be considered complete.
How to care for equipment?
Regular, proper care will help extend the trouble-free operation of your Electrolux washing machine.
So the drum and powder compartment are wiped at least once a week with a soft sponge using baking soda paste (the dry powder is diluted with warm water until it becomes a thick paste). Such actions help clean surfaces from limescale and other impurities from hard tap water.
Don't forget about the rubber cuff around the hatch. It is in its folds that the largest amount of dirt collects, which can be cleaned with a soft toothbrush and baking soda paste.
The rubber seal cannot be cleaned with chlorine-containing compounds (for example, Belize). Otherwise, the cuff will very quickly lose its elasticity and become covered with cracks.
The drain filter and water inlet filter require special attention. To avoid problems with draining waste fluid, it is necessary to clean the drain filter once every ten days. You can find it in the lower part of the hull behind a small hatch.
The drain filter is unscrewed (counterclockwise movements), cleaned of hair, threads and other debris, and then installed in its original place.
Covered with a layer of impurity particles from tap water, the water inlet filter blocks the process of water entering the washing machine. How to clean it? To do this, on the back panel of the washing machine body, unscrew the fastening nut of the inlet hose, from which, using a flat screwdriver, carefully remove a small metal mesh - the inlet filter. The mesh is cleaned under water pressure with a toothbrush , and then installed in its original place.
Once a week, wipe the body of the washing machine with a soft cloth or sponge moistened with soapy water.
Features for other detergent compositions
The variety of laundry detergents makes you think about how to properly load them into the washing machine.
Gels
Concentrated gel-like liquid products cannot be poured into the main wash compartment (everything that gets into the tray will simply flow down the walls into the tank without having time to mix with water).
Gels or liquid powder are poured directly into the drum of the washing machine using special measuring balls with holes.
Air conditioner
Do not pour conditioner into the main wash compartment. Otherwise, the product will be washed out at the very beginning of the process and you can forget about the effect of soft tissue.
For the conditioner there is a special compartment of the dispenser (powder receptacle) marked with the symbol “*” or a flower.
Bleach
Products intended for removing stains from clothes (bleaches, stain removers) are poured together with washing powder into the pre-wash compartment.
There is no need to experiment by pouring bleach directly into the washing machine drum. Aggressive chemicals, not diluted with water, destroy fibers and change the color of the fabric.
Capsules
Gel capsules or tablets for washing are loaded directly into the drum (bottom) of the Indesit washing machine.
Reacting with water, the capsules quickly dissolve, ensuring complete removal of stains from clothing.
You should not put gel capsules or tablets into the powder receptacle. In a short time of supplying water to the tray, the capsules do not have time to completely dissolve, which significantly reduces the quality of the wash.
Mode selection
There are many symbols on the control panel - encrypted meanings of the main washing modes and additional functions of the Electrolux washing machine.
Main modes:
Auxiliary programs (selected depending on the type of laundry):
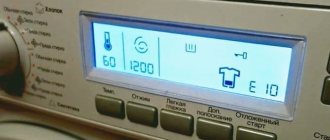
Additionally, the display of the control panel of the washing machine displays information about how much time is left until the end of the wash, the number of spin revolutions, and the water temperature in the tank set by the selected program.
Video review of the modes of the Electrolux washing machine:
Adviсe
By installing the washing machine on a rubber mat, you can significantly reduce the noise and vibration of the body during the washing process.
At the end of the full washing cycle, the household appliance must be unplugged from the outlet (sudden surges in the network voltage can lead to serious repairs to the control module).
Do not pack the washing machine drum tightly. Otherwise, overloaded household appliances will break down very quickly.
Clothing with rivets and other metal fittings must be turned inside out before loading into the drum. This will help protect the inside of the tank from scratches and dents, and your clothes from being snagged or torn.
A special measuring spoon will help you accurately measure the required amount of dry (or liquid) washing powder. If a situation arises that requires adjustment of the specified parameters (for example, it is necessary to change the water temperature), the “Start/Pause” button is pressed again. The green indicator starts flashing and the running process is suspended.
Preparing for washing
Preparation for the washing process proceeds according to the following scheme:
- The household appliance is connected to the power supply (separately installed, grounded outlet). The Start/Pause or Power button indicator on the control panel should light up.
- Sort dirty laundry. Everything that requires washing is divided into groups: according to degree of contamination, color and material of manufacture. It is unacceptable to wash colored and white items together (the result is damaged, faded clothes). Hand-embroidered items and hand-knitted items are washed separately.
- Load the drum of the washing machine. The maximum amount of dirty laundry (weight) that can be loaded into the drum depends on the model of the washing machine (the necessary information can be found in the data sheet of the household appliance).
For synthetic items, the maximum loading level does not exceed a third of the drum volume, for knitted woolen items - a maximum of half the tank. With a maximum load of products made from natural, dense fabrics, there should be enough free space in the drum to fit the palm of your hand.
Connecting the dishwasher to water supply and sewerage
Beginning owners usually have particular difficulties connecting the dishwasher to the water supply or sewerage system. The results of mistakes are a spoiled mood, a reproachful look from the wife, and the dishwasher breaking down. To prevent such problems, it is recommended to carefully study all the features, nuances and tricks of installing a kitchen appliance.
If there are any doubts about the correctness of the actions and even the instructions do not explain how to carry out the installation, it is recommended to first consult a specialist. A professional will explain in detail how to carry out the installation step by step and avoid mistakes. It should be remembered that the service life of a kitchen appliance depends entirely on the correct connection.
How to connect a dishwasher to the water supply
You can correctly connect the dishwasher yourself without any problems if you have already had to deal with installing a washing unit before. The step-by-step processes are no different, so you can get the job done in the shortest possible time. Even the hoses of the devices are identical, with the same diameter, cap nut, sealing gasket, which has a filter in the form of a fine-mesh metal grid. It is first recommended to make sure that the dishwasher hose is the correct length; lengthening it will not help in any way - even the most reliable joint will not help avoid leakage. It is better to take care in advance and purchase a hose of the required length.
The simplest option for connecting a hose for a dishwasher is to install a shut-off valve at the point where the water supply is connected to the kitchen faucet. In this case, there will be no difficulties - just disconnect the flexible connection on the cold pipe and install a tee valve (in everyday life called a straight-through valve). Connect the pre-disconnected mixer hose to one of the ends (where there is no tap). To the end on which the tap is located, it remains to connect the hose that supplies water to the kitchen unit.
If it is not possible to install a kitchen appliance near a water supply, the task becomes more complicated. You will have to start soldering polypropylene or metal-plastic, which not everyone can do - you will need the necessary skills, tools, and devices. In this case, it is better to leave it to professionals; it is easy to make unwanted mistakes on your own.
How to properly connect a dishwasher to the sewer
The easiest step in installing a Bosch dishwasher or another model is connecting to the sewer system
It is important to take care of the length of the flexible outlet in advance - if necessary, you will have to extend or purchase a hose of the required size. If you don’t have the opportunity or time to go to a hardware store and make a purchase, it is recommended to use a special connector made of durable rubber (usually comes with a purchased flexible outlet). The extended hose is attached to the sewer outlet - just insert a thick rubber seal (a simple cuff)
The extended hose is attached to the sewer outlet - just insert a thick rubber seal (a simple cuff).
You will have to face difficulties if there is no outlet on the sewer pipe. The optimal place to organize the required unit is the junction of the kitchen sink and the drain siphon. It is recommended to take the simplest route - disconnect and install an additional tee. As a result, instead of one output, you will get two, to one of which you will have to connect the dishwasher drain. Connect the sink siphon to the second one.
Another option for connecting the unit to the sewer is a stationary supply. Usually faced with a similar installation method when the dishwasher is at a large distance from the sewer pipe
It is important to consider that too much depends on the length of the hose - increased load on the device will lead to rapid wear of the components. Carrying out a special supply will allow the water to drain on its own. The hose from the dishwasher must descend at an obtuse angle, any sagging is unacceptable, otherwise it will be too difficult for the pump to cope with even a small amount of liquid
The hose from the dishwasher must descend at an obtuse angle; any sagging is unacceptable, otherwise it will be too difficult for the pump to cope with even a small amount of liquid.
Setup and first launch
The first test run of the washing machine after connection will help check the tightness of the connections, clean the drum, hoses and pipes from industrial dust and traces of lubricants.
Algorithm of actions:
- insert the power plug of the washing machine into the socket;
- close the loading hatch door (the washing machine drum is empty);
- pour washing powder into the detergent dispenser and into the main wash compartment;
- set the washing mode “Cotton” at a temperature of 60C;
- We start the stacks process (click the “Start” button).
The washing process should not be accompanied by any extraneous sounds (creaking, grinding), leaks, or strong vibration. Otherwise, you should think about possible connection errors or malfunctions of the household appliance.
What to do after?
Once the washing is finished, you must:
unload washed laundry from the drum of the washing machine;- Wipe the rubber cuff from moisture with a clean cloth (additionally check the seal for stuck small items of clothing);
- slightly open the detergent dispenser (if there is any undissolved powder left in the tray, it must be removed);
- open the hatch door slightly for ventilation (ventilation of the inner surface of the drum prevents the formation of an unpleasant musty odor).
Do not try to open the hatch door immediately after the sound signal for the end of the wash. The UBL keeps the door closed for another 2-3 minutes. Sudden movements or tugging can break the lock.
Call the master
You can call a technician to connect the washing machine. You can find the right contact on the Internet. A technician from a washing machine repair company will carry out the work efficiently and quickly enough.
The cost of the service may vary between companies. If additional work is required along the way, the price will increase. Also, the cost of connection does not include parts that may be needed, for example, a lost inlet hose.
On average in the capital, connection will cost from 1,000 rubles with disconnected communications and 1,500 – 3,500 rubles with preparatory work. If the equipment is built-in, then the cost of the work is higher - from 1,700 to 4,000 rubles.
When calling the technician, you must name the model of the device and indicate whether there is a supply of all communications for installation.
What other functions are there?
Different Electrolux models may be equipped with additional icons that are not present in other models - developers are constantly improving the devices, adding something, removing something. So, for example, you can see the following signs on some branded cars:
- Iron is an option - easy ironing. Of course, there is nothing like an iron there, it’s just that the drum, rotating in a special way, prevents creasing.
- A square with sound waves and the words “very quiet” - this icon indicates that the machine is unusually silent.
- A square with a weight with a number drawn inside it notifies the user about the maximum load of the drum.
- A square with a circle inscribed in it - imbalance control.
- A square with water and soap bubbles indicates foam control.
Let's start with the electrical network
Under the washing machine, in accordance with safety regulations and SNIPs, it is necessary to install a separate socket of the appropriate voltage. The electrical point must have grounding and special protection against moisture. Modern washing machines usually have a high level of protection against electric shock to the user, but it doesn’t hurt to be on the safe side.
In most models, the length of the power cord does not exceed 1.5 meters, so the outlet should be provided as close to the washing machine as possible. Of course, you can also use an extension cord that has a waterproof bayonet, but this is not as safe as plugging the device directly into an electrical point.
Grounding at the outlet is necessary to prevent small shocks that may be felt due to the small voltage being applied to the body of the CMA. They do not pose a serious danger to humans, but at the same time they are very unpleasant. Therefore, we strongly recommend using sockets with grounding, this way you will protect yourself and protect yourself from unpleasant sensations.
Determining and preparing the installation site
You can choose the location of the PMM at the stage of its purchase, based on the actual conditions of the kitchen. The machines come in full-size, narrow, and compact sizes.
Small devices are installed under the sink or on the countertop. All standard sizes of PMM can be built-in. Having chosen a place, they measure it, and buy a dishwasher to fit the existing dimensions of the niche.
The optimal location is near a sink and an outlet that meets the requirements for it. It is not recommended to remove the machine from water pipes at a distance of more than 3 meters: the load on the components and parts of the dishwasher increases
When choosing a location, pay attention to the following circumstances:
The base under the device is strong and level: the weight of the machine reaches 60 kg. A concrete floor covered with linoleum or tiles is an ideal case. Sagging floorboards will have to be strengthened and leveled at the installation site.
Connection to hot water is considered if it is provided for by the design of the dishwasher.
The electrical outlet is equipped with a grounding terminal, is securely fastened, and is located no further than the length of the standard wire with plug. If the voltage in the apartment electrical network changes, it is advisable to connect the machine through a stabilizer - an electrical device that compensates for potential changes in the network.
Expert opinion
I work in the household appliance repair industry. Extensive experience in restoring washing machines and dishwashers.
Ask a Question
Preparation for installing the device does not end with strengthening the floor. You need to inspect the places where you will have to connect the inlet and drain hoses. In new buildings, such points are equipped immediately, but in other cases you have to do it yourself
How are they different from free-standing appliances?
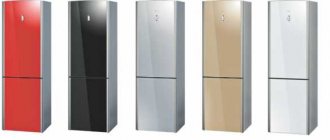
The price tag is not the only thing that distinguishes built-in models of Electrolux washing machines (they are usually an order of magnitude more expensive) from traditional free-standing household appliances.
There are several obvious signs by which you can determine that the washing machine is intended for installation in a furniture set:
- on the front panel of the device, on the right and left sides, there are special fasteners for the decorative door (they look like small rivets with grooves for screws);
- the hatch door is flattened or slightly concave inward (allows the cabinet door in which the washing machine is installed to be completely closed);
- the drain hatch is located slightly higher than in conventional washing machines (otherwise it would be impossible to use the hatch);
- there are no protruding elements on the dashboard (everything is done to ensure that the household appliance fits harmoniously into the furniture set).
Separately, it is worth noting the presence of special grooves (you can find them on the back wall of the case), by which you can determine that this particular model of washing machine is intended to be built into furniture.
Stage #5 - connection to the sewer
Connecting the washing machine to the sewerage system allows you to solve the problem of draining dirty water that remains after washing.
This can be done using different schemes:
- Temporary, by using a special hose directed into the toilet or bathtub.
- Permanent, providing for a stationary drainage device.
The first method is very simple: the water is drained through a hose attached to the edge of the bathtub, toilet or sink, which can be done using special fixing elements.
In the second case, two options are possible. Drainage is carried out using a siphon of a special design, which has a separate outlet for connecting automatic washing machines, located under the siphon elbow.
You should not replace such a device with a conventional analogue, since waste water will linger in it, spreading an unpleasant odor.
This diagram shows an option for connecting the “machine” to the sewer system using a siphon of a special design, which provides a special outlet for the hose
The washing machine can be connected without a siphon. With a sewer pipe diameter of 4-5 cm, the outlet for the machine can be connected directly to this element.
The S-curved drain hose is inserted into the pipe so that it does not touch the waste water, and then carefully surrounded by a sealant and sealed. The distance from the inflection point to the floor must exceed 0.5 m.
The maximum hose length is usually indicated in the instructions supplied with the model. If you select a large part, the load on the pump will increase sharply, which can lead to unexpected failure.
If the design of the washing unit does not provide for a check valve, then when installing the model, there is a restriction on the height at which the drain hose is located. The manufacturer usually provides specific information in the instruction manual.
How long does it last?
The accelerated washing function is available in almost any automatic washing machine (SMA) - Bosch, Ariston, Indesit, Beko, Electrolux, Kandy, Samsung and many others. This program is one of the most popular among owners of automatic washing machines. It is good for the following conditions:
- things are slightly dirty and do not need intensive processing;
- Only a few items are washed at the same time - in a large amount of water.
How many minutes the program lasts depends on the specific brand and model. Super fast lasts 15 minutes. This mode can be found in the latest models. People are in a hurry, the pace of life is accelerating, and SMA manufacturers are trying to satisfy the aspirations of busy consumers. In most machines, the duration of this program is 30–40 minutes. How can you reduce time? Thanks to a reduction in the number of water heating, washing and spinning cycles, as well as due to the absence of additional rinsing.
Preparing the installation site
When a washing machine is purchased for the first time in a new interior, it is very important to think about the place where it will be permanently located. This is an important point, since it will be necessary to enter the dimensions in a certain place. Therefore, if there is a certain position, it is necessary to measure 3 parameters:
Therefore, if there is a certain position, it is necessary to measure 3 parameters:
- Length.
- Depth.
- Height.
In this case, you must add 1 centimeter to each obtained size.
This is important so that the product fits in freely or can then be removed from the required location without any problems. That is, this 1 cm on each side provides such an important backlash. It is necessary to choose a place for installation so that all three systems are located nearby or there is an opportunity to bring them there
It is necessary to choose a place for installation so that all three systems are located nearby or there is an opportunity to bring them there.
If we consider not the dimensions of the location, but specifically the location in an apartment or in a private house, then most often this household appliance is located:
- You can often find this household appliance in the kitchen. In this case, connecting to communications is also convenient, since they are located close. For those who are meticulous about the aesthetic parameters of any room, it is necessary to think in advance about installing a washing machine in a cabinet niche. In this case, you can organize the location in such a way that the front door completely covers the device from view.
- If the toilet room is large enough in size, then you can put the washing machine here too. True, some manage to display the unit even in a small room. In this case, it is mounted above the toilet. But it is precisely this kind of installation system that requires careful consideration and ensuring the proper level of reliability.
- You can also install a typewriter in the hallway. But most often this is due to hopelessness. The main negative aspect of this arrangement is that all communications have to be pulled here. In addition, from here the noise spreads quite intensively to all corners of the home.
- If the apartment has a storage room (closet), then you can install the machine here. Perhaps this is the best option if bringing communications here will not be too costly or problematic. After all, this is an isolated room from where noise will not be heard if the door is closed. The product will not spoil the aesthetics of the premises with its appearance. In addition, it will be possible to equip an entire laundry room here, placing all the laundry products, a laundry basket and other small items.
- In a private house, such household appliances are also located in the basements. This is very convenient, but the underground must be heated.
- In bathroom. Convenience in this case is due to the fact that all communications are located in close proximity. The appearance of the product fits harmoniously into the space. If you plan to renovate this room with a complete re-equipment of plumbing, then you can place the washing machine under a sink of a suitable design with an equipped drain along the rear plane.
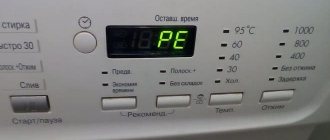
Errors (on screen) and what to do about them?
The self-diagnosis system, which is equipped with most models of Electrolux washing machines, helps to quickly determine the cause of the problem and restore the normal functioning of household appliances. The error code displayed on the information display on the control panel will tell you what exactly caused the malfunction:
- Error E01 (EA1), E02 (EA2), E04 (EA4), EA5. Problem: The washing machine does not spin the drum. What to do: check the drive belt, test the drum self-positioning device.
- Error E03. Problem: The washing machine does not heat the water. What to do: test the heating element relay and heating element with a multimeter (replace if necessary).
- Error EA6 (typical for top-loading washing machines). Problem: The drum does not rotate. What to do: check the drive belt, restart the wash.
- Error E10 (in some models E11). Problem: lack of water supply to the tank. What to do: check the water pressure in the tap, inspect the hose for breaks and kinks, test the fill valve.
- Error E13. Problem: leaks in the system. What to do: disconnect the washing machine from the power supply, call a specialist for detailed diagnostics and repairs.
- Error E20, E21 (C2), E23, E24. Problem: no water drainage. What to do: check the drain hose and the drain pump impeller for blockages, test the drain pump.
- Error E31, E32, E33, E34, E35, E38. Problem: the tank is not completely filled with water or the water level exceeds the permissible limit. What to do: test (replace if necessary) the pressure switch, clean clogged areas of the sensor.
- Error E40, E41, E42, E43, E44, E45. Problem: The machine does not start the washing process. What to do: check the tightness of the hatch closure, the integrity of the rubber cuff, test the functionality of the UBL, restart the wash.
- Error E50, E51, E53, E54, E55. Problem: The washing machine does not spin the drum. What to do: restart the washing machine, check the functionality of the triac, motor (brushes), tachometer, Hall sensor.
- Error E52, E56, E59. Problem: the tachometer is malfunctioning. What to do: restart the washing machine, ring the controller circuit, test the tachometer (replace if necessary).
- Error E57, E58. Problem: the washing machine does not emit any rotation signals, the washing process is blocked. What to do: check the voltage in the network (most often this problem is associated with very high voltage in the network), test the control module.
- Error E61, E62, E66, E68, E69, E3A, E71, E74. Problem: the machine does not heat the water or the temperature of the heated water exceeds the value set by the program. What to do: check the contacts of the heating element and temperature sensor (replace faulty elements).
- Error E90, E91, E93, E94, E95, E96, E97. Problem: The washing machine does not respond to specified commands from the control panel. What to do: test the control unit elements, clean or replace the electronic boards if necessary.
- Error EH2. Problem: The mains voltage is too high. What to do: check the power supply.
- Error EH3. Problem: The mains voltage is too low. What to do: check the power supply. If necessary, install a voltage stabilizer.
If troubleshooting the error yourself does not lead to the desired result, it is better to entrust the repair of the washing machine to the service center specialists.
Electrolux program table: description and symbols
It is not recommended to select a specific mode at random. It is better to immediately read the description of the designations and then begin operation. In the table below you will find the names and explanation of the main and additional modes for the Electrolux washing machine. All symbols on different Electrolux models are interpreted the same way.
Basic modes
| Designation | Name | Decoding | The approximate time* |
| Pre-wash mode | The symbol is also placed on the detergent dispenser tray to prevent the user from confusing the powder compartments. This mode allows you to pre-wash an item and is suitable for heavily soiled laundry. | Increases washing time by approximately 20%. | |
| Main wash | Standard mode. | Depends on temperature and type of fabric. | |
| Rinsing | An extra rinse can be used if you are not sure that the clothes have been rinsed thoroughly beforehand. | up to 20 minutes. | |
| Spin | The ability to additionally wring out laundry and regulate the speed of rotation. | about 5 minutes. | |
| Wash delay | Allows you to load laundry into the tank and set the time (after 3, 6, 9 hours) when the machine starts. | Maximum - up to 24 hours (depending on the model). | |
| Stop rinsing | Some users may confuse it with regular rinsing. However, in the usual one, a basin with waves is drawn, and a stop is depicted as a basin with smooth water. | — | |
| Drain | A basin with an arrow pointing down means a drain, which can be turned on if the washer does not drain the water after the end of the program. | — | |
| End of cycle | An arrow pointing to the right will indicate that the program has completed. | — |
*The data in this and the following tables are approximate; For the exact time, see the instructions for your model.
There are also indicators on the panels of Electrolux washing machines. With its help, it is convenient to determine the end time of the cycle (on the display) or the operation of one of the functions (the indicator lights up). An audible signal warns that the wash is finished and the laundry can be removed from the tub.
Additional programs
Additional in this case include those modes that allow you to care for certain types of laundry.
| Designation | Name | Decoding | The approximate time |
| Cotton | Set the mode for cotton products. The water temperature is 90 degrees. | 145 minutes. | |
| Cotton Eco | For white clothes, as well as colored clothes that do not fade at temperatures from 40 to 60 degrees (can be adjusted). | 136 minutes. | |
| Washing synthetics | Removing common stains on mixed and synthetic fabrics. You can adjust the temperature from cold to 60 degrees. | 90 minutes. | |
| Thin fabrics | The program allows you to wash delicate fabrics (acrylic, viscose) as gently as possible. The temperature is 40 degrees. | 60 minutes. | |
| Wool or Hand wash | The machine allows you to care for woolen items that can only be hand washed at a temperature of 40 degrees. | 55-56 minutes. | |
| Silk | The program provides gentle washing at 30 degrees for silk items, as well as mixed synthetics. | 40 minutes. | |
| Blankets | The mode washes any blanket as comfortably as possible so that its “filling” does not bunch up in one direction. Temperature from 30 to 60 degrees. | 100 minutes. | |
| Jeans | By choosing this program, you can wash knitted clothes, as well as denim and dark-colored items. The temperature is adjustable from low to 60 degrees. | up to 100 minutes. | |
| Curtains | In SM Electrolux you can safely wash curtains and curtains at a temperature of 40 degrees. Before the main wash, a pre-wash is performed, during which it is not recommended to use powder. | up to 100 minutes. | |
| Sport | Suitable for washing synthetic clothing and sports shoes. Can be used to refresh new things. | 30 minutes. | |
| 5 shirts | The mode allows you to wash 5-6 shirts at a time at a temperature of 30 degrees. | 30 minutes. |
Useful features
The Electrolux washing machine also provides other useful functions that will make washing even more efficient.
| Name | Decoding |
| Steam System | A useful steam treatment technology that allows you to refresh your laundry without creasing, while maintaining its shape. |
| Panel lock | Serves also as a child protection. By selecting this option, you block all buttons from being accidentally pressed. |
| Direct Spray | The function prevents wrinkles by spraying the clothes with water. |
| Aqua Control | The sensor system protects the washing machine from leaks. |
| Time Manager | The program allows you to set your own washing parameters. |
How to connect an Electrolux washing machine?
Consider the stages of connecting household appliances:
To electricity
Electrolux washing machines are designed to operate from an electrical network with a voltage of 220-230 V, 50 Hz.
The outlet itself must be removed from the meter separately, without the use of extension cords. The maximum load that the network must withstand is 2.2 kW.
If the socket is installed in the bathroom, then you need to choose a model that is designed for a wet room and has a special cover. The socket must be separate, with an outlet for the machine.
When connecting the device to a common outlet group, there is a possibility of a power outage due to overload when various devices are simultaneously connected to the network. The socket, in accordance with the rules of electrical engineering, must be grounded.
To water supply
Connecting the Electrolux washing machine to the water supply is done using the inlet hose that comes with the kit. One end of it is connected to the water supply distribution, the other to the washing machine.
To connect the hose, you must first install a special tee tap with an outlet for connecting the washing machine. The connection is made by tightening the nut. It's not difficult to do this manually. You should not use pliers, an adjustable wrench or any other tool, so as not to damage the part itself or strip the thread.
The hose that connects to the body can be turned in any direction. If its position needs to be adjusted:
- The nut is loosened a little.
- Change the position of the hose.
- Tighten the nut again, securing the position.
If the length of the hose that comes with the kit is not enough, you can install a new hose of longer length.
To the sewer
Connection to the sewer can be done in several ways:
- use a guide to throw the free end of the hose into the bathtub or sink (more often this option is used as a temporary one);
- directly into the drain pipe;
- into the siphon under the sink.
The drain hose must be raised above the tank level to prevent self-draining.
Options for connecting the drain can be seen in the video:
Probable causes of failure
What to do if the Electrolux brand washing machine does not turn on, that is, it does not show any signs of operation at all, the lights do not light up, the control panel does not activate, and the machine does not make any sounds? First of all, there is no need to panic and rush to call the specialist. Collect all the information about the symptoms of a breakdown and determine the range of possible reasons that caused these symptoms. So, what could happen to the Electrolux washing machine, why doesn’t it turn on?
- The power cord is broken, or the capacitor that filters electrical noise has burned out.
- Somewhere in the case the power wire going to the control panel or command device is broken.
- The command device itself or the start button is damaged.
- The control module is broken.
Be attentive to the symptoms of an Electrolux machine breakdown, every little detail will help you narrow down the troubleshooting area. In particular, if the Electrolux washing machine does not show any signs of any operation at all, and it is clear from everything that it is de-energized, you can exclude the command device from the list. Be sure to check the outlet that powers the machine; it cannot be ruled out that the problem is not in the equipment at all, but in electrical communications.
Be careful when working with electricity, first turn off the power to the communications, and only then start repairs.
Power cord or capacitor?
If the Electrolux washing machine is completely de-energized and does not turn on, first try checking the power cord and interference filter (capacitor). First, carefully inspect the power cord and plug for damage and scorched areas. If any are found, then most likely the problem is in the wire and it needs to be replaced with a new one. The faulty wire may not be detected visually (most often this is what happens), which means you need to check it with a multimeter, and at the same time check the capacitor. What do we have to do?
- Prepare the washing machine for repair by disconnecting it from all communications.
- Unscrew the top cover and remove it.
- At the end of the power cord, where it enters the body of the washing machine, you will find a small semiconductor part; this is the interference filter.
- Unscrew the interference filter along with the power cord and pull out both elements.
- Disconnect the noise filter from the power cord of the Electrolux washing machine.
- Set the multimeter to ring and install one probe of the device on the prong of the fork, and the other on one of the wire cores. Check all the strands of the wire one by one; if they ring, it means that the network wire is intact and that’s not the problem.
- Next, we install the multimeter probes on the contacts of the capacitor and check it for breakdown. The bell rang - there was no breakdown.
- After this, we will set up the device to test the resistance. Set the minimum resistance value. Place the probes on the contacts of the capacitor of the Electrolux washing machine. If the device display shows a significant number, and it gradually increases, then everything is fine. If the device display shows 1 or 0, the capacitor needs to be replaced.
You should not measure the resistance of the power cord connected to the FPS; the data obtained will be incorrect and you will not understand what to do next.
Broken wire in the housing
We checked the socket, rang the capacitor and the power cord - everything works, then why doesn’t the Electrolux washing machine turn on, what should I check next? Well, we weren’t able to quickly discover the cause of the malfunction, so we’ll go deep into the washing machine and check the power wires inside.
From the mains capacitor comes a rather impressive bundle of wires that power all components and assemblies of the Electrolux washing machine. It would be good to ring each wire to understand what the problem is, but this will take a lot of time, so we will start from another. It will be necessary to check each plug and each wire connection for breaks, and also inspect the wires for damage. Perhaps one of the wires is too pinched or frayed.
If you couldn’t detect anything visually, take a bundle of power wires and start calling them one by one. If a damaged wire is found, it must be replaced. After this, the Electrolux washing machine should turn on.
The control unit is faulty
If the Electrolux automatic washing machine still does not turn on, despite our efforts to fix it with our own hands, it is very likely that one of the most important components has failed - the control module. Damage to the control board is possible in the event of a strong voltage drop in the electrical network, or as a result of adverse external influences. Factory defects also cannot be ruled out.
How to connect equipment correctly, on your own or call a specialist
All manufacturers of household appliances, with the exception of some Chinese companies, provide rules for installing and connecting a dishwasher in the operating instructions for the device. Moreover, dealers and representatives of well-known European brands often require that the connection of washing machines and dishwashers be carried out only by authorized specialists, otherwise the warranty may be denied.
Although there is a free connection service for certain types of very expensive equipment. For example, most retail centers for household appliances offer a technician to connect and diagnose an Electrolux dishwasher completely free of charge. For simpler dishwashers, such promotions are rare.
In such a situation, you can do the following:
- Agree and pay for the specialist’s work, giving him all questions related to connecting the equipment. At the same time, the responsibilities of the master do not include laying pipes and wiring, or preparing the space in the kitchen. You will have to do all this yourself; the service representative will only connect the wiring, drain hoses and note in the report that the work was completed in accordance with the requirements and connection diagram of the dishwasher;
- Connect the dishwasher yourself. With proper preparation, this will take a maximum of one day, saving money and nerves, especially since 99% of the connection work will still have to be done by hand;
- Buy a six-year warranty service for the purchased dishwasher in the same salon. As a rule, this is very little money, and the problem of installing and connecting a dishwasher does not interest them at all.
In this way, you can get a real guarantee and simplify the problems of self-installation. Of course, if the equipment is delivered to your home or place of residence at the expense of the selling company, before acceptance it is advisable to check with the utmost rigor that the delivery is complete and that there are no signs of opening the case.
For your information! This approach is justified not only in the situation with a dishwasher. If a batch of equipment is produced with defects, then the faulty unit will “shoot” and break much earlier than six months have passed.
On the other hand, service companies are very reluctant to provide free replacement or service; most often you have to pay for quick and high-quality repairs, regardless of who and how the dishwasher was connected.