It is impossible to imagine the Bright Orthodox Easter holiday without delicious Easter cake and colorful eggs. Dyeing eggs for the holiday is one of the most interesting and exciting traditions. And every housewife has several recipes for coloring them for Easter. Some resort to simple options using onion peels. Others go for brighter colors using food coloring. But there are also those craftswomen who constantly experiment, creating interesting coloring options, one of which is giving the shell a marble color. The streaks and transitions from one color to another with veins actually resemble natural marble, making the eggs attractive against the background of conventional coloring. At the same time, marble eggs for Easter can be made in various ways, creating the most incredible patterns, similar in color to real stone.
How to paint marble eggs for Easter
Achieving a marble effect for Easter when painting is not as difficult as it might seem at first glance. Having seen beautiful marble products for the first time, it never occurred to me that such beauty can be obtained in a fairly affordable and simple way.
The easiest way to paint marble eggs for Easter involves using ordinary onion peels with the addition of greenery, and in some cases, the use of manganese. There are also other methods of coloring for Easter, for example, using various cereals. Or you can create a marbled color using regular food coloring. Some housewives even resort to using nail polish for Easter; surprisingly, this method also helps achieve an incredible effect.
What is better – brilliant green or paint?
Despite the doubts of many regarding the harmlessness of the main coloring ingredient - brilliant green - I hasten to assure: the most popular product of every home medicine cabinet is a hundred times more useful than any food coloring, which experienced and wise housewives have long abandoned. And participation in the process of coloring onions does not raise any questions at all. This is the most traditional and time-tested method of coloring Easter eggs.
Step-by-step recipes for marble eggs for Easter
Coloring eggs for Easter with a marble effect can be achieved using the most common ingredients that are found in every home. But the availability of the necessary components is only one of the main tasks; it is also important to follow the order of actions, due to which the desired effect is created. If you do not know the correct sequence of painting, then you will hardly be able to get an original marble color for Easter. That is why detailed step-by-step recipes with photos will be presented below.
With greenery and onion skins
The most affordable and most harmless dyes, which are available in absolutely every home, are onion peels and brilliant green. Even if you don’t have these ingredients at home, it won’t be difficult to buy them. But, like any process, coloring with husks and brilliant green has its own procedure, compliance with which is simply necessary to achieve the required result.
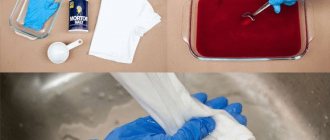
What you will need for coloring:
- eggs – 6 pcs.;
- brilliant green – 10 ml;
- onion peel - from 5-6 onions;
- salt – 1 tbsp. l.;
- a piece of gauze or nylon fabric;
- threads;
- water.
Advice! Be sure to wear gloves to avoid getting your hands dirty during the process.
It is advisable to use a saucepan for painting made of stainless steel or even an old one, since the brilliant green will be difficult to remove from the surface of the dish.
The first step is to remove the eggs from the refrigerator; they must be at room temperature, otherwise the shell may burst during cooking due to a sudden change in temperature.
Then you should prepare the onion skins. It is best if it is of different colors (from red and yellow onions). It must be finely chopped; the smaller the pieces, the finer the pattern.
Afterwards the fabric is prepared. If you use gauze with a large mesh, it may be imprinted on the shell, but this will even add an additional pattern. But the use of nylon will allow the shell to obtain a uniform color. The fabric should be cut into square pieces with a side of approximately 10-12 cm.
Once the pieces of fabric are ready, you can begin the process of preparing for dyeing. To do this, take an egg, dip it in warm water, then roll it in finely chopped husk (it should completely cover the shell).
Place the egg in the middle of a square piece of cloth. Lift each corner of the piece. Connect and scroll so that the fabric fits tightly and does not move, otherwise the design may turn out blurry. Tie the twisted corners with thread at the very base. If the ends stick out a lot, they should be trimmed to prevent them from picking up paint. Perform this action with all other eggs for Easter.
Place the wrapped eggs in gauze into a saucepan and add water to lightly cover them (the water should be at room temperature). Then add salt; it will also provide additional protection against cracking of the shell.
Place the pan on the stove and immediately pour 10 ml of brilliant green into it. Bring to a boil, reduce heat and cook the eggs for about 7-8 minutes.
Important! The more eggs you need to color, the more brilliant green you should use, since the amount of water also increases.
After cooking, place the pan in the sink, turn on the water and wait until the running water fills the pan and, as it drains, turns light. After this, you can turn off the water and drain the remaining liquid. This should only be done with gloves. Afterwards, the eggs are unwrapped and peeled, washed and placed on a plate to dry.
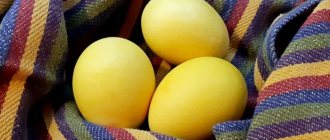
These marble Easter eggs, painted with brilliant green and onion peels, turn out incredibly beautiful, you can see this by looking at the photo.
With rice and onion skins
Marble coloring of eggs for Easter can also be obtained with a different pattern if you use rice for this. In this case, you will also need to boil the eggs in onion peels, but only wrapped not with it, but with rice.
What you will need:
- eggs – quantity as desired;
- rice;
- onion peel;
- salt – 1 tbsp. l.;
- gauze or nylon;
- threads;
- water.
Eggs are also taken out of the refrigerator in advance. Pour rice into a bowl (the future marble pattern will depend on its shape). The eggs are moistened in warm water and rolled in rice (it is advisable that it evenly covers the entire surface of the shell).
Wrap it in a square piece of gauze and tie the ends tightly so that the rice does not move. Place onion skins in a saucepan, add water, salt it and add eggs wrapped with rice. Place the pan on the stove and bring to a boil, reduce the heat and cook for about 10-15 minutes.
The finished eggs are carefully removed from the pan with a spoon, the gauze and rice are removed and washed under running water. Place on a plate and allow to dry and cool completely.
Krashenki with a marble pattern for Easter are completely ready.
Important recipe secrets
The procedure for painting Easter eggs with onion skins and brilliant green is not complicated, but it is important to carry out a number of preparatory measures in advance.
- To avoid cracks in the shell, the eggs should first be warmed to room temperature for thirty minutes - in warm water or simply left on the kitchen counter.
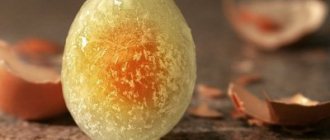
- It is important not to overcook eggs - with prolonged heat treatment they lose their beneficial and taste properties. Would you like to enjoy some rubbery protein?
- When cooking, it is recommended to add 2 tablespoons of salt to half a liter of water. Salt will further strengthen the shell.
- If you want to achieve an even color, the eggs should be washed in advance with soap or soda, wiped with vinegar or alcohol to degrease the surface - this will allow the paint to be evenly distributed over the shell.
- It is better to add a couple of tablespoons of vinegar or lemon juice to the coloring solution - this will additionally protect the color.
- After coloring, for shine, you need to grease each egg with a cloth soaked in vegetable oil.
- And, perhaps, the most important thing in this case is to quickly get rid of green stains, if something happens, you can use a regular solvent or nail polish remover.
We recommend: Plastic VS metal facade: which siding is better, vinyl, metal or acrylic?
With brilliant green, manganese and onion skins
Beautiful marble Easter eggs can be painted with either green paint or manganese. The drawing will turn out no less beautiful and interesting.
For this you will need:
- eggs – 10 pcs.;
- onion peel - from 6-8 onions;
- brilliant green – 10 ml;
- manganese – 2.5 g;
- gauze or nylon fabric.
Dyeing process:
- Cut dry onion skins into small pieces. Also prepare pieces of gauze or nylon fabric - 10 pcs. 10x10 cm.
- Moisten the eggs with water and roll them in pieces of shell until the shell is completely covered. Place on a piece of cloth and wrap. Tie with thread and trim the ends.
- Place 5 wrapped eggs in 2 pans. Pour in water to lightly cover them. Place the pans on the stove and bring to a boil.
- After boiling, pour brilliant green into one pan and add manganese into another. Boil like this for another 10 minutes.
- Ready eggs should be unwrapped and washed under running water. Afterwards, it is better to transfer them to a plate, let them dry and cool completely.
You can also see how to perform this marble painting for Easter in the video below.
“Lacy” Easter eggs using brilliant green: photo
Lacy eggs using brilliant green
If you have a piece of unnecessary lace in your house, then you can make lace Easter eggs.
Wrap the egg in lace and tie it tightly with thread
Follow these steps:
- Wrap a raw egg in lace, twist the end and tie with thread.
- Then put a pan of water on the gas, lower the eggs, and when the water boils, add a few drops of brilliant green.
- Boil the eggs for no more than 7-10 minutes.
- After this, remove the eggs and place them in cold water to cool.
- Now take them out of the water and remove the lace.
Lacy Easter eggs are ready!
With food coloring
A beautiful marble pattern for Easter can be achieved not only by using greenery and onion peels, but also by using food coloring.
The method of coloring eggs for Easter with dye to achieve a marble effect is not particularly difficult, but differs significantly from previous options.
For staining you will need:
- eggs – 8 pcs.;
- table vinegar - 2 tbsp. l.;
- paper napkins;
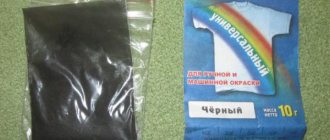
- gel dyes of different colors.
Unlike dyeing marble eggs for Easter, in previous versions, the main product must already be ready to use dyes. Therefore, it is necessary to hard-boil the eggs in advance and let them cool completely.
Cooled and completely dried eggs are wrapped in paper napkins. Place them separately on small saucers and pour vinegar over them so that the napkin is completely wet on all sides.
Then add 1-2 drops of dye of different colors onto the eggs wrapped in napkins (it is advisable to use contrasting colors to make the pattern brighter and clearer).
After applying the dye, you should wait a few minutes. After a couple of minutes, they should be turned over and the dye applied again to the unpainted areas. You need to leave them in this form until the napkins are completely dry (about 40-60 minutes).
Dry wipes should be carefully removed. It is advisable to wipe the shell with vegetable oil so that the colors become richer and acquire shine.
Attention! When painting for Easter in this way, it is necessary to thoroughly ventilate the room, since vinegar has a pungent odor.
Ingredients
For coloring you will need the following products:
- fresh chicken egg - 1 dozen;
- alcohol solution of brilliant green 1% - 10 ml (1 bottle);
- onion peel - medium dry layer from 5 large heads;
- fresh water – 1.5–2 l.
The pattern appears brighter and more contrasting on white eggs. Smooth, even, uncracked specimens are selected for painting. Size doesn't matter. When purchasing, it is important to consider color and absence of defects.
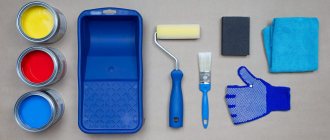
The following equipment is also required:
- latex gloves;
- medical bandage (gauze) – 1 pc.;
- dense threads - 1 m;
- metal container with a wide bottom, 2 liters;
- scissors.
With nail polish
Oddly enough, but not only with the use of natural dyes you can create a marble pattern. You can even marbleize eggs for Easter using nail polish.
Execution process:
- Boil the eggs for about 8-10 minutes. Remove from water and cool.
- Pour water into a bowl and add a few drops of different colored nail polish.
- Drops of varnish on water are slightly diluted with a wooden skewer or toothpick to create patterns and the colors are slightly mixed.
- Then carefully lower the boiled egg into a drop of varnish obtained in water, turning it over slightly so that the shell is covered with a pattern on all sides.
- Also, carefully painted egg is placed on a paper napkin and allowed to dry completely so that the varnish layer does not stick. The rest of the eggs are dyed in the same way.
Advice! To avoid getting your hands dirty with varnish, you can wear medical or rubber gloves.
Marble eggs made for Easter thus turn out to be very bright, but you should not get too carried away with painting with varnish, since this is still a substance of chemical origin.
DIY marbled hibiscus tea paints
If you want to surprise your guests, use hibiscus. Depending on the color of the eggs and the time of painting, they turn out very different. You can use both chicken and quail eggs.
We will need:
- eggs;
- hibiscus tea;
- water;
- dishes;
What to do
It is better to brew hibiscus in advance so that it has time to cool. Wash the eggs thoroughly with a sponge and soda. Then boil hard in salted water. Then place in tea so that it covers the eggs completely. The minimum dyeing time is 2 hours, but to achieve a more saturated color, leave them in tea for 3-5 hours. After coloring the eggs, dry them on a napkin and brush with oil for shine.
In order for the paint to apply evenly, the shell must be degreased with vinegar.
Useful tips
Even though the process of painting marble eggs for Easter with your own hands is quite easy, it is still better to adhere to the following tips:
- Eggs should be warm or at room temperature before boiling. To completely prevent the shells from cracking, you can pre-immerse them in warm water.
- Also, in order to prevent the shell from cracking, it is advisable to add salt to the water (the more salt, the higher the likelihood that the shell will remain intact).
- To ensure that the shell is evenly colored, it must be degreased before cooking. This can be done using table vinegar.
- After dyeing, you should not rinse the eggs under running water for a long time (this applies to marble eggs with onion skins and green stuff), as the color may become paler.
- After coloring and complete cooling, it is recommended to rub the shell with vegetable oil. So, the drawing will look brighter and richer with a beautiful shine.
- Eggs with white shells are more suitable for coloring. Since the pattern on a white shell will be more clearly visible than on a brown one.
- It is better to prepare onion peels in advance; for example, during cooking you can put them in a separate bag. After all, the drier the husk, the more dye it will give off.
- To obtain a clearer and richer marble pattern, it is recommended to use peels not only from yellow onions, but also from red ones. It is also necessary to take onion peels with a darker color. So, the coloring matter itself will be darker.
By following these simple tips, the coloring process will definitely delight you with only excellent results. And such marble eggs will be a wonderful decoration for the festive table for Easter.
How to paint eggs with brilliant green and iodine?
Many housewives wonder: is it possible to make marble eggs if there are no onion peels, for example, replacing them with iodine?
- It is worth noting that without onion peels it will not be possible to make a “marble” coating.
- Using iodine, you can paint eggs an even light brown color using the method described above in the classic recipe.
- It is worth noting that if you add a little soda and salt to the water, the iodine will turn it blue. The result will be an interesting shade.
- But this does not always work out, since everything will depend on the composition of the water (whether you use purified water, from the tap, etc.), the reaction of iodine and soda.
Therefore, first try to perform the process on one egg, and then, if you don’t like something, repaint it in a different color.
Interesting: If you mix equal parts brilliant green and iodine and paint eggs in the classic way, you will get an interesting color - khaki.