How long does it take to sterilize jars in the microwave? This directly depends on the size. It will be enough to leave the “litrovka” for 3 minutes, and to process a three-liter jar it will take an average of 5 to 7 minutes. The best way to navigate here is by boiling water. After boiling, it is necessary to continue heating the vessels for another 1-3 minutes, and then the device can be turned off. While boiling, steam will come out of the cans, which will ensure the sterility of the vessels.
You need to take out the processed dishes very carefully. It is important to avoid sudden temperature changes that could cause the glass to burst. It is better to wait a couple of minutes until the container cools down a little, and only then open the door. Remove the vessels with both hands using a dry towel or oven mitts. Make sure that no cold or wet objects come into contact with the jar; it is better not to touch the neck.
The remaining water must be poured out, and the vessels must be immediately used for preserving hot preparations. If you need to fill containers with cold food, first place them upside down on a towel and wait until they cool completely.
Typically, a standard size microwave oven can fit up to five “liters”. If you need to sterilize a three-liter container, fill it with a small amount of water, cover the bottom of the microwave with a towel and place the container on its side. Make sure it is fixed and start processing.
Is it possible to sterilize glass jars in the microwave?
A microwave oven makes it possible to sterilize several jars at once in a few minutes. There are no prohibitions on the use of the unit; glass containers are allowed to be placed in the chamber; the microwave heating temperature is sufficient to eliminate bacteria.
Is it possible to sterilize empty jars in the microwave?
The microwave oven allows you to process containers without food inside. But it is not recommended to place completely empty, dry cans into the device chamber. To carry out sterilization, you need to pour a little water into them or place a separate container with liquid nearby so that hot steam is formed under the influence of radiation.
How to properly prepare containers
No matter how clean a glass jar is, it must be thoroughly washed and sterilized. The detergent must be rinsed off several times. The process of preparing glass containers:
- Check the integrity of the glass: there should be no cracks, chips, or other defects. If you ignore the damage, the glass will simply burst when heated.
- Rinse containers. It is advisable to use soda - it is harmless and can be easily washed off the glass surface.
- Sterilize washed jars.
At what temperature should jars be sterilized in the microwave?
The temperature at which food and empty containers are processed in a microwave oven depends on the power setting. With an indicator of about 800 W, the unit will quickly heat water in a glass container to 100 °C.
At boiling temperature, hot steam is generated in the microwave oven, which ensures disinfection
How many minutes does it take to sterilize jars in the microwave?
The duration of heating the cans in the microwave depends on their volume. The larger the container, the longer it needs to be kept inside the chamber.
How long does it take to sterilize empty jars in the microwave?
Typically, the process of sterilizing unfilled jars takes about six minutes. But in each case, the time is determined individually; it is necessary to monitor when the water boils in the container.
How long to sterilize half-liter jars in the microwave?
One small 0.5 liter jar can be placed in the microwave for just two minutes. If there are several containers, the time is increased to 3-4 minutes.
Reviews
Sterilizing salads in the microwave takes much less time than traditional heat treatment. Therefore, many housewives have already tried this technique. Those who do not need to prepare salads on an industrial scale for a large family were especially pleased. For 3-4 half-liter jars, using a microwave oven will allow you to quickly and conveniently sterilize the workpieces.
Housewives also note that for this method of hot processing, the quality of the container and its preliminary inspection are of great importance, since a small defect can lead to the need to clean the microwave oven from glass and scattered vegetables and fruits.
However, some people were dissatisfied, and this is mainly due to the small capacity of the microwave and the limitation on the height of the container. Some models of microwave ovens do not allow processing more than one can at a time, therefore, productivity will be low.
Preparing jars for sterilization
Before quickly sterilizing jars in the microwave, they need to be prepared. Namely:
- wash thoroughly with soda, mustard powder or regular dish gel, using a brush if necessary;
- pay special attention to the bottom and necks; contaminants most often remain in these places;
- rinse and dry the jars naturally on a towel;
- inspect the container and make sure there are no cracks or chips.
Damaged jars may burst in the microwave during the high-heat sterilization process. In addition, it is unsafe to store food in them; the seal will be incomplete, and accordingly, the products are likely to deteriorate ahead of schedule.
Preparatory stage
First of all, you need to prepare the jars for high temperature treatment. The quality of canned products depends on this.
- Carry out an external inspection of the container . There should be no chips or cracks on the neck and other parts. Otherwise, the container may burst. It is better to dispose of such cans immediately so as not to confuse them with good ones.
- Rinse thoroughly . Experienced cooks recommend using a soap-soda solution or simple powdered baking soda. For rinsing - clean, filtered water. Detergents with additional fragrances are not recommended. Chemically created flavors are poorly washed out, which can subsequently affect the taste of the finished dish.
- Place on the kitchen table, after laying a clean waffle towel on it. Dry.
- Wash the lids in the same way. Place in a saucepan, add filtered water and boil for a quarter of an hour. Carefully drain the liquid and place in the jars.
Jars in the microwave
How to properly sterilize empty jars in the microwave
The classic algorithm suggests steaming jars in the microwave using water. But if you need dry containers, you can use another method. It looks like this:
- Pour clean water into a small glass glass, leaving about 4 cm to the edge;
- place the container in the center of the plate in the microwave;
- glass jars that need to be sterilized are placed empty around them;
- set the power to 750 W and put the unit into operation for five minutes.
The microwave oven will heat the liquid inside the glass, and due to this, the temperature in the chamber will rise to the desired values. At the end of the device’s operating cycle, the dry containers are removed and canning begins immediately.
Important! It is necessary to remove dishes from the oven after sterilization using oven mitts. If you handle it with bare hands, you may get burned.
How to sterilize 3-liter jars in the microwave
Not every microwave oven is suitable for sterilizing large 3-liter jars. It is necessary to ensure that the container actually fits inside the unit.
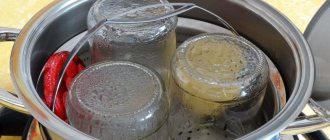
Typically, a 3 liter jar only enters the microwave in a horizontal position. Therefore, the processing is carried out like this: a little water is poured into the dishes, and then placed horizontally in a deep plate.
Place a plate under a large jar to prevent it from rolling around the chamber
Ideally, the liquid should not spill out of the jar, but even if this happens, it will not leak directly onto the glass stand. The sterilization process itself is standard - you need to set the power to about 800 W and start the microwave oven for 5-6 minutes.
How to sterilize liter jars in the microwave
It is easiest to process 1 liter containers in the microwave. To sterilize containers, just fill them with 2-3 cm of clean water, and then place them in the device chamber at a short distance from each other. The oven is put into operation for two minutes if there is only one can, and for five minutes if there are several of them at once.
Dry sterilization method
There are situations when dishes must be dry after processing. This cannot be achieved using the method described above, so the procedure will look like this:
- Containers with defects are sent to a landfill so that their fragments do not have to be raked out of the chamber later.
- Wash selected specimens with a strong solution of baking soda, rinse and wipe with a foam sponge. Then place it on a clean cloth, bottoms up, and wait until it dries completely.
- Pour filtered water into the glass 3/4 full so that it does not splash out when boiling.
- How long to sterilize - at least 4-5 minutes. Place the glass in the center of the plate, and the jars without water at the edges. Set the power to 0.75 kW and sterilize for 5 minutes.
- After the timer signal, remove the container using an oven mitt.
The above methods are applicable for processing glass bottles.
How to sterilize jars of water
The classic algorithm for sterilizing jars in a microwave oven looks like this:
- Pour a little water into clean and pre-dried containers, no more than 3 cm from the bottom. It is better to take filtered liquid so that limescale does not form.
- The jars are placed in the microwave oven so that they do not touch each other or the walls of the chamber. The unit plate should rotate freely.
- In the microwave oven settings, the power is set to about 800 W and the time is set from two to six minutes, depending on the volume and quantity of containers.
- Turn on the microwave and wait for the water to boil. After this, you need to keep the jars inside the device for another 1-2 minutes to ensure steam disinfection is as effective as possible.
At the end of the heating cycle, turn off the microwave oven and remove the glassware from the chamber using a tight potholder. The remaining water is drained, and the moisture on the bottom and walls is blotted with a sterile bandage or gauze.
Water becomes a conductor of heat in the microwave, so without it the dishes will simply remain cold
Important! It is recommended to start canning food immediately after finishing cooking the dishes in the oven.
It should be noted that jars with lids cannot be sterilized in the microwave. The latter may melt or spark under the influence of radiation. Metal and plastic lids are treated separately; it is best to simply put them in boiling water and leave for 15 minutes.
Tips for choosing and preparing containers for winter preservation
Don’t forget to handle hot containers with an oven mitt or towel to avoid getting burned.
This is very important, since many methods involve hot processing
1. After carefully checking the container for chips and cracks, it must be washed with detergent manually or in the dishwasher.
2. It is necessary to make sure that there is no heavy contamination on the neck; if necessary, rinse the container additionally.
3. To produce sufficient quantities of food, you will need various glass jars, cylinders and bottles, and enamel containers.
4. The dishes should be colorless or with a faint greenish, bluish tint. If a defect is detected, the container should be replaced.
5. For heavily soiled cans or bottles, use a 1% soda ash solution.
6. To stock a large volume of processed products, containers should be sterilized in batches. For such work, an oven is best suited, since several pieces can be placed there at once.
7. Dried jars are turned over and placed on trays for ease of use.
8. When carrying out manipulations in the oven, the heating is increased gradually over half an hour. After turning off the device, open the door slightly to allow the heat to evaporate a little. The containers must cool down, and only when warm are they transferred to the cloth. If you do this earlier, the glass may not hold up and cracks will form on it. You need to fill the prepared raw materials while the dishes are still warm.
9. Used lids and stoppers are boiled before working with them. After the liquid boils, 10-15 minutes should pass and you can add the lids.
As you can see, sterilizing jars at home does not take much time, but will protect you from unpleasant factors. How to sterilize jars and how much you know, so follow the instructions so that the jars filled with homemade preparations remain with you until you eat their contents.
The shelf life of the canned product depends on the preparation of the container. Well-processed and sterilized containers allow you to store twists for a long time without fear for the safety of vegetables and fruits.
How to sterilize jars in the microwave with preparations
Some recipes suggest sterilizing jars in a microwave oven not before canning, but at the final stage of the procedure, when the jars are already inside. This processing method allows not only to eliminate microorganisms from the surface of the container, but also to reliably disinfect the products themselves. Most often, mushrooms, vegetables and fruits are subjected to sterilization, in the preparation of which vinegar and other food preservatives were not used.
A microwave oven allows you to process filled dishes at high temperatures without harming the workpiece. This method even has additional advantages. Under the influence of radiation, it is not the container itself that is heated, but rather the liquids inside it; accordingly, sterilization of workpieces in the microwave will be doubly effective. The advantage is that processing does not take much time. The desired temperature in the oven will be reached in a few minutes, and the taste of the food will not change, as could happen with prolonged heating.
How to sterilize jars of salads and pickles in the microwave
Processing in a microwave oven extends the winter storage period of salads and pickles, prevents the products from spoiling prematurely and does not affect the taste. Sterilization is carried out according to the following algorithm:
- clean dishes are filled with food - not up to the neck, but about 2/3 of the total volume;
- place the jars in the microwave one at a time or several at a time, the containers should not touch each other;
- set the power to about 750 W;
- set the processing time; if salads and pickles are to be sterilized in a 1 liter container, heating for three minutes will be sufficient;
- close the chamber and turn on the microwave oven.
The video on how to properly sterilize jars in the microwave notes that you do not need to cover them with lids. After the sound signal, the device is not opened immediately, but the containers are allowed to stand for about five minutes. Then the dishes are carefully removed with oven mitts, placed loosely on top of the lid and left on the table until cooled. When the workpieces have cooled, all that remains is to fill the container to the end and seal it hermetically.
If the cans are filled almost to the top, it is better to put them in trays, the liquid will splash out
How to sterilize jam jars in the microwave
You can disinfect jars in the microwave for the winter along with jam. The procedure is carried out as follows:
- Place fresh jam in the container, leaving about 5 cm from the neck so that when boiling the delicacy does not leak over the edges;
- without lids, the jars are placed in a microwave oven and positioned so that they do not touch each other or touch the walls of the chamber when the plate rotates;
- set the power for the microwave to about 700-750 W;
- put the device into operation for 6-8 minutes.
At the end of the heating cycle, the chamber door is not opened immediately, but after five minutes. The hot dishes are removed from the microwave and allowed to cool slightly, after which they are tightly wrapped for the winter and stored.
How to sterilize jars of fruits and berries
Kitchen appliances allow you to quickly and effortlessly pasteurize jars in the microwave along with berries and fruits. The processing is usually carried out in sweet syrup, and the scheme looks like this:
- washed and dried fruits are placed in containers, leaving a few centimeters to the neck;
- prepare simple sugar syrup and pour it over berries or fruits up to about half the container;
- place the jars inside the microwave oven and set the maximum power;
- turn on the unit for 3-5 minutes depending on the size of the dishes;
- After the sound signal, wait another five minutes and remove the containers.
After the dishes have cooled a little, you will need to add the syrup to the end, seal the preparations hermetically with sterile lids and leave them on the table under towels until they cool completely.
Important! It is recommended to turn the containers upside down during the cooling process to ensure that there are no leaks.
Handling containers with salty foods
Before starting the procedure, jars for blanks are emptied 2/3 of their contents so that the solution does not splash out. Before seaming, the containers are filled again. When placed in the oven there should be gaps between them. The time is set to 3 minutes and the power to maximum. After the timer goes off, the products are kept in the oven for another 5 minutes. Twisting is done after the cans have cooled, loading them to the top. Housewives sometimes doubt whether it is possible to sterilize jars of cucumbers, as they will cook and stop crunching. So far, there have been no cases of cucumbers losing their crunch after being microwaved.
Advantages and disadvantages of sterilizing jars in a microwave oven
High-temperature processing of cans in a microwave oven has its advantages and disadvantages. The procedure has several advantages:
- Sterilization takes only a few minutes and can be completed faster than using an oven or water bath.
- When using a microwave, the microclimate in the kitchen does not change, the temperature does not rise and no fumes are formed.
- You can put several small jars at once in the microwave, whereas on the stove you usually have to process them one at a time.
- If you follow basic safety rules, there is virtually no risk of getting burned. Removing hot cans from the microwave is not much more difficult than removing a plate of heated food.
If you carefully inspect containers before placing them in a kitchen appliance, sterilization will not harm the glassware in any way.
Dishes in a microwave oven can only burst if there are cracks in them to begin with.
At the same time, disinfecting containers in the microwave has certain disadvantages:
- The capacity of a kitchen appliance is usually small - it will not be possible to process a large number of cans in one go.
- A microwave oven is best suited for sterilizing 0.5-1 liter jars; bulk containers are simply not included in most models.
- Processing dishes requires electricity, while heating containers on the stove or in the oven is usually more economical.
In general, sterilization in the microwave has many more advantages. If you need to disinfect small containers, then using a kitchen device will be convenient.
Why sterilize containers
Sterilization is one of the greatest achievements of mankind. Without it, we wouldn't have long-lasting food, and outside of the refrigerator, food would spoil in a matter of days. Factory-prepared canned food in cans has a shelf life of up to two years and at the same time retains all its taste and remains safe for human health. It is difficult to achieve such preservation at home, but it is still possible to prevent the appearance of mold for six months to a year.
Some people neglect sterilization for reasons that all preparations will be stored in the cellar or refrigerator. However, cold does not kill microorganisms and molds, but only slows down their reproduction. Only heat treatment kills all harmful microflora, which means that the products will not only be tasty, but also safe.