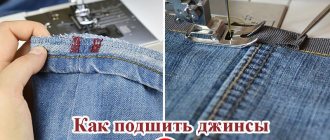
The beret is often a very important piece of military equipment. Many troops use it because the hat is really comfortable and stylish. But some berets come out in the form of a pancake, so they look ugly. They need to be repulsed. You can do this yourself.
Headdresses differ in color, depending on the affiliation of the troops. For example, special forces wear maroon, infantrymen wear black, and paratroopers wear blue. But in order for the beret to look neat, you should work on its appearance. To create military berets, flexible and lightweight material is used. Usually there are no difficulties in shaping the headdress.
Batting target
Beating is an extremely important process that must be performed strictly according to the instructions. The technology largely depends on the type of headdress and the desired result. True, before studying the basic methods of performing such manipulations, you should first of all understand why they engage in beret beating in the first place.
This headdress, as already mentioned, is used not only by civilians. The military beret is part of the equipment in almost all armies on the planet. True, over time it loses its original shape and begins to look like a pancake. Naturally, the appearance becomes significantly worse. This is why the beret is beaten.
You will be able to perform such actions yourself. In the manufacture of such products, as a rule, pliable, lightweight materials are used. It is quite easy to give them the desired shape. You just need to understand the intricacies of performing such manipulations with a beret.
Black, maroon, blue
In different countries, the same color of a disc-like headdress indicates belonging to different branches of the military. Below are the colors that are relevant for domestic military personnel.
- Black. The black color indicates that they belong to the Marine Corps. This is the most compact of the existing berets. You can easily hide it in your pocket or put it over headphones if necessary. The Marine Corps is the elite of the Russian army. And a black beret is evidence of belonging to this elite.
- Speckled. A military maroon beret is a kind of award for a serviceman, confirming his professionalism. You can get such a headdress only after successfully passing a series of tests. Moreover, first they conduct a training exam, and only after it the military man runs a cross-country race, demonstrates his mastery of acrobatic tricks and engages in hand-to-hand combat with an opponent.
- Blue. Blue berets can most often be seen on soldiers and officers of the Airborne Forces. Especially when this branch of the military celebrates a professional holiday. Until 1968, paratroopers wore crimson headdresses. But then they were replaced by blue “discs”, the wearing of which is still relevant today.
Berets are divided into seamed and seamless. The latter are popularly called “droplets”.
Step-by-step instruction
Before ironing the headdress, you need to decide on which side it will be laid. As a rule, maroon beret models lean to the left, while all others lean to the right. In the case of parades and military ceremonies, the edge of the product is located on the right.
Having decided what the broken accessory should look like, you can get to work. The task of shaping a beret can be dealt with in several ways. All of them do not cause any difficulties and are suitable for doing at home. You just need to choose the appropriate option.
Manually
Soaking
Then we give the shape
Fixation with clothespins
Drying
Using Sugar Water
Figuring out how to hit the beret correctly is not at all difficult. When using this technology, the first step is to prepare a sugar-based syrup. For this purpose, you need to dissolve one tablespoon of granulated sugar in a glass of water. It is this that will act as a retainer, allowing the product to be given the required shape.
The instructions on how to beat off the beret are as follows:
- Place the product on your hand.
- With your other hand, actively knead the material so that the accessory takes on the correct shape.
- When performing such actions, your fingers must be periodically moistened in the prepared syrup.
- Now all that remains is to straighten the edging.
After performing such manipulations, you can safely put on the broken hats. The main thing is not to get caught in the rain after this. Under the influence of water, the material will become soft and the beret will lose its shape again.
Info! In addition, this method has another drawback. When using it, granulated sugar is used, which can attract the attention of insects.
Dissolve sugar in warm water
Soak the beret
Squeeze out
All that remains is to give it shape.
Instead of sugar, beer can be used. This is a more reliable fastener that is not afraid even of wind and rain. When using it, you can also knead the fabric with your fingers dipped in an intoxicating drink. True, complete immersion of the headdress in beer is also allowed. After this, you just need to wring it out, put it on, give the beret the desired look, smooth out the edging and do not remove the accessory until it is completely dry.
However, you need to take into account that beer has a very specific smell. It will be extremely difficult to get rid of it. Therefore, you can take a simpler route. To achieve the desired result, just wet the demobilization beret and place it on a plate. The main thing is that the dishes fit the size of the accessory perfectly. In this position, the product is left to dry completely. However, in this case you should make sure that the material can be washed. There are fabrics that can only be cleaned using the dry method.
Chopping on the head
There is nothing easier than beating the beret directly on the head. For this purpose, you just need to follow these instructions:
- The accessory is immersed in warm water. If there are stripes or emblems on it, you should avoid getting these parts wet. You also need to take into account that excessively hot liquid can cause shrinkage.
- Excess liquid is squeezed out. Water should not drip, but the material remains sufficiently damp.
- The beret is put on the head, pulled up, and then pulled to the right side.
- The fabric is straightened by hand.
- Such manipulations are repeated until the accessory lies flat.
- The product remains on the head until it is completely dry.
When using this technology, it is possible to achieve an optimal fit and also prevent severe shrinkage. All actions should be performed with the utmost caution. It is strongly not recommended to twist the fabric during spinning. Otherwise, creases may appear and the fabric will stretch. The best option is to squeeze the beret in a towel, which will absorb excess liquid.
Use of a hammer
Separately, you should figure out how to properly beat off a beret using a hammer. When using this method, the following actions are performed:
- The headdress is wetted in warm water.
- It is given time to dry a little, after which it is placed on a stable and level surface that allows manipulation with the hammer.
- Performing synchronized actions, the entire accessory is beaten in a circle.
Soak and squeeze well
Steam
Use a spoon or hammer to shape it on a flat surface.
The hammer can also be replaced with a regular tablespoon made of steel, as well as a rolling pin. True, this method can only be used on rough canvases. To achieve a more pronounced effect, it is recommended to soak the beret not in ordinary water, but in sugar syrup or starched liquid.
Use of starch
The degree of starching varies:
- low. Only a teaspoon of starch is consumed per liter of water. The shape in this case will hold until the first wetness;
- average. A tablespoon of product is consumed for the same volume of liquid;
- high. For a liter of water you need to use two tablespoons of starch.
A simple instruction will help you figure out how to hit the beret correctly:
- The first step is to prepare a solution of suitable consistency.
- The liquid is cooled. Its temperature should be room temperature.
- The accessory is immersed in the prepared solution, but the emblem must remain dry.
- Excess liquid is squeezed out as carefully as possible.
- The fabric is smoothed and carefully straightened.
- The beret is put on a three-liter bottle or a ball of suitable diameter.
- The object is straightened and remains in this position until completely dry.
Dissolve starch in water
Beret lock
Without squeezing, we give it shape and leave it to dry.
When using this method, it is possible to achieve a lasting and pronounced result.
Beating by ironing
There are many materials that can be ironed to achieve the desired effect. Even a soldier who has just entered service can perform such actions. When using this method, the accessory is simply washed and then ironed. The main thing is to pass the iron over it through gauze folded in several layers.
Before ironing, it is recommended to place a towel soaked in water, which is previously rolled up, inside as an aid. This way the ironed accessory will acquire its proper appearance.
Using shaving foam
This method is considered more complex than the above options. When using it, you should strictly follow the instructions. Otherwise, the wardrobe item may be damaged. In this case you will need:
- shaving foam;
- varnish designed to fix curls;
- container filled with hot water;
- Shaver;
- scissors.
The beating is carried out according to the following scheme:
- Using scissors, the first step is to tear off the lining.
- The accessory is immersed in prepared water.
- The beret is wrung out, but not twisted, just squeezed with a towel.
- The wet product is put on the head, smoothed and placed in the desired position.
- Foam is applied to the material. There is no need to remove the object from your head.
- After a few minutes, the foam begins to rub into the fabric. These steps must be performed in such a way that the product is distributed evenly and no white streaks appear.
- After thirty minutes, the canvas is completely dry and is removed.
- They go over the surface with a razor. This removes any remaining foam and pellets.
- Varnish is sprayed on the inside. It is recommended to use the entire bottle to ensure the most secure hold.
- A figure similar to a beret is cut out of plastic. It is inserted between the lining fabric and the cockade itself.
Rip off the lining
Rub the foam into the surface of the beret
We put it on a mannequin or something similar, give it a shape and leave it until completely dry.
At the final stage, all that remains is to sew on the lining.
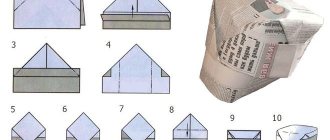
Use of old newspapers
Not everyone will like putting a wet beret on their head. In such a situation, you can use this method. In this case, it is simply filled with old, unnecessary newspapers. They are crushed and placed inside the accessory, after which they are moistened with a spray bottle.
Additional use of hairpins and regular clothespins is allowed. With their help, matter is fixed in the desired position. When the newspapers are completely dry, they are removed. After this, the item of clothing should be tried on, and if necessary, the procedure should be repeated.
How to hit the beret correctly, 8 proven ways
Berets are worn by both civilians and military personnel. This headdress is a source of pride in the army and gives a certain chic. In order for the beret to look beautiful, it must be periodically beaten. How a civilian wears a beret is a matter of taste, but the army has its own rules. It is necessary to keep the beret in proper condition.
Let's take a closer look at how to hit the beret correctly and what methods there are. Useful tips and recommendations for beginners in this business.
Subtleties of beating a suture headgear
A suture beret is more difficult to beat, but this does not mean that it is completely impossible to achieve the desired result. If the accessory does not fit tightly, it should be sutured. After this, the fabric needs to be moistened and creased in the required direction. In the process of beating, you need to adhere to the following scheme:
- The fabric is carefully ironed from the side of the future crease of the beret.
- A towel folded into a ball is placed inside the product.
- The opposite side of the beret is smoothed out.
- The shape is created using your fingers.
Additionally, it is recommended to equip the cockade with plastic. This part is fixed between the lining and the main part of the beret.
“Guards Corner” - a band on the Airborne Forces beret
Red badges were attached to the paratroopers' berets, which were worn on the left side of the berets in everyday life, and during parades they were tilted to the right side. Later, such a badge - a band on the Airborne Forces beret - began to be worn in all formations and units of the Airborne Forces. However, there were no standardized sizes.
And since 1989, the mandatory wearing of uniform badges by all airborne troops has been enshrined at the legislative level. These badges were flags made of brass or rondole.
Since 1995, the band began to be made for the first time with the image of the Russian coat of arms. Subsequently, he was accepted along with a modified military uniform, and this was recorded at the legislative level. Corresponding changes to the military uniform of the paratroopers were made retroactively. This was the decision of the Head of the Central Clothing Directorate of the Russian Ministry of Defense in July 1995.
Such beads are of great value to their owners. Especially those that were created by skilled soldiers with their own hands even before 1989. Moreover, most of the bands made before 1989 are rare works of folk craft and are highly valued by collectors.
Final processing
Dressing on a mannequin
Use a razor to remove pellets
Apply hairspray inside
What is needed for this?
Often, berets are literally “beaten”, that is, to give the correct shape you will need a hammer.
In the case of products made from thin fabrics, and not from thick wool, you can get by with less drastic measures. For example, you can turn to heated water (sweet or starchy), paraffin, or hairspray. Since most methods require washing, you will have to find the right place to dry before starting manipulations. In this context, a window sill is definitely not suitable, as well as rooms with drafts and rooms with high humidity. You should not place woolen or wool-blend items near heating appliances . This is fraught with deformation and change in size.
Recommendations for Beginners
For newcomers who have just entered the service, it is quite difficult to provide the beret with proper care. The following recommendations will help simplify this task:
- when performing beating, it is easier to cope with the work if you use sugar syrup rather than ordinary water;
- soft berets fit much better on the head. Naturally, it turns out to be much easier to give them the correct, beautiful shape;
- The razor will help remove pellets, as well as get rid of excessive fluffiness, which often appears as a result of beating the accessory. If it is not eliminated, the beret will look very unattractive;
- Drying the accessory can be done not only on the head. For this purpose, you can use a globe and a ball, as well as a three-liter jar that is turned upside down;
- To prepare a starch solution, it is initially recommended to dissolve one hundred grams of this powder in half a glass of cold water. After this, you should wait until all the lumps dissolve and add the remaining hot liquid. The liquid should be stirred as efficiently as possible. Otherwise, the starch simply will not dissolve. Accordingly, it will simply not be possible to achieve the desired result.
If none of the above methods work, don’t despair. There are many other methods for giving the beret the desired shape. For example, you can glue non-woven fabric onto it; you can use paraffin, candles, as well as cardboard and the most common laundry soap.
Not everything always works out perfectly the first time. Experience comes with time. You just need to not give up. In the manufacture of such hats, fairly pliable and dense fabric is used, so you can safely experiment with it. Even with frequent beating, the risk of damaging it is minimized.
In addition, you can always ask your colleagues for help. More experienced soldiers know very well how to perform such actions with a beret. It is possible that they managed to come up with some special and simpler method. Surely they will share this information and give a number of other valuable recommendations. Naturally, in this case, beating the headdress will not cause any difficulties.
Berets in Russian and other security forces
Currently, blue berets are the most recognizable attribute of airborne troops, equally with the blue and white vest. Recently, berets in general have become widespread, and the legendary maroon berets have also become especially popular. Military personnel of only a few special units of the Ministry of Internal Affairs are entitled to receive the latter.
In addition, maroon berets are worn on the left side, and blue berets are worn on the right. The only exception for blue berets is parades, when absolutely all military personnel have to wear their hats on the left side, in accordance with the event protocol. You should also know that berets with blue colors are present in the armed forces of other states. For example, blue berets are worn by UN military personnel, although the shades of berets of the Russian Airborne Forces are different from all others.
If you have any questions, leave them in the comments below the article. We or our visitors will be happy to answer them
For many branches of the military, the beret remains one of the components of the uniform. Therefore, first of all, this wardrobe item is associated with military workwear. Recruits are given berets in extremely poor condition - they resemble stacked pancakes. To bring it into an attractive shape, you need to beat off this accessory.
The need to carry out this procedure also arises during service, since soldiers often roll up their beret and wear it under their shoulder straps. If you want to learn how to quickly shape a headdress, watch the attached video. The tips below will help not only soldiers, but also fashionistas who have this accessory in their wardrobe.
How to keep your beret in shape for as long as possible
The army teaches a person to be quite resourceful. Soldiers often use a variety of improvised means to maintain the shape of their beret:
- cardboard;
- thin plastic;
- candle wax (applied to the inside of the beret).
At home, you can place self-adhesive fabric in your headdress. The beret should be prepared first - moisten it with water mixed with a small amount of granulated sugar. You will also need to form the edging. To do this, it’s time to beat it off in the same way as in the method given above.
A reinforced beret can be worn for several days without adjusting its shape. However, as soon as you sweat a lot in it or get caught in the rain, you will have to start all over again - the edges of the beret will droop and will look very unsightly.