Curtain (furnishings) tape is a braid, along the entire length of which cords are laid to create folds and holes or loops for attaching the product. Such fittings make it easier to sew window textiles, eliminating the need to create loops and folds directly on the fabric. It is not difficult to sew curtain tape of any size to curtains, the main thing is to make the correct calculations and follow the step-by-step instructions.
Curtain tape for curtains and tulle
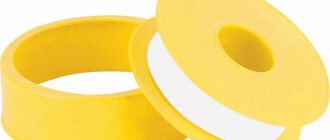
Curtain tape resembles a ribbon and can be white or colorless.
Along its entire length there are parallel ropes, and in the middle there is a dense layer with loops for hanging the curtains to the fixing device. Curtain tape consists of fabric strips of different widths, along the entire length of which thin ropes or laces are stretched in one or several parallel rows.
The material for curtain tape can be either natural or synthetic fabrics of different densities.
Curtain tape is a special type of soft decorative fittings used to form curtain folds of various sizes and shapes. This is a kind of framework for all variations of assemblies. With the advent of tape, securing curtains has become much easier and more convenient. There is no longer any need to attach metal clips that damage the base or sew on eyelets manually. In total there are approximately 70 varieties of braid.
In the middle of the tape there is a denser layer with loops designed for hanging curtains from a baguette, and ropes are used to create gathers of the desired shape and size.
They differ in the following characteristics.
- Fixation methods. These can be eyelets, loops for hooks, strings, pipes, as well as sticky stickers.
- Fold configuration There can be many options here, which depend on the wishes of the customer or the imagination of the author.
- Dimensions. Braid from 1.5 to 10 cm is considered standardized. 2.5 and 6 cm are more in demand.
- Material. For draping airy organza and veils, fishing line is used, and for thicker, weighty textures, polyester, cotton and paper are used.
After tightening the laces, folds form on the surface of the curtain; they can be given the desired shape.
To remove the curtains, you just need to untie the laces and straighten the tape.
IMPORTANT! Curtain tape is sewn from both natural and artificial fabrics of varying densities. The braid, sewn from rigid materials, holds its shape perfectly
Energy and power in electrical engineering
In electrical engineering, there are also such concepts as energy and power associated with Ohm’s law.
Energy itself exists in mechanical, thermal, nuclear and electrical forms. According to the law of conservation of energy, it cannot be destroyed or created. It can only be transformed from one form to another. For example, audio systems convert electrical energy into sound and heat. Any electrical appliance consumes a certain amount of energy over a set period of time. This value is individual for each device and represents power, that is, the amount of energy that a particular device can consume. This parameter is calculated using the formula P = I x U, the unit of measurement is the watt. It means moving one ampere by one volt through a resistance of one ohm.
Thus, the basics of electrical engineering for beginners will help you understand the basic concepts and terms at first. After this, it will be much easier to use the acquired knowledge in practice.
Step-by-step instructions for using curtain tape on hooks
To decorate a room, it is important to know how to hang curtains with tape on a rod for a more durable “fit.” The product can already be sewn industrially, or it can be attached independently
In order for the finished composition to hold firmly, it is important to know the order of its design and choose the right braid, taking into account such an indicator as the assembly coefficient.
The KS determines the “pitch” of the fastenings, depending on the width, which matters for the number of assemblies and their splendor.
When hanging curtains, it is important to sew the hook tape correctly. This operation is performed as follows:
- cut off a piece from the strip equal to the length of the curtain plus an increase of five centimeters;
- lay the ends of the braid down 2.5 cm each and smooth them;
- pull out the cords so that they hang freely and are not secured;
- place the tape over the allowance for the top trim and pin;
- stitch, retreating 12 mm from the top and bottom, stitch twice.
If the curtain tape has several ropes, we sew it along each of them.
Important! It is necessary to stitch in such a way as to close the fold so that the cords remain free. Then, stepping back 10cm from the side edge, you need to hang a hook - it will be the outermost one
Having folded the curtain along this hook, the next one is hung on two loops at once - the outermost one and the one opposite it. This action is called a technical twist. It can be done differently: tuck it in immediately when the strip is sewn on
Then, stepping back 10cm from the side edge, you need to hang the hook - it will be the outermost one. Having folded the curtain along this hook, the next one is hung on two loops at once - the outermost one and the one opposite it. This action is called a technical twist. It can be done differently: tuck it in immediately when the strip is sewn on.
The folds obtained on the braid after tightening the ropes should be evenly leveled.
The next element is threaded into the loop close to the collar, and it is threaded into the second one - after five centimeters. The result should be a fold. Further formation of drapery using curtain tape on hooks is done in a similar way.
Curtain tape is a convenient device used on any curtain, curtain or drapery.
How to hang curtains
Housewives who know various methods of attaching curtains independently decide how best to hang curtains on a strip. Drapery options:
- “pencil”, which is suitable for veils, the material hangs almost without gathering;
- “columns” are rows of folds of the same size, the density is determined by the tension force of the cord;
- uneven waves-buffs are made on curtains with lurex or a metallic sheen; the curtain tape will need to be wide, with 4 threads;
- a medium-density curtain is gathered in a “fan” pattern;
- the beautiful butterfly relief with a diamond-shaped screed looks elegant;
- “glass” or “glass” with a lower double tuck of ribbon-braid;
- Counter folds are practiced on soft woolen fabrics.
The braid is selected taking into account the assembly coefficient, the number of cords on which the fit density depends.
How to choose the width of the curtain and the length of the curtain tape
In the process of determining the width of the finished curtain, it is necessary to take into account 2 points: the length of the curtain rod, as well as the so-called gathering factor. The latter depends on the type of folds. So, for example, if you plan to make a simple, even drapery, the coefficient will be 2.0, and if there are curly folds - 2.5. This indicates that in the first case, to determine the width of the finished curtain, the length of the cornice needs to be multiplied by 2.0, and in the other - by 2.5.
It is much easier to calculate the length of the braid. Since it is attached along the top edge, the length of the fabric strip should correspond to the width of the curtain without folds + 8 cm for the hem.
The size of the braid is easy to determine
How to sew ribbon for hanging curtains on a ceiling cornice
Attaching curtains to ceiling cornices is a labor-intensive process. This cornice has special hooks for hanging. Curtains require mounting tape, including for beautiful draperies.
The work is performed according to the proposed algorithm:
- The strength of fastening the ribbon to the material should be calculated.
- The strings are pulled out, gathered and tied at one end of the ribbon. This reduces the width of the curtains and creates clear folds.
- Hooks are used to attach to the curtain. They are connected by sewn loops, which are located in the mounting tape. The distance between the loops should be 10 cm.
- The fasteners are attached to the cornice.
The work is completed by checking the strength of the fasteners fixed to the cornice.
Secrets of choosing the right curtain tape for tulle
In order to get the expected result with minimal effort, you need to choose the right accessory. It is enough to know a few simple conditions:
- The tape can be secured to the canvas not only by machine stitching; curtain tapes with an adhesive base, which are fixed during heat treatment, are also widely known. They are precisely intended for thin gas material. This braid will perfectly hold tulle and its like.
- Depending on the shape created by the curtain composition, a tape with loops, a seal or pockets for hooks is used.
- The width and transparency of the fabric play an important role when choosing curtain tape. For tulle, a narrow, porous, almost invisible braid is most suitable.
- It is also necessary to take into account the number of cords running through the tape and the required intensity of drapery. This must be correctly compared with the size and quality of the material so that the resulting folds look harmonious.
Types of folds
When choosing a curtain tape, pay attention to the type of folds it forms. The following types are popular:
- Pencil is a common type of gather in the form of repeating narrow, rounded folds. Tulle on tape is assembled mainly in this way.
- Columns are evenly spaced narrow folds.
- Buffs (wafer) are uneven folds that imitate a waffle surface.
- Butterfly - clear diamond-shaped figures formed by four laces.
- Bow folds are paired folds, the creases of which are directed in different directions.
- Counter folds - the folds are directed towards each other.
- Glasses - spectacular volumetric folds (can be filled), similar to a glass on a stem.
- Fan. When pulled together, beautiful folds are formed on the fabric, extending from a common point in the form of a fan.
The choice of drapery when designing curtains is influenced by the style of the room. In laconic interiors, simple solutions are appropriate: pencil, bow or counter folds. Pretentious styles correspond to original draperies: fan, glass, etc.
Methods for attaching weights
If you wish, you can sew your own curtains with additional weights. A load, fabric to match the color of the curtains, a sewing machine, threads, and scissors are prepared in advance. Measurements are taken with a measuring tape or tape measure. The method of attaching coins or wire depends on the weight of the web.
Tulle and lightweight materials - use weights weighing 12-22 grams.
The sequence of internal fastening of the weighting material to the lightweight fabric:
- If the curtain is light in weight, it is recommended to sew the strips on the sides. It is enough to take 2 parts weighing no more than 22 grams.
- Each element must be placed in a fabric pocket, which is sewn separately.
- A small cut should be made on the back side of the bottom hem of the curtain, keeping an interval of 5 cm from the bottom. If the material is not tucked, then it is allowed to use curtain tape.
- A pocket with a weighting agent is inserted into the resulting cut and sewn to the curtain.
To insert the parts, preliminary preparation of the bottom edge or side of the curtain is required.
When the curtain is made of dense, heavy material, the weight needs to be sewn in in a different way. On the reverse side at the bottom there are several pockets into which coins or metal balls are inserted. The folded bottom of the curtain can serve as a place for placing the parts.
Curtain tape is sewn to cover the holes
It is important to secure the weights so that they do not fall out when the curtain is in an upside-down position. To fix a wire or chain, you must first fold the fabric 10 cm and stitch it
A weighting agent is threaded into the resulting hole.
To prevent the load from shifting, the side edges of the hem are sewn up.
It is not necessary to sew a special pocket to fix the curtains in one position. Frequently, loads are attached to the outside of the curtains. In this case, weights for curtains or products with holes are used. From scrap materials, old coins will come in handy. The bottom of massive curtains is decorated with fringe or pendants, but such a detail is appropriate in classic or retro-style interiors.
Another weighting option in the form of a special fringe sheet attached to the bottom is suitable for massive heavy curtains.
The weighting material on organza curtains does not need to be placed in a special pocket. Here a special cord is used to match the curtains and is sewn on the back side of the fabric. It is prohibited to use chains and slats for curtains made of organza.
To sew weighting to organza, the material chosen for balancing is sewn directly to the bottom edge without forming a pocket.
Common mistakes made by newbies
In some cases, novice craftsmen may have problems. Lack of experience often leads to avoidable mistakes. The instructions below will help you get the firmware installed correctly the first time.
- How to choose the right door to your apartment?
- Kitchen design in Khrushchev: useful tips for those who have a small kitchen (100+ photos)
- Which laminate to choose?
- After washing, the material may shrink and, in principle, cannot be used further. This can only be corrected later by cutting and re-stitching. However, this is easy to avoid - you just need to leave extra supply of tape.
- Often, laces fall out of place, causing irreparable damage. The best way is to tie strong knots on the sides that will prevent it from moving freely. The best solution would be to make pockets on the reverse side. The ropes are placed in them, after which they are fixed and will no longer be able to fall out.
- In the middle of the tape there is a tightening seam, which is easily damaged during operation. If you cut it, subsidence will occur. It will not give the proper tension.
Advantages of curtain tape
This strip is made from different materials. For curtains made of thin fabrics: organza, veil and others, a transparent, soft, thin but durable material is used. To work with denser bases, the thickness and texture of the braid will be different. It is easy to stitch it on a machine in any part of the product, depending on the design ideas for the curtains.
A very convenient device for draping curtains is curtain tape.
With its help, you can form folds of various configurations, adjusting their size and number. It has the following features:
- makes sewing easier;
- there is no need to sew loops for hooks - they are already on the tape;
- makes it possible to drape fabric of any texture and density;
- allows you to design window openings in an original way;
- with its help you can adjust not only the length, but also the width of the curtains.
Using curtain braid, beautiful folds of the same size and shape are created.
In addition, after washing it does not shrink and retains its shape.
Using a curtain strip, you can carefully trim the edge and attach the finished curtain to the curtain rod without using special clothespins.
The products are presented in a variety of options and differ in the methods of fastening, size, and shape of folds, which can be designed using your imagination.
They are made from fishing line, polyester, non-woven base.
There are also different connection methods, one of which is fastening loops for hooks.
They are arranged not only in one, but in several rows. The design features of the drapery depend on this:
- simple folds are made on a strip with two rows of loops;
- The upper part of the curtain can be decorated with a strip with four-row installation of fasteners.
You can attach the strip to the curtain by sewing or gluing it.
In this case, the adhesive tape is available in single-sided and double-sided versions. In this case, it is attached to the curtain fabric after smoothing the base with an iron.
The different widths of the tape - from 1.5 cm to 10 cm - allow you to use it for various options for fastenings and curtains of different lengths and materials, as well as diversify the methods of decoration.
The narrower the ribbon, the lighter the fabric should be.
It helps to perform all kinds of assemblies, including:
- horizontal;
- vertical;
- “accordion” and other drapery options, such as “pencil”, “glass”, “butterfly”, “bouffe”, “tulip”, fan-shaped and others, where curtain tape is used everywhere for installation on hooks.
There are several types of curtain tapes on sale, each of which is designed to assemble the fabric in the desired way.
There are other types: zigzag, tubes, “triplets”. Each type of curtain tape is made from different materials and has a parameter called the assembly factor (CS). It is the ratio of the original width of the curtain to the folded width, and is usually equal to 1.5; 2; 2.5 and 3. (KS) is usually indicated on the product packaging.
The wide ribbon has several rows of hooks that allow you to hang the curtain higher than usual, raising the fabric above the curtain rod.
Types of curtain tape and its correct choice
Curtain tape is a strip of fabric that is sewn to the tulle or curtain from the edge of the reverse side. It then helps form the folds on these decorative materials. It is necessary to take into account the importance of choosing it correctly so that it does not become a foreign element after fixation on the tissue. Therefore, you need to take into account that on dense materials they sew braid of the same structure, and for thin tulles they opt for transparent fittings. The width of this tape also depends on the structure of the fabrics. The thinner it is, the more organic the narrow braid options will look.
There is also a difference between curtain tapes in terms of functionality. There are options for this fitting for cornices consisting of pipes. In this case, the braid is simply put on the pipe. It is called "Velcro". And there is a vertical tape that is designed specifically for French and Roman curtains.
To choose accessories for sewing to tulle, you need to know these simple tips:
- If braid is needed to finish the edge of tulle fabrics, it should be transparent to avoid it standing out against the background of thin fabric. A ribbon with a denser structure is suitable for sewing to a curtain;
- The width of the fittings affects the complexity of the drapery and the intricacy of the fold patterns. If it is narrow, it is suitable for thin materials. This is considered a braid that is 2-4 cm wide and 4-10 cm wide;
- Another nuance is the number of rows of loops. They also have practical significance: with the help of rows it is possible to adjust the length of curtains or tulle. For example: if the product is shorter than we would like, then it is better to place it on the bottom row of loops. The long one goes to the top;
- Each fitting has its own assembly factor. This value is calculated by measuring the width of the curtains or tulles in the unassembled state to the already draped material. This parameter is designated by the letter “K”. For ordinary drapery this coefficient will be 1.5, and more intricate patterns may have a value of 3;
- Another type of marking indicates what fabric the fittings are intended for. If there is an o, then it indicates the versatility of the curtain tape, “Z” is for thick, “F” is for light, and “/Z” is for transparent. Organza products require a “T” braid.
Also, when choosing a ribbon, the color scheme is important. For opaque material, light or white braid is used, and for translucent fabric, nylon fittings are used.
How to properly prepare the material
In order to be able to beautifully sew a ribbon to a curtain or tulle, and the result of the work will not disappoint you, you need to familiarize yourself with some of the subtleties of the process. When bending the tape, leave 3 cm on each side. Since this braid shrinks, it is measured with a reserve and then carefully steamed. The same is done with the fabric to which the fittings will be sewn. In this case, you can no longer expect negative consequences from shrinkage. The tape must be sewn loosely; neither the threads nor the material should be pulled.
When choosing a tape, you need to carefully examine the product, and if you see its large waviness, then you can already conclude that the quality of this material is low. Such fittings will not last long and will quickly become unusable.
Second stitch and cord pouch
Of course, performing the second line requires special skill. After all, you need to understand that the tape and the fabric must be connected in such a way that a landing does not form as a result. To do this, during stitching, you should stretch the fabric along with the tape and not allow the machine to “sag” the fabric. But here another problem arises: if you pull the fabric too tightly, you can displace or break the needle. This can be avoided if you use both hands to evenly and smoothly stretch this section of the fabric in different directions and at the same time secure the braid with a stitch.
When the second line is finished, you need to start working on the cord pouch. First of all, after the stitching process is completed, you should pull out the cord from the other edge of the product and tie it into a knot. This is necessary to prevent the cords from slipping out of the loops. After which the excess edge of the tape is cut off and folded inward. The ends of the lace are hidden there. Then the edge of the tape is stitched. The cords need to be tied into a knot with each other, this will prevent them from slipping out.
A cord pouch will allow you to hide the remains of the cord from prying eyes. It is made from braid and sewn onto the edge of the curtain
In the process of sewing, special attention should be paid to the choice of threads for sewing, since the quality of the work performed largely depends on their quality
How to sew curtain tape?
How to properly sew ribbon to a curtain? It's not difficult at all. You will need a sewing machine, thread, needle, scissors and iron.
- Measure the required length of the braid, leaving an allowance for embedding of 4-5 cm.
- The top edge of the curtain is folded 2-3 cm and ironed. If the fabric is fraying a lot, it is advisable to overcast the edge with an overlock stitch.
- Apply the tape with the wrong side to the wrong side of the curtain on the folded edge, retreating from the top 0.5-1.5 cm, depending on the type of assembly. The minimum indentation is made for simple assembly or for narrow braid without assembly. Make sure that the loops (pockets) are on the outside.
- The end of the curtain tape is folded in 2–2.5 cm. The ends of the cord are pulled outward so as not to accidentally sew them to the curtain.
- Sweep with large stitches.
- Place two lines on the edge: first the top, then the bottom. The number of lines depends on the number of cord lines. The braid is stitched along each cord or oriented according to the width of the braid: up to 5 cm - two lines, 5-10 cm - three lines, more than 10 cm - four lines. Stitch pitch length is 4-5 cm.
- The ends of the cords are tied, otherwise they may jump out of the tape. By evenly pulling all the cords on one side, the fabric is assembled. Straighten out folds.
The curtain is ready to be hung on the curtain rod. The cords are tied again. Do not cut off the excess - this length will be needed when you get ready to wash and iron the product. To prevent the ends from dangling, you can wrap them on a strip of paper and hide them under the braid.
When buying braid for curtains, they take into account the type of curtain rod and the method of attaching the fabric to it, and think over the design solution for curtains and drapes. To ensure that your fabric will look beautiful on your chosen ribbon, drape a small section of the curtain by hand.
How to properly connect curtain tape with tulle - Step-by-step instructions
Knowing how to sew curtain tape onto tulle, you don’t have to go to a studio, but do everything yourself.
Important! It is necessary to pay attention to the fact that the loops on the ribbon must be on the outside so that you can then attach the tulle to the hooks.
To ensure the job is done well, let's look at this process step by step:
- You should start by cutting out the material. We also measure the required length of the braid: for this, take the width of the tulle and add another 0.25 to 0.5 m (a few centimeters for the bends and additionally for shrinkage);
- The next step is to process the sides of the fabric;
- If we are working with tulle, then the top hem of the material (on the wrong side) should correspond to the width of the fittings we have chosen;
- Some fabrics have a loose cut line, so they need to be folded twice (for example, organza), while others (veil) can be folded once. In each case, after folding they should be ironed;
- In order to sew the braid to the tulle fabric from the inside out, the steamed edge of the product and the prepared tape are swept together.
- In this case, it should be placed below the edge by 0.5-1.5 cm, but in no case should it be above the edge of the fabric. And the edges of the braid are bent 3 cm on each side, and at the same time the threads are pulled out.
- So, how to sew ribbon to a curtain neatly? Using two running stitches. You need to make sure that it does not slip on the material. If this happens, then you need to use pins.
- After sewing the main seam, it is recommended to carefully remove the basting seam and remove the pins. If you are sewing on a wide curtain tape, it is necessary to additionally stitch it in the middle. This will improve the quality of work and give the braid a more neat appearance.
- At the final stage, the laid tape is sewn on the sides. Then they tighten the threads so that beautiful folds are formed and secure them by tying them together.
Important! You need to be careful with the loops - the seam made in the middle should not affect them.
If the sewing process is done according to all the rules, then such accessories will be invisible to others on the tulle or curtain.
Video on the topic:
Characteristics and purpose of using weighting materials
Even heavy curtains are not stable and are easily moved by the wind. To fix the curtains in one place, special weights are provided. Such devices have different weights, thicknesses, and modifications.
A special weighting device ensures the much-desired evenness of the lines.
Important! When choosing a weighting agent, you need to rely on the density of the fabric. The higher it is, the greater the mass of the element used should be.
Which curtain models need additional load.
- Roman. Curtains have a mechanism that lifts the fabric and rolls it onto the curtain rod. The design is additionally equipped with a wooden or plastic slats.
- Japanese. These are fabric sheets that are weighted with metal, wood or plastic slats. They are secured with glue.
- Curtains in the bathroom. Small magnets or plastic parts are used as weights to prevent deformation of the waterproof fabric.
- Tulle. Lightweight sheer fabric can only be finished with lace.
- Heavy curtains. Here it is recommended to use metal balls and cylinders.
You can make a weighting agent from available items (ribbon, cord, metal parts, slats are suitable).
In each specific case, the choice of weighting material is determined by the properties of the fabric.
The weighting material allows you to maintain the necessary shape of the curtains and prevents the curtains from deforming. In addition, this detail helps to quickly straighten the curtains. Thanks to a small load, the tulle will always look neat.
Cord and ribbon are used if the main material of the curtains is tulle, organza or other light fabrics.
Selection of material
Any curtain is hung on the window with a small gather. How to calculate the length correctly? For example, you need to hem a curtain on a window 3 meters long. The tape has a build factor k. For example, k=1.5. To get a curtain of the required length, you need to calculate the width of the canvas and multiply the length by the coefficient (3x1.5 = 4.5). Thus, you need to buy a canvas 4.5 meters wide.
Coefficients range from 1.5 to 3. The length of the braid should be equal to the width of the fabric. It should be taken into account that different fabrics have different degrees of contraction depending on the density.
Length calculation
When choosing curtain tape, you need to collect part of it by pulling out the ends of the cord. If it holds the shape of the folds well, then it is worth using for further work, and if the gathers are uneven, then it is better to look for another option.
The curtain tape must be sewn to the curtain for the entire width; it can significantly exceed the length of the cornice or curtain, due to the creation of decorative folds. In order to correctly calculate the required width of the material, a special coefficient is used:
- 1.5 is used when creating a simple gather on curtains or tulle;
- 2.0 is used for more complex ones, the formation of ruffles, waffles;
- 2.5 allows you to create radial and bow folds;
- 3.0 is required when laying the most complex, triple or cylindrical folds.
The length of the braid and the width of the curtains must be correctly calculated based on the size of the fastening multiplied by the coefficient necessary to create the necessary assemblies. That is, for a curtain of 3 meters when cylindrical folds are formed, 9 m of fabric and the same amount of braid will be required. If the curtain is not long enough, you will have to make assemblies much less often, as a result you will not get the expected effect.
How to make a choice and calculate the length
In order for the braid to correctly perform all functions, it is selected in accordance with the fabric. For example, types of tape for products of different materials are as follows:
Braid on the veil
- light fabrics, voile, organza or denser fabrics, hold quite well on narrow curtain tapes with two ropes, loops are created on the first to hang products, folds are formed on the second;
- Large and thick curtains, of course, are hung on wide strips with 3-4 ropes. This way you can create unusual folds.
To obtain a buffer, a special tape is selected. In textile stores you can find braid suitable for a certain type of fabric. Therefore, it is advisable to consult the seller before purchasing.
Tape calculation
The length of the curtain mesh tape depends on the assembly index - this is a kind of “pomp” factor of the required folds. For example, to calculate the length of a product on a tape with classic folds, you need to double the footage of the material. For formal and luxurious gatherings, the fabric must be tripled and 10 cm added to the lapel.
Tape for thin curtains
To calculate the width of the curtains on the braid, the dimensions of the cornice are used to determine the parameters. It is important that the braid attached to the curtain covers the cornice completely or extends slightly beyond the edge. To do this, you need to know the structure of the fabric - braid for thick curtains from 5 to 10 cm and the required height above the cornice - +5-10 cm.
How to sew on braid
Before starting work, you need to prepare the necessary tools and equipment. You will need thread, scissors, chalk, measuring tape, pins and, of course, a sewing machine.
Everything is prepared - you can start working. The author of the GidShtor website figured out how to properly sew curtain tape to a curtain.
- The first step is to cut the edges on the fabric from which the curtain will be made. Usually the factory hem tightens the material and the curtain wrinkles at the hem on the side, so it’s better to cut the edge. To make an even cut, you need to pull out the thread along the entire length at a distance of 1.5-2 cm from the side edge and cut the material strictly along the resulting line.
- Next, fold the side edges. To do this, wrap the material on the wrong side of the canvas twice, laying 2.5-3 cm each. It is better to pin the hem with pins or baste with large stitches, but experienced craftswomen can do without this. The side seams are stitched and steamed with a hot iron from the front and back.
- Before sewing the braid to the curtain, the top of the fabric must be thoroughly ironed. To avoid shrinkage, the tape should also be steamed with an iron.
- Apply the tape to the front side of the material so that the top edge of the fabric is 1 cm below the top edge of the curtain tape. The side edges of the braid are folded inward.
- Sew the bottom edge of the braid onto the curtain, being careful not to pull the material.
- Turn the fabric inside out and fold the ribbon over. Pin along the entire length and sew along the very edge of the tape, constantly adjusting the fabric to avoid the formation of wrinkles.
- If there are two or more cords on the braid, you can place a seam in the middle of the strip, being careful not to touch the loops for the hooks and the tightening cord.
- The tape is sewn tightly to the curtain. Now you need to iron it again and close one side cut with a short stitch. On the other hand, the side edge of the braid is left open. This is a convenient place to hide the ends of the cords after the folds are completed.
- Pull the braid on one side, distributing the waves of folds evenly along the entire length. Having finished the drapery, the ends of the cords are tied and tucked into the side under the ribbon.
So, step-by-step instructions will allow any housewife, even the most inexperienced in sewing, to sew curtain braid on her own. In order not to make a mistake with the choice of accessories, you can use a small piece of material to see how the braid will work and whether the resulting drapery matches the overall design.
Options for decorative folds
Braid with different “K” coefficients forms various types of draperies. The “K” value is indicated on the hardware label.
Drapery options are grouped in the table.
| Types of drapery assembly | Features, attachment, SL size, “K” coefficient value |
| "Accordion" - easy assembly | Narrow parallel pleats for thin and delicate fabrics. Transparent LH: 6 cm, K=1.5 Hook fastening to a string, thin rod. |
| “Pencil” (“columns”) – classic version | Narrow vertical folds. Wide three-row LH: 7.5 cm, K=2.5. Hook attachment. |
| "Sleeves" or "wave" | Round folds. Three-cord SL: 9-10 cm, K=2. Suitable for long curtains with detachable hooks. |
| French folds | Fan assemblies with three tucks and two pockets 14 cm deep. Double-row L: 8.5 cm, K=2. Optimal for any fabric. Recommended for long curtains. Do not overtighten the cords - the pattern will be disrupted. |
| Double pleated | Three rows of narrow folds in a checkerboard pattern. Four-cord SHL with two pockets: 10 cm, K=2 |
| Counter pleats | Double-row SL: 7.5 cm, K-2. Under detachable hooks. |
| Diamond folds. Varieties: “butterfly”, “waffles”, “checkerboard” | Formed into rhombuses. Double-row four-cord SL: 7.5 cm, K=2.5. Lay 4 lines along the cords. |
| Flemish assemblies (“glasses”) | The fold consists of 3-5 tucks that make up the bottom of the glass, transitioning into a large rounded gather (the top of the glass). Wide four-cord fittings: K=2-2.5. Fastening with detachable hooks. Suitable for long curtains. |
| Bow drapery (bow) | Flat folds laid in opposite directions form a bow. Double-row, two- or four-cord tape 5 cm, K=2.5-3. Recommended for short curtains, frills. Not suitable for sliding curtains. |
| Trellis fold | It is formed by two counter-directed tucks. Three-cord tape with three stitched rows |
| "Tulip" | The lower part of the SL is gathered, and a fold is made on top, reminiscent of a tulip. The form is reinforced with filler. |
| One-sided folds | The gathers are directed in one direction and are represented by even tucks. |
| "Chicken feet" | Three pintucks at the bottom of the HL, diverging upward. |
When buying braid, test it. Rigid, neat assembly guarantees a beautiful appearance of the product.
How to sew braid to tulle
In this option, a thin ribbon is suitable. The first step is to calculate the parameters of the tulle and braid. This is easy to do by multiplying the length of the cornice by the material assembly factor with the addition of 25 cm for deformation and processing.
There are also such types of ribbons as the column, which forms 1 to 2 gathers, and the Austrian ribbon, which forms various patterns and forms folds into “puffs”, “butterflies”, “glasses”.
A tape of 1.5-4 cm is considered narrow. It is necessary when the cornice is covered, when the hooks are covered with a special decorative strip.
When choosing a wide braid, follow the following sequence of actions:
- Carefully process the tulle on all sides except the top. If the material is loose, then additionally overlock it with an overlocker. You can pull back three threads and cut straight.
- Fold the tulle on top with the wrong side to the width of the curtain ribbon and iron.
- Apply tulle braid to the finished fold, stepping back up to 1.5 cm from the fold. The more complex the tails, the greater the distance required. Make sure that the braid does not protrude beyond the border of the canvas.
- Secure the ribbon with pins and baste it to the tulle.
- Sew the tape on the machine. The number of seams should match or be greater than the number of rows on the braid. To avoid creases, the material should be slightly stretched and always stitched in one direction.
- Finish the side edges and remove the basting.
Narrow tape is also used for short curtains made of lightweight fabrics.
If the braid is narrow, the upper cut is folded inside out by 2 cm and then stitched by hand. The curtain tape is secured with 5 mm pins. from the top edge. Then sew on in any convenient way
It is important to remember that the loops must be on the outside of the ribbon to secure hooks or rings
Just as there are many types of curtain tapes, there are also many options for decorative types of folds.
Note! When working with tulle, it is necessary to avoid unnecessary holes from needles and pins, as the material can become deformed. Tulle is an obedient material, and many novice seamstresses begin to “get their hands on it” with it.
What you will need
Prepare the material. The braid is selected taking into account the properties of the fabric (its density). There are special types of products for transparent fabrics. Thick curtains should be hemmed with a white stripe. The corsage option is used to increase the rigidity of the trouser waistband.
It is a product of medium width without fastening elements. Theoretically, you can attach it to curtains, but to fix it to the curtain rod you need to make loops. This option is being considered to hang very thick curtains.
Determine the amount of material. To do this, measure the length of the cornice and multiply the resulting value by the assembly factor. Also add 5-6 cm to the folds.
Other materials, tools:
- scissors;
- thread with a needle for basting;
- pencil or chalk.
Types of draperies
There are a large number of draperies available for curtains. Let's look at the main types. The most common types include pencil folds and column folds. The latter are formed by tensioning the tape on the laces. Puffs, butterflies, glasses are types of folds that form voluminous lush structures. They are easy to make. Bow folds (counter folds) are created with a certain effort, but depending on the material, they can look both strict and romantic.
Waffle and French curtains look impressive on a wide braid. If you want classic folds with a twist, use diagonal straight drapes.
If you decide to immediately form folds on the curtain, the amount of curtain tape you need for work will increase, and its consumption will be greater. Add another 15-20 centimeters to the calculated amount, because the edges of the tape will need to be folded and processed.
Where and when are different types of SL used?
Let's take a closer look at how different types of braid are used:
1. Narrow fittings are sewn on if:
- the top of the curtain is hidden by a lambrequin;
- the cornice is covered with a baguette or recessed in the ceiling niche;
- for forming ruffles on delicate thin fabrics: tulle, veil, organza.
2. Wide, dense white braid with a rigid structure is sewn in the following cases:
- draperies of heavy massive curtains;
- if the cornice is open (string, profile or round cornices) - cover the curtains with a decorated top;
- with a small number of hooks, the dense tape does not allow sagging;
- to create folds of various configurations.
3. Multi-row braid for hook attachment.
A two-row ribbon forms simple “pencil” and “column” folds, while three- and four-row ribbons create complex folds in the form of glasses, bouquets, and butterflies. In addition, the rows help you adjust the length of the curtain without cutting it.
4. Wide fittings with special hooks - for creating heavy triple folds with a bow. 5. Adhesive tape with a layer of hot-melt adhesive - to seal the fabric and add rigidity. Such a SL is simply pressed with a hot iron to the edge of the curtain.
These simple recommendations will help you determine the type of curtain tape for sewing curtains of your style.
Ready-made curtains on tape: examples, description.
Curtains decorated with curtain tape will add originality to any room if they are chosen tastefully and fit harmoniously into the interior.
It is better to place the hooks at a distance of 5-6 centimeters, this way you will protect yourself from sagging of the canvas.
Moreover, they can be used to decorate rooms in a variety of colors and any style:
- For minimalism and hi-tech, a laconic design is suitable, without any “embellishments”;
- Provence and shabby chic will delight you with light, weightless curtains with soft floral or checkered-striped patterns, beads, beads or ribbons along their bottom;
- The children's room will be filled with a special spirit of childhood and mischief if clips in the form of funny animals, butterflies, flowers, cars or bows are used to secure curtains made of fabric that does not shrink when washed and does not fade.
To decorate and add originality, a variety of elements can be used, sometimes unexpected, such as brooches, soft toys, rings made from bracelets, large buttons.
The classical style, as well as baroque or rococo, is characterized by the extensive use of cords and tassels.
Taking into account the stylistic features of the interior allows you to achieve the best result when draping, giving the room originality and originality.
Examples of decorating rooms with curtains with a detailed description of the procedure can be found on the Internet.
Tips from experienced seamstresses
Experienced seamstresses share small tricks for sewing high-quality and beautiful curtains:
- Choose your threads carefully. For thick curtains, choose colored threads to match; for braids, choose white threads of the same thickness. Thread two colors of thread into the machine.
- Adjust the sewing machine properly to the type of material. Set the appropriate thread tension, foot pressure and stitch size in 3-4mm increments.
- Check the machine needle. Strengthen a thin, even, sharp needle. Test it on a small piece of thin fabric. If there are no puffs, then you can sew.
- Choose the right textile tape. It is necessary that it be invisible and not seem like something foreign on the curtain.
- Pre-wash the braid and fabric in warm water without detergent to prevent shrinkage in the future.
- Wrap the long ends of the cords on a piece of paper and place them in the unsewn edge of the tape or in special pockets mounted on the curtain. This way the cords will not get tangled.
- Before you start sewing curtains from expensive material, try sewing a kitchen or garden curtain from plain cotton. Practice sewing techniques and try different types of draperies. Start with simple types of drapery and inexpensive materials.
- If it is not possible to sew the tape to the curtain (for example, the machine is broken), use tape with hot-melt adhesive. It just needs to be ironed.
How to properly and beautifully hang tulle on a curtain tape
If a very thin and delicate fabric was purchased for the curtain, when decorating it, it is important to know how to hang the tulle on hooks, and to be extremely careful and attentive, avoiding unnecessary punctures of the fabric, so as not to deform it
The braid sewn to the curtain allows you to decorate the window opening in an original way and drape the curtain with soft waves.
It should be noted right away that to work with such thin materials, you will need transparent or translucent tape. It is available in various widths. The craftswoman decides which one is suitable for decoration.
Curtain braid is a simple, quick way to hang light tulle, curtains or heavy curtains.
Before hanging tulle curtains, you will need:
- measure and carefully trim the fabric,
- cut off excess;
- process the edges and cut areas.
After this, you can sew the ribbon in the following order:
- bend the top edge to the width of the strip;
- carefully iron the edge of the fold;
- Tuck the edges inward and attach it to the edge of the ironed fold line, which will prolong its service.
As a rule, narrow (2.5-4 cm) braids are used on curtains where drapery is not needed.
Additional Information. Before starting work, it is necessary to wash the fabric so as not to spoil the finished curtain if it suddenly happens that the material shrinks after washing.
Ideas for sewing ribbon
Help the site, share with friends

Let's discuss this article together:
Click to cancel reply.
How to sew curtain tape to a curtain: step-by-step instructions
To accurately attach the braid and hang the curtains, you need to know how to attach them to the cornice. An incorrect choice of canopy method can harm the author’s idea and spoil the design concept. In addition, this often causes the collapse of the entire mechanism. In construction hypermarkets you can see various samples of cornices. However, the most popular products are made of metal, wood, as well as ceiling and string models.
Curtain tape makes window decoration much easier, especially since you can easily sew it on yourself.
The methods for attaching curtains to them are as follows:
- Rings. The most inexpensive and common fastening method. In addition, they are often included in the main set.
- Drawstrings or pockets located along the top line of the curtain. Designed for fastenings with a circle-shaped cut.
- Clothespins. Suitable for weightless materials only.
- Clips. They are similar to clothespins, but lack the teeth. Designed for products made from weightless textiles. Some subtypes are equipped with locks and may have designer treatments.
- Textile loops are made from the same material as the main product or similar to it.
Tapes made from rigid fabrics retain their shape very well.
Next, using photos and step-by-step instructions, we will look at how to sew ribbon to a curtain. This master class will be useful for both beginners and more experienced craftsmen.
Peculiarities
To attach curtains to curtains or ceiling cornices, fastenings are required. Fittings are made from various materials:
- metal-plastic;
- non-ferrous metal;
- aluminum;
- become;
- light and durable polymer.
Hooks or rings usually come with curtain rods. Toothed crocodile clips are used for heavy materials, clips are used for organza and tulle.
How to hem tulle - tips for beginners
If you have a sewing machine at home, then you can handle hemming tulle easily, quickly and easily. First, you should take the necessary measurements and, if possible, cut off the excess length.
If you don't want to cut the fabric, make a few hems and baste by hand or using a machine.
Make long stitches and use pins or needles as needed. After basting, iron the hem thoroughly, this will help make the fold line as straight as possible. Next you should sew it on a sewing machine.
The length of the seams should be minimal.
At the beginning and end of each line, do not secure the thread. After everything is stitched, simply tie the ends of the threads tightly. All that remains is to connect the curtain tape (braid) with the tulle.
How to do this correctly will be discussed in the next section.
The final stage is consolidation
After stitching the seams, the cords on one side must be tied together with a knot. You cannot cut the cord on the other side. You may need to loosen the tie to hang the curtain over a wider window opening. There are 2 ways to hide the cords:
- in a bag made of braid;
- wrap the cord around a thick material and pin it to the fabric.
Sewing curtain tape requires some experience. If you are not confident in your skills, it is better to delegate the work to an experienced seamstress.
Forming folds in curtains
If you managed to beautifully and correctly sew the ribbon to the tulle, we proceed to the most enjoyable stage of the work: forming the drapery. We pre-iron the product and tighten pairs of threads on both sides: this makes it easier to distribute the folds evenly across the entire width of the curtain. If you don't have an assistant, when working on one side, secure a couple of threads on the other edge.
WATCH VIDEO INSTRUCTIONS
We do not cut off the loose ends of the cords, but carefully wind them up. The curtain will have to be stretched before washing and ironing, so we hide the wound threads under a ribbon or in special bags that professional seamstresses sew on each side.
Features of hanging tulle
For fastening, hooks and rings are used, sometimes the canvas is attached to a pipe, and a special pocket is made along the entire width.
For drapery you will need transparent braid with a gather factor of more than 2.5. It is better to choose adhesive-based options. Standardly, the strip is attached to the folded edge, first sewn on top. For decorative purposes, up to 20 cm is removed from the top edge. The tulle will have visual lightness and airiness.
The fabric is usually gathered with an accordion or deep folds are made with a certain step.
Formation of folds
If you did everything correctly, then forming neat folds will not be difficult:
- Tie the tightening laces tightly together at the edges.
- Pull the laces. The fabric will begin to gather into folds.
- Form folds of the desired density and distribute them evenly over the curtain.
To create folds on the curtains, you need to tighten the threads on the braid.
You have “extra” strings hanging along the edge of the curtain. Experienced craftswomen sew small secret pockets to the edges where they can be hidden.
The remaining threads from the braid can be carefully hidden in homemade pockets. All is ready. You can hang the curtain on the curtain rod using the loops located on the curtain tape. The distance between the hooks should be 8-12 cm.