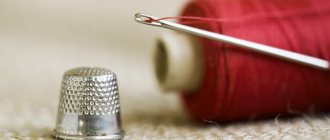
Elbow patches for a sweater or cardigan: 9 ideas with instructions
First of all, patches on the sleeves were invented for utilitarian purposes: they are designed to protect the elbow area from damage. Patches can also be used to revive sleeves that are already stretched or torn at the elbows - this especially often happens with knitted items. Originally created as a functional part, such patches are also a decorative element. Below are a few ideas for patches that can be used to protect and decorate the sleeves of knitted items.
Tweed elbow patches
Tweed is a great option for decorating and patching the elbows of a sweater. In this case, the tweed patches are first glued to a double-sided adhesive interlining and then hand-sewn along the edges. By the way, here’s a life hack on how to draw an even oval template for a patch: use something round—for example, the size of a coffee glass lid.
Photo and source: brit.co
How to decorate a sweater: 7 spectacular ideas
Leather elbow patches
One of the most popular options and the most traditional - once upon a time, when these patches were first invented, they were made of leather. Leather can be natural or artificial. You can put it on a “web” or just sew it on. Threads can be colored or contrasting. You can sew by hand or by machine (in both cases, use special needles for leather).
Photo and source: lovevividly.com
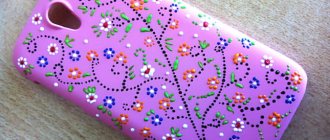
Decorate a sweater with bright felt flowers
Elbow patches made of fabric with sequins
Before cutting out parts for patches, the fabric with sewn sequins should be reinforced, for example, with adhesive interlining. Having cut out the parts, strengthen their edges by stitching. You can then sew on the patches, either by hand or by machine using a zigzag stitch.
Photo and source: seekatesew.com
How to sew from fabric with sequins
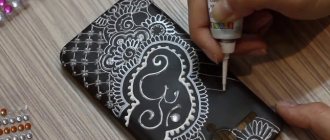
Elbow patches made of felt and sequins
This option looks similar to the previous one, but is executed differently. First, patches are cut out from felt, then embroidered with sequins, and then sewn to the sweater. Details + link to download the patch template - follow the link.
DIY sequin decor
DIY applique on clothes
Elbow patches in the shape of hexagons
If you want something more unusual than simple oval patches, but less original than the face of an animal, you can make patches, for example, in the shape of hexagons.
Photo and source: onelittlemomma.com
Genuine leather: types and description
Painted elbow patches
This method is suitable for strengthening and decorating a new item made of thin knitwear - the paint will not look neat on elongated or torn and sewn sleeves or on loose knitted knitwear. Acrylic is suitable for fabric; you will also need a sponge and thick paper for a stencil. Before applying paint, place a piece of polyethylene in the sleeve so as not to stain the second layer of knitwear.
Photo and source: momtastic.com
How to decorate a sweatshirt with a pattern of stitches: master class
Knitted elbow patches
If you know how to crochet or knit, patches can be knitted.
Photo and source: creatinglaura.com
Pillow made from an old sweater with cross stitch: master class
Woven elbow patches
And these patches are woven from knitting yarn that matches the color of the knitted item.
Japanese technique "Boro"
The technique originated in the Middle Ages in the Land of the Rising Sun. Boro art consists of numerous parallel stitches of equal length, hand-crafted. They resemble darning with coarse threads. For ease of use, needlewomen advise using long needles.
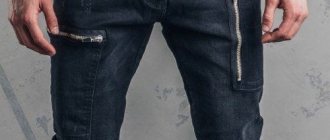
- To repair damage to jeans, choose thin denim, cotton or linen fabric.
- To work, choose a flap of any shape. The seam allowance should be 3-4 cm.
- Finish the outline of the cut or hole with forward stitches using a needle. In this case, the damage will not stretch further.
- Parallel to the outline of the hole, use a washable felt-tip pen to draw parallel lines for future embroidery. The distance between them can be 0.6-0.8 cm.
- From the wrong side, baste the prepared patch.
- Apply smooth stitches along the marked lines, which should be longer on the front side than on the back side.
- You need to turn the stitch onto the next row from the wrong side. Continue embroidering in the opposite direction.
- Make several rows of stitches on the bottom and top of the patch of different lengths, as well as on the sides.
The cuts on the flap can be slightly frayed if the flap is sewn on the front side of the product. To add style to the patch, you need to choose different stitch lengths and thread colors.
Video about Boro technique
How to make elbow patches on a men's jacket, shirt and sweater yourself?
Hello, dear craftswomen!
I continue to replenish our collection of master classes on repairing clothes with my own hands. And answer the question: “How to make a patch?” You and I made them on knitted pants and jeans. Today we will pay attention to the abrasions on the elbows and make beautiful patches in this place.
Often favorite things such as jackets, jumpers, sweaters and even shirts are updated by sewing ovals, rectangles and even stars on the elbows. They are made even when there is no hole, just to give the product a “man's street style” style.
Schoolchildren in America and England decorated and still decorate the elbows on their uniforms with them. This extends the life of tweed jackets.
Today, a jacket with patches is a fashion trend and is often used in men's collections. Suitable for men of any age. We women are not lagging behind and also use them in our jackets and sweaters.
As you can guess, this is a very popular alteration in our studio. Looks stylish and practical.
For patches you can use fabric, leather, suede, thick knitwear. The colors are chosen to match the tone of the product, but they are often asked to choose a material in a contrasting color or several shades darker. Then they turn out stylish and fun.
Our goal
Our goal today is to find out how to sew a patch professionally so that the material does not deform when the product is worn. Also, change the product so that friends say: “Oh, a new jacket.”))). So, let's begin.
Shoes
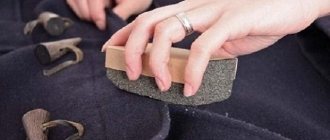
Depending on the season and trouser model, suitable shoes are selected. In the cold season, an insulated jacket is worn with jeans and low shoes. It is better to wear shoes with low heels or flat soles under straight trousers.
Jackets with patches to match jeans dictate their own terms, and strict classics will become inappropriate. It is better if sneakers, moccasins or sneakers are on your feet - this is a casual style. If you choose loafers or leather oxfords, it will look more like a business style.
Workshop “from Idea to Result”
Now, the Creativity section has moved there. There will be master classes, courses, consultations on sewing, decorating clothes and creating accessories. In the “Blog” section, I publish posts on fashion and handicrafts. I created this platform for our communication. Let's be friends!
Follow the link ideatoresult.com
Our actions:
In our case, we reinforce the edge of the hole and the edges of the interlining with a zigzag stitch. Picture 6.
To carefully carry out all the described actions, we need to open the seam on the sleeve, picture 7. By opening the seam we can easily approach the worn area.
Everyone's sewing machine is different, but these are the basic settings and everyone has them.
In our case, we sew using a hole in the sleeve, so it will be more convenient for us to sew the stitching without this part.
We place the machine foot on the edge of the basted oval and slowly sew a stitch in a circle. Picture 10.
See how leather patches look on a velvet men's jacket.
A men's jacket with elbow patches looks stylish, right?
In order to start working on the jacket, we need to turn the sleeve inside out. Open the seam at the sleeve lining and only then open the seam of the sleeve itself.
As we have already said, this is done for a convenient approach when performing a stitch. All other actions (described above) remain unchanged.
Having completed the work, we turn the sleeve inside out again, and first of all we sew up the hole on the sleeve, and then on the lining. That's all)))
And this is what patches on sweaters look like. Not bad, isn't it?
If you have any questions or want to suggest a topic for the next master class, write in the comments. I am in touch)))
You may be interested in:
Join our company by subscribing to receive new publications.
Share the link with your friends. I think this information will be useful to many needlewomen.
All the best to you! Ilona
If this article was useful to you, rate it - light a heart)))
Source
How to darn with a hidden seam
A blind seam is used if it is necessary to sew up a hole in a product so that it becomes invisible. To do everything correctly, you should follow the recommendations:
- thread a needle and make a small knot;
- turn the product inside out;
- pass the needle inside out through the hole so that the knot remains there;
- sew up the hole;
- finish the seam.
After the hole is sewn up, you need to pull the thread until it goes into the seam and becomes completely invisible from the front side.
Blind seam
Master class: Applique patches on elbows
Source Translation: Marie STRATAN
Everyone knows that elbow patches have a practical function. Elbows are the place where clothes wear out faster and stop looking neat. Patches can also be a decorative element. A jacket with patches looks quite stylish and can become a basic element of your wardrobe if you like clothes in a casual style. Traditionally, elbow patches are an oval shape, but now a variety of shapes and styles are in fashion. In this tutorial you will learn alternatives to traditional star shaped patches.
Lifehacks to help prevent scuff marks
- When buying, choose the right size, you can take a looser one.
- Give preference to pants with a medium or high waist; they are less likely to wear out quickly.
- Fidget less in your chair.
- Wash your jeans properly: hand wash or delicate wash will do. They need to be turned inside out, fastened with a zipper and buttons, and not washed too often.
- At the first sign of scuffing, take it to a workshop or, if possible, fix the problem yourself.
- Buy several pairs of pants and wear them alternately, this way you will increase the service life.
- Try purchasing quality custom made jeans.
Test step
I have an old jumper, it's also cashmere, but it's too old to try to revive, so I decided to try it on that first.
The shape of the patch turned out to be unfavorable; this shape would be suitable for leather or corduroy, but for such a patch it looks terrible. In addition, I made the surface of the patch too dense, felted it for too long and put in too much wool.
This is a big mistake, as Julia Roberts said in the movie Pretty Woman. Because all that remains is to bite your elbows, and even then you won’t be able to bite through such a thick layer of fur. After all, this can no longer be corrected.