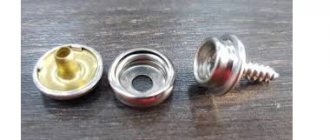
Since the ancient times of the invention of navigation, humanity has known such a thing as eyelets, which have become an integral attribute of sails used by sailors. Externally, this device consists of two rings of equal diameter, fixed into a hole in the target material and serving to strengthen and hold the entire structure on the base.
Eyelets are the basic method of attaching awning canvases
Installing grommets yourself
Eyelets are rings of two elements for fixing part of the fabric between them. Nowadays, it is a universal device used in many areas. The ring holds its shape perfectly, so it adds strength to the fastening. For the textile industry, eyelets have become indispensable elements. Clothing designers have repeatedly used the structure of overlays to emphasize the beauty of the product. Due to the multidisciplinary use, eyelets have acquired all sorts of proportions. In some cases a flat leg is needed, and in other cases a high leg is needed. The width of the product is also very different: it is designed for both thick ropes and thin laces. In industry, high-strength linings made from modified materials are used. Eyelets are distinguished by shape, although the most widely used is the classic ring-shaped one. In some cases, the installation of eyelets is done by hand. Public master classes will help with this.
Types of grommet rings
The materials from which this type of fastening is made are varied - from metal to plastic of various shapes and colors.
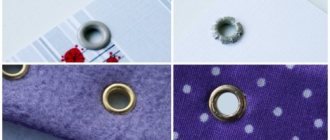
Installation methods also directly depend on this. A plastic eyelet is much easier to install, but a large load on it is unacceptable! If desired, you can remove it and use it again, but the fixation of the edges of the fabric will be very poor - they crumble and become deformed, and the product looks sloppy.
Colored metal eyelets are much more reliable than plastic ones - they hold the fabric perfectly, preventing it from tearing.
Steel fasteners are considered the most reliable for fastening fabrics, leather parts, and cardboard. But before you install eyelets without tools on clothes or shoes, you will need to practice on unnecessary pieces of material. This is necessary to understand how the work is going and not to spoil the thing.
The most popular way to use eyelets is to attach them to curtains. To do this, you additionally need grommet tape, which is sold in specialized stores. It is used to glue the edge of the fabric, creating rigidity.
The mount itself can have a completely different shape - from circles to animals. The color palette is also huge.
Curtain eyelets will help to form smooth, interesting and neat folds. In order to move such a curtain on the eaves, you do not need to apply any force. The fabric does not wear out on the cornice, and, accordingly, its service life is longer.
Manual
Manual installation of eyelets on fabrics and canvases is used when organizing handicraft industries with a small volume of manufactured awnings. To implement it, two simple devices are used:
- punch - a steel tube of suitable diameter, pointed at the working end, working in tandem with any impact tool;
- a manual press consisting of a matrix and a punch, also requiring a hammer or half-sledge hammer.
The technology for installing eyelets manually involves performing the following steps in the described sequence:
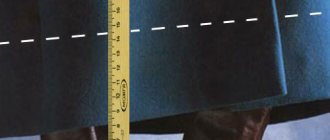
- along the edge of the canvas, using simple measuring instruments, marking the installation location of the fittings for threading the cords;
- at the indicated points, using a punch, round holes are cut out with such a diameter that the cylindrical part of the half-eyelet fits tightly through it;
- the eyelets are inserted into the hole and a counter ring is put on the tubular shank;
- using a hand press and a hammer or half-sledge hammer, the protruding cylindrical part is crimped, placing the matrix at the bottom, and a mandrel with a hemispherical working surface is installed at the top.
The advantages of this method are simplicity, accessibility, and low cost. The disadvantages are the low speed of installation of eyelets and the low quality of work.
Preliminary work
Preliminary preparation is important in any business to obtain a quality result. Before you think about how to make eyelets for curtains, you should:
- Make the necessary calculations.
- Buy material of the desired color for curtains and lining.
- Buy dublerin or grommet tape, eyelets. The width of the tape should be 2 centimeters larger than the outer diameter of the fastener.
- Find a flat surface to work on: you can work on the floor or use an ironing board.
Fabric yardage calculation
To calculate the required amount of fabric, you should find out the length of the cornice and determine the height of the finished product. The length of the cornice should be multiplied by a factor to give the product beautiful folds. The coefficient will be equal to:
- For light fabrics - 1.5.
- For dense materials - 2 or 2.5.
The calculation also includes material for side allowances (up to 15 cm), top and bottom allowances (at least 25 cm). The calculation looks something like this for a cornice length of 1.5 meters: 1.5 2 + 0.15 = 3.15 meters or 315 centimeters.
Counting the number of fasteners
To purchase the required number of fasteners, a preliminary calculation of materials should be carried out. To calculate the required number of eyelets, you need to measure the internal and external diameters of the fasteners, taking into account the standard properties:
- It is necessary to purchase an even number of eyelets.
- The rings should be attached at a distance of about 18 centimeters. The optimal distance for attaching them ranges from 15 to 20 centimeters. When using a double curtain rod, consider the distance between the rods so that the curtains do not touch.
- The distance between the side edge and the center of the first eyelet should be at least 7 centimeters. This parameter depends on the width of the hem and the outer diameter of the fastening. To securely fasten the fittings, you should place them so that the fasteners do not touch the seam.
Preparing fabric for cutting and finishing seams
The curtain is prepared in advance for installation of eyelets. Before installing the rings, you should:
- Decorate curtain fabric. This procedure is carried out by wetting, drying until damp, and ironing the fabric. After this treatment, the fabric does not shrink after washing.
- Sew on the lining and finish the seams.
The seams are processed in strict sequence. The top seam is treated first. The material is processed in compliance with the technology:
- The material is laid out on a flat surface.
- The wrong side is folded and ironed 2 cm.
- Another fold is made to fit the width of the grommet tape.
- Having released the width of the hem from the edges, lay the tape between the layers of fabric.
- The strip with tape is glued using an iron. Iron small sections of the tape until the sides are completely glued. Only after obtaining a high-quality result do they move on to the next section.
- The fabric is sewn along the edge of the lapel, departing 2 centimeters from the edge.
You can sew the side seams using a hem stitch. It is not necessary to use grommet tape - you can use regular curtain tape, after removing the tension cords from it. You can hem the bottom of the product after installing the eyelets at home in order to measure the desired length of the curtain to the floor. In order not to spoil the fabric due to lack of experience, you can carry out all the necessary work on a small piece of fabric.
Installation materials and tools
To install eyelets using improvised means, you will need the following materials:
- eyelets of the selected diameter;
- pencil or marker;
- ruler;
- stationery knife;
- a special rubber mat or piece of linoleum;
- a flat piece of iron, an iron ruler will do;
- a heavy hammer that fits comfortably in your hand;
- part for flattening the eyelet leg.
The main tool for installing grommets is a heavy hammer.
This part, depending on the diameter, may be different. For small diameters, balls from bearings or commercially available steel rods with a rounded end are used. Rods with a tapered end work well, provided that the main part is larger than the diameter of the grommet.
A lathe can produce a whole set for installation if iron rods of different diameters are available. If you have a tool, rounding the end of each rod and turning it with a cone is not difficult.
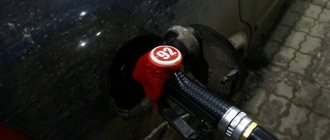
Classification of eyelets by type of application:
In the case of using grommets in the automotive industry, awnings are divided into 2 types according to application: 1 option for using the grommet: for a cord or rope; Option 2: eyelets for staples.
Accordingly, the first ones are intended for threading a cord or rope through them. And the subsequent fastening of the awning to the side hooks. Therefore, it is necessary to first compare the internal size of the eyelet and the fastening cord.
The second is for putting an awning with a grommet on a bracket, followed by threading a cord or sealing cable through the bracket and further sealing the trailer. Similar to the previous option - it is necessary to select the grommet and bracket for dimensional compatibility.
Installation instructions yourself
Having all the necessary materials and tools at hand, anyone can independently make an awning or canopy with eyelets at home, which can be used on the farm. This product can be used in various areas, from a tarpaulin curtain at the entrance to a garage to covering an outdoor pool from foreign objects and dirt.
Eyelets are great for securing canvas curtains to gates
Regardless of the area where you plan to use an awning with grommets, first of all, you should acquire high-quality blocks and rings; the overall strength of the grommets will depend on them. Experts recommend purchasing ready-made kits in specialized stores.
Typical eyelet sizes
As for tarpaulin, its choice should be made based on its intended purpose, based on the characteristics of strength, moisture resistance, frost resistance and the like. The shape and size are selected individually.
Preparing the tarpaulin for installation of eyelets
Having prepared all the necessary components and selected a tarpaulin for installing eyelets, you can move on to the next stage - punching holes in the tarpaulin, for which you will need the following tools:
- Ruler.
- Pencil, marker.
- Punch.
- Hammer.
Using a pencil and ruler, you need to find and mark the areas on the tarp where the eyelets will be placed. The mark should be made according to the diameter of the ring, evenly, at the same distance from each other. After this, using a punch and a hammer, holes are made in the tarpaulin in accordance with the marks.
It is necessary to accurately determine the location of the eyelets so as not to make unnecessary holes
Note! Before punching holes, it is recommended to fold the tarpaulin in half to more securely attach the grommet to the material.
If the tarp is thin, you can use a piece of durable fabric or use plastic or brass washers
Before punching holes, a wooden board is placed under the tarp to serve as a shock absorber when the hammer and punch collide.
Installing eyelets on the awning yourself
Having completed all of the above manipulations, all that remains is to secure the grommet in the tarpaulin awning, which, if all conditions are met, will not be difficult.
To do this you will need the following tools:
- Flaring.
- Hammer.
A block and a ring are placed in the previously prepared holes on the tarpaulin on both sides, opposite to each other, after which they are securely fixed to the material using a flaring tool and a hammer.
A furniture bolt with a wide head is suitable as a flaring tool.
This method allows you to quickly and efficiently install eyelets on the awning for further use for their intended purpose.
As you can see in the photo, flaring can be done quite efficiently even without a special tool
In addition, there are special manual presses for installing eyelets, which allow you to install eyelets on any type of material as quickly and easily as possible. This method is more suitable for installing grommets for commercial purposes.
Advantages and disadvantages of application
This is a functional device with obvious advantages. Firstly, they facilitate the process of putting on, taking off, and attaching. Eyelets also diversify and decorate the design, especially since models of different shapes have appeared. However, a round structure resists deformation best. The grommet is easy to use, so any type of work can be done quickly and without complications. This is a very useful and cheap part with a large distribution, and it is also easy to manufacture. Among the shortcomings, the first thing that appears is damage to the material that is being strengthened. A careless or sudden movement of the lace can cause the eyelet to fly out, at the same time damaging the integrity of the fabric. If we talk about use on curtains and tulles, metal parts make a lot of noise. The hinge fastening method is more convenient in this regard. A common problem is color deterioration, but this depends on the specific material.
Installing eyelets with clips
Press the eyelet half against the skin in the desired location.
Using pressure marks as a guide, cut a hole. Also cut out an additional piece of leather for reinforcement.
Glue the additional piece, aligning the holes.
Insert the main part of the eyelet from the front side.
Place the second part of the eyelet on the wrong side and release the clamps. Tap gently with a hammer.
Reinforce the grommet location with adhesive material (or fold the fabric in several layers or reinforce several layers for additional thickness). Press down on the grommet to create a hole impression.
Carefully cut out all holes following pressure marks.
Fold all layers of fabric, pin around the hole and insert the main part of the eyelet from the right side.
Place the second part of the eyelet on the wrong side.
Release the clamps. Tap gently with a hammer.
Classification by place of use:
Eyelets are the most widespread and practically irreplaceable method of framing holes for fabric materials, such as:
- banner fabric;
- awnings;
- tarpaulin fabrics;
- tent materials;
- advertising banners and banners;
- covers and capes for vehicles and equipment;
- camouflage nets;
- artificial (synthetic) and natural fabrics;
- also used in leather products and linens.
Plastic eyelets for awnings
Eyelets are made from a special plasticized mixture, which is characterized by high strength, quality and elasticity. Such a product can have a wide variety of shapes (oval, rectangular or round), as well as any size and color. These properties make it possible to obtain a finished product that has an aesthetic appearance. Because of this, it goes well with any color and shape of the product.
Plastic eyelets have many advantages, for example:
- they do not rust, do not damage the material,
- stretch well and are also recyclable.
- This product perfectly withstands any weather conditions, ultraviolet radiation and temperature changes.
Such eyelets for awnings are installed using special professional equipment. Among all the equipment, the machine for soldering the two halves of the eyelet especially stands out. The machine provides high productivity, accurate and fast welding, as well as the strength of the finished product. The installation tool is also equipped with a comprehensive system that allows automatic feeding and punching for mass grommet installation.
There are plastic eyelets that are attached to pre-punched holes by squeezing the two halves, that is, like clips.
Although they have a number of advantages, due to their complex technology, they have become less common. And most likely, in the next few years, their production will be discontinued.
What it is?
In the modern world, the use of eyelets has expanded many times, and they can be used:
- in the production of banners for outdoor advertising;
- for tarpaulin awnings;
- in tents for tourism;
- in the manufacture of awnings for cars;
- in clothes and shoes;
- in the manufacture of curtains;
- in accessories and much more.
At their core, eyelets are the edging of a hole, embedded in the material, serving to strengthen it and allowing cables, ropes, harnesses and other guides to be passed through them without causing mechanical damage to the material during use.
The awning can be secured with eyelets using a cord passed through the holes
Or with a strap passed through the staples
In designs that require quick and convenient assembly, eyelets with swivel brackets are used
Eyelets for an awning allow you to give the entire structure the necessary shape and tension, which distinguishes them from other fastenings.
The main characteristics that eyelets have are the following:
- Diameter that must match the hole in the material.
Eyelet parameters - Strength depends on the material from which the eyelets are made (plastic or metal).
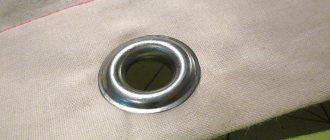
- The appearance of the eyelets is usually made in the shape of a circle or oval.
Round eyelet
Oval grommet
Grommet with teeth
Eyelet with screws
Depending on the material from which the eyelets are made, they can be divided into two types:
- Plastic.
- Metal.
Plastic eyelets are secured by soldering two halves using special equipment
Undoubtedly, metal eyelets are more practical and reliable, because they are less susceptible to deformation under constant physical stress, and their installation does not require special devices, as for plastic ones.
Metal eyelets are most often made galvanized or nickel-plated
How to install eyelets on an awning with your own hands
Installing eyelets on an awning is not the easiest thing, but I wouldn’t say it’s very difficult either. The instructions “how to install eyelets on an awning with your own hands” are as follows:
Having prepared the tarpaulin for installing the eyelets, you need to place a metal ring and a block (the eyelet itself, which does not yet have a ring) in the holes made, which will be fixed to the fabric using a hammer and flaring (creates a strong, hermetically sealed connection between the fabric and the metal). After simple manipulations (the main thing is to accurately hit the target with a hammer, without breaking off all your fingers), the grommet will be securely fastened to the tarpaulin.
Eyelets: history of appearance
The likely timing of the grommets' appearance remains unknown. It is known that this happened a very long time ago, perhaps during the times of Ancient Greece. Scientists do not know the language in which this word appeared, much less the inventor of this device. The appearance of the grommet is associated with the use of wind power, and the term itself refers to the hole in the sail for threading the fastening threads. In ancient times, this is how the rigging of a ship was formed. Nowadays, the term has expanded its meaning. Now this is an option for strengthening the edges of holes that are less strong than the cable passing through them.
The grommet is often used as a decorative device rather than a means to strengthen the material. Examples include linings in leather products, fiberboard, and foam board. A modern grommet is a mechanism made of a washer and a shaped sleeve. In this case, the material used is mainly metal or plastic.
Where are they used?
There are several areas of activity in which eyelets are often used.
Outerwear production
Most often, such elements are used to create outerwear. In clothing production, such eyelets are used to decorate products and give them a unique look. Such details can often be seen on modern models:
Shoe making
Many manufacturers use eyelets when creating shoes. In this case, only high-quality and durable components made of durable steel metal are used. Their surface is coated with nickel or copper. This protective coating protects the metal from the formation and spread of corrosion.
Release of home furnishings products
Often lumpen people can be seen on home furnishing products, which are found in almost every home. These elements are found on some types of curtains or curtains. They are also added when making lambrequins or curtains. In this case, simple steel parts are used that do not have a protective coating.
Tourist and holiday destinations
Such components are often used to create country or tourism products. For example, they are used during the production of textile canopies. Grommets are also found in most modern tents used in the tourism industry. In the manufacture of canopies and tents, high-strength steel parts are used.
In commercial activities
Eyelets are considered common parts that are used in commercial activities. Many manufacturers make them and then sell them separately. Most often they are purchased to be used to replace broken elements.
Manufacturing of shipping products
Few people know, but eyelets are often used in the creation of shipping products. Most often, such rings are used to create sails for ships. In this case, large and large parts are used that would withstand the load from strong gusts of wind.
In office and printing
Another area of activity in which eyelets are regularly used is printing and office work. Metal products are used to create calendars, notebooks, and books. They are sometimes found in decorative gift wrappers.
Curtain sewing technology
Making a curtain begins with processing the top and gluing the tape. A master class with step-by-step instructions given below will tell you how to sew curtains with eyelets:
- Fold it over to the wrong side and carefully iron 2 cm of the top edge of the future product. If the craftswoman does not have much experience, it is best to first draw a straight line along which the fold will go.
- Measure the height of the comb from the smoothed rib. Draw a straight line and iron it inside out again. The cut of the top will be inside, between the layers of fabric.
- Unfold the ironed edge and insert tape with an adhesive layer (grommet) inside. As mentioned above, its width should coincide with the height of the comb - the width of the pressed hem. On thin fabrics, it is advisable to shorten it in relation to the fabric by the amount of allowances for processing the side edges.
- Heat the iron high and iron the folded part of the panel so that the tape inside sticks well. Be sure to perform this step through gauze or a clean white cotton cloth. When ironing thin tulle, you can pre-moisten the gauze.
- On the wrong side, stitch the hem 2-3 mm from the edge, securing it. At the same time, you can sew on decorative braid if the design solution requires it.
- Fold and stitch the side seams.
You may also be interested in: How to beautifully combine Roman blinds and tulle - tips with photos
After the panel is ready, sewing curtains on eyelets involves installing rings. But how to make the eyelets neat, like in the pictures? To do this, you will need the results of calculating the distance between the centers of the rings, a ruler and chalk.
Installation of eyelets
Set aside 1.2-1.5 cm from the side edge. If the calculations were made correctly, the mark will have to be placed a little further than the line. From this mark, set aside ½ of the outer dimension of the ring and mark the center of the outer insert. Do the same on the other side of the tape.
Set aside from the center mark an amount equal to the distance between the eyelets. Place a dot to mark the center of the next ring. Set aside the same segment again, mark and continue until the end of the tape. If everything was calculated without errors, the last mark should match exactly the next time you measure the distance between the eyelets.
If the error and discrepancy are too large, an error in the calculations is likely. You need to measure the distance between the extreme center marks and recalculate the size of the fold, dividing the distance by the number of eyelets. After this, repeat the markings.
Place the outer ring on the comb so that the mark is in the center of the inner hole. Trace a circle inside. Do this for each mark.
Use nail scissors to carefully cut holes for the rings. The eyelets themselves are installed very simply: the lower half is placed under the fabric (from the inside out). The edges of the hole should fit around the bushing. The upper, decorative part is placed on top and pressed until it clicks.
How to hem the bottom of a product?
To make your new curtains look beautiful, you need to know how to properly sew and trim the bottom edge. The almost finished product needs to be hung on the cornice rod. Determine at what distance from the floor the bottom of the curtain should be. This value must be measured from its surface several times, along the entire fabric, placing marks on the fabric.
Remove the curtain and lay it flat. Connect the marks using a ruler. The straight line will be the bottom line. Fold the material inside out along it and iron the fold. From the fold, set aside the desired width of the hem, draw a line, bend the cut along it inward and iron. Stitch 2-3 mm from this last fold.
If you carefully carry out all the operations one by one, then neither inserting eyelets for curtains nor processing the edges of a large product will seem difficult. In this case, the accuracy of measurements for the uniform arrangement of the rings and the accuracy of processing the cuts are important.
Technology for making curtains with eyelets ↑
Curtains with rings are valued for their beautiful, uniform waves of drapery, to obtain which you need a lot of fabric - usually 2.5-3 widths are taken, you should not save and take less than 2.5, this will noticeably affect the appearance.
To decorate such large windows you will need a large amount of fabric.
A span of more than 4 may also not give the expected decorative result, because they can turn out to be bulky and heavy, more like shields. The choice of length is individual - in the kitchen the length varies more freely - from the floor to the windowsill or to the middle of the window.
We must not forget that the edges of the fabric will have to be folded and stitched, add another 3-4 cm on the sides and bottom and a little more on top - it will not be possible to install the rings well on one layer of fabric. To calculate the amount for the top hem, you need to take into account the density of the material - the denser it is, the more you can fold (professionals recommend leaving 13 cm on thick fabric). It is imperative to take into account the diameter, because it is directly connected to the cornice; for unhindered movement of the curtains it must be 1.5 cm larger. Otherwise, the eyelets will cling to the cornice and get stuck on it.
In order to sew, you need: fabric, eyelets, scissors, a pencil, eyelet tape (it can be replaced by interlining or dublerin), an iron for gluing it and skills in working with a sewing machine (entry level is quite enough).
Determine the distance between them in advance, based on the desired depth of the folds - if you need deep relief folds, then install the rings at a distance of 22 cm from each other, if the folds need to be softer, then 15 cm is enough. Large intervals between the rings can lead to sagging fabrics, especially dense ones, and small ones will not give the expected aesthetic effect. The optimal distance is 18 cm.
The deep relief wave allows you to take a fresh look at their design
It is important to determine the distance from the top edge; here it is better to focus on the density of the material. Soft fabric holds its shape worse; the bend at the top edge is about 5-6 cm for organza or tulle, if the fastening rings installed on them have an outer diameter of 3.5-4 cm
You can install eyelets on loose fabrics, but place them closer to the top edge
Feel free to cast aside all doubts - organza, mesh, voile, tulle can adequately compete with other types of fabrics for curtains and will harmoniously fit into the interior of the room.
On such fabric, the main condition is the location closer to the upper edge of the product.
If the combination of lightweight fabrics and fastening rings does not inspire confidence, you can make an original trim from a denser fabric, and at the same time show off your design abilities.
Such a bright trim will emphasize the elegance and sophistication of organza
Before installing them, you need to make sure that the curtain is completely ready - the edges are processed and the top of the product is reinforced with grommet tape or its equivalent. Now you can begin the most important part of the work - marking the fabric. Marks are made where the rings will be installed, and holes are carefully cut out.
When marking fabric, you need to take into account the possibility of its displacement.
Eyelets are installed on both sides and snapped into place, or pressed through with a press, if ordinary.
After the markings have been made and the holes cut, you can safely install the mounting rings themselves.
If professional manufacturing is not part of your immediate plans, then you will not need a special tool for installation. But a punch and flaring tool will greatly facilitate and speed up installation.