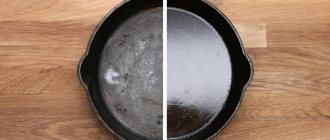
Deformation and damage to shoes is a common occurrence. This may be due to both natural “wear and tear” and unfavorable weather conditions (snow, rain, temperature changes). Often, it is the sole that suffers. It peels off, causing the seal to be lost. However, before you run to the store for a new pair, you can try to fix the defect yourself at home. A special glue comes to the rescue.
Photo: Pixabay.com
The qualitative composition of such products should have a number of characteristics.
Among the main ones:
- Durable grip.
- No deformation of shoes at the joints.
- Long lasting effect.
- Elasticity of seams.
- Resistant to moisture and frost.
To begin with, it is worth noting that shoe adhesives, depending on the basis of the formula, are conventionally divided into the following types:
- Rubber.
Its purpose is auxiliary work. For example, using such means you can connect parts of textiles, insoles, and other elements. Here it is worth considering poor resistance to moisture and low temperatures. Therefore, rubber glue is only good for summer open shoes. - Polychloroprene.
It is used to “adhere” rubber soles, felt and leather insoles. It is resistant to moisture and frost. The only downside is that it is not suitable for polyurethane. - Polyvinyl chloride
- based on adhesive resins. Good for seams and toes. - Polyurethane.
It is considered very durable, fixed “tightly”. However, it is worth considering that the volume will increase after complete drying. Ideal for gluing soles to textiles or leather. It is important to be careful when working, because residues of the composition are difficult to remove from the surface. - “Instant”,
or - universal. Suitable for minor repairs. It has a convenient release form, and even a beginner can handle it.
As a rule, all packages of specialized glue are marked “For shoes.”
We present the rating of shoe adhesives 2022. The best 11 products that were selected by our experts based on user reviews and ratings.
| Rating (2021) | Prices, ₽ | A country |
| 1. UHU Schuh & Leder | from 260₽ | Germany |
| 2. Super Moment | from 130₽ | Ireland |
| 3. Kalina M Kleyberg | from 300₽ | Russia |
| 4. Henkel drop | from 400₽ | Russia |
| 5. Contact Packaging of super glue “Contact” | from 660₽ | Russia |
| 6. Moment Marathon | from 120₽ | Russia |
| 7. Anles nairite | from 170₽ | Russia |
| 8. Second 403-109 | from 70₽ | China |
| 9. Polytech Instrument 88 | from 80₽ | China |
| 10.Strength SSBL1-15 | from 40₽ | China |
| 11. Novbytkhim Sprut | from 40₽ | Russia |
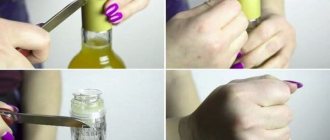
Method 3
To restore the sole you will need a soldering iron and a piece of nylon.
- First of all, remove dirt from the shoes, clean and degrease the cracked surface.
- Use a heated soldering iron inside the damaged area. The sole material will begin to bubble and become sticky.
- Next you will need to rub the melted nylon into the damaged surface. To do this, place a piece of nylon on the broken area and press it down with a soldering iron. The nylon will melt, all you have to do is fill the crack with it until it completely disappears.
Note: to straighten the melted nylon, during operation, use the handle rather than the hot nose of the soldering iron.
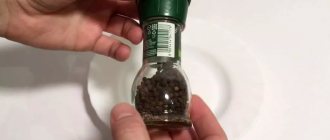
What can I do to prevent my shoes from slipping?
You can also use glue to prevent shoes from slipping. Apply the pattern with Moment glue or other superglue to the sole, let it dry, and then rub it with coarse sandpaper. For greater effect, you can sprinkle a little sand on the still wet composition.
This anti-slip protection will last 1-2 weeks.
You can also glue special anti-slip/anti-icing pads.
Pros and cons of compositions: what a home master needs to know
So, you buy shoe glue. Which one is better to choose to repair shoes, boots or boots with your own hands? In this case, you simply must be aware of the advantages and disadvantages of a certain type of glue, and, in addition, you must know whether this composition is suitable for your product. For example, what is the best rubber cement for shoe repair?
It makes sense to use Nairite glue when the product’s resistance to moisture is required. Its main advantages are that the seam is extremely strong, long-term fixation of surfaces is not required, and the resulting joint is resistant to frost and moisture. The main disadvantage is that it is not suitable for gluing together soles and uppers made of polyurethane. But at the same time it is perfect for repairing rubber, synthetic, felt products and shoes made of genuine leather.
Preparing the heels of shoes or boots for installing heels
Probably, looking at the photo above, you noticed the appearance of the heels after removing the heels. The plane is almost entirely filled with holes and the question arises, how to attach new heels?
The answer is simple, you need to install wooden plugs in the holes for attaching standard plastic heels. The holes for the pins usually have a diameter of 5 mm and a depth of 10-15 mm. First, measure the depth. If it is less than 10 mm, then using a hammer, you need to drill out the base of the heel to a depth of 15-20 mm.
If you drill with an electric drill, you need to take into account that the drill can “pull” the soft material of the heel and the depth of the hole will be greater than necessary. I usually perform this operation manually, holding the drill in a special handle.
Plugs in heels for installing heels can be made from any piece of wood by sawing off the required piece to length and pricking with a knife of the required diameter. You can also use ready-made ones, for example, wooden Japanese chopsticks fit well in diameter.
It is enough to cut them into pieces of the required length. If the stick is a bit thick, then trim it a little with a knife. After making the plugs, they can be driven into the holes of the heels. The diameter of the plugs should ensure that they fit tightly, but you should not make plugs that are much larger in diameter than the holes in the heel, since driving in the plugs may cause the heel to crack. The plugs should not protrude beyond the surface of the heel; it is better to let them be slightly recessed.
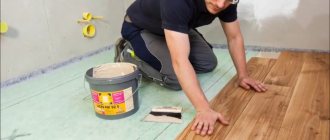
Gluing the soles at home?
To glue the sole on yourself, you need to follow simple instructions:
- Thoroughly clean the damaged boot and dry it completely.
- Carefully inspect the sole; if it comes off in several places, it is better to tear it off completely and re-glue it. In addition, some shoes have honeycomb soles, which require special care.
- Using a spatula, clean the surface of old glue and degrease (acetone or alcohol).
- Apply sole glue to both surfaces according to the instructions. Most often we are talking about a thin layer of glue - no more than 3 mm.
- Wait a few minutes and press the sole firmly against the shoe so that there are no gaps between them.
- Secure the boot in this position for at least 10 hours. You can put a weight on top, having first tightly stuffed the boot with paper or newspapers so that it does not lose its shape. The second option is to fasten the seam with clothespins, just be careful not to scratch the skin.
The described method is called cold. The hot method differs only in that the applied composition must be left until completely dry (about half an hour), and then heated with a hairdryer and pressed firmly onto the surface for 20 seconds. You can wear repaired shoes after two days.
Video instruction:
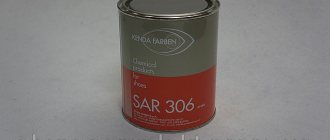
KENDA Farben SAR 30E – suitable for minor repairs
Nairite glue from an Italian manufacturer allows you to glue the rubber sole to almost any upper - regardless of the material. But it does best with minor repairs.
Another area of application for Nairit is the manufacture of custom-made shoes: for covering heels, gluing insoles, placing blanks on lasts and other assembly work.
Pros:
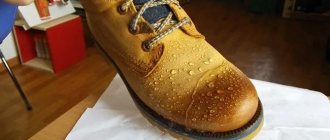
- Does not allow water to pass through;
- Does not harden or crack in the cold, always maintaining good elasticity;
- You can do without thermal activation, but it is precisely this that provides the strongest adhesion;
- It evaporates more slowly compared to nairites from other manufacturers, which gives time to correct flaws;
- If something goes wrong, the frozen composition can be reheated and re-glued.
Cons:q
- “Not friendly” with PU soles;
- It takes a long time to dry.
How to glue the soles of sneakers?
One of the most common problems is with sports shoes, namely sneakers. Due to intensive use, the toe may come off or the sole may puncture while jogging.
How to seal a hole?
Due to their specific nature, sports shoes (sneakers, sneakers) often have rather soft soles, so stepping on something sharp can leave a hole. The problem can be solved at home using glue. The edges of the hole must be cleaned and degreased, and then sealed with glue. In the large hole you need to additionally put a fiberglass mesh.
To ensure that the sole remains level, after filling the hole with glue, it is better to seal it with construction tape until the composition dries completely.
As for glue, the best option would be American polyurethane glue and sealant Seam Grip
. This composition is used to repair rubber boats, so you can be sure of the durability of the repair. The problem is that it cannot be found everywhere, and it costs more than other adhesives.
An alternative may be domestic epoxy glue
or imported
DoneDeal
.
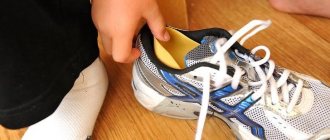
How to seal the toe of a sneaker?
The second weak point of the sole of a sneaker is the toe. To repair, the thinning area must be treated with sandpaper and degreased. Next, you need to cut out a patch from rubber or polyurethane, sand its edges and apply glue to both surfaces. Press the patch firmly onto the sneaker for 15–20 seconds, and then leave it under pressure for another day.
How to seal a sole with voids?
Quite often, demi-season and winter boots are made with honeycomb-shaped soles, in which voids appear over time. Repairing such a pair of shoes yourself is a little more difficult: the empty honeycombs need to be filled with scraps of micropore or other porous rubber; for this, most likely, you will need to bend the insole. Next, fill them with sealant. In some cases, it makes sense to tear off the insole and replace it with a new one.
After the sealant has hardened, you need to degrease the surface again and seal it using the usual method.
Other options
Now about the combined mixture. It is obtained by processing various resins, nairite and rubber. This is the best option if you have to attach a leather or synthetic upper to the sole. The glue is also suitable for sealing seams and coating welts.
You may have heard about a special composition called “Eva”. This is one of the best options when you need to repair shoes or boots. The composition is hypoallergenic, lightweight, has excellent elasticity, does not absorb moisture, and takes on a transparent appearance when dried. This is perhaps the best shoe glue for sealing almost any pair at home. The only important exception is that it is not suitable for repairing PVC products.
When choosing a suitable glue in a store, you should read in advance reviews of commercially available products and carefully read the instructions that come with them. If you still can’t decide, we recommend using the help of a consultant.
Which glue is better not to use?
The range of adhesive compositions goes far beyond the scope of the listed products and some of them can also cope with the task. In order not to confuse you, we decided to indicate which adhesives should absolutely not be used, since they either will not provide sufficient strength or will further damage the pair being repaired.
- PVA glue
is not waterproof, so the shoe will fall apart after the first puddle. - Superglue (Moment glue, Second glue, etc.)
assumes a rigid connection, and the sole and material of the shoe are deformed when walking. The material simply cannot cope with such a load. - , adhesive for ceiling tiles
copes with the repair of leather, textile and rubber products, but leaves stains on them that cannot be removed.