When purchasing shoes with laces, many do not even think that the tying method can be changed. Buyers do not wonder how to lace their shoes correctly and continue to use the manufacturer’s suggested option, even if it is aesthetically unattractive or uncomfortable. Changing the look of shoes or sneakers is not difficult at all. All you need to do is learn a few simple ways to do this.
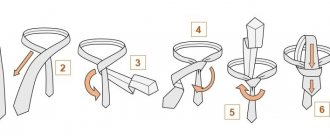
Method 1. Criss-to-cross lacing
Every child knows the traditional way of lacing shoes Criss-to-Cross. It is simple, functional and quite versatile. If you are a practical person, this is the best choice for you. The method is time-tested and will fit any men's classic shoes.
How to tie shoelaces using the Criss-Cross method:
- The lace is passed through the bottom holes of the shoe from the inside and out on both sides. It is important that the laces are the same length at this stage.
- Take one end of the lace and pass it through the next empty opposite hole.
- Repeat the operation with the second lace. You should now have a crosshair of laces.
- Continue this simple operation to the very top holes.
Obliquely
The trick is that the laces are pulled into eyelets on opposite sides and tied in the middle. This weave will require an odd number of pairs of eyelets. We thread one lace into the lower left hole with the eyelet facing out, and the second into the upper left. We draw the bottom lace horizontally, thread it into the lower right eyelet, then bring it out into the second left one and again draw it perpendicularly. Thus we lace up to the middle.
We draw the top lace strictly horizontally from the outside, then lead it to the opposite eyelet and gradually go down. The laces meet in the middle and can be tied into a bow.
Method 2. Diagonal lacing
The diagonal lacing method for men's shoes looks fresh and attractive. Once both boots are laced, it creates a rather interesting diagonal pattern. It can be either the same or mirrored on a pair of shoes.
How to tie shoelaces using the diagonal method:
- Pass the lace through the bottom holes on one side from the inside and the other from the outside. The side that came through from the inside will be visible on your shoe, but the other will not. It is important that the laces are the same length at this stage.
- Next, take the end that will be visible and thread it into the next, opposite direction so that the end enters from the outside, not the inside.
- Pass the other end (which will not be visible) through the next opposite hole from the inside. Please note that in this step, the side that was not visible will be on the outside of the boot.
- Continue the operation to the upper holes, alternating between the visible and invisible sides of the lace.
Lacing high top sneakers
The height of fashion for high-top sneakers was observed in the eighties, and today their popularity is again returning. This is not surprising, because these sneakers are very comfortable and practical to wear. But given the unusual style, many modern fashionistas do not understand how to tie the lacing on high-top sneakers.
In principle, there is not much difference in how to lace high or standard models. You can choose any method you like. But there are several nuances:
- Since there are more holes in such pairs, the laces must be longer than standard parameters.
- When choosing a lacing method, focus on the one with a larger pattern (since fine lacing will require even longer laces and will take much more time).
- To make shoes easier to remove, it is better to choose lacing options that allow you to ease the tension.
How to tie long shoelaces is up to you. You can do it in the form of a butterfly, with a hidden knot, or not tie it at all, but simply tuck the ends inside the shoes.
Method 3. Lacing Cross over and under
As the name suggests, after lacing your boots, you will have an alternating cross ABOVE your boots and UNDER your boots. This method looks best on boots with 5 or 6 holes on each side. Quite an interesting way of lacing, especially if you have classic Oxfords.
How to tie shoelaces using the over-under cross method:
The first thing you need to determine is how many crosses OVER you will get. If you have up to 4 holes, you will only get one full cross. If you have 5 or more holes, then you will get 2 or more crosses OVER the boots.
If you have 3 holes:
- Thread the lace from the inside so that both ends come out from the inside. It is important that the laces are the same length at this stage.
- Next, cross the laces and thread them through opposite holes on the outside to form a visible cross.
- Next, do the same as in the previous step, only this time you will have an invisible cross UNDER your boots.
If you have 4 holes:
- Thread the lace from the outside so that both ends go inside. It is important that the laces are the same length at this stage.
- Next, cross the laces and thread them through opposite holes on the inside to form an invisible cross.
- Next, do the same as in the previous step, only this time you will have a visible cross ABOVE the ankle boots.
- The next cross will be invisible, after lacing both ends will come out from the inside to the outside.
If you have 5 or more holes:
- Thread the lace from the inside so that both ends come out from the inside. It is important that the laces are the same length at this stage.
- Next, cross the laces and thread them through opposite holes on the outside to form a visible cross.
- Next, do the same as in the previous step, only this time you will have an invisible cross UNDER your boots.
- Repeat both previous steps and you should have 2 visible and 2 invisible crosses (if there are 5 holes).
What you need for work
Before you start shortening, prepare everything you need:
- sharp scissors;
- marker or felt-tip pen;
- transparent tape;
- polyurethane glue or nail polish;
- cocktail straw or shrink tubing;
- lighter or candle.
Start fixing the ends immediately after trimming.
Method 4. Straight lacing
Straight lacing allows you to lace your shoes with parallel lines, which look quite unusual on any classic shoe. On the one hand, laced shoes look “easy”, on the other hand they look attractive. The direct method is interesting with any number of holes for laces. The only inconvenience is the difficulty of tightening the laces, especially if the shoes fit tightly on the foot.
How to tie shoelaces using the direct method:
- Thread the lace from the outside so that both ends go inside. It is important that the laces are the same length at this stage.
- Take the left lace in your hand and thread it from the inside out into the next hole on the same side of the row of holes.
- Take the right lace in your hand and thread it through 1 hole from the inside to the outside on the same row.
- Next, take the left lace in your hand and thread it from top to bottom into a strictly parallel hole on the adjacent row.
- Take the right lace and repeat the same action as in the previous step. You should end up with 3 parallel lines formed by the laces.
- All other holes must be laced exactly in the order stated until you reach the last row.
Ladder
A combination of straight lacing and cross lacing. We tighten the eyelets of both laces into the lower eyelets, leaving a straight stitch on the outside. Next, we thread the right one from the inside into the second left eyelet and make a straight stitch parallel to the bottom row. We thread the left one into the third right eyelet, making a parallel stitch. Next, we lace the laces one by one to the very top.
Method 5. Reverse or Military lacing
If you love minimalism in all its manifestations, then I can recommend you to lace your shoes using the Reverse or Military method. This lacing method received its last name due to its practical use in many armies of the European Union countries.
How to tie shoelaces using the Reverse or Military method:
- Thread the lace from the outside so that both ends go inside. It is important that the laces are the same length at this stage.
- Cross both ends of the lace and thread them from the inside out into the next empty holes. You should get an invisible cross.
- Next, take the left end and thread it through the next hole in the same row from top to inside.
- Do the same operation with the other end.
- Next, cross the laces and thread them into the next opposite empty holes to create an invisible cross.
- Repeat steps No. 3 and 4.
Continue lacing your shoes until you reach the top eyelets.
Lacing up the shoes
It is unlikely that you will be able to lace your boots using the methods described above. Therefore, we have selected the most unusual and at the same time functional lacing patterns suitable for Oxford, Derby and Chuka boots. At the same time, functionality has become the main selection criterion, because you need to lace up your boots not only beautifully. It is important that the intricate intricacies can be tightened without crushing the leg or spending more than a minute on it. For men who prefer classic shoe models, lack of time is a pressing problem.
"Straight"
The most laconic and neat lacing - only parallel lines are visible from the outside, and there are no diagonal intersections at all. At the same time, it is done quite easily. The diagram and detailed instructions will make the process even easier:
- the ends are threaded into the first lower holes so that they go inside the boot;
- then one end comes out of the second hole on its side, and the second from the third;
- the laces brought to the front side are transferred to the opposite side and threaded into a hole located at the same level;
- from the inside, the ends of the tape are reinserted into the hole, passing one free one (through one hole);
- from the front side, the lace is again passed through the hole located opposite, and so on until the very top of the shoe.
Important: To tie a knot, the shoes must have an odd number of holes, otherwise the ends will remain inside the shoes.
This pattern can be used and, if necessary, laced with high-top sneakers or any other sports shoes. The result will look neat.
"Butterfly"
A very simple method, suitable for low boots. One of the advantages of this option is the ease of pulling the ends into a knot to regulate the fullness of the shoe. The technique is as follows:
- pass both ends of the lace inside the shoe;
- from the inside, pass the ends into adjacent holes and bring them out;
- cross the ends and pass them into the next holes;
- go up one hole again from the wrong side;
- bring the laces out and cross them;
- thread the ends through the next holes again;
- continue in the same way.
For sports shoes, this option is simple, because you can lace sneakers in more intricate ways, but classic shoes still require restraint.
"Ladder"
Despite its apparent simplicity, this scheme is considered quite complex. But if you have mastered the methods of lacing sneakers described above, then there will definitely not be any difficulties here. Step-by-step instructions to help:
- insert the ends of the tape into the lowest holes so that they come out inside the shoe;
- then we lace first one end, then the other;
- we take the first end (yellow in the diagram) out, threading it into the hole above;
- we throw it to the opposite side and pass the shoe inside;
- now we thread it through the hole on the opposite side through one;
- again we throw the end to the opposite side, but now, threading it through a hole located at the same level;
- we continue according to this scheme to the very top;
- We thread the second end (it’s blue in the diagram) using the same principle into the free holes, not forgetting to pull the lace under the existing loops.
Of course, there are many ways to beautifully tie laces on sneakers or boots. Our selection contains the most interesting patterns, the repetition of which will not cause any particular difficulties. Well, as they say, it’s better to see once - video instructions to help!
Method 6. Lattice
The last method that we will consider is the most difficult. However, if you have enough patience, you will get a very unusual design that will appeal to many. Please note that lattice lacing looks best on shoes with 6 holes.
How to tie shoelaces using the Lattice method:
If you have 4 holes:
- Thread the lace from the inside so that both ends come out from the inside. It is important that the laces are the same length at this stage.
- Cross both ends of the lace and thread it inward from the top through one empty hole.
- Next, take one of the laces and thread the hole missed in step 2 from the inside and pull it out.
- Repeat step #3 with the second lace hole.
- The final step is to thread both ends from the inside out through the last holes, after crossing the ends.
If you have 5 holes:
- Thread the lace from the inside so that both ends come out from the inside. It is important that the laces are the same length at this stage.
- Cross both ends of the lace and thread it inward from the top through one empty hole.
- Next, take one of the laces and thread the hole missed in step 2 from the inside and pull it out.
- Repeat step #3 with the second lace hole.
- Pass the ends from the outside in.
- Take the left end and thread it through the next hole in the same row from the inside out.
- Repeat the previous step with the second end.
If you have 6 holes (recommended):
When lacing, try to intertwine the ends in a lattice pattern, using the principle: once on top, once on bottom….once on top, once on bottom.
- Thread the lace from the inside so that both ends come out from the inside. It is important that the laces are the same length at this stage.
- Cross both ends of the lace and thread it inward from the top through the two empty holes.
- Take the left end and thread it through the next hole in the same row from the inside out.
- Repeat the previous step with the second end.
- Take the left end and thread it through the second (empty) opposite hole that was missed in step 2.
- Repeat the previous step with the second end in a mirror image.
- Take the left end and thread it through the next hole (third from the bottom) in the same row from the inside out.
- Repeat the previous step with the second end.
- Thread both ends from the inside out through the last top holes.
How to choose the right shape and length of laces
Traditionally, the look and type of lacing is the last thing that attracts shoe buyers. Much more important for many are the material of the upper and sole, comfort to wear, practicality and compatibility. However, it is the laces that can increase wearing comfort or negate other positive aspects of the shoe. The last few decades have radically changed the role of laces in matters of fashion and style.
The main reason is the large number of types, materials for manufacturing and style solutions in footwear. White, colored or dark colors, long and short, cotton, synthetic and leather - the range and availability of different types allows you to choose the ideal option for yourself or choose several. However, not all types are equally convenient, although they can look very attractive:
- Traditional cotton ones are securely fixed in a bow, but the usual white color does not always suit modern fashionistas.
- Synthetic ones are very attractive in appearance, but they cause significant discomfort: the smooth and slippery texture is not securely fixed and makes it necessary to constantly tie a bow.
- Leather ones do not go well with all types of shoes, but they look presentable and respectable.
Knowing how to choose laces for different styles can give your moccasins or sneakers a unique, unique charm.
The classic choice of laces for shoes is tone on tone - brown with brown or black with black. There are many more options for sports shoes: there are no restrictions on colors and lacing styles; both bright contrasting combinations and playing with the intensity of different shades of the same color are allowed.
Thickness is another important issue in choosing the right product. Classic shoes require thin laces, while sports shoes allow wider, round or flat options.
If your imagination allows, you can create the most unusual and vibrant combinations: combine black with orange, yellow with blue, pink with gray.
Laced shoes - photo
Straight-laced brogues
Classic shoes laced in different ways
Classic men's shoes tied using the Criss-to-Cross method
Knitted laces using the Cross over-under method