sdelay.sam.ua
The neckline is often one of the main problems with new clothes. A neckline that is too deep looks provocative and is not suitable for every woman. An excessively narrow throat causes discomfort. In this case, modeling of the neckline is performed. This can be done in a studio or yourself. The operating principle depends on many features of the product. The material, model, cut, size matter. Before starting work, it is advisable to make a drawing of the future product and decide on the key points that you would like to correct. With incorrect calculations and drastic changes, the back, front, armhole or shoulder may be distorted. Therefore, it is important to act carefully, connecting all the dots so that they do not change the basic cut.
How to make your neck smaller
If the collar on a cheap knitted dress has stretched out, it’s easier to buy a new one. But if the main fabric has not lost its presentation, then you can save a T-shirt, long sleeve, half-over or dress:
- the most primitive thing is to tie it with a hat elastic band, a strap, a decorative ribbon, or the like. They are usually threaded into the hem, inside the knitted trim or under the facing. A more complex option is to make holes, process them with grommets (blocks) and tighten the tension through them;
- make darts (pinch and stitch or sew with a hidden seam in several places);
- add a placket in the same way as a knitted edging on T-shirts, only choose a larger width for the part;
- sew on a decorative facing/yoke, i.e. fold the factory knitted tape, make a decorative edging out of it, and sew a new collar with unstretched tape to the wrong side;
- Insert lace, knitted or any other insert into the V-shaped neckline. Another option is to close it with a hidden stitch.
The method of processing the neckline is chosen taking into account the model and style of the dress, one’s own experience and available materials. The most important condition is to act carefully. And the neckline will look like a purchased item.
Knitted trim
To sew a T-shirt, like in a store, you will need to buy a ready-made knitted strip (trimming, trim). It is made of ribbed knitwear, ribana, very elastic and holds its shape perfectly. The same method is useful for a tunic or T-shirt dress.
How to process a knitted neckline:
- Place the finished strip on the front side of the neckline.
- Baste (this is important so that the edge does not stretch).
- Sew using an overlocker or fine zigzag, making sure that the parts do not stretch.
- Take out the basting.
- Lay out the pieces so that the seam is on the wrong side and the placket is facing up.
- Place a securing stitch along the face using a zigzag with a slight bend or a stretch stitch.
- Press to make the seam flatter.
Kashkorse and ribana
This processing method gives the product a sporty look, which many people like.
The first step is to decide how much material we will need. There is a special formula for this that allows you to find out the length of a circle inscribed in another circle:
- We measure the circumference of the neck according to the pattern
- Divide it by 3.14
- Subtract the width of the finished collar, multiplied by 2
- We multiply all this by 3.14
It turns out perfect! But if you don’t want to count every time, you can use a simpler formula:
Name
- We multiply the length of the neck by 0.7 - we get the length of the collar!
The same formula can be used for the cuffs and waistband.
Kant
Edging is a strip of fabric cut diagonally and encircling the cut of the collar. This is the most time-consuming way to process a neck, requiring maximum precision - if you want the perfect option, of course.
How to sew a piping beautifully:
- Either cut out the edging from the main fabric, or take a ready-made one so that it becomes a decorative element.
- Fold the edge in half along the long edge and iron it well, it is advisable to even steam it so that the fold does not get lost.
- Place the piping on the neckline so that it touches the fold inside the piping.
- Be sure to baste, otherwise the part will move out and the cut will not be caught by the stitching.
- Sew the edging on the wrong side of the main product, bending the edging cut by 3-5 mm.
- Repeat the procedure on the front side. Fold the edge so that the edge barely covers the already laid line.
The method is not technological, as taught in sewing schools, but proven and error-free. The main thing is accuracy.
According to the rules, the edging is sewn first from the face (folding 2-4 mm), and then from the wrong side, and the wrong edge is folded in such a way that the second line lies exactly on the first or runs along the lower edge of the left side of the edging. This requires skill, accuracy and no haste.
Unusual ways to process the neck of a T-shirt made from knitwear
There is an alternative processing method. It is used when the main material serves as the binding. The advantage is that you do not need to calculate the required length of the canvas. First, the right shoulder is overlocked, then the trim is sewn openly. Cut off the required length in place and only then sew on the left shoulder, along with the binding.
The disadvantage of this method is that if you use ribana or similar material as binding, the seam on the second shoulder will be too rough. In this case, cotton with lycra is best suited. It stretches well and is much more convenient to work with.
Simple bias tape
If we are not talking about knitwear, then you can cut the trim from the main fabric. The pattern should go diagonally, otherwise folds and blisters will form at the turns of the neckline.
There are no other tricks, and the binding is sewn on very simply:
- Place the binding and the main product right sides together.
- Sew along the edge of the neckline, retreating 2-4 mm. If the fabric frays too much, overlock both edges with an overlock or zigzag stitch.
- Place the binding on the wrong side and sew its lower edge, bending the cut inward by 2-3 mm.
Tip If you pre-stitch the edge of the binding, then its lower edge can be sewn with a “cross”, capturing 1-2 threads of the main product. Then the bottom line will not be visible from the front side.
There are also ready-made trims on sale. Their main drawback is their satiny, bright shine and sliding texture. In practice, this is not the most convenient material, especially for a novice seamstress.
How to properly process the neck of a knitted T-shirt
What tools and materials are used in the processing process
To perform the processing accurately, you will need the following tools:
- sewing machine with overlock;
- stitcher;
- a set of pins;
- needle sets;
- flexible meter;
- a simple pencil or chalk;
- metal ruler;
- tailor's scissors.
And materials:
- a set of threads;
- T-shirt without a neck;
- ribana cloth.
What lines are used
For finishing, 3 types of seam are usually used:
- double on the cover;
- chain;
- double needle on a machine.
Vitamin complexes for skin
| Name | Compound | Properties of the drug | Price |
| Famvital | The composition contains: borage seed oil, camellia extract, vitamin C, fish oil, glycerol, beeswax, soybean oil, B6 vitamins, grape seed extract, palm oil and coconut oil. | The drug is able to maintain the health of the skin, hair, and nail plates. The product also improves a person’s overall well-being and can be used to adjust a person’s weight category. | 2800 rub. |
| Imedin | Tomato extract, grape seed extract, white tea extract, vitamins E and C, zinc. | The vitamin-mineral complex improves the quality of the skin, moisturizes, increases elasticity and smoothness. | 2600 rub. |
| Vitrum Beauty | Vitamins A, E, C, folic acid, manganese, calcium, iron, magnesium, zinc, selenium, phosphorus, iodine, boron, horsetail extract. | Taking this vitamin complex helps to compensate for vitamin deficiencies and improve metabolic processes. | 970 rub. |
| Complivit Radiance | vitamins A, E, C, B vitamins, folic acid, copper, zinc, selenium, magnesium. | The biological supplement promotes collagen production, accelerates metabolic processes in cells, and protects the body from the harmful effects of the external environment. | 270 rub. |
Processing technology
In mass production, to optimize the technological process, special devices and equipment are used to minimize the use of manual work. At home, processing a knitted neckline includes machine and manual operations. The use of a knitting machine needle with a rounded tip, which pushes the fibers apart, and the use of knitted elastic stitching improve the quality of the finished product.
Smooth edgings and eraser trims are used to decorate T-shirts, sweatshirts, basic assortment dresses or sports style models. Stand-up collars with polo-type trims are used to decorate sports dresses and polo T-shirts. Elegant knitted blouses and dresses benefit from hem facings that create a clean edge.
Round neck trim
- Cut out the binding from the main fabric or eraser. Its length when flat is equal to or shorter than the length of the finished neck cut. Make sure that the elasticity and length of the assembled edging are sufficient to be pulled over the head.
- Stitch the piece along the short side to form a ring.
- Fold the piece in half and iron it.
- Fold the binding with the neck cut right sides together, aligning one shoulder cut of the product and the stitching seam of the part.
- Pin together perpendicular to the cut, evenly distributing the lengths of the sections. Sweep if necessary.
- Sew the edge with an elastic stitch or overlock.
- Place or iron a seam stock on the product.
- Place an elastic single or double finishing stitch along the seam reserve.
V-neck trim
- Cut out the binding from an eraser. Its length when flat is equal to or shorter than the length of the finished neck cut.
- Sew the piece along the short side in the shape of an angle.
- Notch seam allowances and press.
- Fold the piece in half and iron it.
- Fold the binding and the cut of the product right sides together, aligning its seam with the corner of the cutout.
- Stitch the piece, starting the stitch from the corner.
- Overcast the edge using an overlocker.
- Place or iron a seam stock on the product.
- Place an elastic single or double finishing stitch, securing the inner seam margin.
Bias trim
- Cut the binding from the main fabric at an angle of 45 degrees. The width of the binding is equal to the planned finished width multiplied by three.
- Fold it in half and iron it.
- Overcast one outer edge.
- Place the open sections of the parts right sides together and prick them, evenly distributing the lengths of the sections.
- Sew with a seam 0.5-0.75 cm wide.
- Fold the binding over to the wrong side of the product.
- Iron or baste.
- Place a finishing stitch from the front side to the edge, catching the wrong side.
Hem edging
- Cut out the facing according to the patterns or the shape of the neck.
- Duplicate the parts with elastic interlining.
- Sew the shoulder seams, connecting the parts into a ring.
- Press seams and overcast open outer edge.
- Pin the pieces together, matching the shoulder seams.
- Stitch the neckline with a seam of 0.5-0.75 cm.
- Baste the edge and stitch along the inside part or into the edge, depending on the model.
The processing of the neck of knitted products affects the overall appearance of the garment and characterizes the quality of the product. There are various ways of edging and decorating sections of knitted clothing. Special methods of processing a knitted dress include, for example, edging the neck with a one-piece facing or hemming details that duplicate the cuts.
Tops and T-shirts can be topstitched using finished braid with a clean finished edge. Modern synthetic and blended fabrics use a method of thermal bonding of open cuts, which provide a clean edge without additional sewing operations.
Turning
Facing is a piece of fabric, 4-5 cm wide, completely repeating the shape of the collar or collar and armhole, if a sleeveless model is sewn. This design allows you to close the cut in an invisible way, leaving an even, smooth edge. This is how the neckline without a collar is treated on factory items (except T-shirts).
It is desirable that the facing does not have any seams, except for the side and shoulder ones. To prevent the part from turning on its face, to keep its shape and to prevent the neckline from stretching, the facing is glued with dublerin or non-woven fabric.
The material of the part is usually the same as the main fabric. And it is sewn on according to the lining principle. When finished, the front side of the facing is adjacent to the body, the back side is adjacent to the back of the garment.
Advice Even though the facing is glued, it is still better to process the cut. The ideal option is an overlocker, but zigzag on a regular household sewing machine will also work.
Grinding technology
The technology of stitching the facing is not very difficult:
- Place the main piece and facing with right sides together.
- sweep or secure with pins.
- Sew along the edge, retreating 2-5 mm.
- Turn it inside out (turn the facing to the wrong side of the main product), straighten and iron the seam.
- If the fabric density is high or the facing is too narrow, sew a stitch on the outside to secure it. In the usual case, it is enough to secure it with a couple of stitches on the side seams.
Important If there is a zipper, the facing should follow the contours of the neckline in this area as well. Therefore, you need to sew it last, after the lock.
Quality of clothes
www.liveabout.com
The higher the quality of the clothing, the less likely it is to shrink. Special finishes and manufacturing technologies that prevent shrinkage are more often used by higher-end manufacturers who care about product quality. Because most people don't want their clothes to shrink, Gagliardi notes. Customers want to be able to wash their clothes over and over again and keep wearing them, and for them to continue to look the same as when they bought them.
Changing the size of denim items
You can make even denim clothes fit. You've probably noticed that after washing, denim trousers become smaller, but then they wear out. To consolidate the shrinking effect, wash your denim items in warm water. It should not be at the highest possible temperatures, otherwise things will simply fade. By drying denim items in a dryer, you can achieve the same effect.
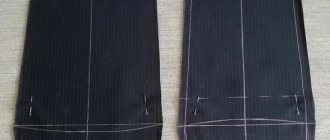
Making a round V-shaped neckline
Many women prefer a V-neck to a round neckline. This neckline visually lengthens the neck and makes the woman more graceful.
Unfortunately, V-neck t-shirts are not that easy to find. But with the help of this MK you can make your favorite cutout on any T-shirt.
For work you will need: 1. a seam ripper (if you don’t have one, you can use nail scissors), 2. scissors, 3. sewing machine, 4. pins, 5. thread, 6. T-shirt with a round neck.
Using a seam ripper, open the neckline on the front of the T-shirt from one shoulder to the other.
Fold the T-shirt in half along the center front line, matching the shoulder seams.
Using sharp scissors, cut out a new neck shape. Attention, do not make the neckline lower than 5 cm from the edge, otherwise there will not be enough fabric to cover the neckline.
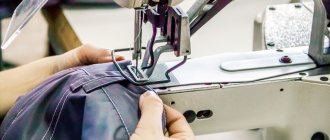
Cut the neck trim in half.
ATTENTION: We sew the edging from the shoulder seam and not reaching 2-2.5 cm to the middle of the neckline, i.e. we need to leave the edging unsewn in order to beautifully design the neckline.
Then, using a pin, align the end of the edging with the opposite edge of the cutout.
Did you like the article? Subscribe to the channel to stay up to date with the most interesting materials
Source
Skin restoration massage
Massage in combination with creams and laser therapy gives excellent results. The procedure allows you to increase the elasticity of the skin against the backdrop of pleasant relaxation and restoration of the body as a whole. Even one session will be enough to notice changes with improved blood circulation and accelerated scar healing. You can do abdominal massage at home on your own. Follow the simple instructions:
- Take a shower or cleanse your stomach.
- Apply some oil or stretch mark cream to your stomach.
- Using light circular movements without force, rub the cream over the surface of the abdomen.
- Rub the product into the surface of the skin more actively for 5-6 minutes, act especially delicately in the area of damaged areas.
- At the end of the session, cleanse the skin of any remaining product and give yourself time to rest for a few minutes in a lying position.
This massage should be done daily, preferably in the morning and evening. Use proven natural creams and oils.