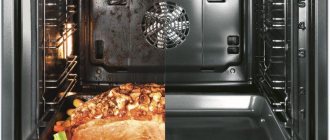
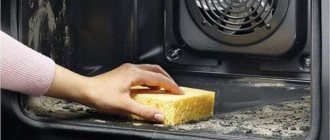
During use, grease, traces of detergents, dust and other contaminants settle on the oven walls, forming permanent stains.
And if cleaning the inner walls can be made easier with the help of steam, then cleaning between the glass doors is a task of increased complexity.
The method of processing the inter-glass space is chosen depending on the design of the oven, the degree of contamination and other factors.
We'll tell you later how to clean between the glass in the oven door.
Preparation
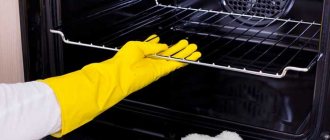
Disassembling and washing the oven door is a labor-intensive procedure, so it is advisable to do it at the very end of cleaning.
Before you begin removing the glass, you must:
- Cool the oven completely after cooking or hydrolytic (steam) cleaning;
- wash the internal surfaces, completely removing traces of foam and cleaning sprays;
- inspect the door for leaks, grease stains and other contaminants;
- inspect the fasteners and, if necessary, treat them to remove grease or rust.
During general cleaning, you can remove the door before processing the internal surfaces of the oven in order to wash hard-to-reach areas at the joint.
To clean glass from all sides you will need the following tools:
thin or Phillips screwdriver (depending on the type of fastening);- soft sponge or microfiber cloth;
- paper or cloth towels;
- cover;
- thin knitting needles or long bamboo skewers;
- old toothbrush;
- cotton wool or gauze;
- protective gloves.
Some housewives use a steel wool or blade to scrape off dried grease, but this is not recommended. Sharp metal edges leave scratches into which dirt and detergent residues become trapped. In addition, a large amount of damage leads to cloudy glass.
The most stubborn stains can be removed from glass using a plastic scraper.
On a note
The methods discussed are only part of a complete oven cleaning. Maintaining cleanliness and order for a long time should also include mandatory compliance with the following measures:
- To prevent fat from splashing, it is recommended to use special bags and sleeves;
- when cooking is finished and the oven has cooled down, wipe the glass so that it remains dry;
- Use a cleanser once every 7 days.
If the owner or housewife washes their own oven for at least 10 minutes a week, they guarantee themselves that it will remain tidy for a long time, and will get rid of the need to carry out lengthy manipulations, scrubbing away old grease for a long time.
Expert opinion
Valery Garmash
Chef of the Grill House restaurant, griller
Almost all detergents can be used for cleaning. Any household chemical store will do. When working with these substances, you must wear protective gloves to protect your hands from the acids and alkalis contained in these substances.
With the right approach, greasy deposits from glass can be easily removed, but the surface must then be rinsed thoroughly, otherwise the chemicals remaining on it may subsequently end up on the food being prepared.
How to disassemble the door?
The procedure for disassembling the door varies depending on the manufacturer and model of the stove. The panel pressing the glass can be attached in several ways:
- Several bolts in the corners or in the oven handle.
- Bolts holding the lower stop.
- Bendable clamps in the corners of the glass.
- Top bar with ventilation holes.
- With latches that snap off when you press a button.
To avoid damage to the structure, you need to study the operating instructions for the stove in advance. It is recommended to document glass dismantling step by step using photos or notes.
How to disassemble the door:
- Open the oven and find the fasteners that hold the inner glass in place. If the fixing bar is located at the bottom (for example, on Gefest slabs), then to gain access to the fasteners you need to open the drawer under the door.
- Place a blanket on the floor to cover the glass.
Unscrew the bolts on the inner door panel, release the latches or buttons.
If the fastener is blocked by clogged grease and carbon deposits, treat it with a small amount of diluted dish soap and remove the dirt using a toothpick or skewer.Lemon juice and “defrosting” for fasteners will help to unscrew rusted bolts.
- Remove the top strip with ventilation holes.
- Hold the door, remove the glass and place it on a soft surface. If the design of the slab allows you to remove both glasses, and not just the inner one, then dismantling is recommended to be done by two people. Since the door is held open by the weight of the glass, it may slam shut when removed.
If the bolts are located on the lower stop, then it is not necessary to unscrew them completely. It is enough to loosen the fastening and remove the glass from the grooves, picking it up with a toothpick.
Advantages of CEZARIS slabs
* In the production of household floor slabs, a high-tech glass enamel process is used on the equipment of the Italian company IMEL. An important quality of enamel is its high heat resistance - the ability to withstand significant temperature changes.
A thin layer of enamel (up to 0.2 mm) can withstand temperature differences of 300ºС without disturbing the surface condition. Particular attention is paid to color - white and blue are achieved. Any slab can be made in dark brown using RAL 9224, enamel made in Slovenia. * The plate table, without visible external fastening elements, can be easily removed. For all our stoves, the following parts are made only enameled: tray; control Panel.
* The application of protective and decorative powder coating to the remaining external parts of the slab is carried out using nanotechnology on an automatic production line in Sweden, this allows increasing the corrosion resistance of the product during operation for up to 10 years
* Cup type burners
* Gas burners of CEZARIS stoves have a low CO level - 0.0018%. (According to GOST, <.=0.1% is allowed).
This is an important factor for human health, especially in residential areas.
“Cup-type” burners are installed in gas and gas-electric stoves; each stove with gas burners is tested for gas permeability.
* The oven in CEZARIS stoves has thermal insulation, which consists of basalt fiber and shielded with aluminum foil.
* The oven provides the best quality of baking due to the fact that a divider is installed above the gas burner, which is located in the oven; it allows the temperature to be evenly distributed over the entire surface of the oven.
* The inner coating of the oven is made using glass enamel, which can withstand temperature changes and shocks that are inevitable during operation.
* The glass used in the oven door is double panoramic (the glass itself does not have joint lines with the metal - this advantage is that fat, pieces of food, and moisture released during cooking in the oven do not flow along the seams and fasteners in the metal, which does not interfere with the aesthetic appearance of the oven glass, and the process of caring for it is reduced to wiping it with a sponge and detergent). This improves the performance of the oven and reduces the heating of the outer glass.
* The door is mounted on hinges with clips, which allow you to easily remove the oven door during operation and clean it most effectively, both the panoramic glass and the oven itself.
* The oven door has a fixed position at an angle of 45 degrees (to remove excess moisture), which allows you to: dry fruits and vegetables, bake airy meringues, watch the baking process without disturbing the overall temperature in the oven.
* The temperature of the outer glass of the oven door (according to tests carried out at BELLIS) at maximum heating does not exceed the permissible temperature heating threshold - 60% (advantage - safety during operation).
* All floor-standing household stove ovens under the “CEZARIS” brand are equipped with gas control! And in models PG 2100 -15, PG 2100 - 16, PG 2100 - 17, PG 2100 - 18 there is full gas control of the work table and oven. Gas control allows you to turn off the gas supply if it is inadvertently interrupted.
* Electric stoves are assigned energy saving class A, which allows you to reduce energy consumption, and this ultimately allows you to save energy costs! The effect is obvious - economical!
* Electric stoves are equipped with express burners (a red circle is marked on the surface of the express burner).
* In gas-electric stove models (when grilling) there is no need to keep the oven door open.
* CEZARIS stoves, which are equipped with glass lids, have a “balancing mechanism”, it has a slowing effect, which prevents the lid from accidentally falling onto the working surface of the stove.
* Gas and gas-electric stoves "CEZARIS" are equipped with a function - a fixed position "small flame". In versions of the CEZARIS stoves, where the THERMOSTAT is included in the package, the oven is equipped with a thermocouple that maintains an independently set temperature, set by a handle on the control panel of the stove.
* A mechanical timer with sound allows you to set the required time for cooking; after the time has elapsed, a sound signal is emitted.
* The temperature indicator located on the panoramic glass indicates the temperature in the oven, and you can easily control the temperature during the cooking process.
* The backlight located in the oven allows you to observe the cooking process.
* Drawer for storing utensils.
* All stoves operate on both liquefied and natural gas, using an additional set of nozzles for converting to liquefied gas.
* All our slabs are tested in BELLIS, BelGISS, after which they are issued certificates of conformity and the Customs Union.
* The packaging of the slabs is designed in such a way that a wooden frame, polystyrene foam and three-layer corrugated cardboard allow the slabs to be transported in 3 tiers, which is successfully used when shipping our slabs to the territory of: Ukraine, Kazakhstan, Uzbekistan and the Russian Federation.
What to clean with?
Both industrial and home remedies are suitable for cleaning glass from grease and carbon deposits. The selected product must meet the following requirements:
- used for glass, enamel and plastic, if the rear panel of the door is enameled and the latches are made of plastic;
- contains a small amount of aggressive surfactants and is easily washed off from the surface (as a rule, such products are marked “Eco”);
- has a liquid or gel form and does not contain abrasive particles.
The most effective oven door cleaners include:
- Amway Oven Cleaner;
- Grillnet Extra Pramol;
- Synergetic for slabs;
- Reinex for ovens.
For fresh stains and light stains, it is recommended to use household chemicals based on alcohols rather than alkalis (potassium and sodium hydroxides).
If there are no old stains, you can wash the glass with a detergent for children’s dishes (“Eared Nanny”, “Honey Bunny”, etc.), which can be easily removed from the surface.
The following cleaning tools are used:
- foam rubber and cellulose sponges;
- wet rags;
- plastic scrapers for washing glass;
- microfiber cloths.
Melamine sponges, which are good at removing old stains and carbon deposits, should not be used to clean all internal surfaces of the oven.
Folk remedies
Home remedies remove stains from the oven no less effectively than household chemicals, although they act less quickly. The following products are used to clean the surfaces between glass:
Baking soda, baking powder .
The powder must be diluted to a thick paste, applied to the surface and left for 1-2 hours, periodically moistening with water. The action of soda is based on the formation of a weak alkaline solution, which reacts with fats.It is recommended to use this method when there is a large amount of fat, so soda paste is mainly useful for cleaning the glass on the oven side.
- Laundry soap . Soap-based products remove not only grease, but also other stains and streaks. To clean the glass you need to rub 2-3 tablespoons. soap, add warm water, beat into foam and apply. The most stubborn stains can be scrubbed with a mixture of soap and soda. The disadvantage of this method is the stains that remain after washing.
- Mustard . Mustard effectively emulsifies grease, allowing it to be washed off the surface with a soft sponge or rag. To remove stains, you need to moisten the surface, sprinkle a little mustard powder and rub. This method is suitable for greasy stains and drips that formed when washing the stove with a mixture of household chemicals and dirt.
- Acetic and citric acid . Acids have a weak effect on fat, only slightly softening it, but they remove stains well and add shine to glass. Lemon juice or table vinegar in a 1:1 ratio with water will help to achieve transparency of the glass.
- Ammonia and ethyl alcohol . Ammonia solution (ammonia) is used for the most stubborn stains. For cleaning you will need to dilute 1-2 tbsp. product in 200 ml of warm water and wipe the surface. To remove streaks, drips, fingerprints and other stains, alcohol-based glass cleaners or concentrated alcohol are suitable.
Review of gas stove Gefest 5300-03 0046
The question of buying a stove has long arisen. Manufacturers chose Belarusian, which is now in almost every apartment. Gefest 5300-03 0046. It took us a long time to choose. We immediately decided that the stove would be gas, but with electric ignition, since there were problems with the wiring. We were worried that the electric stove would put a large load on the network, which was already regularly knocked out. Therefore, the only choice was among gas ones. At some point it became clear that the choice was quite simple - most of the models are similar: only the design and size change. So the first criterion was size. Unfortunately, only the 50th was suitable. Honestly, I would take the same model, but 60k. Indeed, these ten centimeters make a big difference when you cook several dishes at once in a large bowl. For example, a five-liter saucepan will not fit next to a 28 cm frying pan. Photos with frying pans 22 and 28 cm in diameter:
Cleaning sequence
to wash the oven in this order:
- prepare tools and work surfaces;
- apply cleaning product to the inside of the oven;
- dismantle the fasteners, remove the top bar and retaining panel;
- take out the glasses, rinse them with warm water and moisten them with household chemicals;
- wash the interior surfaces of the oven;
- if possible, remove the fasteners and soak them in a soapy solution, clean the permanent fasteners with an old toothbrush;
- wash the glass and dry it by placing it on a clean cloth;
- Wipe dry glass surfaces with an alcohol-containing product and a lint-free cloth;
- install glass in the door.
When cleaning, it is important to thoroughly wash the glass seats and fasteners, otherwise, during assembly, breakage or a violation of the tightness of the structure may occur.
FAQ
What products should I buy to clean my oven?
Everyone has different preferences. To find “your” remedy, it is better to try several popular ones. For example: Amway Home, Reinex, Top House, Sanita. To make a quality comparison, try to test them under equal conditions. You can even keep a journal where you can make notes about the success of a particular product.
Can you tell me the best cleaning product at hand?
1. Pour soapy water into a baking tray and place in the oven for 15 minutes at 110 degrees. 2. Wait for the carbon deposits to soften from the water vapor. 3. Apply the baking soda solution with a rag for 15 minutes. 4. Rinse off. 5. If the dirt remains, you can also wipe it with a vinegar solution.
How to put it back?
To install glass in the door you need:
- Open and hold the door. If necessary, bend the clamps.
- Install one or both glasses depending on the oven design.
- Replace the strips with ventilation holes or stops under the glass.
- Screw in the fasteners holding the side strips or back panel.
You need to install the glass into the grooves without effort, keeping the sides parallel.
Why might you need to remove the door?
- Long-term operation of the oven. If the oven is used for several years, dirt and grease will get inside and remain on the back of the glass.
- Violation of technological processes during the manufacture of a gas furnace. If the glass has been strained too much, cracks may appear.
- Damage during transportation. Even telescopic cracks can lead to failure.
- Mounting error.
- The glass may break if the oven inside is hot and cold water comes in contact with the outside.
You can make the replacement yourself. You should buy glass in special stores.
Is it possible to clean the inside of the door without disassembling it?
If disassembling the door is impossible or complicated, you can try to clean the glass without dismantling it.
For this you will need:
- thin skewers or plastic knitting needles;
- wet wipes for cleaning kitchen surfaces;
- pieces of cloth or gauze.
Cleaning without disassembly occurs through the ventilation holes at the top and bottom of the door. This method is suitable for removing dirt from end openings, but if there are large stains on the glass it will not be effective.
The video will show you how to clean the inner glass of the oven without dismantling the door:
What to do if a drill bit gets stuck in a drill
The problem of drill bit jamming in the drill head is often encountered and it is not easy to solve this problem. Many people wonder how to remove a drill from a drill if it is jammed. This article will describe all the ways to get out of such a situation.
Types and causes of drill jamming in an electric drill
There are several reasons why an electric drill may jam.
- Marriage
The most obvious reason for the breakdown is a manufacturing defect; this problem most often occurs in very cheap and low-quality drills. That is, tools from Bosch, Makita, Metabo, Interskol companies will be less likely to be defective. That is why such equipment is popular.
- Violations of the rules for using the tool
Even the most reliable tool can fail if used incorrectly. And here it doesn’t matter who the manufacturer is - the same Bosch or Makita are even more susceptible to breakdowns if operating rules are violated.
This reason is not tied to a specific brand or tool parameter, but some brands provide for this point and provide protection from an inexperienced user.
- Chuck malfunction
If the tool is used or stored incorrectly, the main part of the drill can easily break. This is a very common problem, but it cannot be called a marriage.
Attention! Most often, the device breaks down due to user negligence.
In the first two cases, it is most likely impossible to repair the instrument at home. In the case of the third problem, you can do everything yourself. But first you need to determine the type of cartridge.
Types of drill heads
Before you figure out how to remove a drill from a drill, you should understand what fastening mechanisms manufacturers use.
There are only two main types:
- Key or toothed
The key type is very reliable, but as the name suggests, a special key is needed to tighten it. It activates special cams that firmly fix the drill. This type is the most reliable, but the drill fastening time leaves much to be desired.
- Quick-clamping
Quick-release sockets are keyless and are tightened by the user's manual efforts.
Keyless chucks are divided into two more types:
- Double coupling
Tips and tricks
make cleaning easier and avoid the appearance of new stains :
- When baking food, use a sleeve, foil or parchment that prevents fat from splashing.
- Immediately after the oven has cooled, thoroughly wipe the inside of the door to remove fresh dirt and condensation.
- When treating the main part of the oven with anti-grease agents, seal the ventilation holes on the door with construction tape or wide electrical tape.
- To soften fat and quickly remove stains, you can use a steam generator or steamer.
Removing glass
Once the door has been removed, you can begin to remove the glass. Modern stoves have two or three glasses installed. The second glass is usually attached to the body. Removing it is quite simple. Removing the door was necessary for safe and convenient cleaning. If the door is not removed from its hinges, there is a risk that it will slam shut and a person may be injured.
For the following oven models, instructions are provided on how to remove the glass and wash it:
Do not press too hard on the glass. If the impact force is exceeded, it can be damaged.
To remove the glass, we need:
- Place the door handle down on a smooth and soft surface.
- Pay attention to the presence of bolts in the door. If there are any, unscrew them. If they are missing, start moving from the bottom up. An open door looks like a laptop. Bolts may be missing on some oven models. But the upward movement of the structure does not depend on the type of model.
- The glass part is now free. It needs to be lifted up and pulled out.
- You can start cleaning the glass.
- After cleaning, we put the glass back where it was. Please note that there are special strips on the sides.
- We fix all fasteners.
- Place back on the oven.
Pull the top of the door from top to bottom
When open, the door looks a bit like a laptop
It doesn’t matter which glass needs to be removed - external or internal. In both cases, you need to follow the steps listed above. The mounts for both glasses are located inside.
If you can’t clean the glass, you can turn to professionals.
Oven door mounts
Necessary tools for repair work
For repairs you need very few tools: a Phillips screwdriver and adhesive sealant.
You also need gloves to avoid injuring your hands when replacing a cracked or broken glass sheet. A sealant is needed with good adhesion, high heat resistance, elasticity and lack of toxicity.
Regular sealant or sealant for stoves and fireplaces will not work in this case. You need to find a special glue for repairing kitchen appliances. For example, Dow Corning Q3–1566.
For repairs, you will also need a new workpiece. We’ll talk about this in more detail, since not everything is suitable for the oven. It should be heat resistant and thick enough. Each oven model has its own dimensions and configuration, so the material may be shaped or have cutouts. Then you will have to order a “original” part from the manufacturer, which will not be cheap, or have it made to order from a specialized company.
When ordering, you need to bring an exact sketch to the master. The parameters of the workpiece are measured with a ruler and calipers. If only fragments remain, you will still have to contact the manufacturer.
The price of tempered figured glass is about 2 thousand.
The order completion time will be about a week, which is much faster than contacting the service center of the cookstove manufacturer. You can wait several months for delivery of the “original” glass.
Precautionary measures
- Glass is slippery, so you need to be careful when cleaning it.
- Be careful with fasteners. If you apply force when removing the door, they can be damaged.
- The door is quite heavy. Therefore, it is advisable that two people film it.
- Do not use powders or chemicals to clean materials.
- If you used the oven before cleaning the glass, you should wait until the inside has cooled down.
- You can use rubber gloves when cleaning.
Conclusion.
Disassembly of the structure is only necessary if you need to clean the glass or replace parts. It's simple and almost anyone can do it. But you need to be very careful when separating the door and glass so as not to damage the fastenings and harm yourself. Most ovens are sold with instructions that tell you how to remove the glass and how to clean it.
The oven's front glass door retains heat inside the cabinet itself and allows you to monitor your food as it cooks. Some foods, such as baked goods, may be damaged by opening the door too much.
It happens that the inside of the window is covered with a translucent film. When this happens, it is important to know how to clean oven glass.
Before first use
Manufacturers recommend preheating the oven to 250°C for 30 minutes, then washing with warm water and a small amount of dishwashing liquid.
Don't forget to remove the protective film from the telescopic guides. Open the window, turn on the hood, when it first warms up there is an unpleasant smell and smoke.
- Lighting – light bulb and fan working.
- Quick heating - (the instructions say “the upper heater, baking function and fan” work - what a “baking function” is in this context is not clear) - auxiliary mode, allows you to quickly heat the oven to the set temperature.
- Defrosting - only the fan runs, no need to set the temperature. If you choose a temperature of 50-60 degrees, then you can dry herbs, mushrooms and other products in this mode. In this case, you need to leave the oven door ajar.
- Turbo grill and convection - the upper grill heater and fan work. This mode speeds up the frying process. Recommended temperature 190 °C.
- Reinforced grill – the upper grill heater is working. Recommended temperature 250 °C.
- Grill – only the grill works. The mode is required for frying a small amount of food, or is used as an auxiliary mode to create a crust on the finished product.
- Bottom heating – the lower heating element works. The mode is needed to heat food; manufacturers recommend using it for steam cleaning of the oven.
- Upper and lower heating elements – classic mode for baking.
- Upper and lower heating elements fan – mode with additional convection. Ideal for roasting poultry and meat, it allows you to cook faster and at a lower temperature.
Everything is quite traditional.
- There are two recessed regulators on the panel - temperature and modes.
- Between them is a large display, on the central part of which there is a clock with an indication of options, and below them there are three sensors.
There are no markings around the regulators on the body. All information is located on the switches themselves. It's a little unusual at first, but you quickly get used to it. All inscriptions are large, clear, the paint does not rub off. The pintograms of the modes are clear.
There are two indicator lights on the oven panel.
One signals that the oven is operating, it lights up all the time the controls are turned (even if the oven light is just turned on), the second lights up when heating is in progress, and goes out when the temperature inside the oven matches the set one.
Possible causes of failure
A broken oven door is a common problem. Many reasons were discussed above when describing the visible signs of failure.
The main reason is incorrect or careless operation.
- Sometimes heavy dishes are temporarily placed on an open door and children sit on it, which leads to excessive stress on the hinges and brackets. Deformed parts must be replaced.
- Problems sometimes arise due to loose fasteners or defects in the rubber seal. The fasteners can be tightened and the gasket replaced. On some stove models, you have to remove the door from its hinges to replace the seal.
- Sometimes repairs are necessary due to problems with the glass. It may crack or burst. Causes:
- manufacturing defects;
damage during transportation and installation of the slab;
- temperature difference (heated oven and drops of cold water falling outside).
This leads to the formation of microscopic cracks; over time, the glass wears out more and more, and at a certain point it may finally crack.
Important
You can replace the glass yourself, but you need to pay special attention to purchasing new glass.
Hose connection, Mains connection
Connection using a hose
Before connecting the stove using a flexible hose, check with your gas supplier.
service, whether this type of connection is allowed according to local standards and the necessary
When connecting, the following requirements must be met: – the selected hose must have a document indicating the date of manufacture, expiration date
service and replacement, and installed in accordance with Fig. 9;
– the hose must be accessible for inspection along its entire length; – the hose should not pass through the hot air zone of the chimney or touch the back
slab walls (Fig. 10);
– the hose should not be pinched, have strong bends or experience
– the hose must be at least 1.5 meters long; – if the hose is damaged, it must be replaced entirely, repair
Network connection
The stove is connected to a 220-230 V (50 Hz) network. The socket must be in
in an easily accessible place and should not be covered with a stove.
REMEMBER:
AFTER INSTALLING THE PLATE IN PLACE, BE SURE TO CHECK
POSITION OF THE FLEXIBLE GAS SUPPLY HOSE AND POWER CORD (FIG. 10).
THEY SHOULD NOT PASS OVER THE CHIMNEY OR TOUCH THE BACK WALL
PLATES. WHEN THE OVEN OPERATES, A HIGHER TEMPERATURE ARISES THERE,
WHICH CAN DAMAGE THEM.
Prohibited
CHECK THE TIGHTNESS OF CONNECTIONS AND LOOK FOR LEAKS
GAS USING MATCHES AND OTHER OPEN FLAMES!
Main symptoms of a malfunction
Any breakdown leads to the fact that the door no longer holds, locks or closes normally. The reasons for such malfunctions are different, but first it’s worth listing all the visible signs of the need for repairs:
- The door fits obliquely to the stove itself. This is a fairly rare case, but sometimes it happens that the door and even the stove itself can become warped if it is standing on an uneven surface. The curved one will have to be replaced, but the legs of the stove can be adjusted in height.
- Dangles or “walks” too freely. This occurs due to wear and tear on the hinges that hold the door in place. The screws on the hinges can be tightened with a regular screwdriver. Sometimes you have to take it apart to replace the hinges with new ones. The hinge device has springs that need to be tightened or replaced.
- It closes normally, but does not lock. The sign applies only to those slabs on which a locking lock is installed. If it wears out or breaks, you will have to install a new locking device.
- It closes poorly, and dirt is visible on its borders and the body of the stove. A trivial reason, but housewives rarely pay attention to the cleanliness of the area adjacent to the oven. The stove just needs to be thoroughly cleaned and washed.
- The rubber seal was deformed or roughened in some places. The rubber also wears out, and any roughness in the seal will result in the door not fitting tightly enough to the body. This seal will have to be replaced. The oven will close like new.
- The door has to be closed with force. The reason for this may also be the seal, which often jumps out of the special groove. You need to place the rubber gasket back into the gutter and make sure that it is securely fixed in place.
- You cannot close the door tightly because something is preventing it. If all the parts of the oven and the door are in order, then it is worth inspecting the seal. Perhaps some hard object accidentally fell inside it, which prevents a normal fit.
- Does not open. This sometimes happens on expensive multifunctional stoves.
For example, the oven is blocked if you activate the child lock or set it to self-cleaning. Usually the door can be unlocked, but sometimes you have to follow a complex sequence of actions specified in the instructions for the stove. Advice If all else fails, the stove can be disconnected from the power supply - this will immediately remove the blockage. Sometimes the cause of blocking is a breakdown of the lock itself or the electronic control unit. Here you need the help of a master.
Many malfunctions arise for unimportant reasons; you can fix them yourself. In extreme cases, you have to disassemble the door and replace faulty parts. If there is not enough experience or knowledge, it is better to entrust the repair to a specialist.
The signs and causes of gas oven malfunction and its repair are described here.