Share link:
Initially, the slime toy (or “Slime” from the English Slime) was created completely by accident in 1976. An 11-year-old girl mixed the ingredients at her dad’s place of work, who worked in a factory. Slime comes in different colors (from bright to transparent) and types, easily stretches, transforms into different shapes and creases well with your hands. Now this is one of the most popular toys among children. There is a whole trend - slimers, children and adults adore this toy for a reason.
Initially, the slime was only sold in green. After the release of the series “Ghostbusters,” the slime was named Lizun, just like one of the characters in the series.
Slime is sold in children's toy stores in small containers that also serve as containers for storing them. Slime, at first glance, seems like just an elastic mass, but in practice it can be a boy or a girl, requires daily nutrition, a comfortable temperature, humidity, and even reproduces regardless of gender. Slime is not picky when it comes to food: it needs a few drops of clean water and a pinch of salt to feed it, see more details here.
You can not only buy slime, but you can also make it yourself at home. In this article we will tell you how to make slime.
How to make slime without glue
There are several ways to make slime, and many recipes require glue. If you don’t have glue on hand, it doesn’t matter. Find out how to make slime without it.
How to make slime: YouTube/Yulia Rai
The following materials will be required:
- shampoo - 100 ml;
- water - 100 ml;
- starch - 200 g;
- dye - optional.
Pour starch into a plastic or glass container, pour in water and stir to avoid lumps. Add shampoo and dye. Stir. Cover the container with a lid or film and refrigerate for 12 hours.
There is another recipe for making slime without glue. To do this you will need the following ingredients:
- liquid soap - 2 tbsp. l.;
- toothpaste - 1.5 tbsp. l. (approximately 20 ml);
- flour - 2.5 tbsp. l.
How to make slime: YouTube/Yulia Rai
Take a metal bowl and squeeze toothpaste into it. Add the soap and stir the mixture well to dissolve the toothpaste. Gradually add flour, remembering to stir so that lumps do not form. Then knead the mixture with your hands. Finally, sprinkle with water and knead well again.
How to make slime without sodium tetraborate
Borax, or tetraborate, is the second most popular component of classic slime after glue. It is sold in pharmacies without a prescription and in hardware stores. Borax improves the properties of the slime, but if you don’t have it on hand, don’t worry: you can make do.
To make slime you will need the following ingredients:
- PVA glue - 50 g;
- baking soda - 1 tbsp. l.;
- water - 100 ml;
- dyes - optional.
Mix glue with half the amount of water, add paint. Dilute baking soda in the remaining water and mix with the water-adhesive mixture. Stir.
Make slime from plasticine. For this you will need:
- gelatin - 1 sachet;
- plasticine - 100 g;
- water - 50 ml.
How to make slime: YouTube/Yulia Rai
Pour cool water over the gelatin, stir well and leave to steep for one hour. Bring the soaked gelatin to a boil. Place the plasticine in another container and place it in a water bath. Heat until the plasticine softens. Then pour the slightly cooled jelly into it and knead.
Work instructions indicating proportions
When creating slime at home, you can use simple ingredients, the main thing is to follow the technology. An important part of making slime is mixing the ingredients. Do not rush to add a thickener, because the ingredients need time to combine qualitatively into an unusual union.
At home, it is possible to prepare a toy that meets all the owner’s requirements regarding color, smell, consistency and even safety of the composition. For small children, slime is prepared based on chocolate paste, flour or starch , so there is no need to worry about food poisoning in your baby.
The disadvantage of such compositions is their short service life and insufficient elasticity. Quite quickly they begin to tear when trying to stretch.
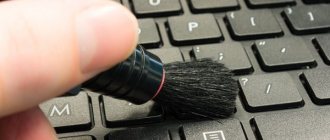
Those who need slime to clean their keyboard from minor dirt can prepare a lot of the required density from available ingredients. The slime does not remain on the surface it comes into contact with, so its use is safe for equipment. Fans of original solutions can surprise their friends by playing with transparent, magnetic or glass slime - there's no way there's any kind of slime!
Method of preparation from flour
This option is suitable for those who want to make the most ordinary, but nevertheless very cool slime from scrap materials, which is always obtained. It is enough to take :
- flour – 250 gr;
- dye;
- water – 0.5 l;
- acrylic paints;
- felt-tip pen.
How to cook:
- Mix flour and water in a deep bowl, and divide the resulting mass into 3 equal parts.
- To color the slime a beautiful color, add coloring to a bowl with 1 piece of dough and microwave for 1 minute using medium power.
- Another portion is prepared in a frying pan over medium heat, after mixing with acrylic paints. The mass must be constantly stirred, not allowing it to lose its integrity.
- A mixture of water and flour with felt-tip pen ink is placed in the oven for 5 minutes, setting the temperature to 160 °C.
Important! This kind of slime is short-lived and a little short compared to store-bought slime. It is difficult to stretch and dries quickly, but is perfect for children.
This video is about flour slime:
From shaving foam
To create a lush, airy and elastic slime, softer to the touch than others, you need to take the following ingredients for mixing :
- white shaving foam - 1 small bottle;
- deep bowl;
- stationery glue stick – 1 piece;
- liquid for contact lenses based on boric acid;
- water;
- dye;
- soda – 1 tsp;
- boric acid – 1 tsp;
- liquid soap – 1 tsp.
- Remove the glue from the packaging and place it in a bowl.
- Add the dye and mix thoroughly, only then add the whipped foam, combining the ingredients in a circular motion.
- In a separate container, mix soda and contact lens liquid, gradually pour the resulting solution into the prepared mass, stirring it constantly. It should become creamy.
- To fix the airy slime, pour a mixture of liquid soap and boric acid into it.
Manufacturers use different ingredients when making foam, so if unsuccessful, you can try to replace this ingredient by taking a bottle of a different brand. The best results can be achieved by giving preference to budget formulations.
Video about making slime from shaving foam:
We recommend: What is clear slime, how can it be made, proven recipes
With plasticine
To create slime using a real proven method, you need to use only airy plasticine ; its other forms do not allow you to achieve the desired result. To prepare slime you need to take:
- starch – 40 g;
- thick shampoo – 40 g;
- plasticine - 1 bar;
- shaving foam - 5 tbsp. l.
- Shampoo and foam are mixed, then thickened with starch.
- Plasticine is added to the prepared homogeneous mass, which must be kneaded for high-quality combination with other ingredients.
Recipes with plasticine require some experience and a fair amount of luck , so failure at the first attempt to make such a slime is quite likely.
Watch a video on how to make slime from plasticine:
Shampoo + salt
For those who do not want to waste time searching for specific ingredients and do not have enough time to repeatedly try to make slime, there is a simple working recipe that recommends using:
- shampoo – 3 tsp;
- natural salt – ½–1 tsp.
- Combine shampoo with a pinch of salt and knead until smooth.
- Add more salt and stir until the crystals dissolve.
- As soon as the mixture becomes thick, it must be placed in the refrigerator for 15 minutes. The cooled mass is completely ready to play.
This slime can only be obtained from thick gel-like shampoos. Salt should be added gradually, at least 1-2 minutes should pass between adding each portion. It is necessary to play with the resulting mass carefully, because some substances remaining on the hands if they come into contact with the mucous membranes of the eyes can cause irritation.
From nail polish
In a well-ventilated area, you can prepare an elastic mass from:
- 1 bottle of nail polish;
- vegetable oil.
The ingredients are taken in equal proportions.
- First, oil is poured into the container for work, then white or colored varnish is added (choose what color you wish), which is intensively kneaded with a wooden stick, not allowing it to spread.
- As soon as the mass thickens, you can knead it with your fingers.
Even the finished product has a pungent odor. This slime dries quickly, it is harder than regular slime and cannot be stretched too much. Its advantages are color and pleasant pliability when kneading.
Step-by-step instructions for making slime from nail polish can be found here:
No water included in the ingredients
There are several such options; the most popular are slime recipes based on a film mask or Teymurov's paste , sold in any pharmacy (this is the best thing that can replace a mask). In the case of using Teymurov's paste, to prepare a real glossy slime, you need to take this:
- pasta;
- PVA glue – 1 bottle;
- dye, flavoring.
A cooking method that works is this::
- Apply Teymurov's paste in a thin layer to the bottom of the workware, then pour out the glue and add a few more peas of paste.
- Thoroughly knead the mixture of 3 ingredients until it thickens, after which the slime is improved by adding flavoring and dye.
The list of ingredients for creating a slime according to another recipe includes::
- film mask – 50 g;
- shaving foam – 2–3 tbsp. l.;
- baking soda – 1/2 tsp;
- boric acid-based contact lens solution – a few drops.
Ingredients are added in stages:
- In a convenient bowl, combine the foam and film mask; if desired, you can add food coloring to them.
- Add soda to a homogeneous mass and stir.
- Stability can be achieved by adding lens fluid.
- The mixture is kneaded until it stops sticking to the walls of the dish.
To prevent your homemade slime from being too sticky, you can add a couple more drops of lens liquid to it. The solution must contain boric acid; other substances do not provide the desired reaction.
To learn how to make slime without water, watch this video:
Soap + salt
Dishwashing detergent and liquid soap containing phosphate esters, lauryl sulfates and sulfonates are excellent for creating toys, and the thicker the base, the higher the likelihood of getting a good, high-quality slime . For the experiment take:
- soap – 100 ml;
- fine salt - 3 large pinches;
- dye.
- Pour shampoo and dye into a deep plate, add 1 pinch of salt, knead for about a minute with a wooden stick, then add more salt, knead.
- It takes 3-4 minutes for the mass to thicken, subject to vigorous stirring.
You can make sure that the toy is ready by touch: when you touch it, it does not stick to your hands. You can take it and knead it.
We recommend: How to make slime from lens liquid, simple recipes
Excess salt will cause the mixture to not thicken . The problem can be corrected by adding additional soap.
Below is a video on how to make slime from soap and salt:
Sugar
Sugar works well with thick detergents.
Have to take :
- water – 1 tsp;
- liquid soap - 1 tsp;
- shampoo – 3 tsp;
- baking soda – 1 tsp;
- sugar – 12 tsp.
- Mix shampoo and soap, dilute with water, combine with sugar. Stir until it is completely dissolved.
- Place the air mass in the freezer for 30 minutes, then remove and add soda to it.
- At the last stage, the mixture is kneaded with your hands.
A few drops of sugar syrup help extend the life of this slime. It is enough to add a pinch of sugar and a few drops of water to the container with the toy so that it increases in volume while maintaining its properties.
The simplest slime made from sugar and toothpaste:
Magnetic - what can you add to make it work?
The main ingredient in this recipe is sodium tetraborate . This substance is sold in every pharmacy and is not very expensive, so you should not experiment by trying to replace it with baking soda or other means. The powder helps save the situation even when something goes wrong. To make slime, just take:
- PVA glue – 1 bottle;
- water;
- sodium tetraborate;
- metal shavings.
Here's how you can make this cool, unusual slime at home::
- Glue and water are mixed in equal proportions.
- In a separate container, dilute the sodium tetraborate solution by adding 0.5 tsp. in 2 tbsp. l. water.
- Slowly pour the solution into the glue, stirring it vigorously.
- As soon as the mass begins to thicken, metal shavings are poured into it. To prepare it, just rub a metal plate with a file. The more chips in the composition, the higher the magnetic properties of the finished slime.
The toy should only be stored at room temperature to prevent its components from separating. Slime is sensitive to overdrying, which must be taken into account to extend its service life.
Watch the video on how to make magnetic slime:
Water + starch
Creating a toy based on a recipe is simple, and the final product is safe for children and does not require compliance with safety measures or restrictions during use. To make slime, just take:
- starch – 150 g;
- water – 75 ml;
- dye.
To achieve the desired result, only warm water should be used . Pour starch into a dry bowl, combine it with the dye, and then add water in a thin stream, vigorously mixing the base.
At the first stage, the slime resembles liquid jelly, but after prolonged kneading it acquires the necessary elasticity.
The disadvantage of such a toy is its short service life (up to 2 days). The advantages include safety for the child and ease of manufacture.
The following is a story about one excellent recipe for making slime from starch:
From toothpaste (jelly)
The main secret to successfully making slime using this recipe is to use creamy, not gel, toothpaste. The process of making such a slime is simple, accessible for beginners and safe, so even children can trust it. It is enough to take:
- toothpaste;
- liquid soap in a bottle with a dispenser.
Squeeze the paste into a container, add 1 portion of soap, mix everything. Repeat. Depending on how much paste you use, you may need 2-4 servings of soap. If you want to make the slime bigger, increase the ingredients accordingly.
The finished slime has a jelly-like shape and does not stick to your hands . Adding coloring and flavoring can help increase its attractiveness. Slime prepared in this way is short-lived and slightly inferior to the store-bought version.
Whitening pastes with crystals are not suitable for making toys. Because of them, the mass turns out to be grainy.
Another video about five toothpaste slimes:
Can you make your own clear bubble slime at home?
The original slime is prepared using boric acid powder . It is this ingredient that provides the necessary elasticity to the finished product. Here's how to make this slime correctly and what proportions of ingredients are needed:
- transparent PVA glue – 100 ml;
- boric acid powder - 1 tbsp. l.
- The glue and powder are mixed in a glass container, knead thoroughly using a wooden stick until smooth.
- As soon as the mass stops sticking to the walls of the bowl, you can take the slime in your hands.
- The addition of glitter allows you to add extra attractiveness to the toy.
You can create a shiny, iridescent slime with lots of bubbles inside in a slightly different way, using more ingredients:
- office glue – 1 bottle;
- water;
- baking soda – 1 pinch;
- boric acid solution - 1 tbsp. l.
- Mix water and glue in equal proportions. When adding water, it is better to add too little than to add too much. Stir everything.
- Add the remaining ingredients and knead until a dense lump is obtained.
- After this, the slime should be placed in a glass jar with a lid and refrigerated for 48 hours.
We recommend: How to make rainbow slime, simple preparation methods
The finished toy is highly dense . Such slimes are even called glass ones; playing with them is no less interesting than with the classic mass, which can be easily kneaded in the hands.
Video on how to make clear bubble slime:
How to create your own glitter with PVA glue?
In order not to make a mistake with the amount of glitter in the process of creating slime, you can take office glue, which already contains such elements.
If there is no time or desire to look for such a specific glue, then only small sparkles (similar to dust, for example, those used for nail design) are selected for slime. According to the classic recipe, the toy is made from :
- 100 ml glue;
- 250 ml water;
- 1 tsp. sodium tetraborate.
- The glue needs to be thinned a little by adding 1 tbsp. l. water, the rest of the water is used to dissolve the borax powder.
- Combine the ingredients, remembering to mix vigorously.
When the slime becomes firm and elastic, you can pick it up and knead it.
It is better to prepare the mixture in a glass container, using a wooden stick for stirring.
An interesting video on how to make slime from PVA glue and glitter:
A toy for children that is made from Nutella and candy
For the youngest slime lovers, you can prepare an absolutely safe toy that is not dangerous to taste . To prepare a truly original slime, take just two ingredients:
- chewing candies or chewing marshmallows – 100 g;
- Nutella – 2–4 tsp.
- Melt chewing candies or marshmallows in a small saucepan over a water bath until a homogeneous viscous mass is obtained.
- Add one spoon of chocolate paste to it, knead thoroughly.
- Then the mass is taken into your hands and kneaded for 5–7 minutes until it stops sticking to your hands and acquires the necessary elasticity.
The edible toy cannot be stored and may tear when stretched intensively, but its advantage is its excellent taste and absolute safety. It is recommended to play with this slime only on clean surfaces to prevent dust or small debris from sticking to it.
Watch a video about making sweet Nutella slime:
Light airy
It is not difficult to make a bright and light slime that is pleasant to the touch at home. A repeatedly tested recipe involves the use of soft clay. It can be purchased in the craft department and at the pharmacy. Additionally you should take:
- PVA glue – 3 pcs;
- transparent office glue - 1 medium bottle;
- water – 50 ml;
- shaving foam - 0.25 standard bottle;
- dye;
- boric acid.
- The amount of boric acid is selected individually.
- In a deep bowl, dilute the glue with water, mix with soft clay and knead the ingredients.
- Then add dye and foam.
- Mix everything until a homogeneous air mass is obtained.
- Thickener (boric acid) is added 1 drop at a time, focusing on the thickness and density of the resulting slime. After each addition of boric acid, the prepared mixture must be thoroughly mixed.
Excellent airy slime is obtained if you make it according to the recipe presented below:
How to make slime from shaving foam
Make slime with this ingredient and you won’t regret it. This slime turns out to be the most fluffy and pleasant to the touch. To prepare it, take:
- foam - 20 ml;
- PVA glue - 80 ml;
- tetraborate - 1 tsp;
- liquid soap - 20 ml;
- coloring and flavoring - optional.
How to make slime: Pixabay
Mix foam, soap and glue, carefully pour in tetraborate. Add coloring and flavoring (for example, spices). If you used high-quality glue, the slime will thicken immediately.
Another variation of this recipe eliminates the tetraborate and soap. It is necessary to mix the foam and glue. To stop the mixture from sticking to your hands, you will need to knead it for a long time.
Video
Young children will be interested in taking part in making toffee . Older children can make their own slime. How to select and mix the ingredients correctly, watch the following video:
Homemade slime is an excellent alternative to store-bought slime. The advantage of creation is the confidence that the toy is safe and does not contain harmful components. Many of the ingredients to create can be found at home or purchased at a pharmacy or office supply store. Don't be afraid to experiment with compositions. Homemade slimes will delight both children and adults.
Anti-stress from a ball and flour: top recipe
How to make slime: Pixabay
One of the most common toy options is the classic anti-stress ball. To make it you will need: a high-quality balloon, flour or starch, an empty bottle (or plastic funnel), a wooden stick, scissors, and any decorative elements.
Next, form the anti-stress toy like this:
- Inflate and deflate the balloon several times to make it more elastic.
- To fill the ball well with flour, use a pet bottle. Carefully cut off the top of the bottle, thereby creating a kind of funnel.
- Then pull the ball over the neck and carefully pour the dry ingredients inside, pushing them with a wooden stick.
- Carefully remove the ball and tie its tail into a strong knot. Trim the protruding edge with scissors.
- Decorate the toy to your taste. Children will especially enjoy drawing funny faces on the ball.
The toy can be safely used immediately and stored in any convenient place.
DIY transparent slime: how to make
How to make slime: Pixabay
A very unusual version of slime is good because when creating it, you can add various decorative things (beads or sparkles), thereby making it absolutely unique.
You can mix the desired mixture from: transparent glue - 100 ml, boric acid - ½ tbsp. l., hot water - 200 ml, water at room temperature - 2 tbsp. l.
If you want to decorate transparent slime, prepare additional glitter. Then do the following:
- Mix boric acid well with hot water and make sure the mixture is smooth and clear.
- Pour the glue into a separate container and add one spoon of water to it. Stir.
- The next step is adding boric acid. First add 2-3 tbsp. l. solution to the glue and mix the mixture well. It should become sticky.
- Next, start kneading the slime with your hands, adjusting the amount of ingredients. If you feel that the slime is becoming too dense, add a little glue to it. If it is sticky, you need to add a few more tablespoons of boric acid.
Keep in mind that when playing with this slime, bubbles may form in it. To restore it to its original appearance, leave it for a few days. Be sure to store in an airtight container or cellophane.
Starch slime based on PVA
For starch slime based on PVA, you need to follow certain rules:
- Use fresh glue, preferably white and thick. Freshness is an important condition, since after long-term storage the liquid can separate, which is not important for its intended purpose, but is crucial for creating a stretchy mass;
- starch should be looked for in the household chemicals store on the powder shelf. A liquid concentrate is required, which is used for washing clothes. If you can’t find it, you can prepare it yourself from 1 part starch and 2 parts water;
- Choose a thick bag for mixing, as it will wrinkle well and preferably with a zip fastener.
If everything is prepared, then let's proceed:
- Pour 70 ml of starch and 2-3 drops of dye into the bag. You can start with 1 drop, because if you overdo it, the mucus will stain your hands.
- Shake the glue well and measure 25 ml into the bag.
- Close the zip fastener tightly or tie it. Knead the mixture thoroughly until it thickens.
- This will remove a small amount of liquid, which needs to be drained and the slime dried on a paper towel.
Store in a tightly closed container for a week. After playing, be sure to wash your hands.
Turquoise slime: a simple method of preparation
How to make slime: YouTube/Yulia Rai
Sea green slime is not only a fun, but also a very beautiful toy. To make a suitable base and paint it in the desired color, use: warm water - ½ cup, any shampoo - 15 g, flour - about 100 g, blue and green gouache or turquoise food coloring.
Make a safe plastic toy as follows:
- Dilute the shampoo in water and mix lightly without forming foam.
- Add flour little by little to the soapy liquid, kneading the elastic mass.
- When the slime is almost ready, pour a couple of drops of dye into it. Mix the slime well until the color is uniform.
- Keep the preparation in the refrigerator for about an hour.
The result is a top-notch slime, the only downside of which is a very short shelf life.
Big pink slime: top recipe
How to make slime: YouTube/Masha Zoom
To make the most of your time, take the time to make a big pink slime. Such toys are very popular on Instagram, but it is not necessary to order them from online stores.
It is enough to purchase: office glue - 2 tubes, shaving foam - 1 large bottle, hand cream - ½ tube, baby powder - as needed, body lotion - 1 tbsp. l., red dye, washing gel as a thickener.
Next, mix all the ingredients in the following order:
- Fill a large container with glue and shaving foam. Mix these products thoroughly.
- Add hand cream to the finished mixture, and then gradually add powder. Mix until smooth.
- You will need very little body lotion. Also add a small amount of good coloring. Mix all ingredients thoroughly and adjust thickness with additional foam or powder.
- To make the contents of the bowl look like slime, gradually add washing gel to it. The main thing is not to pour in a lot at once, otherwise the slime may turn out hard.
The finished toy should be very voluminous and airy.
Butter slime from plasticine: how to make it at home
How to make slime: YouTube/Masha Zoom
Butter slime is a very delicate slime that has a texture reminiscent of soft butter. Repeating the recipe for this slime will not be difficult.
You will need: light plasticine, PVA glue - 120 g, shaving foam - 1 bottle, baby powder and starch - approximately 50 g each, hand cream and shampoo - 20-30 g each, dye - optional, sodium tetraborate.
Plasticine will serve as an ideal basis for such a toy. Do the preparatory work:
- Mix the glue and foam into a homogeneous mass, and then stir in the dry ingredients.
- Once you knead the mixture perfectly, pour the cream and shampoo into the same container. Mix everything thoroughly again.
- If using dye, add it at this stage. It is best if it matches the color of the plasticine used.
- Next, the slime needs to be thickened. To do this, dilute sodium tetraborate with water and add little by little to other products. When you get the required consistency, knead the mixture with your hands.
- Gently knead the plasticine and slime until smooth using your hands.
Now you can enjoy the light texture of this slime.
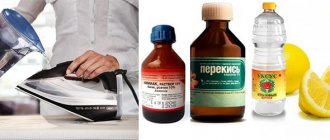
Why use thickeners and what they are?
The consistency of the slime depends on the form of the thickener:
- eye drops;
- borax or borax (sodium tetrobarate);
- contact lens cleaning composition;
- a drug containing alcohol or salicylic acid;
- washing gel;
- air freshener;
- soda or salt;
- Polish for hair;
- powdered sugar;
- starch;
- dishwashing liquid;
- gelatin.
Each of the listed funds has its own characteristics and characteristics.
Salt
Sodium tetraborate, also known as borox or borax, and other salt-containing substances are the most effective thickeners, firmly holding the slime together through chemical reactions. The selected components are first thoroughly mixed, then one of the salt products is added drop by drop.
Soapy
If sodium tetraborate is not available, you can use washing gel or washing liquid. The process of creating such a toy does not take much time and it turns out thick and beautiful.
Sprays
Some people make the slime thicker with air freshener or strong hold hairspray. These are very “capricious” products that do not always allow you to achieve the desired consistency. Experienced slime manufacturers recommend choosing thickeners from soda or salt.
Soda
Works as well as sodium tetraborate or salt in most recipes. Use soda in the form of a solution or powder - you need to mix one part of it with three parts of water. Soda gives the product good density and ductility.
Gelatin
It is not a universal product and only works under certain conditions. To make the toy, gelatin is soaked in water for 40 minutes. While it swells, mix the bulk of the other components.
The soaked gelatin is heated over low heat, stirring constantly until completely dissolved, then cooled and added to the rest of the ingredients.
Sugar
It is better to use powdered sugar diluted with liquid soap or shampoo rather than sand. Edible slimes are made from the same thickener, of course, without chemical components.
Fluffy slime: classic recipe
How to make slime: YouTube/Issin
Every day, many accounts on social networks publish videos with incredibly airy slimes. To get a similar product at home, stock up on: PVA glue - three tubes, transparent glue - one medium jar, water - approximately 30-50 ml, soft clay - if possible, shaving foam - ¼ bottle, any dye - optional, thickener (boric acid or sodium tetraborate) - as needed.
Using this recipe, you will definitely be able to make the same delicate fluffy slime as in the pictures. Complete the following work steps:
- Pour all the prepared glue into a deep bowl. Add some water and mix thoroughly.
- If you can find soft clay, add it to the sticky mixture and knead it well.
- Add a little shaving foam to the same container, after shaking the can well. At this stage you can use dye.
- The last step is to use a thickener. Determine its quantity based on the consistency of the slime.
You can also repeat this recipe without using PVA glue and clay, but the result will not be as high quality.
Brief description of PVA and its types
PVA is a combination of an aqueous emulsion of polyvinyl acetate with various plasticizers and additives. It has a white color and a weak characteristic odor. PVA Features:
- withstands deformation when drying;
- does not crystallize;
- mixes with water;
- non-toxic;
- elastic;
- soluble in organic acids;
- does not burn.
The scope of application varies depending on the additives present in it. There are several options for PVA:
- Household (wallpaper) . It can be used to glue paper-based wallpaper to walls. Frost-resistant (down to -40˚С). Holds paper well.
- Universal (PVA-MB). It has the ability to glue not only paper, but also wood, leather, and cardboard. Frost resistance down to -20˚С.
- Stationery (PVA-K). The most common office adhesive. Does not have frost resistance. More liquid in consistency than wallpaper.
- Super glue or improved universal glue (PVA-M). It is used during construction work. Frost resistance reaches -40˚С.
Any of these types is suitable for making slime at home. You just need to take into account the characteristics of each of them. [su_youtube url=”https://www.youtube.com/watch?v=F7PMplPHo3E”]
Cool slime made from toothpaste and liquid soap: a simple recipe
How to make slime: YouTube/Fun DI Family
If you want to get a very sticky slime, we recommend paying attention to this option from toothpaste. Use the following ingredients: aromatic liquid soap, toothpaste, dye and a little flour.
This recipe is very simple, you need to do the following:
- Soap and toothpaste will have to be added in equal proportions, so start mixing a small amount of ingredients, gradually increasing it. Immediately stir in the dye.
- To thicken the contents of the bowl a little, gradually add a little flour.
- Once you are sure that there are no lumps left in the slime, pour some water into the bowl and mix the correct sticky slime.
Since the components of such a toy can dry out quickly, it is better to store the paste slime in an airtight container.
Safety rules for making and playing with slime
Basic recommendations:
- Do not give to a child under 3 years of age. Inedible slimes can be dangerous for babies. Edible slimes are difficult to chew and often lead to airway blockages.
- They are not allowed to take slime outside. Dust and dirt settle on the sticky surface - the toy turns into a breeding ground for bacteria. There is no point in washing such a slime; it will soften.
- Do not stretch the viscous substance. Despite its flexibility, the mass breaks. And the slime, rolled into a tight ball, breaks when it hits the floor.
- Do not store edible slimes for more than 1 day. The product will spoil.
- Do not leave the slime in the heat or sun. The toy will melt.
When making slime, mix the ingredients thoroughly and handle the components and utensils carefully when working with the microwave.