Attaching roller blinds: expert advice
Another name for roller blinds is fabric blinds, and indeed, the principle of operation and functionality of this type of curtain is in many ways similar to standard horizontal blinds. At the same time, this option looks much more natural in a home interior, and thanks to the large selection of color options, you can choose curtains to suit any room decor style. Another advantage over blinds is the ability to combine with other types of curtains, drapes and drapes.
Rolled
- The structure of the roller blind mechanism
- Mini curtain design
- Installation of roller blinds: step-by-step instructions
We install the structure without drilling
The roller blinds are assembled according to the same principle as described above. The main difference is the method of attaching the brackets. Without screws or drilling, they are glued to the sash, or attached to special hooks to the upper edge of the sash.
Hooks are applicable if the width of the sash and the seal allow this. The bracket is assembled according to the manufacturer's instructions. The shaft is mounted on the installed brackets similar to the drilling method. In this method, it is important not to forget to check that the bracket latches do not interfere with closing the window.
As for fasteners with an adhesive layer, everything is simple. The first step is to thoroughly degrease the surface where the structure will be glued. Then everything follows according to the instructions. By the way, the adhesive base can be additionally lubricated with glue - this will be more reliable.
Attaching roller blinds to the wall (ceiling)
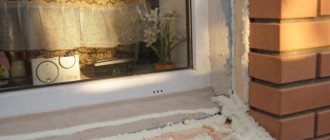
If you are faced with the task of completely closing the window opening, hiding everything that is on the windowsill, the best option would be to use roller blinds mounted on the wall or ceiling.
Typically, roller blinds have a short length, covering only the window opening, with a small margin for the space above the window opening and 10-15 cm below the window sill level. This is quite enough for them to fully fulfill their utilitarian functions - to shade the room or protect it from views from the street.
There are two options for mounting roller blinds: on the wall and on the ceiling.
In the first case, when mounting on a wall, you will have the opportunity to use side guides, which are fixed on both sides of the window opening. The guides along which the lower weight bar of the roller blind slides do not allow the canvas to move away from the window opening during a draft or gusts of wind, presses the canvas more tightly to the wall in which the window is located and provides better shading, since there is practically no gap between the wall and the curtain .
Another significant advantage of this method of fastening is the ability to use a roller blind with a spring mechanism that ensures its automatic winding onto the drum.
When purchasing, take into account the size of the window opening. The roller blind should be 30-40 cm longer than the height of the window opening and 10 cm wider than it.
Since the weight of the structure is not large, it is enough to drill holes D 6 mm in the wall with a hammer drill or impact drill. Such small holes, if you decide to get rid of roller blinds, can be easily sealed with acrylic sealant. They will be almost invisible.
When attaching a roller blind to the wall, it is necessary to take into account the fact that when lowered, it will fall approximately in the middle of the window sill of the plastic window. It should be free from indoor plants and other objects. Otherwise, it will be difficult to use roller blinds at full length.
If you want to preserve the flowers located on the window and not move them, then it is better to fix the roller blind on the ceiling. The place where it will be necessary to drill holes for fastening is determined using a plumb line, which is brought to the level of the edge of the window sill.
The use of guides and a spring mechanism for winding curtains in this case is impossible.
With Velcro
The advantage of this mounting option is that Velcro can be used to mount the curtain even in the absence of a cornice and without drilling.
When purchasing, take into account the size of the window opening.
In addition, it is suitable for decorating a room in any style, is easy to install and maintain, and has a long service life.
The design of such sun protection systems is as simple as possible.
Before attaching the roller blind to the window using Velcro, you need to determine the place where it will be placed.
Determine where the curtain will be installed before attaching it.
Further:
- Cut a strip of fabric. Its width will depend on the density of the curtain.
- Fold the strip in half and iron.
- Sew Velcro to the top edge of the curtain.
- Fold the fabric and stitch it as close to the Velcro as possible.
- The front side of the fabric will be covered with a strip. It also needs to be secured with a seam.
- The rigid side of the fastener is applied to the window frame and glued.
- The correct operation of the roller blind is checked.
Attaching roller blinds
Attaching roller blinds does not require any special skills and will not take much of your time. Everything is very easy and simple.
Typically, roller blinds are attached to plastic windows, although they are also well suited for wooden ones.
One of the most important elements of success is to choose the right size of the canvas so that they do not interfere with opening the doors and do not cling to the handle.
To choose the right size, you must first determine where the curtains will be attached (to the wall, to the frame of the opening, or to the ceiling), and also select the appropriate system.
With the right choice, roller blinds will become a real highlight in the design of your home, as shown in the photo
- Mini;
- Classic;
- profile;
How to attach roller blinds largely depends on the system you choose and the installation location.
Mini system
This is the simplest design. It consists of a canvas wound on a shaft and a control mechanism.
To determine the required size, it is necessary to measure the distance between the outer edges of the window beads in width and height. The length and width of the fabric must correspond to the measurements received.
Magnetic tape
This mounting option is only suitable for a small product. It can be installed either on the wall or directly on the window. To do this, magnets are attached to the surface using a self-tapping screw or double-sided tape. They are placed on the curtain at the same distance. Next, the roll structure is applied to the fastener on the wall or frame.
Magnetic tape is a good device for attaching curtains.
There are many options for attaching roller blinds to a wall or window.
Roller blinds made from the right fabric allow you to achieve the desired level of illumination in the room
The choice depends on the type of structure, its weight, availability of tools for installation, etc.
Choose a curtain that matches the design of your room.
You can clearly see the whole process in the video.
Installation features depending on the type of curtain
The answer to the question of how to attach roller blinds to a plastic window also depends on the design of the curtain itself. Lifting mechanisms are usually divided into two types:
- Open curtains. This is a simple design: it consists of a shaft onto which a rolled web is wound; lifting and lowering is controlled using chains. Such curtains are usually mounted on the wall above the window opening or on the ceiling using brackets or self-tapping screws.
- Cassette curtains. This is a closed system in which the fabric is wound onto a shaft and stored in a plastic box. It is installed directly on the window frame or sash, the fabric is raised and lowered using guides. Thanks to the guides, the fabric does not move to the side, but moves smoothly. Installation can be carried out without drilling; double-sided tape is used for mounting on the frame.
With a cassette mechanism, the box can be made of aluminum, this makes it possible to install an automatic drive. The curtain will rise and fall when you press a button on the remote control.
Mounting on wooden windows
For wooden windows, it is preferable to fasten roller blinds with self-tapping screws. They provide high structural strength. If you refuse them, there will be no sticky marks left after the self-tapping screws, which require a lot of effort to remove.
Holes in wood can be filled easily and without leaving a trace. If you decide to install roller blinds on wooden windows using double-sided tape, you can read our recommendations in the previous section.
Self-tapping installation principle:
- We lay out all the components for the curtains on a flat surface, and make sure that the kit includes screws. If not, we get ours. You will also need a drill and a pencil.
- We assemble by connecting the roller with the fasteners.
- We attach the structure to the window profile, without screwing anything, and fix it with our hands.
- Mark the holes with a pencil. They should coincide with the holes, that is, you mark them as if using a stencil.
- We remove the structure from the window.
- We disconnect the fasteners, apply them to the marked place, and fasten them with self-tapping screws.
- We put the lifting mechanism on the gear.
- We fix the roller in the holders.
- We make sure that everything is working properly: we lower and raise the curtain.
Installation with self-tapping screws
The most reliable and durable way is to fix closed roller blinds to the surface with self-tapping screws. To do this, you will have to break the integrity of the window frame, wall or ceiling.
Such installation requires skills in working with a drill and screwdriver, accuracy, and attentiveness, because any mistake can lead to irreparable consequences. Especially when it comes to placing the structure on a window frame or sash.
It is important to securely fix the brackets for the box, and double-sided tape can be used for the guides. To work you will need:
- pencil and building level for marking;
- self-tapping screws of the required size;
- screwdriver;
- hammer drill or drill for preliminary preparation of holes in the wall or ceiling;
- tape, scissors.
Work begins with marking the fastening locations, then a cassette is applied to check the dimensions, and the brackets are fixed. The shaft is equipped with special latches, after which the box and guides are attached, and finally you need to attach a limiter for the chain.
So, there are many ways to fix a roller blind on a plastic window - in the opening, on the wall, ceiling or sash, with self-tapping screws or double-sided tape. Choose based on personal preferences and design features of the room.
Self-tapping screws
To do this you will need the following tools:
- drill;
- screwdriver;
- building level;
- screwdriver.
You will have to use a lot of construction tools.
Installation instructions look like this:
- Determine the location of the fasteners. To do this, double-sided tape is glued to the back of the structure and applied to the frame in the position in which the curtain will be fixed. All mounted elements are assembled with tape.
- Install the guides and secure the ends of the threads.
- Using a drill, drill holes and screw screws into them.
- Mount the roller roller, place the roll of fabric in the grooves and press until it clicks.
- Install tensioners. To do this, use a level to mark the place where they will be located on the frame. Secure the ends of the fishing line, drill holes by inserting self-tapping screws.
- Check how the design works.
Follow the window measurement instructions.
Attaching roller blinds to the ceiling
Roller blinds are attached to the ceiling with self-tapping screws, similar to the wall:
- We prepare all the structural elements, screws and dowels, a pencil, a hammer drill.
- We assemble the curtain.
- We attach it to the ceiling.
- Mark the holes with a pencil.
- We drill them out.
- We hammer dowels into them.
- We fix the fasteners in the holes with self-tapping screws.
- We put the chain mechanism on the gear.
- We fix the roller in the holders.
- Let's check how the mechanism works.
IMPORTANT! It is possible to fix curtains on the ceiling only if it has sufficient strength (for example, concrete or wood). If the room has a suspended ceiling, it is advisable to choose a different installation method or wait for repairs and change the ceiling.
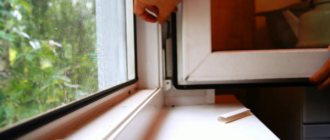
Mounting on plastic windows
For plastic windows, it is preferable to mount without using self-tapping screws, since later, when deciding to remove the decor, it will be problematic to disguise the holes.
If for some reason you decide to install the structure on plastic windows using self-tapping screws, our recommendations are detailed in the next section on mounting to wooden windows. The only peculiarity is that before screwing the screws into the plastic frame, it is better to drill holes in it with a drill.
Without drilling into a plastic profile, roller blinds can be fixed using spring brackets or plates, which are fixed with a special adhesive tape or double-sided tape.
Each curtain model may have individual features, which will be reflected in the accompanying instructions. Perhaps the most significant difference will be the choice of fastening depending on whether the window sash opens. Spring brackets are used for opening sashes, and plates for blind sashes. However, the principle of fastening without drilling is the same for all canvases and is as follows:
- We prepare all the components for curtains and a pencil, and if there is no special adhesive tape included, double-sided tape.
- The fastening elements and the surface of the profile on which the roll will be attached must be thoroughly washed, degreased with alcohol and dried.
- We glue pieces of tape onto the fasteners, leaving a protective film on the side that will be in contact with the window profile.
- We assemble the roller blind design completely.
- We fix it on the window with our hands, without gluing it to the tape.
- Mark the boundaries of the fastenings (brackets or plates) with a pencil.
- We remove the structure from the window, disconnect the roller with the canvas.
- Remove the protective film from the fasteners and firmly press the fasteners into the marked place.
- We put the chain mechanism on the gear.
- We fix the roller in the holders.
- We check whether the mechanism works properly: open and close the curtain.
Types of curtains by type of installation
There are three main methods of fixing to a window profile:
- to the ceiling;
- to the slope on the inside of the window opening;
- on the wall above the window opening.
Roller blinds can be fixed using adhesive tape or special fastening.
Choosing the appropriate method is based on the size of the canvas and the characteristics of the room. Massive roller blinds are best installed on special holders that are fixed with self-tapping screws. Light weight structures are held well with double-sided adhesive tape. Typically, finished products are packaged with two sets of fasteners, from which you can choose the most suitable one.
If the roller is massive, it is better to screw it to the ceiling. This installation method reduces the risk of deformation of the product, since the load is distributed correctly - the center of gravity should not be on the side of the screws, but under them. You can hide the ceiling mount using a niche.
If you want to make the dimensions of a large roller invisible, attach it to the slope. Before doing this, you need to make sure whether the material can withstand the load. Thus, plastered and puttied slopes will not create problems, but self-tapping screws will not hold slopes made of sandwich panels.
Roller blinds can be installed on the wall above the window opening if the windows are small and do not have a window sill. If the rolls are light and small, you can fix them on the frame. This way you can free up maximum space on the windowsill. We will tell you how to do this further.
Fastening without drilling
The method of decorating a window with roller blinds without drilling involves the use of adhesive tape. This mount is suitable for windows with plastic frames. In rare cases, the roll can be fixed to the upper slope of the window. To do this, the slope must be made of PVC.
IMPORTANT! Attaching to a PVC slope poses some problems:
- the slope may not be perfectly smooth, and a deviation from the level of even a couple of millimeters causes the entire roll to skew, which can cause damage to the edges; deformation of the slope can also occur as a result of installing a structure on it;
- the quantity and quality of adhesive tape must correspond to the weight; If you make the wrong choice, the structure may fall.
Double-sided tape can hold a roller blind on a wooden window, but this is not rational. For wooden structures, a self-tapping screw connection would be more suitable.
Fastening to plastic frames is described in detail above in the 3rd section of our article; to wooden ones - in the 4th.
Installation of roller blinds day-night. How to install roller blinds day night
Roller blinds are modern products for protection from sunlight. They combine the positive qualities of regular curtains and newer blinds. Recently, such curtains have been in great demand and have become quite widely used.
The provided catalog of fabrics for day-night blinds will give you the opportunity to choose the fabric for these curtains according to your desire and discretion.
Installation of roller blinds
Before you start installing curtains, you need to decide where exactly they will be placed: inside the window frame, on the wall or on the window sash. Then you need to take appropriate measurements, taking into account the location and type of curtains.
Standard fastening using self-tapping screws is performed as follows:
- We mark and install the bracket.
- We measure the distance from the edges of the window and mark in any convenient way the places where the very first fastening should be located.
- We drill a hole in this area and install a dowel in it.
- We fasten the mount with careful and confident movements.
- Using a level, we make markings on the opposite side of the window.
- Install the second bracket in the same way.
- Next you need to install the auxiliary mount. It should be located approximately 12 cm from the control chain, because this is where the main load is placed on the mechanism.
- The curtains are fastened to the brackets on the main control side.
- After the curtain is inserted into the pipe and closed with gears, a peculiar click should sound.
- We install the correctors up to the regulating chain and perform trial testing work. The fabric should be wound smoothly, without distortions.
- We fasten the bracket cover. Their main purpose is purely decorative.
How does the type of curtains affect the installation process?
The table briefly summarizes the installation features of the main types of roller blinds.
| Type of curtains | Installation features |
| Fabric | Such curtains are relatively light in weight, which is why they can be easily attached both to walls and ceilings, and directly to the window frame. |
| Plastic horizontal blinds | Plastic is also often lightweight and can be installed using any type of installation. |
| Horizontal wooden blinds | Typically, this type of blinds is not hung on a frame due to its significant weight, in order to avoid deformation of the window. It is better to turn to the ceiling mounting method. Or use the side surfaces of the opening for this. |
| Smooth roll | This type can be mounted in any way. |
| With pleats (classic) | It is not recommended to mount the classic version directly on the doors, in the immediate vicinity of the glass - the folds require distance. In this situation, it is better to choose to install the curtains on the top of the opening or on the walls. |
| Open (without eaves) | Such curtains do not impose restrictions on the method of fastening. However, they should not be used in areas with harsh operating conditions. An unprotected mechanism can be damaged by large amounts of dust, dirt or moisture. |
| Closed (with cornice) | They can also be installed anywhere. True, for them the installation process is somewhat more complicated than for open analogues. |
The fastening method must be chosen before purchasing a roller blind.
Each type of curtain is characterized by its own specifics, which should be taken into account when making the final choice of the appropriate option.
Installation recommendations
Read the installation instructions carefully before starting installation to avoid mistakes and subsequent rework.
Follow the recommendations of professional masters:
- Fasteners must be suitable for the selected installation method.
- Follow the installation instructions carefully. Fastening recommendations have been developed taking into account all possible consequences and should not be neglected. Do not assume that double-sided adhesive tape will replace self-tapping screws for non-wall or ceiling installations.
- Prepare the surfaces for installation thoroughly. If the roller shutter is attached to the window sash, thoroughly wash and degrease the mounted surfaces. This procedure will allow you to securely secure the curtain with double-sided tape.
- Take correct measurements. Remember that the width of the fabric does not correspond to the width of the curtain. Consider the size of the fasteners and the box if the structure is closed.
- Use a building level. Do not do it “by eye”, otherwise the unevenly mounted curtain and inaccurate attachment will require rework. And this will take extra time.
- Keep the receipt from the purchase of roller blinds for 14 days. If the components are missing fittings or fasteners, request them from the seller. The receipt will prove that the purchase was made in this store.
- Study the design features of the rolls before purchasing. Some types of roller blinds have a non-removable control mechanism. To avoid purchasing two right- or left-sided curtains, carefully check everything in the store or when receiving the goods by courier delivery.
- Consider the length of the blade when determining the mounting height. Compare the size of the window and the length of the fabric. Do not raise it too high so that light does not enter the room when the curtain is completely lowered.
- Choose the correct position of the holder brackets. Determine the position of the roller blind on the window. Check whether the design interferes with opening the window, turning the window handle, and whether the roll rolls/unfolds well. Consider all the details. Only then begin installation.
Knowing all the intricacies of installation and possible mistakes, you can install the roller blinds yourself without any problems.
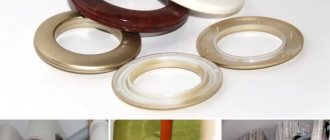
Types and types of structures
For example, let’s look at the device of a roller blind with an electric drive. It consists of:
- roller (drum);
- gears;
- chains for manual lifting/lowering;
- electric drive with remote control;
- canvases;
- brackets;
- guide strings;
- weighting agent;
- boxes (for closed structures).
The operating principle of a roller shutter is to wind fabric onto a roller using a gear, chain or electric drive with a remote control.
Articles on the topic (click to view)
- How to become a great lawyer?
- All the pros and cons of forged beds in the interior
- 29 years - Velvet wedding: description, meaning, options for celebration and gifts
- Washing machine repair
- Why are solid doors better?
- Features of pool paths
- Green kitchen interior
Depending on the type of material, rolls can be made of wood, bamboo and fabric.
Roller blinds are produced in two types of designs: open and closed.
According to the type of lifting mechanism they are divided into:
- chain;
- spring;
- electrically driven.
The types and types of designs are described in more detail in the article on choosing roller blinds.
Let's look at the main types of roller blinds.
Open classic:
- lifting mechanism chain or spring;
- attached to the ceiling, wall, or window opening;
- installation is energy-intensive.
Closed cassette Uni:
- have an additional plastic box;
- spring or chain lifting mechanism;
- the cassette is attached to the frame;
- They can even be installed on non-standard windows.
Roller blinds Mini:
- chain lifting mechanism;
- mounted on the window frame and sash with self-tapping screws, holders or double-sided mounting tape;
- minus – in hot rooms the mounting adhesive tape is unreliable.