With use, the surface of the hood gradually becomes dull, the air intake grille becomes covered with a sticky coating, and the performance of the device decreases. You will have to fight for a presentable appearance of household equipment.
First, you should choose the most suitable method and decide how to clean the kitchen hood from grease, taking into account the degree of contamination, the effectiveness of different methods and the safety of detergents. Let's look at the variety of means and methods for cleaning the hood.
Preparatory activities
Before cleaning the hood, you must arm yourself with the factory instructions for the device and familiarize yourself with the manufacturer’s recommendations for care and operation. The paper should indicate how often to clean the hood and what cleaning products are suitable for cleaning.
Important! The products are selected depending on the material from which the body and parts are made - some chemicals can damage the coating.
Treatment is carried out only after the device is completely de-energized. Therefore, you will have to figure out how the hood turns off - otherwise, if liquid gets inside the housing, you risk getting a short circuit and electric shock.
Does your kitchen have a hood?
Not really
Useful information: you can find out how to clean your hood from grease here. Also read how to clean the hood filter from grease.
Prepare the preparations and tools you will need for cleaning:
- personal protective equipment – gloves, respirator (if necessary);
- a spacious container for soaking removable parts;
- kitchen sponge - one or more;
- a cloth or cloth for wet cleaning;
- cleaning products depending on the chosen processing method.
Household chemicals
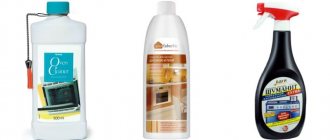
Manufacturers of household chemicals have developed special anti-grease products for the kitchen. They contain powerful additives that break down even very strong and old fat deposits.
Spray Sanita
Sanita “1 Minute” in spray form contains unique fat solvent additives . The spray gets rid of dirt and grease deposits on hoods, stoves, tiles, sinks and microwaves, fights germs and leaves behind a pleasant aroma.
The manufacturer guarantees ideal cleanliness within just one minute. Spray the product onto problem areas, after a minute remove the product along with grease and dirt.
If necessary, repeat the procedure and wipe the surface with a damp cloth.
“Cinderella” Anti-fat
A budget-friendly but effective product for cleaning kitchen utensils and surfaces from sticky deposits and dirt.
Important! Thanks to the trigger sprayer, the product is convenient to use - you spray it on dirty areas and give it time to work. After 5-10 minutes, treat the surface with a damp sponge or rag to remove dirt.
The spray does not contain abrasive particles, so it can be used on coatings that are susceptible to scratches. Suitable for processing hoods, microwaves, stoves, tiles, dishes and countertops.
Synergetic for slabs
This eco-category product contains only natural ingredients and is not harmful to health . Easily copes with grease, soot, food stains and deposits on stone, ceramic, glass, glass-ceramic and stainless steel coatings.
Available in gel form - applied to contaminated areas and after a few minutes is completely washed off with clean water.
To enhance the action of Synergetic, you can use brushes or scrapers.
Reference! Eco-friendly product Synergetic is recommended for cleaning even in children's institutions.
“Shumanit” from “Bagi”
The spray grease remover instantly removes stubborn and stubborn grease from hoods, stoves, grates, steam traps, ventilation systems and dishes. Contains sodium hydroxide, solvents, surfactants and flavorings.
The spray is sprayed onto contaminated areas, allowed to act for a few minutes and washed off with a damp cloth several times. The manufacturer recommends working with gloves - the product irritates the skin .
Household chemicals Cillit bang
Two anti-grease products from the Cillit bang brand are suitable for cleaning hoods:
- Gel - fights fat deposits, rust, lime, and deeply ingrained dirt. Not suitable for processing porous, wooden, ceramic and glass-ceramic surfaces.
- Spray - easily copes with oil stains, dirt, soot, and burnt food residues. Not suitable for treating hot, damaged, halogen or wooden surfaces.
Types of ventilation
The ventilation system in the kitchen can be:
- natural, that is, providing for the entry of fresh air into the room and the outflow of internal air due to the creation of special pressure;
- supply air, which assumes that stale air is pushed out of the room by a stream of fresh oxygen;
- exhaust, the work of which is to pull out old air from the room and the influx of new air masses due to pressure release;
- supply and exhaust, anticipating the movement of air and exchange processes thanks to the installation of a special apparatus.
In most apartment buildings and private buildings, ventilation is done naturally. Such a system is considered simple, as it allows the exhaust air to be replaced through windows and doors. In this case, a hole with a grill, through which gas that is no longer suitable for breathing escapes from the room, is always placed in the upper part of the wall.
Both fresh and exhaust air circulate through the channels
Checking the functionality of the ventilation duct
Before cleaning the ventilation shaft, you must first make sure that the operation of the air ducts is really impaired. To do this, you can use a burning match - bring it to the grate and see if the flame deviates to the side. If this does not happen, then the ventilation system is not functioning well.
Using a lighter near a ventilation vent may cause undesirable consequences.
Utility workers do not recommend assessing the performance of ventilation systems in this way, as it is dangerous. The fact is that in buildings with main gas pipelines, gas leaks occur that get into the air duct. If you bring a flame to a ventilation shaft where the gas has not yet escaped, an explosion may occur. Gas workers advise resorting to a safe way to check the operation of ventilation:
- cut a piece of paper 30 cm long and 3 cm wide from a newspaper;
- bring the paper strip to the ventilation shaft grille, closing the windows and doors in the room;
- pay attention to whether a piece of paper is pulling towards the grid.
If the strip pulls, then there is no need to doubt the functionality of the ventilation. If the air duct does not respond properly, you should start cleaning the ventilation system.
Checking the functionality of the ventilation duct can be carried out in three stages
What are ventilation grilles and how are they designed?
Before asking yourself the question of cleaning the ventilation grille, you should consider its structure. Kitchen hoods, as a rule, have a rectangular shape, and accordingly, the products are also made in a similar configuration.
Grilles for forced ventilation in the kitchen are produced in three main types of design: flat, with a rear flange and products installed using magnets.
Flat gratings
Flat products are a regular plate with some kind of ornament or pattern and countersunk holes through which accessories are screwed directly to the wall or ceiling.
As a rule, a mesh substrate is mounted on the back side of the front panel. This is a thin perforated metal plate that protects the niche from small objects and hides its insides.
Since in flat grilles the backing mesh is mounted in close proximity to the front panel, cleaning it is a very labor-intensive process. Some areas, for example in the corners of small holes, cannot be removed from dust or traces of grease at all. Over time, the amount of plaque will increase, and this, in turn, will lead to a deterioration in the overall appearance of an exclusive and expensive accessory.
On the one hand, it is easy to dismantle a flat-shaped product. Access to the screws or bolts is completely open; you can remove the grille using a screwdriver or screwdriver. However, if you do this often, the threads in the holes will wear off, which will lead to the accessory not being installed securely.
Products in the form of a regular panel with an ornament are the simplest and most budget option. It has the right to exist in kitchen hoods. However, installing such a grille will not create the ideal delicate image that is expected from a premium accessory.
Grilles with magnets
Products installed using magnets do not differ in their design features from conventional flat accessories. This is a panel with ornaments, perforations or blinds. A distinctive feature of these grilles is the installation method.
Magnets are attached around the perimeter of the hood. A grid with a mesh backing is attached to them. This is a very simple method that allows you to hide mounting elements. The use of magnets makes it possible to dismantle the grille at any time and install it back in a few seconds.
Cleaning products installed using this method is quite easy. You won't waste time unscrewing screws or bolts. Similarly with flat grates, washing the corners in the small holes of the pattern is very problematic.
Please note that after installation, the end of the product will appear in the form of a sandwich, consisting of a front panel and a magnet, about 4 mm thick. Some clients are not satisfied with this appearance of accessories.
Grilles with rear flange
The most convenient designs in terms of cleaning. The rear flange allows you to install the backing mesh at some distance from the front panel, thereby simplifying the care of the product.
Eyelets are also mounted on the rear flange for hidden fastening. Small corners are installed inside the hood, to which the grille is fastened through the eyes. Dismantling such a structure is quite easy and safe; you can remove the accessory countless times.
It should be noted that installation using hidden fasteners allows you to ideally position the grille even in niches with broken geometry. The product is first twisted with mounting angles, then it is brought into the desired plane, and only then tightened. This makes it possible to level out the defects that the builders made.
In addition to being easy to clean, the design with a rear flange, mesh backing and eyelets for hidden fastening is a delicate and aesthetic solution. When looking at the installed grille diagonally, metal strips will be noticeable, made in the same style as the front panel. The screws or bolts will be hidden inside the niche, and the backing mesh, mounted a short distance from the front panel, will allow the ornament to look accentuated against the background of the formed void.
In our practice, we recommend products of exactly this design to our clients. Once installed, they are presented most delicately. When looking at the accessory, only the ornament and the emptiness behind it are visible. As a rule, it seems that it is simply impossible to replace an already installed grille with another product.
Important! Grilles with a rear flange are made only from stainless steel, painted steel and brass. It is not possible to produce a product from aluminum, since this material is very difficult to weld. Flat-shaped accessories, in turn, are made from all 4 metals listed above.
FakeHeader
Comments 22
Insert a thin screwdriver into the side and bend it as if inward. there are some type of pins. 1. panel. 2. deflector. 3. pin.
I stole this from the forum. but this is for Peugeot - but the essence is the same
yes, I already found one from the dude)))) shall we go smoke?
Fan installation
in the bathroom, toilet
It is quite easy to install an exhaust fan in a bathroom, toilet or kitchen with your own hands, without the help of third parties. Can you please tell me how to remove the grille from the Vents fan to clean it? or it cannot be removed (. The whole process takes from 15 to 20 minutes. You will learn how to do the installation correctly from this instruction. Before proceeding with the installation, you need to connect the fan according to this instruction, and also choose the right one for the kitchen, bathroom and toilet.
Before installing the fan, I recommend that you read the instructions in the kit, which should carefully outline the installation procedure and features for your model in Russian. If there is no annotation or description, this most likely indicates the cheapness or low quality of the product you received.
How to prepare equipment for washing?
Before washing the hood of accumulated grease, you should turn off the power and disassemble the air cleaning device. You must first study the technical documentation and find out the list of dismountable sections. It is necessary to prepare boxes for removable parts, and clear the working area of the stove from kitchen utensils.
Standard algorithm for dismantling and dismantling actions:
- Unclip the latches, remove the cover from the grooves or unscrew the mounting bolts.
- Remove the grease filter. In recirculation models, remove the carbon cartridge - it is located behind the metal grill.
- Dismantle the pipe running from the exhaust hood to the vent.
- Remove the internal air filter, if provided in the design.
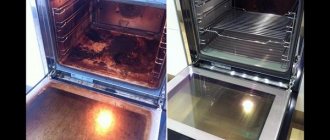
After disassembling the hood, you need to assess the extent of contamination and choose the optimal cleaning method. To remove old fat growths, you will have to resort to aggressive methods.
With proper timely care, the next cleaning is reduced to washing with dishwashing detergent. If you don’t have a specialized product at hand, traditional methods will do.
How to disassemble the device?
In the instructions for the unit, the manufacturer indicates which parts are removable/dismountable and includes a diagram of the device. Based on the diagram, even a woman can disassemble it.
If there are no instructions, you should use the standard algorithm, it may also work:
- The device is disconnected from the power supply.
- Unsnap the latches and remove the top cover of the case.
- Remove the filter.
- Remove the tube that connects to the vent.
- Disconnect all removable parts and take out the air filter.
Important! Fixed elements are cleaned in assembled form, trying to wring out the rag as much as possible so that water does not get inside the case.
Dismountable parts are soaked in a large container with soapy water for a couple of hours . After the allotted time, rub intensively with the hard side of a kitchen sponge and wash under warm running water.
The soap solution is prepared from dishwashing detergent or hand washing powder (it produces more foam).
Standard diagram of a kitchen hood
Equipment of any modification of the hood (Krona, Bosch, Asko, Elikor) contains standard components:
- four-speed motor – provides regulation of the air flow power of the exhaust fan. Thanks to this, air masses pass through the filters, in which heavy fat particles are retained;
- filters – today there are many different filters for circulation modules: ceramic, carbon, hydrogen, carbon-plastic, fiber optic, absorption. They all work on the principle of rough cleaning of all types of material;
- lighting lamps. The cooking surface is illuminated with LED lamps, halogen, ultrasonic and other light sources;
By installing a special application on your mobile phone, you can set the operating mode of the kitchen hood.
Method 3. How to clean the hood grille with a grease remover (for difficult cases)
Another radical method of cleaning the hood is with a grease remover or oven cleaner. For example, it could be Bugi Shumanit, Bugi Giant, Sparkling Cauldron, Oven Cleaner from Amway and others. Don't forget to open the window and use rubber gloves!
Instructions:
- Treat the hood filter with the product.
- Place the grille in a bag (!) to prevent the pungent odor from spreading throughout the apartment.
- After 10-15 minutes, wash the mesh as usual and rinse thoroughly.
Advice:
- If you have children or pets, it is better to use Amway oven cleaner, as it has almost no odor and works more efficiently than its analogues. True, it is sold only through brand dealers or in the company’s online store.
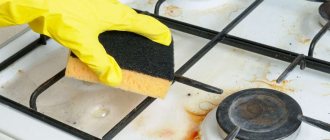
See also: How to clean a gas stove in 8 steps
Vinegar
The dirtier the parts, the more concentrated the essence. Vinegar is even suitable for combating old fat deposits. Remove the parts, fill them with essence and leave for 15-20 minutes. Afterwards, wash the items thoroughly in clean water. If there are any stains or grease remaining (although this is unlikely), apply vinegar to individual areas. The acid is quite aggressive, so be sure to wear protective rubber gloves.
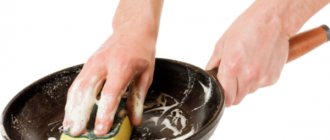
How to wash the probe?
The probe is the main working part of the exhaust device , which is responsible for capturing fats and fumes. It is this part that gets dirty the fastest and requires effective cleaning measures.
Treating the mesh with soda solution
Baking soda is a universal substance suitable for removing most stains in the kitchen. It effectively breaks down fats, and at the same time allows you to save on expensive household chemicals.
Instructions for use:
- Prepare a spacious basin - the grilles and filter should completely fit into it.
- Pour 5 liters of water into a basin and boil on the stove.
- After boiling, add 0.5 cups of baking soda and reduce the heat to low, making sure that the liquid does not stop boiling.
- Place a filter with grids in boiling water and boil for 5 minutes.
- After 5 minutes, check how well the fat is removed. For old stains, continue boiling for another 5-10 minutes.
- Remove the parts from the basin, cool slightly and wash with soap and then running water.
Advice! If you don’t have a large boiling container, place the grates vertically and boil on both sides in turn.
Soda is an easy and simple way to clean grease from your microwave.
Soap solution
If the coating of the hood grates and meshes allows, rough mechanical cleaning can be used. It is used when the amount of fat deposits is very large.
Procedure:
- Dissolve half a bar of laundry soap marked 72% in three liters of hot water. For better dissolution, grate the piece.
- Use a concentrated soap solution to wipe the parts with a sponge, periodically foaming the liquid.
- Let the solution “work”. After 5 minutes, begin scraping off the grease with a metal or plastic scraper, stopping at heavily soiled areas.
Advice! Small parts can be boiled in a solution of laundry soap for 5 minutes. Upon completion of cleaning, the elements will only need to be rinsed with clean water and dried.
Acetic acid
The acid contained in vinegar can corrode almost any dirt, including dried greasy splashes and soot.
Due to the pungent odor of vinegar, it is necessary to ensure a sufficient flow of fresh air into the room and protect the respiratory system with a respirator.
There is no need to dilute the substance. Moisten a wet cloth with table vinegar (9%) and wipe all dirty surfaces . Wait 10-15 minutes for the fats to break down and do the final cleaning.
You can use a hard sponge, washcloth or scraper. Rinse the parts under a good stream of tap water.
Lemon acid
Citric acid acts like vinegar - it softens dirt and fats , helping to easily remove sticky dirt. Citric acid will not help with ingrained old dirt, but it polishes the hood body well.
For washing, use a concentrated solution of citric acid - 2-3 tablespoons of powder per 1 liter of water. Rub the prepared solution onto the grates and meshes, leave for 10 minutes and scrub off all accessible dirt with a brush.
Advice! Hard-to-reach narrow areas of the hood are cleaned with cotton swabs soaked in a cleaning solution.
Chemicals
When the available substances help little, you will have to use more aggressive drugs. As a rule, they are not intended for maintenance of hoods, but they can help get rid of a thick layer of stubborn dirt.
"White". The hood parts are moistened with warm water, and then “Whiteness” is applied to the problem areas using a sponge. After 10 minutes, the dirt is removed with a sponge or brush, and finally washed with running water.
Pipe cleaner. It is used in extreme cases, since it contains aggressive chemical compounds that can damage the hood parts. The drug is suitable in liquid or powder form.
How to use the powder:
- Place the grates and meshes in a regular oven tray.
- Sprinkle anti-clog powder on top and pour hot water over it.
- After 10 minutes, remove the parts and begin cleaning with a washcloth or brush.
- Rinse the solution under running water and flush the remaining product down the toilet.
How to use the liquid product:
- Close the drain hole of the washbasin with a stainless steel plug.
- Place the dirty parts of the hood in the washbasin and pour it with a pipe cleaning solution.
- Leave for 10 minutes, scrub with brushes and rinse with tap water.
Digestion: the fight against old fat
Boiling is also called the “grandmother’s” method - it has long been used to remove carbon deposits from frying pans and pots.
How to clean exhaust grilles:
- Select a suitable container that will accommodate the wide filter parts.
- Grate half a piece of laundry soap and pour it into a container for boiling.
- Add two large spoons of baking soda to the soap and add water.
- Immerse grease grates and other removable parts in the solution.
- Boil everything over medium heat for 30 minutes.
- Let the solution cool slightly, remove the parts and clean them thoroughly under running water using a mesh, brush or sponge.
Advice! If after boiling you find residual fat, repeat the procedure or extend the boiling for 5 minutes.
Loading …
Mustard powder
Mustard powder is a natural and safe remedy that acts as a fat solvent. It easily copes with dirt and is easily washed off from surfaces, leaving no traces or unpleasant odor behind.
How to use mustard powder to clean your hood:
- Rinse the grates with hot water. For convenience, you can use a shower spray.
- Prepare a cleaning solution: mix 3.5 tablespoons of mustard powder, 2 teaspoons of shampoo (or dish gel). Dilute the mixture with water and vinegar, mixed in a ratio of 1 to 1 - you should get a liquid slurry.
- Apply mustard paste to dirt by dipping a washcloth into it.
- Soak a thin cloth or kitchen towel in hot water and wrap it completely around the grates. This will create a kind of “warm compress” for a better reaction of mustard with fat.
- After 30 minutes, remove the towel, clean the parts with a brush, and rinse with water.
Features of cleaning hoods made of different materials
It is much easier to clean a metal hood than a plastic or tempered glass one.
Stainless steel
You can remove grease from stainless steel quickly and easily using any available means. The material will withstand boiling and strong chemicals. The maximum that can happen is that the surface will darken.
It is not recommended to clean stainless steel with abrasive powders and metal brushes. The appearance of the metal will suffer, scratches will appear, from which dirt will be more difficult to remove during subsequent washing.
Made of aluminum
An aluminum hood can be washed with soda, laundry soap, table salt, and mustard. Acids actively oxidize the metal, causing dark spots to appear on the grate. Alkali dissolves aluminum and renders the mesh unusable.
In the dishwasher, the filter is washed separately from the dishes at temperatures up to 65 degrees. Dishwasher tablets are not used.
Made of plastic
Plastic can be soaked and washed in the dishwasher at low temperature, but cannot be boiled or scraped with metal objects. Plastic is resistant to chemical compounds. The steam generator is used only for heat-resistant plastics.
Glass
Glass parts require careful handling. It is better not to rub them with powders, but to use liquids, pastes and gels. Apply the detergent composition with a sponge or soft brush. Provided daily cleaning, you can get by with a glass cleaning spray.
Method No. 5. Ammonia
Ammonia is found in almost every first aid kit. The product copes well with grease, especially if it has not yet managed to stick firmly to the filter.
Procedure:
- protect the respiratory tract, ensure good ventilation of the room, i.e. open all possible windows, and it is better to close the doors to other rooms;
- 100 ml of ammonia are dissolved in 3.5 liters of warm water (temperature 500C);
- leave for 2-4 hours;
- All that remains is to remove the grease with a brush and rinse the grate.
Machine cleaning: steam generator and dishwasher
The simplest and safest method is steam cleaning. The method is effective, but its implementation requires the use of a steam generator or steam vacuum cleaner. Thanks to the device, it will be possible to remove fat deposits without chemicals.
The steam temperature is about 150°. The household unit not only cleans, but also disinfects the surface. After treatment, the fat can be easily removed with a sponge dipped in liquid soap.
The only drawback of the method is the high cost of the steam generator.
Dishwasher owners can entrust the “dirty work” to an automated kitchen assistant. The performer is required to remove the mesh, put it in the compartment for large dishes, add detergent and select the washing mode.
The machine method is an excellent prevention of the appearance of hard fatty deposits. Cleaning frequency: twice a month.
Method number 9. Mustard powder
This is one of the oldest, so-called. grandmother's methods, but some housewives use it to this day.
Procedure:
- to 3.5 tbsp. l. add 2 tsp mustard powder. shampoo, mix and pour in a pre-prepared solution of hot water and vinegar mixed 1:1. Mix everything thoroughly so that you end up with the consistency of a liquid slurry;
- wet the filter under running warm water;
- treat the filter on both sides with the mixture;
- wrap in a towel soaked in hot water and leave for 30-40 minutes;
- remove the softened fat with a brush, rinse the filter.
Installation and fastening of fans with self-tapping screws or dowel-nails
- Remove the top grill.
- We place the fan
against the wall and mark on it with a pencil the locations of 4 holes for fastening with self-tapping screws. - We drill holes with a hammer drill exactly according to the marks and insert plastic spacer dowels into them, which are often included in the kit.
- We connect the fan to the electrical wiring according to these instructions, observing electrical safety measures.
- We check its operation with precautions by briefly turning on the power supply.
- We insert it into the ventilation duct and screw the fan itself to the wall with self-tapping screws.
- We put the grate in place.
Steam generator
The device generates a stream of steam heated to a temperature of +150 °C. This temperature is enough to melt fat deposits on the surface. During this treatment, the elements are not only cleaned, but also disinfected. After treating the device with steam, you will need to run the filters under running warm water, and then carefully wash them with detergent.
Share in the comments how and how often you clean the grilles in your hood.
Rate this article
Loading…
Lemon acid
Lemon is suitable for prevention and regular cleaning. Cut the citrus in half and apply the juice to the entire surface of the hood. There was no more fresh contamination. A combination of citric acid and soda can cope with more difficult situations.
First option: mix soda and acid in equal proportions and add 2 tbsp. water. Apply the resulting product to the hood, and after 30 minutes, rinse the equipment with water. Second option: combine the products in equal parts and sprinkle them on the filter with grates. Sprinkle water from a spray bottle on top to create a reaction. Leave for half an hour, rinse and dry.
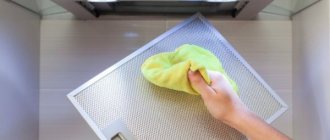
Caring for the outer casing
While the grille and internal filter are drying, there is time to pay attention to the outside of the hood. The difficulty of cleaning the body is that food fat mixes with settling dust and turns into a hard coating.
It is unacceptable to remove dirt with an iron scraper or using abrasive substances - they can negate the glossy shine of the hood or leave scratches
Cleaning procedure:
- Apply detergent to a sponge and rub the surface.
- After half an hour, wipe off the product with a soft damp cloth.
- Remove remaining fat spots with a rubber scraper.
In order to prevent the formation of a hard crust on the body, it is necessary to reduce idle operation of the gas burner to a minimum. Dry heat helps fix grease deposits on the surface.
conclusions
When choosing a decorative grille for the kitchen, you should think about how the cleaning process will be carried out.
First of all, you need to pay attention to the design of the product. The accessory should be easy to remove and install in its place. We recommend choosing grilles with a rear flange and hidden fasteners or designs that are mounted using magnets.
Products should be cleaned with a damp cloth and non-aggressive detergents. Do not use hard brushes or sponges; you can easily damage the surface of the accessory.
Source: www.decogrille.ru
Prevention Tips
- Try not to delay cleaning the filters, as grease tends to harden over time, after which it becomes difficult to wash it off.
- After cleaning the filters, you must reset the hood operating hours counter to zero. How to do this - read the instructions for your device.
(Rate the material! Already voted: 114 average rating: 4.32 out of 5) Loading…
How to clean an air duct?
This item is relevant for owners of flow-through hoods. Reduced draft may be evidence that fat has accumulated in the air duct. Even if everything is in order with the draft, it doesn’t hurt to check the condition of the air duct once every year or two.
Air ducts are:
- round or square plastic;
- round corrugated aluminum.
The first ones consist of several parts and are easy to disassemble. Simply wash them with soapy water and rinse thoroughly. They are easy to clean.
Corrugated pipes are cheaper, are used more often, but collect grease much better. Fat settles and accumulates in numerous folds. It is often easier to replace a pipe than to clean it. If you have a steam cleaner in your home, use it. As a last resort, the pipe can be cleaned with “Mole” or a similar product, but it will need to be rinsed very thoroughly.
What else do you need to know?
To avoid harm, before you start washing the hood, remember the following rules:
- The replacement grease trap must not be cleaned. Even if it does not fall apart during washing, it will then be very poor at trapping fat;
- plastic parts cannot be boiled;
- the external parts of the hood should not be rubbed with hard metal meshes or abrasive detergents;
- aluminum filters cannot be cleaned frequently with alkalis - they gradually destroy the metal;
- It is better to ensure good ventilation during cleaning. This way, toxic substances will erode better, and the unpleasant odor from fatty deposits will go away faster.
Remember, it is better to rinse the filter twice a week in a soapy solution than to worry about trying to deal with a layer of grease every six months.
The article was written for the site remstroiblog.ru.
Typical causes of device malfunctions
To understand the causes of possible malfunctions with the hood, you need to know the principle of operation of the device. It is based on two-stroke indoor air purification:
- All large molecular particles of the intake air volume are cleaned.
- Filters all macro- and microelements of incoming oxygen.
The further cleaning process depends on the type of device design (combined, circulation, evacuating) and filtration elements.
What malfunctions may occur:
- There is a problem with ventilation in the apartment - before installing the hood, you need to check the draft of the exhaust duct. If it becomes clogged, then all the circulated air, filled with unpleasant odors, will return back to the apartment or to the neighbors, and condensation will settle on the windows. Checking the draft force is very simple: you need to bring a lit lighter to the ventilation grille. If the flame deviates towards the air flow, this means that everything is in order with ventilation;
- contamination of the grease trap or filter in the hood - instructions for carrying out preventive work against contamination of the filters or for cleaning the grease traps yourself are included with the hood;
Dirty and clean filter
Switch board and button replacement
Also, the reasons for poor operation of the device may be a breakdown of the electronic interface, a malfunction of the exhaust fan, poor contact in the plug or socket, or loose terminals in the hood body.
In order to protect the device from power surges, it is worth purchasing a special voltage relay
Repairing a hood with your own hands is not difficult. It is enough to carefully study the mechanism of operation of the device, and the troubleshooting process will not be difficult.