Modern ovens delight their owners with an abundance of useful modes and functions. But understanding them can be not so easy, especially when you have to read not advertising brochures, but small icons on the control panel. The pictograms around rotary knobs, on buttons and even on touch screens are numerous and varied - so you won’t remember them all the first time, much less figure out what they mean. Of course, you should first read the instructions for your oven model, but sometimes it may not contain the answer to this simple question.
Designations often differ depending on what type of control is implemented in a particular model. Therefore, we will divide them into groups according to the same principle to make it easier to navigate.
More than 16 modes - premium
In Gorenje Plus ovens, slow SLOWbake and step-by-step cooking StepbyStep are added to the above-mentioned programs. Models with the HomeChef GP979B and GP979X touch module have preset automatic and professional modes. In the first case, the desired recipe is selected using the display (there are more than 80 of them in the device’s memory); if the user wants to change the cooking parameters, the system will switch to professional mode. The most successful options can be saved using the “My Recipes” function.
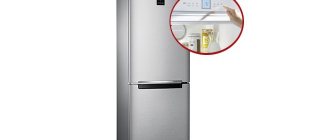
- Independent oven Gorenje BOP799S51X
RUB 104,490
Buy
sponge moistened with detergent. After cleaning, wipe...
Page 39
- Image
- Text
257804
sponge moistened with detergent. After cleaning, wipe the burners dry.
• Salty liquid, burnt food and moisture
may damage the burners, so always clean and dry the burners.
• For cleaning hotplates
wipe them periodically
a small amount of machine oil or regular care product that can be purchased in stores. Do not use oil, lard, etc. (danger of corrosion). If the burners are warm, the product penetrates the pores faster.
• Stainless steel burner rims
due to high
temperatures may turn yellow during cooking. This is normal. Yellowed areas can be cleaned with regular metal cleaners. Do not use aggressive or abrasive cleaning agents as they may scratch the surface.
Oven
• You can clean the oven in the classic way
(cleaning agents, oven cleaning spray), but we recommend doing this only to clean stubborn stains. After such cleaning, thoroughly wipe off any remaining cleaning agent.
• For regular oven cleaning (after each
use) use the AquaClean function. Turn the on/off switch. and selecting the operating mode to position
. Set the temperature to 70°C.
Pour 0.6 liters of water into a baking tray and insert it onto the lower level of the guides. After 30 minutes, dirt on the oven walls will soften and can be wiped off with a damp cloth.
Difficult to remove stains
Allow the oven to cool down before cleaning. • Clean the oven and equipment after each
preparations so that contaminants do not burn.
• Grease is most easily removed with a warm soapy solution,
while the oven is still warm.
• For burnt and heavy stains, use
regular oven cleaners. After using them, clean the oven thoroughly with water to remove any remaining cleaning product.
• Do not use aggressive cleaning agents,
for example, rough cleaning agents, hard sponges and scourers, rust removers, stain removers, etc.
• Painted, stainless and galvanized surfaces
39
Description of modes and functions of Gorenje ovens
Classic heating (top + bottom)
Temperature - 200°C. The top and bottom heating elements emit heat evenly. Traditional conditions for baking, meat stew. Cooking is only possible on one level.
Heating from above
Temperature - 150°C. For finishing, additional baking of the dish.
Heating from below
Temperature - 160°C. For extra baking on the bottom.
Grill
Temperature - 240°C. The infraheater, that is, the central element of a large grill, is working. For frying small portions of meat, sausages, sandwiches, toast.
Large grill
Temperature - 240°C. Overhead and infraheater included. The heat from above is distributed over the entire surface of the baking sheet/grid. For small cuts of meat, steaks, schnitzels, sausages, sandwiches and toast.
Grill + fan operation
Temperature - 170°C. The upper heating element, infraheater and fan are activated. For grilling large pieces of meat and poultry, it produces a delicious, crispy crust. You can only fry on one level.
Bottom heating + ventilation heating
Temperature - 160-200°C. The bottom, ring heater around the fan and the fan operate simultaneously. Ideal for pizza, as well as juicy pastries, fruit cakes made from yeast or shortcrust pastry and curd cakes.
360° Ventilation Heating
Temperature - 150-190°C. Ring heating element and fan included. For cooking meat and small baked goods on several levels (2 and 3).
Eco cooking
Temperature - 170-210°C. A ring heater and a fan are used. A constant circulation of hot air is created around the dish. Energy consumption is optimized during cooking. Used for cooking meat and baking.
Bottom heating + fan operation
Temperature - 180°C. Bottom heater and fan. For preparing low-rising baked goods and preserving vegetables and fruits. Use the first or second level of guides.
Defrosting
Only the fan works. For gradual thawing of food (meat, fish, cakes, pies, pastries, bread, buns, deep-frozen fruit).
Classic heating + fan operation
The lower and upper heating elements and the fan are turned on at the same time. For preparing any baked goods, defrosting food, drying vegetables and fruits. The best results are achieved when using one level. For two-level cooking, use the 2nd and 4th levels from the bottom.
Steam cleaning AquaClean
Only the bottom heating element works. Pour water into a deep baking tray and place in the oven for 20-30 minutes.
AutoRoast (automatic cooking of meat)
Temperature - 160-210°C. The upper heating element, the infraheater and the ring around the fan operate simultaneously. When cooking meat, the grill is placed on the 3rd level, and a baking tray is placed on the 2nd to collect fat. For frying in a baking sheet or grill pan, the second level of guides is used.
Pyrolytic cleaning
Temperature - up to 460°C. All heating elements work. The door is locked while the program is running. All dirt on the walls of the oven and on the baking sheets burns.
Fast oven heating
It heats up to 200°C in just 6 minutes. This mode is not intended for cooking. Once the required parameters are reached, the function is disabled.
Heating dishes
Temperature - 30-80°C. For warming plates, cups, serving dishes, rising dough, heating, making yoghurt.
StayWarm temperature maintenance
Temperature - 30-95°C. Duration - up to three hours.
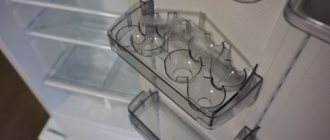
Canning
A special program allows you to simplify the process of preserving vegetables for the winter. Glass jars with glass lids and rubber gaskets are used. Not with screw-on or metal lids.
Pour 1 liter of heated water (about 70°C) into a deep baking tray and place six tightly closed jars. It is important that they do not touch each other or the walls of the oven. The baking tray is placed on the 2nd level from below.
The process is complete when the liquid in the jars boils (bubbles appear). The duration of the program for different types of products is indicated in the instructions for the models.
Automatic preparation AUTObake
The AUTObake program contains more than 80 recipes. You need to select the amount of product, the degree of frying or baking and the completion time.
Multiple stages of STEPbake
Gorenje+ ovens can be programmed with up to three consecutive steps.
After any cleaning, wipe the glass ceramic surface dry...
Page 38
- Image
- Text
257804
After any cleaning, wipe dry
glass ceramic surface with a soft cloth.
To clean the hob, do not
Use metal sponges or abrasive cleaners, as they can scratch the glass-ceramic surface.
To clean the hob, do not
Use aggressive cleaning sprays and unsuitable liquid cleaning agents (Fig. 1 and 2).
Decorative drawing
on the hob can wear off due to the use of aggressive and harsh cleaning agents, as well as cookware with damaged or rough bottoms (Fig. 2).
Water stains
can be removed with a weak vinegar solution.
Do not wipe the device frame with this solution (in some models), as it will lose its shine. To remove limescale, do not use aggressive sprays or cleaning agents (Fig. 3). Difficult to remove dirt and burnt food
can be removed using a special scraper.
Make sure that the plastic handle of the scraper does not touch the hot cooking surface (Fig. 4). When working with the scraper, also be careful not to injure yourself on the blade! Sugar and sweet foods
can seriously damage the glass ceramic hob (Fig. 5), so to avoid damage to the surface, remove them immediately with a scraper, even if the hob is not yet cool (Fig. 4).
Changing the color of the glass-ceramic surface
does not affect the operation of the device. Most often these are traces of burnt food, the result of using certain types of cookware (for example, aluminum or copper). Such stains are difficult to remove completely.
The above damages refer to
appearance and do not affect the operation of the device. This type of damage is not covered by the warranty.
Metal hob
• Clean the surface around the burners with warm water and
adding detergent. Before doing this, soften dried dirt with a sponge.
• Clean the burners thoroughly every time they become dirty.
If they are not very dirty, it is enough to wipe them with a damp cloth and a detergent solution. If heavily soiled, clean the metal burners
38
rice. 4
rice. 5
How to connect a Gorenje electric stove
The manufacturer recommends installation with the help of service center employees, only in this case the device will have a 1-year warranty plus a year of service. Make sure that there is a mark on the warranty card.
A three-phase connection is recommended using a 5x1.5 mm connection cable 2 type H05VV-F5G-1.5 (formerly CGLG 5Cx1.5), (fuse 3x16 A).
For single-phase connection, use cable H05VV-F3G-4 (formerly GGLG 3Cx4), (fuse 32 - 40 A depending on type). The ends of the wires are crimped into terminals, secured with screws, and the lid is closed.
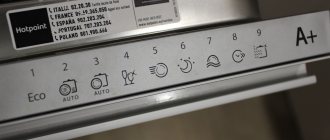
Control methods
The designation of oven icons depends to some extent on the control method. The method of presenting the pointer also differs.
- Mechanical – here the number of marks is minimal. It is mandatory to indicate the degrees on the corresponding handle. The timer indicates intervals in minutes. And in order to accurately set the mode of an electric oven with mechanical control, symbols indicating operating parameters are placed around the handle.
- Electronic-mechanical - the difference here lies in the accuracy of setting the parameters. Both temperature and time are set with greater accuracy. The symbols in Ariston, Bosch, and Electrolux are almost the same.
- Touch - here symbols appear on the display of an electrical device - Bosch, Samsung, one by one, as a rule, this is an LED symbol. In this case, the panel itself may display symbols indicating a specific parameter, since each of them is activated in the same way - by pressing the touch panel.
How to turn on the stove Combustion
The process of turning it on for the first time is quite simple. Remove the transport packaging and baking sheets from the oven and wipe the surfaces with a damp cloth.
Turn on cast iron burners for 3-5 minutes at maximum power so that they burn, the protective coating forms a durable layer. There is no need to place dishes. When heating for the first time, smoke and the characteristic smell of a new device may appear. The kitchen needs to be ventilated.
Gas burners are turned on by turning the switch. Electric ignition is performed by pressing the handle or button, depending on the model. The thermostat should be in the “Large Flame” position. A spark jumps between the candle and the burner and ignites the gas. Keep the switch pressed for approximately 5 seconds to allow the flame to stabilize. If after 15 seconds the gas does not ignite, then turn the knob to 0 and wait at least 1 minute. Then repeat.
The heating zones of glass-ceramic stove models are turned on by turning the regulator. There is no need to warm them up; you can immediately place the dishes and cook.
The induction model EIT6351XPD is equipped with recessed switches to control the oven. On the hob there is a touch control panel, where the heating is set by pressing + and -.