Let's look at replacing a bearing in a Zanussi Aquacycle 1000 washing machine, manufactured in 2002. All work was carried out at home, with our own hands. Since the repair was carried out in 2022, the age of the washing machine was approximately 15 years. Which, in principle, is not bad compared to machines that were manufactured at a later date. With proper operation, the service life of bearings is 15-20 years. Structurally, the Electrolux and Zanussi SMAs are similar, so this approach can be applied to both brands.
Do you wash your shoes in the machine?
Oh yes! No
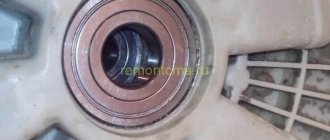
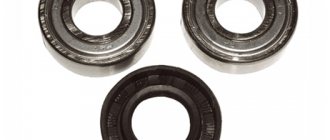
These machines use a powerful SKF double bearing model BA2D.
Characteristics:
- d=30;
- D=60;
- B=37.
Product code from spare parts suppliers: 026298, 12404633657, 255119, 633657, 663667.
For this tank, a special oil seal of the following dimensions is used: 40-60/10. Correspondence table for spare parts of popular models.
- Preparation
- Disassembling the Zanussi washing machine (“Zanussi”)
- Changing the bearing
- Assembling the washing machine
- Catalog SMA "Zanussi"
Analysis of the Zanussi front washing machine
Typically, the body of washing machines consists of a top cover, a front, a back and two side panels. Sometimes there is a bottom pan. Zanussi's technique is slightly different - instead of four panels, the body is divided into two halves, connecting at the sides of the washing machine.
To disassemble the equipment, you need to perform the following steps:
- Unscrew the screws, move it back a little and lift the top cover.
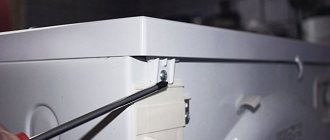
- Under the cover in the middle there is a metal plate, along its edges there is a fastener that holds the front and back panels. You need to unscrew it.
- There are plastic plugs on the sides of the machine at the panel joints. They need to be pryed and pulled out. There are screws underneath that will need to be removed.
- On some models, two more screws are located on the bottom of the back of the washing machine. They also need to be removed.
- Now both halves are fixed only with a plastic holder. To remove it, you need to carefully press the latches. Sometimes it may consist of two halves connected by a screw. Unscrew the fasteners, press the latches, after which the holder rises up and moves to the side.
- Now you can move and remove the back half of the case.
Partial disassembly of the washing machine has been completed. Now the owner of the device has access to the motor, pump, heating element, belt and many other components for repair or replacement.
In some cases, for example, to replace a bearing, it is necessary to completely disassemble the Zanussi washing machine.
- First you need to disconnect the wiring from the heating element and motor, pressure switches and pump, and water inlet valve. It is recommended that the wires be marked or photographed before disconnecting. If errors in its connection are made during assembly, this can lead to serious consequences.
- Remove and pull out the temperature sensor.
- Unscrew the upper counterweight.
- Rotate the pulley and remove the drive belt.
- Unclench the clamps and disconnect the pipes.
- Unscrew the fasteners holding the motor.
- Lightly tap the pulley to move and remove the engine.
- Unscrew the nut between the contacts of the heating element, carefully so as not to break the contacts, and pull out the heating element.
- Unscrew the tank struts.
- Disconnect and remove the pressure switch, loosen the clamps, release the fill pipes and pull them out along with the water fill valve.
- Unscrew the drain pump, disconnect the hose from it and move it aside.
- Disconnect the pipe at the top of the tank.
- Open the hatch, pull the cuff back and pull it towards you. Use a screwdriver to pry up the clamp, find and release the latch, and remove the clamp.
- Pull the upper part of the cuff, find the watering pipe, loosen the clamps, then disconnect the part.
- Unscrew the interference filter.
- Unscrew the two screws, stick your hand inside the tank and pull out the hatch locking device.
- Close the hatch, unscrew the fasteners, remove the hatch.
- Pull out the detergent cuvette, unscrew the fasteners under it and on top that hold the control panel. Release the latches, disconnect the wires, remove and put it away.
- Remove the tank from the springs and pull it out of the housing.
- Disconnect the counterweight.
- Place the water tank with the hatch down, block the pulley, and unscrew the bolt. If it does not budge, lubricate it with WD-40, wait a while, and then try again.
- Grasp the pulley with both hands and, swinging it to the sides, separate it.
- If the tank is collapsible, unscrew all the screws and remove the top part.
- If it is non-separable, select the screws with which it will be connected during assembly and drill holes for them along the seam of the tank. Next, saw the tank along the seam.
- In place of the screw that held the pulley, screw in a similar old screw and knock out the shaft with hammer blows at a right angle.
- You can then remove the drum from the bottom of the tank.
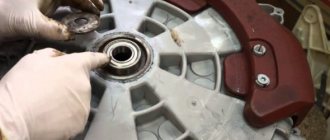
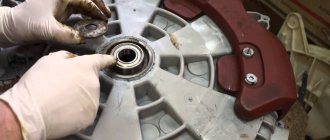
Now you can disassemble the drum, replace the bearings, inspect and clean the shaft and cross, and perform other work. Complete disassembly of the washing machine has been completed.
What tool is needed?
Let’s not “beat around the bush”, but let’s immediately start preparing, because it won’t be possible to disassemble a Zanussi washing machine with a 5 kg drum load right away. First we need to collect all the necessary tools. There shouldn't be any problems with this. It’s enough to rummage around in the garage, rummage in the pantry, and everything you need will be found:
- a set of screwdrivers (you can use a screwdriver with a set of heads of various configurations);
- a set of keys (you will need various keys, including spanners);
- a driver with a set of heads (mostly 7 and 8 mm);
- pliers (large and small);
- small pliers;
- bearing puller;
- mites;
- WD-40 liquid;
- hammer;
- awl;
- markers of several colors.
As you can see, the tool is simple, you can get all this without difficulty, so further discussion of this issue is pointless. The only thing I would like to note is to take only high-quality tools. When unscrewing fasteners with Chinese keys, you will most likely tear off their edges and then add more work to yourself. If you don’t have normal keys, ask your neighbor for the time of repairs or buy Soviet keys from junk dealers - you won’t regret it.
Let's get into the washing machine body
It would seem that it would be easier to climb into the body of a Zanussi washing machine and see what is there, to study, so to speak, its structure in practice. But it was not there. The body of old washing machines of this brand can be disassembled quite cunningly.
The top cover can be removed without any problems, we take a knob with an 8 mm head, unscrew two bolts, grab the cover, move it a little towards ourselves, and then up - nothing special. But the same cannot be said about removing the rear wall of a Zanussi car. The body of the Zanussi washing machine has one serious feature - it does not have removable side walls. What does it mean?
For washing machines of most brands, the housing structure assumes the presence of five or six elements:
- top cover;
- bottom;
- back wall;
- front wall;
- left side wall;
- right side wall.
For your information! Some models of washing machines do not have a tray or a lid that covers the body from the bottom.
The Zanussi washing machine has an unusual device in that the body of this “home assistant” (except for the top and bottom) can be disassembled into two large halves:
- front wall, half of the left wall and half of the right wall of the body;
- back wall, half of the left wall and half of the right wall of the case.
To get to most of the necessary parts, such as the engine, drive belt, drain pipe, we need to completely remove the rear half of the housing. How to do it?
- We drag the Zanussi washing machine to where it will be convenient to work with it.
- We unscrew two or three (depending on the model) screws that are located at the bottom of the rear wall of the case.
- Remove the top cover of the machine as described above.
- Now we examine the side walls and find plastic plugs on them. Using an awl, pull off the plugs.
- Find the screws under the plugs and unscrew them.
- Let's move on to the upper part of the body. If you look into the upper part of the case without a lid, you will immediately notice a rather large metal plate that provides a stiffening rib. Along the edges of the plate we find screws holding the back of the case; they need to be unscrewed.
- The last element that prevents us from removing the rear part of the Zanussi washing machine body is the plastic fastener. A filling valve with two pipes is installed on it. There is no need to remove the pipes; we will pull off the entire mount by carefully prying up the plastic latches with a flat screwdriver.
- Now all we have to do is go around the back of the washing machine and pull the back of the body towards us, it should move and move back. We remove the back part of the case, and a picturesque view of the insides of the Zanussi washing machine opens to our eyes.
To make the back of your body move back faster, rock it from side to side.
Dismantling the main components
By removing the back of the Zanussi washing machine, we made it much easier for us to remove its main components. Now we can unscrew and pull out a lot for repairs, and nothing will interfere with us. What details are freely accessible?
- Drum pulley and drive belt.
- Rear counterweight.
- Washing machine motor.
- Anti-vibration racks.
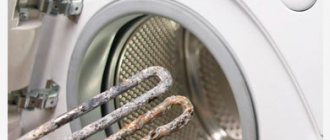
- Heating element (heating element).
- Temperature sensor.
- Inlet valve with pipes.
- Drain pipe and pump.
- Two pressure switches.
- Interference filter.
- Watering pump (used for forced injection of water into the tank while washing things).
We begin the next stage of disassembling the Zanussi washing machine by removing the wires from the heating element (it is located under the drum pulley), the engine, and removing the temperature sensor from the tank. Next, remove the wires from the pressure switches. They are located in the upper left part of the machine body and the pump, which is located at the bottom left. Remove the wire from the intake valve. After this, we’ll do a very useful thing: unscrew the rear counterweight, so that later it will be easier for us to pull the washing machine during repairs. It is held on by 4 bolts.
Attention! All wires you remove must be marked using multi-colored markers and paper labels so that nothing gets mixed up later. After all, the electrical installation of a Zanussi washing machine may seem complicated to a beginner.
Remove the drive belt. We hold the belt with one hand and rotate the drum pulley with the other. The belt will come off easily. We remove the clamps from the pipes and pull them off. We take a wrench with an 8 mm head and unscrew the two bolts that hold the Zanussi washing machine motor at the front, and then unscrew two more screws at the back. Having unscrewed the fasteners, hold the engine from below with one hand, and lightly hit its pulley with the other - the motor will be removed.
Now we take out the heating element. Unscrew the nut located between its contacts. We lightly press on it, and then we take the heating element by the contacts and very carefully, swinging it to the sides, we begin to pull it towards ourselves. It is important here not to break off one of the contacts, otherwise you will have to change the heating element.
Next, remove the racks. On one side they are held on by peculiar plastic rods, and on the other by a regular screw. To remove the rod, you need to take a 14 mm socket, put your hand behind the rod and put the head on its latch. After this, you need to grab the front part of the rod with pliers and pull it towards you, holding the tank - the fasteners will pop out. Unscrew the rack from below and move it to the side. We do the same with the second rack.
We take out the pressure switches from the grooves, remove the clamps from the filler pipes and remove them together with the filler valve. Unscrew the watering pump and disconnect the hose from it. Now let's look into the car body through the top. On the top wall of the tank we see a small breather pipe, we carefully pull it out. What's next?
- We come in from the front. Open the hatch of the Zanussi washing machine. We take our hand by the upper part of the rubber cuff of the hatch and slightly pull it towards ourselves.
- Next, use a flat screwdriver to pry up the plastic clamp and move it around until you find the latch. We disconnect the latch and remove the clamp.
- Since we have a Zanussi washing machine with watering and a large load, it means that in the upper part of the cuff there is an inlet to which the watering pipe is connected. Again, take the upper part of the cuff and pull it towards you.
- Remove the clamps from the pipe and the pipe itself.
Dismantling the Zanussi vertical washing machine
The disassembly process for vertical washing machines manufactured by Zanussi is a little simpler. So, to replace the bearings there is no need to disassemble the tank. Procedure:
- Pry up the sides of the control panel and release the latches.
- Pull up and then move back a little, tilt, disconnect the wiring, remove the panel.
- There is a guide at the top of the panel, and a special groove on the side, which can be used to fix the panel.
Now the user has access to the pressure switch, control board, water inlet valve and interference filter.
To get to the remaining nodes, you need to:
- Unscrew the fasteners from the back of the machine, slide the side panels back, remove and put away.
- Remove the fasteners holding the front wall and remove it.
- To remove the base panel, you need to pry it from above with a screwdriver and press the latches. This will give you access to the drain filter.
- Now the user has access to all important components of the vertical washing machine.
Preparation for repair
To successfully dismantle and then install a bearing, you need:
- Screwdrivers: slotted, Phillips, hex.
- Torx keys.
- Pliers.
- Set of wrenches.
- Hammer and bolt (15-20 cm).
- Glue or sealant.
- WD-40 for stuck parts.
Time to prepare the washing machine. Disconnect it from the network, turn off the water supply. Disconnect the intake hose and drain the water from it. Also drain any remaining water from the drain filter, which is located at the bottom of the front panel, behind the hatch.
Recommendations for replacing parts and assembling a Zanussi washing machine
After repair, reassemble the Zanussi washing machine in the reverse order. If photographs were taken during the work, it is recommended to check them, especially when connecting wiring, in order to avoid mistakes.
If the tank was disassembled, then during reassembly the joints of both halves should be carefully coated with silicone sealant that can withstand aggressive environments and high temperatures. After assembly, the machine should sit for the amount of time recommended by the sealant manufacturer to allow it to dry completely.
In addition to replacing the main part, you need to carry out preventive maintenance on other components of the washing machine: descale the heating element, tank, inspect and clean the shaft and cross, etc.
After the machine has stood for the time required for the sealant to harden, it should be connected to the communications and a test wash should be performed, adding a small amount of powder. If during the execution of the program there are no water leaks under the washing machine, the equipment behaves correctly, there are no signs of malfunction, this indicates that disassembling and repairing the device was successful.
What tool is needed?
Let’s not “beat around the bush”, but let’s immediately start preparing, because it won’t be possible to disassemble a Zanussi washing machine with a 5 kg drum load right away. First we need to collect all the necessary tools. There shouldn't be any problems with this. It’s enough to rummage around in the garage, rummage in the pantry, and everything you need will be found:
- a set of screwdrivers (you can use a screwdriver with a set of heads of various configurations);
- a set of keys (you will need various keys, including spanners);
- a driver with a set of heads (mostly 7 and 8 mm);
- pliers (large and small);
- small pliers;
- bearing puller;
- mites;
- WD-40 liquid;
- hammer;
- awl;
- markers of several colors.
As you can see, the tool is simple, you can get all this without difficulty, so further discussion of this issue is pointless. The only thing I would like to note is to take only high-quality tools. When unscrewing fasteners with Chinese keys, you will most likely tear off their edges and then add more work to yourself. If you don’t have normal keys, ask your neighbor for the time of repairs or buy Soviet keys from junk dealers - you won’t regret it.
Let's get into the washing machine body
It would seem that it would be easier to climb into the body of a Zanussi washing machine and see what is there, to study, so to speak, its structure in practice. But it was not there. The body of old washing machines of this brand can be disassembled quite cunningly.
The top cover can be removed without any problems, we take a knob with an 8 mm head, unscrew two bolts, grab the cover, move it a little towards ourselves, and then up - nothing special. But the same cannot be said about removing the rear wall of a Zanussi car. The body of the Zanussi washing machine has one serious feature - it does not have removable side walls. What does it mean?
For washing machines of most brands, the housing structure assumes the presence of five or six elements:
- top cover;
- bottom;
- back wall;
- front wall;
- left side wall;
- right side wall.
For your information! Some models of washing machines do not have a tray or a lid that covers the body from the bottom.
The Zanussi washing machine has an unusual device in that the body of this “home assistant” (except for the top and bottom) can be disassembled into two large halves:
- front wall, half of the left wall and half of the right wall of the body;
- back wall, half of the left wall and half of the right wall of the case.
To get to most of the necessary parts, such as the engine, drive belt, drain pipe, we need to completely remove the rear half of the housing. How to do it?
- We drag the Zanussi washing machine to where it will be convenient to work with it.
- We unscrew two or three (depending on the model) screws that are located at the bottom of the rear wall of the case.
- Remove the top cover of the machine as described above.
- Now we examine the side walls and find plastic plugs on them. Using an awl, pull off the plugs.
- Find the screws under the plugs and unscrew them.
- Let's move on to the upper part of the body. If you look into the upper part of the case without a lid, you will immediately notice a rather large metal plate that provides a stiffening rib. Along the edges of the plate we find screws holding the back of the case; they need to be unscrewed.
- The last element that prevents us from removing the rear part of the Zanussi washing machine body is the plastic fastener. A filling valve with two pipes is installed on it. There is no need to remove the pipes; we will pull off the entire mount by carefully prying up the plastic latches with a flat screwdriver.
- Now all we have to do is go around the back of the washing machine and pull the back of the body towards us, it should move and move back. We remove the back part of the case, and a picturesque view of the insides of the Zanussi washing machine opens to our eyes.
To make the back of your body move back faster, rock it from side to side.
Dismantling the main components
By removing the back of the Zanussi washing machine, we made it much easier for us to remove its main components. Now we can unscrew and pull out a lot for repairs, and nothing will interfere with us. What details are freely accessible?
- Drum pulley and drive belt.
- Rear counterweight.
- Washing machine motor.
- Anti-vibration racks.
- Heating element (heating element).
- Temperature sensor.
- Inlet valve with pipes.
- Drain pipe and pump.
- Two pressure switches.
- Interference filter.
- Watering pump (used for forced injection of water into the tank while washing things).
Washing machine prevention
To avoid breakdowns of the washing machine, you must follow simple operating rules.
The equipment must be leveled; for this you need to use adjustable feet.
You should only load the washing machine with the amount of laundry that is allowed by the technical characteristics of the device and the program being run. Overload has a negative impact on the condition of the equipment.
If you need to wash bulky items, you need to load them into the machine with care, distributing them evenly inside the drum. Imbalance also harms technique.
The washing machine should be connected to electricity through a stabilizer or at least a surge protector. Voltage surges are detrimental to the device.
When washing clothes, you can only use automatic powders; periodically it is recommended to use products to clean equipment from scale and other contaminants.
How to tell if a bearing is broken
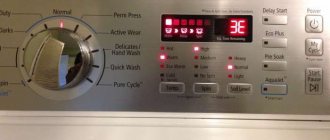
The surest sign of a malfunction is error codes E13 and E55 on the washer display. If the self-diagnosis system detects problems and issues a code, you can proceed with disassembly and inspection.
But if there is no code, and every time you wash you hear a lot of noise, hum, vibration, grinding - all this also indicates wear of the bearings.
Additional check: open the hatch door and shake the drum by hand. If its rotation is uneven, it deviates strongly from the tank towards the rear wall - a malfunction is obvious.
Bottom line
To replace or repair a particular part in a Zanussi washing machine, the equipment will need to be partially or completely disassembled. You can do this yourself if you have the necessary tools. During the process, it is recommended to take photographs of each step in order to correctly assemble the washing machine, especially when connecting the wiring. Observing this rule and following the instructions, many will be able to disassemble the equipment and replace the necessary part. However, if you are not sure of a positive result, you should call professionals and trust them to disassemble and repair the washing machine.
Call a specialist to your home
Please indicate which service you are interested in:
The personal data received will be used solely to contact you regarding equipment repair.
Disassembling the washing machine may be necessary in the event of a breakdown of the unit No matter how high-quality the washing machine is, no one is immune from breakdown. You can, of course, try to immediately contact the service center with a request to repair the car, or you can try to disassemble it yourself. Actually, it is not as difficult as it seems at first glance. After all, all washing machines, no matter what brand they are, have a similar design and operating principle.
Content:
Innovative solutions
Manufacturers do not stop there and constantly introduce technical innovations. Many new models are equipped with an improved inverter motor, which reduces noise characteristics and reduces vibration during operation of the unit, thereby extending the life of the machine.
Another innovation is Airflow technology, which allows you not to worry about the formation of unpleasant odors. To keep the inside of your car clean and fresh, don't leave the door ajar. Thanks to the unique ventilation system, the drum self-cleanses every time after the end of the wash cycle, which also reduces the intensity of plaque formation.
Causes of breakdowns
As practice shows, most of the breakdowns of Zanussi washing machines are most often associated with their improper operation. This could be due to incorrect installation of the unit or simply ignored the instructions for use. In addition, some housewives sometimes underload or overload the drum with the weight of laundry, thereby creating its imbalance.
Some problems are directly related to small objects getting into the working paths of the equipment. It is the blockage that is considered the most common cause of machine breakdowns (laces, coins and buttons can get into the machine during washing).
Such objects can not only clog the pump, pierce the drain hoses, tank, unscrew the heating element, but also tear off the pump impeller.
In addition, a frequent breakdown is the removal of the hatch handle. Breakdown usually occurs when equipment users do not have the patience to wait a few minutes before unlocking the hatch after washing, and they make efforts. The use of large amounts of soap (when washing children's clothes) or washing powder also causes problems. As a result, the heating element becomes enveloped in detergents, overheats and burns out.
The quality of the water used for washing also plays a huge role. If it contains a lot of salts, then at high temperatures they begin to intensively deposit on the heating element in the form of scale. The same applies to rust, which clogs filters and prevents water from entering the tank and waste water being removed. The drive belt is also an unreliable element in Zanussi washing machines it must be regularly tightened or replaced with a new one every 4 years.
Increased speed
The first step in such a situation is to check the serviceability of the engine and the integrity of the power circuit.
Without sufficient experience it will be difficult to do this, so it is better to contact a service center.
Here, if necessary, they will check the correct operation of the control module circuit - perhaps it is sending incorrect commands to the device.