Ways to properly and quickly fillet herring without bones or skin.
Most modern housewives prefer to buy ready-made herring fillets and use it for preparing appetizers and savory salads. But as practice shows, it is precisely this type of filleted fish that is often of low quality.
For this reason, it will be better if you buy whole herring and remove the skin, fins and bones yourself. In this case, you will be able to more correctly assess the freshness and quality of the product, thanks to which you will definitely be able to prepare a delicious snack from it. We will talk about how to clean herring without unnecessary problems in our article.
How to properly, easily and quickly peel herring: advice from chefs and housewives
Cleaning herring: advice from chefs and housewives
If you think that cleaning herring yourself is very difficult, then you are deeply mistaken. If you show a little patience, you can quickly get high-quality fillets. All that is required of you for this is to prepare a cutting board, a sharp knife and a few paper towels.
Simple tips:
- Take a cutting board and wrap it in plastic wrap or just put a few regular bags over it. This is necessary so that after filleting the fish your board remains clean.
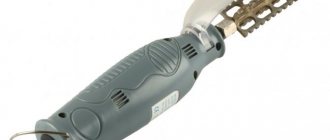
- Prepare a knife with a thin blade. If you realize that it has become a little dull, then be sure to sharpen it. If you don’t do this, you will end up tearing the fish fibers when cutting and this will not allow you to make a perfect fillet.
- Be sure to have tweezers handy. You will use this to remove the thinnest and smallest bones from the fillet, located as close as possible to the herring ridge.
- Also place several paper napkins and towels on the table on which you will cut the fish. You will need them to remove blood and intestinal films from the fillet.
- It will be more convenient to peel the herring with your hands. In order to do this quickly, you will need to pry the skin in the area of the tail or head, and then gently pull it towards you. Be careful not to overdo the tension because the skin will tear and you will have to start the process all over again from the beginning.
Useful tips
- Before cleaning the herring, we strongly advise you to sharpen your knife. Be sure to take a sharp knife for cutting fish, as this will allow you to cope with the task correctly - quickly and without unnecessary hassle. A dull knife will tear the fibers when cutting, and you won’t get a perfect fillet.
- To avoid leaving the aroma of salted fish on your hands, wear rubber, polyethylene, vinyl or latex gloves when starting work. To protect your clothes from stains, we recommend using an apron; you can cover the table with a sheet of paper or cling film.
- It is better to use different cutting boards for different types of products; this rule also applies to fish. To prevent the cutting board from acquiring an unpleasant odor, cover it with white paper or a layer of cling film. After gutting is completed, the paper or film can be removed, bones, entrails, fins and other waste can be wrapped in it, and then easily thrown away.
- After cleaning the fish, it is better to wipe the board with a sponge, which should be soaked in dishwashing detergent and rinsed with water. If this does not help and the amber remains, sprinkle your hands and board with lemon juice.
- To make it easier to clean the herring, you can immerse it in hot water or keep it in cold water, to which you should add a few drops of vinegar.
- If the herring is too salty, soak it in a strong infusion of tea, then it will become tastier.
- To prepare brine for barrel fish, you can take half a liter of water, add 1 tablespoon of sugar and salt, pour in the brine and refrigerate for 24 hours. To make the salting stronger, leave it in the refrigerator for 2-3 days.
- To make the herring tastier, you can make a marinade for onions: pour a few teaspoons of vinegar or citric acid, a little sugar into the water and mix thoroughly with pre-chopped onions, and then leave the onions in the marinade in an enamel container for several hours in the refrigerator.
- If you do not use the fillet right away, after cleaning the fish, put it in the refrigerator, first wrapping it in cling film.
- To prepare herring from scratch, you can buy fresh fish, cut it into pieces, put it in a jar and fill it with a solution of water, vinegar (or citric acid), mayonnaise and add onions. After it has stood for 12 hours in this marinade, the bones, if any remain, will become soft.
How to quickly and correctly peel salted herring for slicing: photo
If your goal is a perfect fillet for slicing, then you need to clean the fish in the classic way and, if possible, do everything as carefully as possible.
So:
- Initially, you will need to rinse the herring and blot its surface with a paper napkin. This must be done so that it does not slide on the surface of the cutting board.
- When you are done with this stage, you can take the knife and proceed directly to cleaning the fish. To do this, place it on a board and cut off the head with a sharp knife. Next, make a neat cut along the ridge line and remove the upper fins in one motion. The lower fins can be cut off with ordinary kitchen scissors.
- The next step is to cut the belly of the herring. If you love the caviar and milt of this fish, then try not to insert the knife very deep. Carefully pull apart the belly and gut all the insides. Also, do not forget to immediately remove all films with a paper napkin.
- Use a knife to pry the skin in the scalp area and begin to remove it with a smooth movement. After the skin is removed, inspect the fish again and, if necessary, remove newly appeared dirt.
- Next, use your fingers to press down on the cut made along the ridge and begin to carefully remove one half of the fillet from the bones. Set the separated fillet aside and do the same manipulation with the remaining part.
- After the ridge is removed, you will need to arm yourself with tweezers and try to remove all the small bones as thoroughly as possible. The finished fillet will need to be cooled and only after that can it be cut into portioned pieces and served on the festive table.
Preparation of the workplace
In order to quickly clean the herring and not stain everything around it with fat, which has a strong and unpleasant odor for many, you need to prepare in advance everything you need for work. Inexperienced housewives can cover part of the table with plastic wrap to reduce their time cleaning after work. The set of tools and related materials is small and includes simple kitchen utensils.
Cutting board
It is better to have a separate board for cleaning fish: even after thorough washing, it can retain a characteristic odor. It is better to choose plastic products. They do not absorb fat, are easy to clean with any dishwashing detergent and are not damaged by sharp knives. After each cutting of herring, the wooden board will have to be scraped and washed thoroughly.
The most convenient board is one on which the whole carcass fits. This will make the table less dirty. It is advisable to buy a board with a groove along the contour: when cleaning and cutting salted herring, the brine remaining on the carcasses will not roll off it.
Knife and tweezers
These tools will be needed to fillet the fish and remove any remaining small bones. Tweezers are not necessary, because if you carefully remove the fillet, there will be almost no bones left in it. You can remove them using the same knife that was used to cut the herring. But the presence of tweezers makes the work more convenient.
Hand and clothing protection
It is best to wear gloves with a rough surface (rubber, polyethylene) on your hands. They will not only protect your hands from the persistent aroma of fish, but will also help avoid injury to the skin from small sharp bones. In addition to gloves, prepare paper towels or napkins to wipe your hands or knife, remove drops of brine from the table, etc.
To protect your dress from accidental splashes, you should wear an apron that covers both the hem and chest. Sleeves can be rolled up to the elbows.
How to clean salted herring from bones on fillets for salad, fur coats: step by step with photos?
Step-by-step photo of cleaning herring
If you plan to use herring fillets to prepare a salad, then you can use the so-called pressing method for this. This method differs from the previous one in that you first have to get rid of the backbone of the fish and only then remove the skin from it.
So:
- To begin, prepare a cutting board, a sharp knife, paper napkins and tweezers. When everything you need is laid out on the table, rinse the herring under running water and dry thoroughly.
- Take a knife in your hands and cut off the head, tail and fins of the fish as carefully as possible. Cut open its belly and take out all the insides. If you see that there are a lot of films or remains of offal left inside the belly, be sure to rinse the fish under water again, and then dry everything with paper napkins.
- Wrap the fish prepared in this way in cling film and tap it on the table or lightly beat it. This little trick will help ensure that even small bones can be easily separated from the fillet.
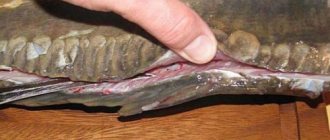
- Place the track belly down and, pressing lightly on it, open it like a book. Press it down onto the table, then turn it over and gently remove the spine.
- At the final stage, divide the workpiece into two separate fillets, remove the skin from them and remove all the bones using tweezers.
Classic method
- First of all, cut off the head, fins and make a longitudinal cut on the belly / Photo: obaldela.ru
- Take the herring, make a cut near the head with a sharp knife and cut the ridge. Next, pull the fish head towards you to separate it from the carcass and grab the insides. Open the belly, remove the black film from the walls with a knife and the insides, if any remain. Trim the fins and tail.
- Next, cut along the ridge, lift the skin and remove it from the meat. Feel the ridge through the abdomen and first separate one half, and then the other. Now inspect the parts of the carcass to see if there are any small bones left in them. They can be removed by hand or taken out with special tweezers.
If you are preparing “Shuba”, we recommend cutting the herring this way.
How to debone herring fillet in one motion
Cutting herring in one motion
Those who want to clean the herring from the bones in one motion can use the method that we will introduce you to a little below. But remember, in order to get exactly the result that you expect, you must hold the fish’s tail very tightly.
In view of this, if you feel that it is starting to slip out, then simply cover each part of it with a paper towel and then fillet the fish.
Recommendations for deboning herring in one motion:
- At the initial stage, it is necessary to carry out standard preparation of the carcass for cutting. This means you must gut it and remove the fins. At this stage, you can additionally dry the abdomen and remove any remaining intestinal films from it.
- Make a cut on the tail of the herring no more than one centimeter deep, and then take it in your hands and begin to make somersault movements towards yourself. If you do everything correctly, the herring will describe circles around its tail.
- In the next step, you must tear the fish into two parts in one sharp movement. As a result, you should be left with two boneless bellies and a loin with a ridge. It can be easily separated from the fillet by hand.
- At the very end, all you have to do is remove the remaining small bones and you can cut the herring for a salad or snack.
Details
Features and secrets of herring and how to clean it from bones
After purchasing herring for fine cutting into a salad or for simple serving, many women encounter a problem, namely, they notice that the fish has a large number of small bones. In addition, some people cannot even remove its skin because it slips.
REFERENCE! However, the process of cutting herring can be greatly simplified.
There is a simple technique that makes it much easier to remove bones from fish.
- The fish must be washed and placed on a cutting board. The board should be covered with cling film in advance. Now you need to make an incision on the belly.
- Then you should cut off the head of the herring and gut it, removing the insides. If there is caviar in the fish, it can be pulled out and eaten.
- You must remember to remove the black film from the herring using a knife.
- After these steps, you can clean the fish using a method that has been proven over the years. To do this, you need to take the fish by the tail, divide it into 2 parts and hold it tightly.
- The fillet should be quickly thrown over the tail. After this, you need to stretch the skeleton and spine in different directions. All the bones should remain on the skeleton, and in your hands you will only have the fillet.
- Near the dorsal fin from above you need to remove a small piece of meat, which contains a lot of bones. From both pieces of fillet from the bottom you should cut about a centimeter, because there are many small bones that are difficult to remove.
- It will be easier to peel the skin if you carry out this procedure from head to tail - from top to bottom.
Secrets. Regarding the question of how to professionally and quickly debone a herring in one motion, the carcass must first be brought into ideal condition, ridding it of skin and remnants of black film.
How to quickly and efficiently clean herring
- To make the small bones easier to pull out, you should first knock the herring on the table and then start gutting it.
- It will be much easier to clean the herring from the bones if you first cut off the gills and then remove the backbone.
- To completely get rid of the black film, you should rinse the fish under running water.
- To make it easier to remove the skin, you need to make a cut at the top where you cut off the head.
- You can carefully clean filleted herring if you remove its slipperiness with a paper towel.
- When cleaning herring, you must have a sharp knife as well as tweezers.
REFERENCE! If guests unexpectedly informed you that they are already on their way to you, then now is the time to find out how to quickly peel a herring. Below are the fastest and most interesting ways to cut fish.
Preparatory stage. First you need to prepare a container or bag for waste, as well as a cutting board and a sharp knife, after which you can start cutting. To make it more comfortable, it is better to protect your hands with latex or polyethylene gloves. The fish should first be rinsed under running water.
The first way to clean herring is classic
You need to place a knife under the first fin at an angle of 45 degrees and make a cut under the gills, then remove the head.
Now you need to cut off the upper part of the abdomen with scissors. You can, of course, do this with a knife, but with scissors the edge of the cut is smoother.
Using a knife, remove all the insides from the herring. If desired, you can leave caviar or milk. Now use scissors to cut off the tail fin.
After this, you need to turn the herring with its back and make a longitudinal cut. It needs to be done shallowly so that the skin is only slightly cut. Now you need to cut out the dorsal fin.
After this, you need to put the carcass with its head towards you and pry the edge of the skin. You need to pry it up so that your finger can fit between the skin and the meat. Using your fingers, you need to separate the skin from the body, removing it as a whole sheet, moving from the head to the tail. The same thing needs to be done on the other side.
To remove the ridge, you need to insert your fingers into the cut on the back and run them along several times so that the meat separates from the bone. From the side of the head we begin to pull the fillet, removing one part of it from the ridge.
To remove the bone from the second fillet, you need to pry the bone at the tail end and pull it towards the head.
REFERENCE! If after such cleaning there are bones left on the meat, they should be removed with tweezers.
The second way to clean herring at home is massage.
You need to cut off the head from the carcass, cut it along the belly and take out all the entrails. Now you need to wrap the carcass in paper towels so that during the next stage splashes do not fly in all directions. The next step is to hit the fish on the board on each side 3 times. This process is called massage, which is necessary so that the bones move away from the pulp easily. After this, remove the paper towel and place the carcass on a cutting board with its back facing up. Now you need to move along the back, pressing the fish to the board and pressing on it.
Then you need to turn the fish belly up and pry the separated ridge in the area of the caudal fin and pull it out.
In this method, after removing the bones, the flesh will not separate into 2 fillets because it continues to adhere to the skin. But the skin can be easily removed with just one movement from both halves at once. This is done with your fingers, as in the previous method. First, separate the skin with a knife in the upper part, and then put your fingers under it and pull it towards the tail.
REFERENCE! All that remains is to check the finished fillet for the presence of bones, and if there are any, remove them with tweezers.
The third method is how to peel a herring by the tail
To start cutting fish using this method, you must first remove the head, entrails and skin from the carcass. It is important here that the tail remains in place. It needs to be cut in the middle using a sharp knife.
Now you need to grab the edges of the tail and throw the fish over it in a circle. Now you need to pull the tail in opposite directions, without letting go of the edges from your hands.
In this case, the fish will be divided into 2 parts - the back and the abdominal. If you continue to pull slowly, you can get 3 pieces - a backbone with pulp and 2 filleted bellies. The lower part of the carcass can be removed, as it is already completely prepared. And from the top you need to remove the ridge, getting 2 more fillets.
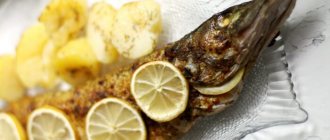
REFERENCE! From such a herring you can quickly and easily make a delicious fish slice by garnishing it with lemon, herbs and sprinkling with oil. Or you can make sandwiches when guests arrive.
How to quickly and correctly clean fresh herring from bones and fillet: photo
Cleaning fresh filleted herring
As you already understand, if desired, the herring can be very quickly cleaned of skin and bones. If you want to simplify this process as much as possible, then use the method described below.
In this case, you can get a beautiful boneless fillet in literally a matter of minutes. True, you must remember that it is easiest to clean the largest herring using this method.
So:
- Take fresh herring, gut it and remove intestinal membranes.
- Use kitchen scissors to remove the fins, and then use a knife to make a longitudinal cut along the ridge line
- Next, stick your finger inside the fish and begin to carefully separate the fillet
- Separate one half, set it aside and use the same movements to remove the bones from the other fillet.
- Inspect the herring and, if necessary, remove small bones with tweezers
Why is it better to peel the herring yourself?
Before making a choice between buying a whole carcass or a cut fillet, most housewives will choose the second option. For example, if for the salad “herring under a fur coat” you need pitted herring, you don’t want to bother with it for a long time. TO
Of course, this option is not bad, but if you want to prepare tasty and high-quality dishes, it is better to first find out the reasons why it is better to buy a whole fish and clean it yourself:
- You can check the freshness of a whole carcass by simply looking into its eyes.
- But unscrupulous producers often make fillets from spoiled fish.
- Small seeds are often removed using chemical compounds, causing them to simply dissolve.
- Buying whole herring will be cheaper.
How to get rid of small bones in herring?
Removing small bones from herring
A large number of people refuse to eat herring due to the presence of small bones in it. But if you don’t buy ready-made fillets, but try to make them yourself, you can easily get rid of the bones. If you fillet pickled or salted herring, then you will need to arm yourself with ordinary tweezers and gradually remove all the bones from the fibers.
But keep in mind that in the ridge area the bones are located quite deep and for this reason they sometimes cannot be seen with the eyes. In view of this, it will be better if you first remove all visible bones, and then begin to carefully probe the fillet with your fingertips and remove whatever you find. This procedure should be completed only after your fingers stop finding the bones. If you remove bones from frozen fish, you will first need to peel and fillet it, and then literally put it in lightly salted water for 15 minutes.
After this time, the fish will need to be removed from the brine, rinsed, and then easily removed all the bones using tweezers. And finally, we want to tell you about a radical, but very fast method of removing small bones. In order to get rid of them in one movement, you will need to take and carefully draw a longitudinal line along the top of the fillet with a knife (its width should be approximately 5 mm). By doing this, you will immediately remove all the bones and you will not have to waste time searching for them with your hands and removing them with tweezers.
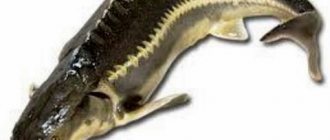
What kind of fish is this and how is it useful?
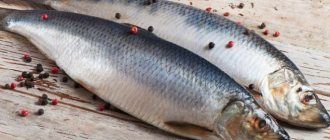
The herring fish family is numerous, although only certain species are of commercial importance. Pacific and Atlantic herring are supplied to the shelves of Russian stores; after a long break, medium-sized iwasi has reappeared. In addition to them, you can often find Norwegian herring, as well as sprat and herring.
The peculiarity of herring is that it is an oily fish. In terms of healthy fat content, it is equal to expensive varieties of salmon, but costs several times less. Fish oil contains a large amount of unsaturated acids (omega-3, omega-6, etc.) and is considered beneficial for the cardiovascular system.
In addition to unsaturated acids, fat is a source of vitamin D, which is especially lacking in winter. The intake of vitamin D into the body is important for children and pregnant women, because it is involved in calcium metabolism and contributes to the proper formation of the skeleton and teeth, and the normal functioning of the kidneys. Sea fish also contains microelements valuable for the body: potassium, magnesium, iodine, selenium, etc. In terms of protein content, herring meat is comparable to beef, but is digested more easily and completely.
Herring is not good for everyone. If there are restrictions on eating fatty foods, then any dishes made from fresh, salted or smoked fish should be excluded from the diet. The calorie content of herring depends on the time of catch and type, but on average it is about 200 kcal/100 g.
Which herring to choose?
When buying fresh herring, pay attention to its gills: they should be dark red, without plaque or mucus. The eyes of the fish are bulging, clean and transparent. By pressing on the side of a fresh herring, you can feel the elasticity of its muscles. There should be no depressed area left on the carcass from pressing. The smell is pleasant, fishy.
Fresh frozen herring of good quality is evenly covered with scales, there are no yellowish spots or streaks on its sides. After rubbing it with your finger, smell it: the smell should be weak and pleasant, characteristic of sea fish. If the herring is covered with lumps of bloody ice and smells unpleasant, then it has already been thawed several times and it may be spoiled.
Salted herring is chosen based on the color of its eyes: a good lightly salted fish has red and convex eyes. Over-salted fish have a dull blue tint to their eyes. If the fish is vacuum-packed, the brine should be clear and red-orange in color. Cloudy liquid indicates spoilage of the product. It is undesirable to buy fish with damaged skin or belly, with yellow-rusty spots on the skin, because it has an unpleasant rancid smell.
Which herring to buy: fillet or cut it yourself?
Recommendations for choosing herring
If you want to make your own herring fillet, then you need to choose the right fish for this. If you decide to save money and buy low-quality herring, then it is unlikely to produce a perfect fillet. Therefore, when choosing this product at the market, store or supermarket, first of all pay attention to its smell.
You don't even have to pick it up to do this. You can simply get as close as possible to the counter where the herring is lying and take a deep breath. If it is spoiled, you will feel a rather specific and unpleasant smell that will smell like rot. Fresh and properly stored herring will have a distinct marine smell. Once you are sure that the fish smells right, try to feel it, paying special attention to the belly.
If you feel that it is too soft, then most likely you have a stale product that has been defrosted many times. Also be sure to look at the color of the herring’s gills. If they are dark red and elastic, then you can safely make a purchase. And finally, look at the eyes. If they are cloudy, this indicates that the seller is offering you a completely damaged product.
Preparation for cutting
Experts recommend buying whole, uncut herring. This way you can easily check its quality. Usually pay attention to the gills and eyes.
- The color of the gills should be dark red. A darker color indicates that the herring is no longer fresh and unsuitable for food. Another sign of freshness is that the gills are elastic and do not fall apart.
- The fish's eyes should not be cloudy or protruding from their sockets.
Also pay attention to the smell. There should not be any foreign impurities in it (for example, bitterness or rottenness). To avoid mistakes, buy only fresh or lightly salted herring. The more spicy the salt, the more likely it is that the manufacturer used it to hide unpleasant odors.
There should be no stains, cuts or holes on the covers of high-quality fresh or lightly salted herring. After the integrity of the skin is damaged, oxidative processes occur inside the carcass, invisible from the outside, and the fish begins to quickly deteriorate.
It is better to buy whole herring carcasses to control its quality
So, the herring has been purchased, and you need to start cutting it. For this you will need:
- cutting board;
- sharp knife;
- tweezers or tweezers for removing small bones;
- plastic bags for waste.
It will be better if you have a separate board for cutting fresh or lightly salted herring. The fact is that this fish has a persistent and corrosive odor that is difficult to wash out of a wooden surface. You can place a sheet of cardboard, paper, or a thick napkin on the board (this makes it even more convenient to remove waste). But under no circumstances should you spread the newspaper! Printing ink will definitely end up in your stomach along with the herring, and this is harmful to the body.
It is also advisable to have a separate knife. It’s good if you have a set of knives, including a special cutting knife for fish.
If you have long nails, you can easily remove small bones from a cut carcass. Otherwise, arm yourself with tweezers or eyebrow tweezers.
How to cut herring at a factory: video
Above, we have already introduced you to simple homemade methods for turning a herring carcass into a perfect fillet. And as you probably already understood, this task is within the power of any person, even those who have never cooked anything in their life.
But finally, we decided to show you that fillet made on an industrial scale can also be of high quality and tasty. To do this, we bring to your attention a video from which you will learn how this delicious fish is cut in large production facilities.
Serious passions
Herring - how much there is in this sound... I felt fear, disgust and disappointment every time I had to cook it. When creating a menu for the holidays, I avoided dishes that contained this fish. I experienced a lot of unpleasant moments because I don’t know how and don’t like to tinker with this crap. The husband praised the women he knew who brought their stupid herring to every table.
That was until I accidentally met a friend whom I had not seen since graduation. We went to a cafe to chat and relax. A friend told me about herself, how everything was fine with her, she worked as a chef in one of the successful restaurants, and everything was going well in her family. I was sincerely happy for her, it was my turn to share.
I started out optimistic that things seemed to be going well for me. And suddenly my memory pulled out this monster from the far corner - herring, a product that seemed to remind me that everything was bad with me. There is a herring there, my husband will grumble if I don’t cook it, but I don’t want it so much that I even left home for a while.
How to beautifully serve herring on the table: photo
Submission idea #1
Submission idea #2
Submission idea #3
Submission idea #4
Submission idea #5
How long to cook cabbage leaves for cabbage rolls
It is advisable to observe the cooking time, especially when keeping cabbage leaves in boiling water. It depends on the type of cabbage. There is no exact number, only approximate ones:
- early varieties of small size - no more than 10 minutes;
- elastic head of late variety cabbage – up to 25 minutes;
- leaves – about 4 minutes;
- young and soft cabbage (Peking cabbage) - just pour boiling water over it.
During storage, the product is more dense, which makes the process more difficult. It is necessary to boil the head of cabbage without the core separately and in several stages. After 20 minutes, you can remove the top leaves of the cabbage, only the soft ones. The rest of the fork needs to be cooked for about 15 minutes.
How to separate cabbage leaves for cabbage rolls
It is better to remove cabbage leaves separately without damage from a medium-sized head of cabbage (more accessible). The stalk must first be removed. Pour water into the resulting hole to the edge; you can keep it under running water or in a container with water until it gets wet. Remove the soft leaves by hand, this way they will all come off gradually.
Stuffed cabbage rolls with minced cabbage leaves
Cooking meat cabbage rolls according to a special recipe gives the dish tenderness and juiciness. They complement the festive table and regular dinner.
First you need to prepare the necessary ingredients:
- cabbage – 2 kg (it is advisable to choose early young varieties);
- rice, preferably steamed – 200 g (with a little cheese);
- minced pork or beef – 0.5 kg;
- white onion – 2 medium heads;
- carrots – 1 large;
- thick tomato paste – 50 g;
- wheat flour – 50 g;
- salt, a mixture of peppers, garlic, suneli hops (any others are possible) - to taste;
- sour cream – 15% fat content;
- vegetable oil – 35 g;
- dried herbs (onion, dill, parsley) - optional.
The method of preparing the dish is easy and simple; you cannot deviate from the recipe (this will change the taste):
- Preliminary preparation of cabbage leaves: divide the head of cabbage into leaves and cut them (if necessary, medium-sized ones are needed), remove the core.
- Cook in boiled salted water for about 10 minutes, it is important that they soften well.
- Peel the onions and carrots. Cut the onion into cubes, grate the carrots finely. Season all this with oil and fry until golden brown.
- Prepare the filling: combine boiled rice, minced meat, half an onion, carrots and spices. Mix until smooth.
- Wrap the resulting meat mass in warm or cool cabbage leaves; the amount of filling is arbitrary (depending on the size of the leaf).
- Place the cabbage rolls in a cauldron or pan, pour warm/hot water into the container to the top, cook over low heat for about 40-50 minutes.
- Upon completion of the stewing process, drain excess water, add tomato paste, flour, carrot-onion mixture, mix thoroughly. Add the ingredients to the pan and simmer slowly for about 15 minutes.
- When serving, place sour cream next to it and sprinkle with herbs on top.
For tender cabbage rolls, it is important to prepare cabbage leaves. The recipe and filling may be different, you can experiment. If you follow all the steps, you get a simple and tasty hot dish.