Have you been going through old things in your dacha or garage and found a rickety Soviet chair? Don't rush to throw it away! If you love vintage things, then such a chair can be easily restored and turned into a unique product that the most fashionable designers will be ready to take away from you. Let's look at an example of how an old chair is restored.
Restored old chair
From boring to bright
These soft-seated examples did not fit into the owners' new dining room. They were repainted in a rich color and looked great against the dark gray background of the walls. The remodel took 4 hours, not including paint drying time.
Tools and materials
To remake 2 chairs you needed:
- furniture stapler with 9.1 cm staples;
- screwdriver or screwdriver;
- shellac-based aerosol primer (1 can);
- spray paint (1 piece);
- thick fabric (3 meters);
- scissors;
- protective film, glasses, gloves.
Step-by-step instruction
Let's start the transformation:
1. Remove the seat by unscrewing the mounting bolts. You will need a screwdriver or screwdriver.
2. We take the products outside and lay them out on film. We prime them and leave them until completely dry, following the instructions.
3. Spray the paint evenly, holding the can at a distance of about 20-25 cm. The paint layer must dry completely.
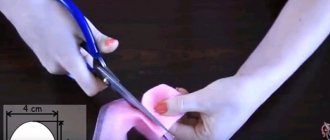
4. Place the seat on the fabric and trace it, leaving an allowance of about 12 cm. This should be enough to fold the fabric at the edges and secure it with a stapler.
5. Fasten the fabric over the old seats using a furniture stapler. First we fix the front edge, then the back and only then we pull it on the sides. We bend the corners with neat tucks.
6. We screw the finished seats to the updated chairs. Work is done!
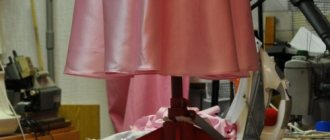
From gloomy to romantic
This chair will fit perfectly into the Provence or shabby chic style, as well as into the children's room of a little princess. Decoupage furniture is one of the popular ways to transform boring objects. You can use not only napkins, but also posters, cards and images printed on a color printer.
Tools and materials
For the transformation you will need:
- white spirit or any other degreasing liquid;
- fine grain sandpaper;
- primer for wood and cardboard;
- acrylic paint;
- varnish glue for decoupage;
- napkin;
- sponge, brushes, roller;
- gilding for decoration (at your discretion).
Step-by-step instruction
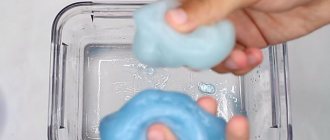
1. Thoroughly clean the stool of dirt. If necessary, we grind, making the surface rougher for better adhesion. If necessary, tighten the fastenings. Degrease the product.
2. Cover the chair with primer, and after it dries, sand it until smooth. Dust must be removed.
3. Apply acrylic paint. A brush works well for corners and seams, and a small roller works well for the back and seat.
4. Separate the top layer of the napkin, cut out the pattern, apply it to the seat and cover it with decoupage varnish.
5. After the varnish glue has dried, paint the edges with background paint to create a smooth transition.
6. If you wish, you can complement the decor with golden artistic paint.
Repair of minor damage
Small defects do not require complete disassembly of the product. To renew your paintwork or repair minor cracks and chips, you need to follow a few simple steps.
If the product is still strong and does not wobble, then it is enough to renew the surface. For this:
- the upholstery is removed;
- the old layer of varnish or paint is removed;
- the surface is sanded and primed;
- a new layer of paint or varnish is applied;
- The upholstery is installed after drying.
Minor defects include cracks, chips or holes made by insects:
- If the width of the cracks is less than 0.5 mm, clean them from dust, fill them with glue and wrap them with paper tape.
- If the cracks are larger than 0.5 mm, they are filled with glue and secured with a clamp or clamp.
- Chips and holes are sealed with a mixture of glue and sawdust.
Preserving the color of the tree
This refreshed chair fits perfectly into a modern interior. It was originally in good condition, but too dark and the brown fabric spoiled its elegant appearance. If you like the natural color of wood, then this simple master class is for you: even a beginner can do it.
Tools and materials
For the remodel you will need:
- fine-grained sandpaper;
- tinted acrylic varnish or oil with wax in the composition;
- screwdriver;
- foam rubber or several layers of padding polyester;
- upholstery fabric;
- furniture stapler;
- scissors.
Step-by-step instruction
Let's start with the modification:
1. Remove old upholstery and foam. Carefully remove the old varnish coating using sandpaper. Sand along the wood grain to avoid scratching the surface. If the varnish layer is thick, you can use a special composition - remover from a hardware store.
If you want to wash a wooden chair, never pour water on it. Use a damp sponge and soap, but do not allow the moisture to soak into the wood. Immediately wipe the water with a paper towel, otherwise the product will “lead” in the future.
2. Cover the product with tinted varnish or oil with any suitable shade. Oak colored varnish is used here. These modern products will protect against moisture and dirt and, unlike conventional varnish, will not cause yellowing: with them the wood will look more noble and the chair will look more expensive.
3. We work on the seat by analogy with the previous master class: we cut out the material according to the shape of the part, leaving allowances, cover it with foam rubber and secure it with a stapler, carefully stretching and leveling it.
4. All that’s left to do is connect the elements. If desired, the bottom of the chair legs can be painted by wrapping the areas that do not need to be painted with masking tape.
Benefits of working independently
By updating an old chair and making it modern, you benefit in two ways:
- You have the opportunity to change the image of the furniture to whatever you want. At the same time, adjust it to the main shades of the interior. And you don’t need to look for similar furniture in stores at all.
- Save time and money. Furniture restoration is often carried out using improvised means. Even the costs you incur for purchasing consumables are only 20-30% of the cost of a new chair.
Interesting: Restoring old furniture in a modern way
Important: before you begin decorative restoration of wooden chairs, be sure to check all fasteners. Tighten loose bolts or replace them with new ones. If there are cracks, chips, or debris, they need to be sealed decoratively. To do this, use special carpenter's wax. It fills voids in the wood, hardens and looks like an integral part of the chair.
Restoration of a Viennese chair
If you have such products in your dacha or apartment, do not rush to throw them away. Viennese chairs are outstanding masterpieces of industrial design. They were invented by the German furniture maker Michael Thonet, who lived in the 19th century. He made a real revolution in the furniture industry, creating laconic and elegant chairs from steam-bent wood. They could be packed in boxes and transported unassembled in 36 pieces, and assembled on site.
One of the most popular models – Model No. 14 – consists of 6 elements. Viennese chairs look natural in any space and are often used by designers in their projects. Such products are easy to find at flea markets and online services, restored and fit into a modern interior.
In our master class we will show you how to restore a Viennese chair, leaving the wood texture. After the update, this product looks truly luxurious.
Tools and materials
For restoration you will need:
- screwdriver;
- wood glue;
- 2 sheets of sandpaper (coarse and fine grain);
- wood putty;
- stain;
- varnish
If the chairs have cracks, the parts need to be glued together using wood glue. The elements are clamped with clamps until completely dry and only then restoration begins. Cracked plywood on the seat should also be replaced, using the old part as a template.
Step-by-step instruction
1. We check the product for strength. We disassemble, drip a little wood glue onto the joints, and assemble. The chair should acquire good rigidity. We carefully sand the parts - it is more convenient to do this when the product is disassembled, but options are possible. First we use coarse-grained sandpaper, then fine-grained sandpaper.
2. Fill small chips and cracks with a special wood putty.
3. After the putty has dried, sand the product again. The cleaned chair already looks like new, but the wood needs to be protected.
4. Cover the chair with stain: it is better to take a high-quality composition so that there are no smudges.
5. After the stain has dried (refer to the instructions), the last stage begins: varnishing in 2 layers. It gives the product a noble shine and simplifies surface care.
6. The restored Viennese chair is very light, comfortable and has its own rich history.
Why is this necessary?
It seems that the very first question that every person who is going to restore an old chair will hear is: “Why is this necessary?” Indeed, isn’t it easier to buy new furniture and just throw the old one in the trash?
It couldn't be easier! In fact, the chairs that were made some 60-70 years ago are much stronger and more reliable than those that you now see in stores. At that time, all goods were produced conscientiously, and what was more important for the manufacturer was not crazy revenues, but the high quality and durability of the products. So it’s not surprising that Soviet chairs, even after so many years, are still found in garages and dachas, albeit a little rickety and shabby. They will outlive us all!
Modern interior with Soviet furniture
In addition, vintage is coming back into fashion, and interiors in the spirit of the USSR have become very popular. Even the “stylish, fashionable, youth” now use either a “grandmother’s” secretary or an old “grandfather’s” radio to decorate their homes. What's worse than the old Soviet chair? Trick him and everything will be as good as new.
You can also note one more reason: do you want something reliable and durable? Do it yourself! Everything is always done efficiently for yourself, isn’t it?
Well, restoring old chairs is an opportunity to create unique designer items that no one else has. Do you agree that standing out from the crowd is fashionable now?
Originally restored old chairs
So, let's see how you can restore an old chair without much effort. In fact, of course, you will have to work hard, but believe me, the result will definitely be worth all the time and effort.
Beautiful photos of alterations for inspiration
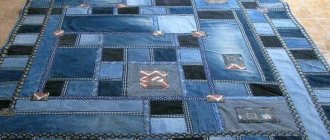
Look at how aesthetically pleasing chairs can be made from boring, familiar objects. Sometimes all it takes is paint, fabric and creativity.
And sometimes you should try and approach the matter with imagination, using and combining various technologies.
Remaking chairs is a great way to update your interior with your own hands and get things with a unique design.
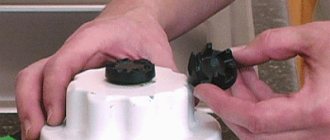
What to do if a squeak appears?
Loose and creaking furniture can last for a long time if the cause of the problems is removed. To do this, you need to carry out a small repair of a wooden chair with a backrest, which does not require special equipment.
First you need to determine where the squeak appears. This may be play in the slats or crossbars at the attachment points. To eliminate the defect, it is necessary to replace loose nails or introduce glue into the gap.
If the squeak remains, you will need to disassemble the product and remove the loose fasteners. All grooves and tenons need to be treated with glue, then assembled and allowed to dry completely.